VS2010Webservice项目开发实例

因为和VS2005存在很大差异,本文主要讲述一个简单的VS2010开发和测试Webservice项目.

主要流程为:

1.打开VS2010

2.新建立C#空白解决方案

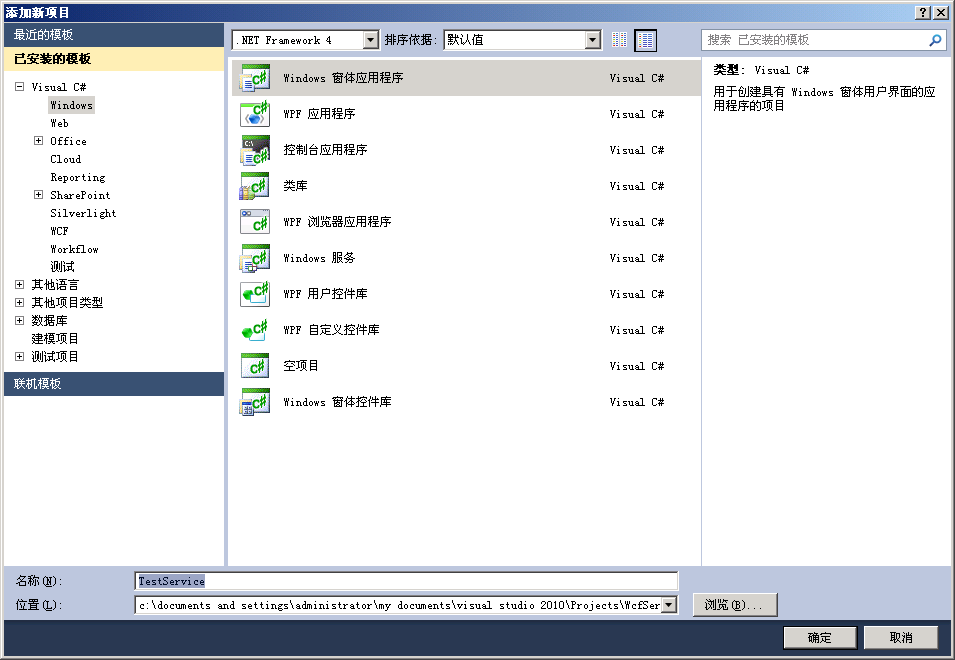
3.添加新项目,选择左侧"已安装的模板"--"Visual C#"--"WCF",选择中间的"WCF 服务应用程序"--输入项目名称"WcfService1".


新建完成后,打开项目中的Service1.svc文件,查看代码,在末尾添加两个函数.HelloWorld()和Add( int  a,  int  b).代码如下

using System;
using System.Collections.Generic;
using System.Linq;
using System.Runtime.Serialization;
using System.ServiceModel;
using System.ServiceModel.Web;
using System.Text;

namespace WcfService1
{
    // 注意: 使用“重构”菜单上的“重命名”命令,可以同时更改代码、svc 和配置文件中的类名“Service1”。
    public class Service1 : IService1
    {
        public string GetData(int value)
        {
            return string.Format("You entered: {0}", value);
        }

        public CompositeType GetDataUsingDataContract(CompositeType composite)
        {
            if (composite == null)
            {
                throw new ArgumentNullException("composite");
            }
            if (composite.BoolValue)
            {
                composite.StringValue += "Suffix";
            }
            return composite;
        }
        public  String HelloWorld()

       {

          return   " Hello, world! " ;

        }
        public   int  Add( int  a,  int  b)

        {

          return  a  +  b;

        }


    }
}


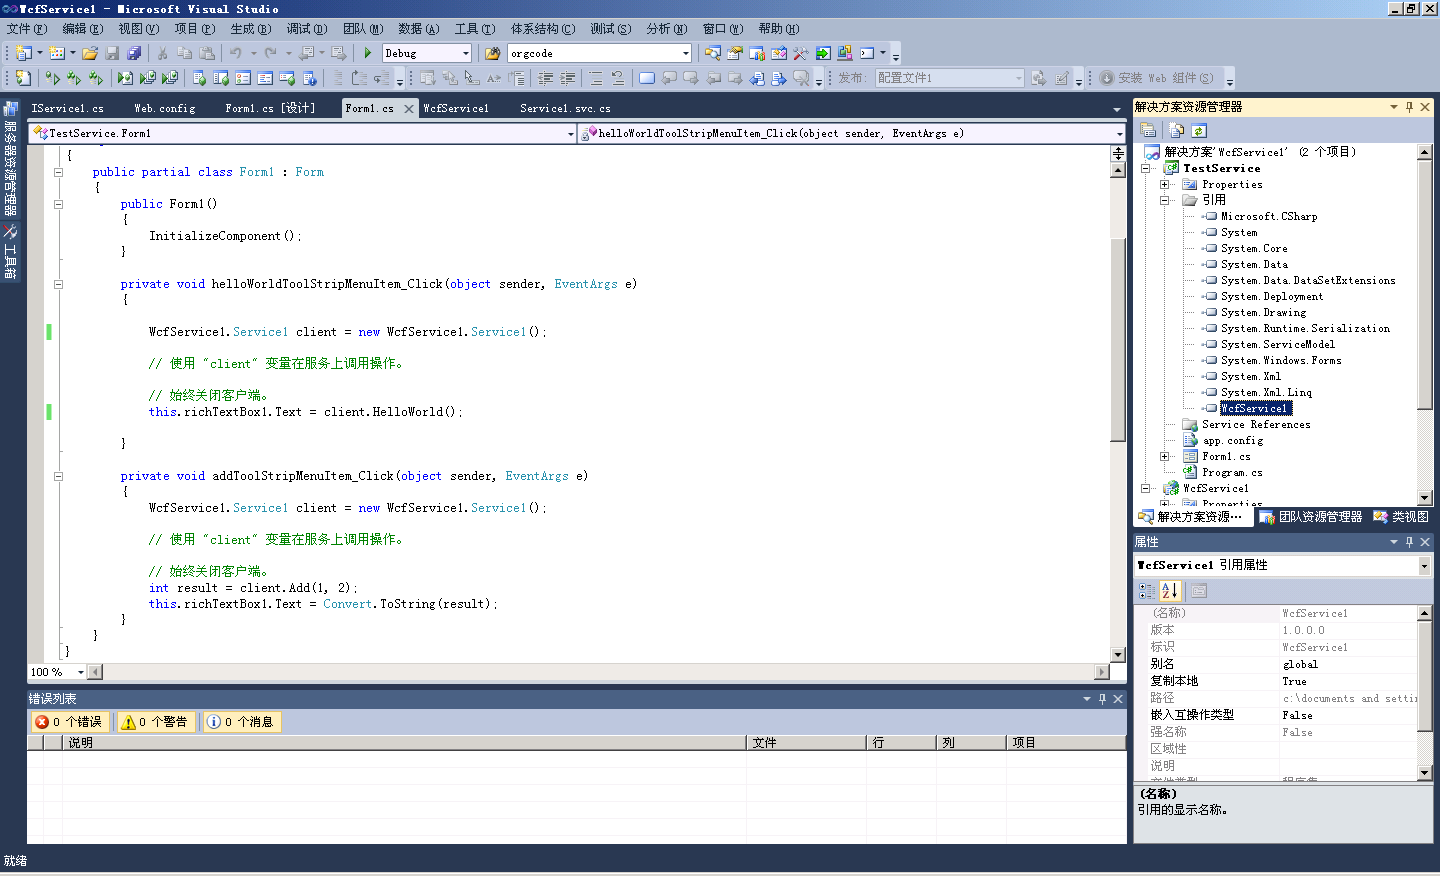
4.添加新项目,选择左侧"已安装的模板"--"Visual C#"--"Windows 窗体应用程序",选择中间的"Windows 窗体应用程序"--输入项目名称"TestService".新建完成后,双击项目中的Form1.cs文件,在界面中拖入一个menuStrip1菜单控件,加入"menuStrip1",依次输入"WebService方法调用","HelloWorld","Add",分别双击"HelloWorld"和"Add"菜单文字.产生点击事件.


using System;
using System.Collections.Generic;
using System.ComponentModel;
using System.Data;
using System.Drawing;
using System.Linq;
using System.Text;
using System.Windows.Forms;

namespace TestService
{
    public partial class Form1 : Form
    {
        public Form1()
        {
            InitializeComponent();
        }

        private void helloWorldToolStripMenuItem_Click(object sender, EventArgs e)
        {

            WcfService1.Service1 client = new WcfService1.Service1();

            // 使用 "client" 变量在服务上调用操作。

            // 始终关闭客户端。
            this.richTextBox1.Text = client.HelloWorld();

        }

        private void addToolStripMenuItem_Click(object sender, EventArgs e)
        {
            WcfService1.Service1 client = new WcfService1.Service1();

            // 使用 "client" 变量在服务上调用操作。

            // 始终关闭客户端。
            int result = client.Add(1, 2);
            this.richTextBox1.Text = Convert.ToString(result);
        }
    }
}
5.选中TestService项目,点击鼠标右键,选择"设置为启动项目",添加项目引用选择WcfService1后按F5运行,点击"HelloWorld"和"Add"菜单即可看见运行效果.


项目源码到我的资源中下载WcfService1.rar

下面是一个简单的Java WebService HTTPS开发实例: 首先,我们需要生成自签名证书,可以使用 keytool 工具生成: 1. 生成私钥:keytool -genkey -alias tomcat -keyalg RSA -keysize 2048 -keystore keystore.jks 2. 生成证书签名请求:keytool -certreq -alias tomcat -keystore keystore.jks -file cert-file.csr 3. 生成自签名证书:keytool -importcert -alias tomcat -file cert-file.csr -keystore keystore.jks 然后,我们需要创建一个简单的 Java WebService 应用: ``` import javax.jws.WebMethod; import javax.jws.WebService; import javax.jws.soap.SOAPBinding; import javax.jws.soap.SOAPBinding.Style; @WebService @SOAPBinding(style = Style.RPC) public class HelloWorld { @WebMethod public String sayHello() { return "Hello World!"; } } ``` 在这个例子中,我们创建了一个名为 HelloWorld 的 WebService,它将返回一个字符串“Hello World!”。 接下来,我们需要配置 WebService 服务端口的 HTTPS 访问。我们可以使用 Spring Boot 来创建一个简单的 WebService 应用,并启用 HTTPS: ``` import org.springframework.boot.SpringApplication; import org.springframework.boot.autoconfigure.SpringBootApplication; import org.springframework.boot.web.servlet.ServletRegistrationBean; import org.springframework.context.annotation.Bean; import org.springframework.remoting.jaxws.SimpleJaxWsServiceExporter; @SpringBootApplication public class WebServiceApplication { public static void main(String[] args) { SpringApplication.run(WebServiceApplication.class, args); } @Bean public ServletRegistrationBean<javax.xml.ws.Endpoint> endpoint() { ServletRegistrationBean<javax.xml.ws.Endpoint> servlet = new ServletRegistrationBean<>(); servlet.setUrlMappings(Arrays.asList("/ws/hello")); servlet.setServlet(new org.apache.cxf.jaxws.EndpointImpl(new HelloWorld())); servlet.setEnabled(true); return servlet; } @Bean public SimpleJaxWsServiceExporter jaxWsServiceExporter() { SimpleJaxWsServiceExporter exporter = new SimpleJaxWsServiceExporter(); exporter.setBaseAddress("https://localhost:8443/ws/"); return exporter; } } ``` 在这个例子中,我们使用 SimpleJaxWsServiceExporter 类启用 HTTPS,并将 WebService 端口设置为 8443。 最后,我们可以使用 SoapUI 工具来测试我们的 WebService: 1. 启动 SoapUI 工具。 2. 创建一个新的项目。 3. 添加一个新的 WSDL。 4. 输入 WebService 的 HTTPS 地址。 5. 单击“OK”按钮。 6. 查看 WebService 的方法列表,并选择“sayHello”方法。 7. 单击“发送”按钮,将返回“Hello World!”消息。 注意:由于我们使用了自签名证书,浏览器可能会弹出一个安全警告。在生产环境中,我们应该使用经过验证的证书。
评论 5
添加红包

请填写红包祝福语或标题

红包个数最小为10个

红包金额最低5元

当前余额3.43前往充值 >
需支付:10.00
成就一亿技术人!
领取后你会自动成为博主和红包主的粉丝 规则
hope_wisdom
发出的红包

打赏作者

疾风铸境

提供工作中碰到的和研究过的技术

¥1 ¥2 ¥4 ¥6 ¥10 ¥20
扫码支付:¥1
获取中
扫码支付

您的余额不足,请更换扫码支付或充值

打赏作者

实付
使用余额支付
点击重新获取
扫码支付
钱包余额 0

抵扣说明:

1.余额是钱包充值的虚拟货币,按照1:1的比例进行支付金额的抵扣。
2.余额无法直接购买下载,可以购买VIP、付费专栏及课程。

余额充值