


Apache Shiro是Java的一个安全框架。目前,使用Apache Shiro的人越来越多,因为它相当简单,对比Spring Security,可能没有Spring Security做的功能强大,但是在实际工作时可能并不需要那么复杂的东西,所以使用小而简单的Shiro就足够了。
详细基础知识,请参考跟我学Shiro 的系列文章
这里只是给出Spring Boot 集成Shiro 的案例,Spring Boot就是为了简化传统Spring开发的复杂度,即去xml化,所以案例中也是没有xml配置,完全 javaconfig方式配置。
集成Shiro核心内容:
- ShiroFilterFactory,Shiro过滤器工程类,具体的实现类是:ShiroFilterFactoryBean,此实现类是依赖于SecurityManager安全管理器。主要配置Filter就好。
- SecurityManager,Shiro的安全管理,主要是身份认证的管理,缓存管理,cookie管理,所以在实际开发中我们主要是和SecurityManager进行打交道的。
- Realm,用于身份信息权限信息的验证。开发时集成AuthorizingRealm,重写两个方法:doGetAuthenticationInfo(获取即将需要认真的信息)、doGetAuthorizationInfo(获取通过认证后的权限信息)。
- HashedCredentialsMatcher,凭证匹配器,用于告诉Shiro在认证时通过什么方式(算法)来匹配密码。默认(storedCredentialsHexEncoded=false)Base64编码,可以修改为(storedCredentialsHexEncoded=true)Hex编码。
- LifecycleBeanPostProcessor,Shiro生命周期处理器,保证实现了Shiro内部lifecycle函数的bean执行。
- 开启Shiro的注解功能(如@RequiresRoles,@RequiresPermissions),需借助SpringAOP扫描使用Shiro注解的类,并在必要时进行安全逻辑验证,需要配置两个bean(DefaultAdvisorAutoProxyCreator(可选)和AuthorizationAttributeSourceAdvisor)实现此功能。
- 其它的就是缓存管理,记住登录、验证码、分布式系统共享Session之类的,这些大部分都是需要自己进行的实现,其中缓存管理,记住登录比较简单实现,并需要注入到SecurityManager让Shiro的安全管理器进行管理就好了。后续章节中会一 一补充。
下面使用Spring Boot 集成Shiro完成一个比较简单的安全验证(传统XML方式配置,请点击这里):
步骤1:首先创建一个Maven工程,在pom.xml中添加shiro相关依赖包:
<!-- 在Spring Boot中使用Thymeleaf模板引擎 -->
<dependency>
<groupId>org.springframework.boot</groupId>
<artifactId>spring-boot-starter-thymeleaf</artifactId>
</dependency>
<!-- 使用Shiro认证 -->
<dependency>
<groupId>org.apache.shiro</groupId>
<artifactId>shiro-spring</artifactId>
<version>1.2.5</version>
</dependency>
<!-- 在Thymeleaf模板引擎中集成Shiro -->
<dependency>
<groupId>com.github.theborakompanioni</groupId>
<artifactId>thymeleaf-extras-shiro</artifactId>
<version>1.2.1</version>
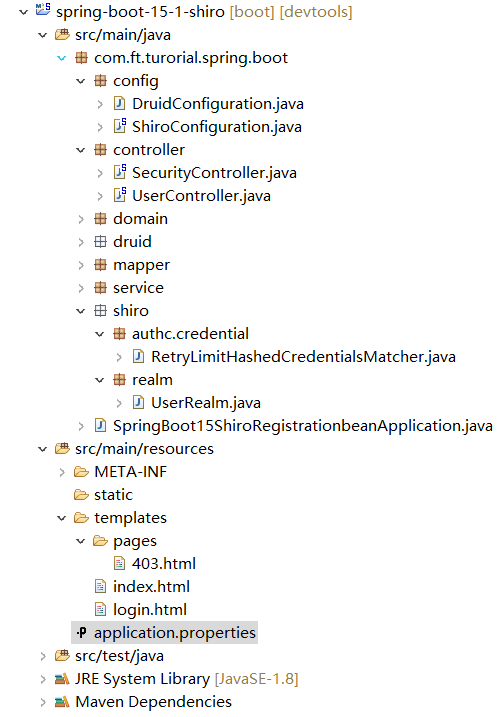
</dependency>目录结构图(其中RetryLimitHashedCredentialsMatcher.java在本例中为使用):
步骤2:实现用户、角色的CRUD的相关类(domain,dao/mapper/repository,service),由于篇幅和重要点关系,这些就省略了。
步骤3:实现Realm,继承AuthorizingRealm,并重写doGetAuthorizationInfo(用于获取认证成功后的角色、权限等信息) 和 doGetAuthenticationInfo(验证当前登录的Subject)方法
public class UserRealm extends AuthorizingRealm{
    @Resource
    private UserService userService;
    @Resource
    private RoleService roleService;

    @Override
    protected AuthorizationInfo doGetAuthorizationInfo(PrincipalCollection principals) {
        String currentLoginName = (String)principals.getPrimaryPrincipal();
        List<String> userRoles = new ArrayList<String>();
        List<String> userPermissions = new ArrayList<String>();
        //从数据库中获取当前登录用户的详细信息
        User user = userService.findByLoginName(currentLoginName);
        if(null != user){
            //获取当前用户下所有ACL权限列表  待续。。。
            //获取当前用户下拥有的所有角色列表
            List<Role> roles = roleService.findByUserId(user.getId());
            for (int i = 0; i < roles.size(); i++) {
                userRoles.add(roles.get(i).getCode());
            }
        }else{
            throw new AuthorizationException();
        }
         System.out.println("#######获取角色:"+userRoles);
         System.out.println("#######获取权限:"+userPermissions);
        //为当前用户设置角色和权限
        SimpleAuthorizationInfo authorizationInfo = new SimpleAuthorizationInfo();
        authorizationInfo.addRoles(userRoles);
        authorizationInfo.addStringPermissions(userPermissions);
        return authorizationInfo;
    }

    /**
     * 验证当前登录的Subject
     * LoginController.login()方法中执行Subject.login()时 执行此方法
     */
    @Override
    protected AuthenticationInfo doGetAuthenticationInfo(
            AuthenticationToken authcToken) throws AuthenticationException {
        System.out.println("###【开始认证[SessionId]】"+SecurityUtils.getSubject().getSession().getId());
        String loginName = (String)authcToken.getPrincipal();
        User user = userService.findByLoginName(loginName);
        if(user == null) {
            throw new UnknownAccountException();//没找到帐号
        }
        //交给AuthenticatingRealm使用CredentialsMatcher进行密码匹配,如果觉得人家的不好可以自定义实现
        SimpleAuthenticationInfo authenticationInfo = new SimpleAuthenticationInfo(
                user.getUserName(), //用户名
                user.getPassword(), //密码
                ByteSource.Util.bytes(user.getCredentialsSalt()),//salt=username+salt,采用明文访问时,不需要此句
                getName()  //realm name
        );
        return authenticationInfo;
    }
}
步骤4:创建Shiro配置类:ShiroConfiguration,这是最重要的,用于替代XML配置的Java Config,详细说明,请看代码中注释。
@Configuration
public class ShiroConfiguration {
    private static final Logger logger = LoggerFactory.getLogger(ShiroConfiguration.class);

    /**
     * Shiro的Web过滤器Factory 命名:shiroFilter<br />
     *
     * @param securityManager
     * @return
     */
    @Bean(name = "shiroFilter")
    public ShiroFilterFactoryBean shiroFilterFactoryBean(SecurityManager securityManager) {
        logger.info("注入Shiro的Web过滤器-->shiroFilter", ShiroFilterFactoryBean.class);
        ShiroFilterFactoryBean shiroFilterFactoryBean = new ShiroFilterFactoryBean();

        //Shiro的核心安全接口,这个属性是必须的
        shiroFilterFactoryBean.setSecurityManager(securityManager);
        //要求登录时的链接(可根据项目的URL进行替换),非必须的属性,默认会自动寻找Web工程根目录下的"/login.jsp"页面
        shiroFilterFactoryBean.setLoginUrl("/login");
        //登录成功后要跳转的连接,逻辑也可以自定义,例如返回上次请求的页面
        shiroFilterFactoryBean.setSuccessUrl("/index");
        //用户访问未对其授权的资源时,所显示的连接
        shiroFilterFactoryBean.setUnauthorizedUrl("/pages/403");
        /*定义shiro过滤器,例如实现自定义的FormAuthenticationFilter,需要继承FormAuthenticationFilter
        **本例中暂不自定义实现,在下一节实现验证码的例子中体现
        */

        /*定义shiro过滤链  Map结构
         * Map中key(xml中是指value值)的第一个'/'代表的路径是相对于HttpServletRequest.getContextPath()的值来的
         * anon:它对应的过滤器里面是空的,什么都没做,这里.do和.jsp后面的*表示参数,比方说login.jsp?main这种
         * authc:该过滤器下的页面必须验证后才能访问,它是Shiro内置的一个拦截器org.apache.shiro.web.filter.authc.FormAuthenticationFilter
         */
        Map<String, String> filterChainDefinitionMap = new LinkedHashMap<String, String>();
        // 配置退出过滤器,其中的具体的退出代码Shiro已经替我们实现了
        filterChainDefinitionMap.put("/logout", "logout");

        // <!-- 过滤链定义,从上向下顺序执行,一般将 /**放在最为下边 -->:这是一个坑呢,一不小心代码就不好使了;
        // <!-- authc:所有url都必须认证通过才可以访问; anon:所有url都都可以匿名访问-->
        filterChainDefinitionMap.put("/webui/**", "anon");
        filterChainDefinitionMap.put("/webjars/**", "anon");
        filterChainDefinitionMap.put("/login", "anon");
        filterChainDefinitionMap.put("/**", "authc");

        shiroFilterFactoryBean.setFilterChainDefinitionMap(filterChainDefinitionMap);

        return shiroFilterFactoryBean;
    }

    /**
     * 不指定名字的话,自动创建一个方法名第一个字母小写的bean
     * @Bean(name = "securityManager")
     * @return
     */
    @Bean
    public SecurityManager securityManager() {
        logger.info("注入Shiro的Web过滤器-->securityManager", ShiroFilterFactoryBean.class);
        DefaultWebSecurityManager securityManager = new DefaultWebSecurityManager();
        securityManager.setRealm(userRealm());
        return securityManager;
    }

    /**
     * Shiro Realm 继承自AuthorizingRealm的自定义Realm,即指定Shiro验证用户登录的类为自定义的
     *
     * @param cacheManager
     * @return
     */
    @Bean
    public UserRealm userRealm() {
        UserRealm userRealm = new UserRealm();
        //告诉realm,使用credentialsMatcher加密算法类来验证密文
        userRealm.setCredentialsMatcher(hashedCredentialsMatcher());
        userRealm.setCachingEnabled(false);
        return userRealm;
    }

    /**
     * 凭证匹配器
     * (由于我们的密码校验交给Shiro的SimpleAuthenticationInfo进行处理了
     *  所以我们需要修改下doGetAuthenticationInfo中的代码;
     * )
     * 可以扩展凭证匹配器,实现 输入密码错误次数后锁定等功能,下一次
     * @return
     */
    @Bean(name="credentialsMatcher")
    public HashedCredentialsMatcher hashedCredentialsMatcher(){
       HashedCredentialsMatcher hashedCredentialsMatcher = new HashedCredentialsMatcher();

       hashedCredentialsMatcher.setHashAlgorithmName("md5");//散列算法:这里使用MD5算法;
       hashedCredentialsMatcher.setHashIterations(2);//散列的次数,比如散列两次,相当于 md5(md5(""));
       //storedCredentialsHexEncoded默认是true,此时用的是密码加密用的是Hex编码;false时用Base64编码
       hashedCredentialsMatcher.setStoredCredentialsHexEncoded(true);

       return hashedCredentialsMatcher;
    }

    /**
     * Shiro生命周期处理器
     * @return
     */
    @Bean
    public LifecycleBeanPostProcessor lifecycleBeanPostProcessor(){
        return new LifecycleBeanPostProcessor();
    }
    /**
     * 开启Shiro的注解(如@RequiresRoles,@RequiresPermissions),需借助SpringAOP扫描使用Shiro注解的类,并在必要时进行安全逻辑验证
     * 配置以下两个bean(DefaultAdvisorAutoProxyCreator(可选)和AuthorizationAttributeSourceAdvisor)即可实现此功能
     * @return
     */
    @Bean
    @DependsOn({"lifecycleBeanPostProcessor"})
    public DefaultAdvisorAutoProxyCreator advisorAutoProxyCreator(){
        DefaultAdvisorAutoProxyCreator advisorAutoProxyCreator = new DefaultAdvisorAutoProxyCreator();
        advisorAutoProxyCreator.setProxyTargetClass(true);
        return advisorAutoProxyCreator;
    }
    @Bean
    public AuthorizationAttributeSourceAdvisor authorizationAttributeSourceAdvisor(){
        AuthorizationAttributeSourceAdvisor authorizationAttributeSourceAdvisor = new AuthorizationAttributeSourceAdvisor();
        authorizationAttributeSourceAdvisor.setSecurityManager(securityManager());
        return authorizationAttributeSourceAdvisor;
    }

    /**
     * 添加ShiroDialect 为了在thymeleaf里使用shiro的标签的bean
     * @return
     */
    @Bean(name = "shiroDialect")
    public ShiroDialect shiroDialect(){
        return new ShiroDialect();
    }
}
步骤四5:实现Controller,登录/退出等操作。
@Controller
public class SecurityController {
    private static final Logger logger = LoggerFactory.getLogger(UserController.class);

    @RequiresRoles("ADMIN")
    @RequestMapping(value="/index",method=RequestMethod.GET)
    public String index(Model model){
        String userName = (String) SecurityUtils.getSubject().getPrincipal();
        model.addAttribute("username", userName);
        return "index";
    }

    @RequestMapping(value="",method=RequestMethod.GET)
    public String defaultIndex(Model model){
        String userName = (String) SecurityUtils.getSubject().getPrincipal();
        model.addAttribute("username", userName);
        return "index";
    }

    @RequestMapping(value="/login",method=RequestMethod.GET)
    public String loginForm(Model model){
        model.addAttribute("user", new User());
        return "login";
    }
    @RequestMapping(value="/login",method=RequestMethod.POST)
    public String login(@Valid User user,BindingResult bindingResult,RedirectAttributes redirectAttributes){
        if(bindingResult.hasErrors()){
            return "login";
        }

        String username = user.getUserName();
        System.out.println(username);
        UsernamePasswordToken token = new UsernamePasswordToken(user.getUserName(), user.getPassword());
        //获取当前的Subject
        Subject currentUser = SecurityUtils.getSubject();
        try {
            //在调用了login方法后,SecurityManager会收到AuthenticationToken,并将其发送给已配置的Realm执行必须的认证检查
            //每个Realm都能在必要时对提交的AuthenticationTokens作出反应
            //所以这一步在调用login(token)方法时,它会走到MyRealm.doGetAuthenticationInfo()方法中,具体验证方式详见此方法
            logger.info("对用户[" + username + "]进行登录验证..验证开始");
            currentUser.login(token);
            logger.info("对用户[" + username + "]进行登录验证..验证通过");
        }catch(UnknownAccountException uae){
            logger.info("对用户[" + username + "]进行登录验证..验证未通过,未知账户");
            redirectAttributes.addFlashAttribute("message", "未知账户");
        }catch(IncorrectCredentialsException ice){
            logger.info("对用户[" + username + "]进行登录验证..验证未通过,错误的凭证");
            redirectAttributes.addFlashAttribute("message", "密码不正确");
        }catch(LockedAccountException lae){
            logger.info("对用户[" + username + "]进行登录验证..验证未通过,账户已锁定");
            redirectAttributes.addFlashAttribute("message", "账户已锁定");
        }catch(ExcessiveAttemptsException eae){
            logger.info("对用户[" + username + "]进行登录验证..验证未通过,错误次数过多");
            redirectAttributes.addFlashAttribute("message", "用户名或密码错误次数过多");
        }catch(AuthenticationException ae){
            //通过处理Shiro的运行时AuthenticationException就可以控制用户登录失败或密码错误时的情景
            logger.info("对用户[" + username + "]进行登录验证..验证未通过,堆栈轨迹如下");
            ae.printStackTrace();
            redirectAttributes.addFlashAttribute("message", "用户名或密码不正确");
        }
        //验证是否登录成功
        if(currentUser.isAuthenticated()){
            logger.info("用户[" + username + "]登录认证通过(这里可以进行一些认证通过后的一些系统参数初始化操作)");
            return "/index";
        }else{
            token.clear();
            return "redirect:/login";
        }
    }

    @RequestMapping(value="/logout",method=RequestMethod.GET)
    public String logout(RedirectAttributes redirectAttributes ){
        //使用权限管理工具进行用户的退出,跳出登录,给出提示信息
        SecurityUtils.getSubject().logout();
        redirectAttributes.addFlashAttribute("message", "您已安全退出");
        return "redirect:/login";
    }

    @RequestMapping("/pages/403")
    public String unauthorizedRole(){
        logger.info("------没有权限-------");
        return "pages/403";
    }
}
步骤6:前端页面,采用Thymeleaf引擎(包括后续章节,都是采用此引擎)
login.html:
<!DOCTYPE html>
<html xmlns:th="http://www.thymeleaf.org">
<head>
<meta charset="UTF-8" />
<title>用户登录</title>
    <link rel="stylesheet" type="text/css" media="all"
          href="/webjars/bootstrap/css/bootstrap.min.css" th:href="@{/webjars/bootstrap/css/bootstrap.min.css}" />
<style>
body{
margin-left:auto;
margin-right:auto;
margin-TOP:100PX;
width:20em;
}
</style>
</head>
<body>
<form th:action="@{/login}" method="POST">
    <!--下面是用户名输入框-->
    <div class="input-group">
      <span class="input-group-addon" id="basic-addon1">@</span>
      <input id="userName" name="userName" type="text" class="form-control" placeholder="用户名" aria-describedby="basic-addon1" />
    </div>
    <br />
    <!--下面是密码输入框-->
    <div class="input-group">
      <span class="input-group-addon" id="basic-addon1">@</span>
      <input id="password" name="password" type="text" class="form-control" placeholder="密码" aria-describedby="basic-addon1" />
    </div>
    <br />
    <!--下面是登陆按钮,包括颜色控制-->
    <button type="submit" style="width:280px;" class="btn btn-default">登 录</button>
</form>

<script th:src="@{/webjars/jquery/jquery.min.js}"></script>
<script th:src="@{/webjars/bootstrap/js/bootstrap.min.js}"></script>

</body>
</html>
index.html:
<!DOCTYPE html>
<html xmlns:th="http://www.thymeleaf.org">
<head>
<meta charset="UTF-8" />
<title>首页</title>

</head>
<body>
Hello, <shiro:principal/>, how are you today?
<shiro:hasRole name="ADMIN">
<br />I'm fine, 我拥有管理员角色--<span th:text="${username}"></span>
</shiro:hasRole>
</body>
</html>
403.html:
<!DOCTYPE html>
<html>
<head>
<meta charset="UTF-8" />
<title>Insert title here</title>
</head>
<body>
您所访问的资源未被授权..
</body>
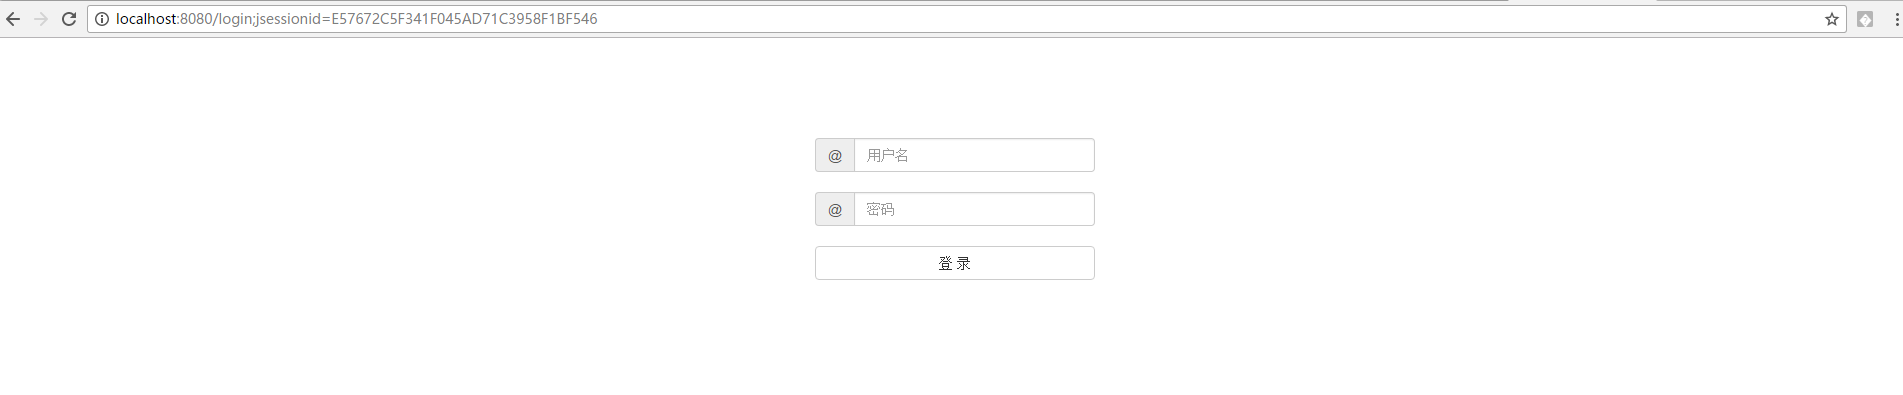
</html>步骤7:启动应用,在浏览器中输入 http://localhost:8080:


 468
468

 被折叠的 条评论
为什么被折叠?
被折叠的 条评论
为什么被折叠?
 到【灌水乐园】发言


