


目录
3. 在Fragment所依赖的 Activity中的activity.xml文件中调用
4.之后再创建三个Fragment,并且在他们的.xml文件上设置背景颜色
CardView
1. CardView的基本使用
CardView是用于实现卡片式布局效果的重要控件,实际上也是一个frameLayout,
只是额外提供了圆角和 阴影,看上去有立体效果。
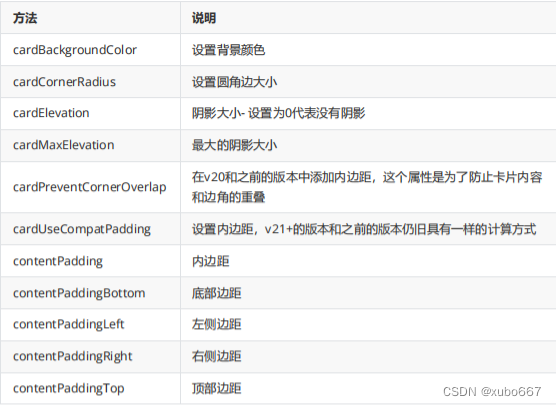
2.CardView常见的使用方法以及其说明
3.CardView与RecycleView的结合使用
1.主布局文件
<?xml version="1.0" encoding="utf-8"?>
<LinearLayout xmlns:android="http://schemas.android.com/apk/res/android"
    xmlns:app="http://schemas.android.com/apk/res-auto"
    xmlns:tools="http://schemas.android.com/tools"
    android:layout_width="match_parent"
    android:layout_height="match_parent"
    tools:context=".MainActivity3"
    android:padding="5dp">

    <androidx.recyclerview.widget.RecyclerView
        android:id="@+id/rv_news"
        android:layout_width="match_parent"
        android:layout_height="match_parent"
        />
</LinearLayout>
2.子布局文件
这里运用到了CardView
<?xml version="1.0" encoding="utf-8"?>
<androidx.cardview.widget.CardView xmlns:android="http://schemas.android.com/apk/res/android"
    xmlns:app="http://schemas.android.com/apk/res-auto"
    android:layout_width="match_parent"
    android:layout_height="150dp"
    app:cardCornerRadius="4dp"
    app:cardElevation="6dp"
    android:layout_marginTop="5dp"
    android:padding="5dp">

    <LinearLayout
        android:layout_width="match_parent"
        android:layout_height="150dp"
        android:orientation="horizontal"
        android:padding="5dp">

        <ImageView
            android:id="@+id/iv_img"
            android:layout_width="wrap_content"
            android:layout_height="140dp"
            app:srcCompat="@mipmap/touxiang1" />

        <TextView
            android:id="@+id/tv_name"
            android:layout_marginStart="8dp"
            android:layout_width="wrap_content"
            android:layout_height="wrap_content"
            android:layout_gravity="center_vertical"
            android:text="TextView" />


    </LinearLayout>
</androidx.cardview.widget.CardView>
3.实体类
public class News {
    private int imgID;
    private String name;
    public News(int imgID,String name){
        this.name=name;
        this.imgID=imgID;
    }

    public int getImgID() {
        return imgID;
    }

    public String getName() {
        return name;
    }
}
4.适配器
public class NewsAdapter extends RecyclerView.Adapter<NewsAdapter.ViewHolder> {
    List<News> list;
    public NewsAdapter(List<News> list){
        this.list=list;
    }
    @NonNull
    @Override
    public ViewHolder onCreateViewHolder(@NonNull ViewGroup parent, int viewType) {
        View view= LayoutInflater.from(parent.getContext()).inflate(R.layout.news_item,parent,false);
        ViewHolder viewHolder=new ViewHolder(view);
        return viewHolder;
    }

    @Override
    public void onBindViewHolder(@NonNull ViewHolder holder, int position) {
        News news=list.get(position);
        holder.iv_img.setImageResource(news.getImgID());
        holder.tv_name.setText(news.getName());
    }

    @Override
    public int getItemCount() {
        return list.size();
    }

    public class ViewHolder extends RecyclerView.ViewHolder {
        ImageView iv_img;
        TextView tv_name;
        public ViewHolder(@NonNull View itemView) {
            super(itemView);
            iv_img=itemView.findViewById(R.id.iv_img);
            tv_name=itemView.findViewById(R.id.tv_name);
        }
    }
}
5.在主活动中使用
public class MainActivity3 extends AppCompatActivity {

    public String[] names={"你","好","啊","你","好","啊"};
    public int[] imgs={R.mipmap.touxiang1,R.mipmap.touxiang2,
            R.mipmap.touxiang3,R.mipmap.touxiang1,R.mipmap.touxiang2,R.mipmap.touxiang3,};

    RecyclerView rv_news;
    List<News> list=new ArrayList<>();

    @Override
    protected void onCreate(Bundle savedInstanceState) {
        super.onCreate(savedInstanceState);
        setContentView(R.layout.activity_main3);

        rv_news=findViewById(R.id.rv_news);
        initData();
        NewsAdapter newsAdapter=new NewsAdapter(list);
        LinearLayoutManager layoutManager=new LinearLayoutManager(this);
        rv_news.setLayoutManager(layoutManager);
        rv_news.setAdapter(newsAdapter);
    }

    private void initData() {
        for (int i=0;i<names.length;i++){
            News news=new News(imgs[i],names[i]);
            list.add(news);
        }
    }
}
Fragment
1.Fragment的简介
Fragment
 最低0.47元/天 解锁文章


 48
48


 被折叠的 条评论
为什么被折叠?
被折叠的 条评论
为什么被折叠?
 到【灌水乐园】发言


