


 本文介绍了Spring框架的七个核心模块及其功能,并详细讲解了依赖注入的概念与实现方式,包括属性注入、构造注入等。
Spring框架是一个轻量级框架,被称为javaEE的春天,是当前的主流框架。也是非侵入性的。
Spring框架有7个模块:
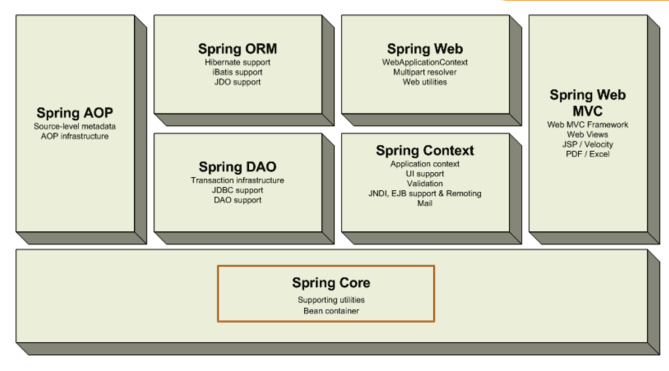
1、Spring Core
Core封装包是框架的最基础部分,提供IOC和依赖注入特性。这里的基础概念是BeanFactory,它提供对Factory模式的经典实现来消除对程序性单例模式的需要,并真正地允许你从程序逻辑中分离出依赖关系和配置。
2.Spring Context
构建于Core封装包基础上的 Context封装包,提供了一种框架式的对象访问方法,有些象JNDI注册器。Context封装包的特性得自于Beans封装包,并添加了对国际化(I18N)的支持(例如资源绑定),事件传播,资源装载的方式和Context的透明创建,比如说通过Servlet容器。
3、Spring DAO
DAO (Data Access Object)提供了JDBC的抽象层,它可消除冗长的JDBC编码和解析数据库厂商特有的错误代码。 并且,JDBC封装包还提供了一种比编程性更好的声明性事务管理方法,不仅仅是实现了特定接口,而且对所有的POJOs(plain old Java objects)都适用。
4、Spring ORM
ORM 封装包提供了常用的“对象/关系”映射APIs的集成层。 其中包括JPA、JDO、Hibernate 和 iBatis 。利用ORM封装包,可以混合使用所有Spring提供的特性进行“对象/关系”映射,如前边提到的简单声明性事务管理。
5、Spring AOP
Spring的 AOP 封装包提供了符合AOP Alliance规范的面向方面的编程实现,让你可以定义,例如方法拦截器(method-interceptors)和切点(pointcuts),从逻辑上讲,从而减弱代码的功能耦合,清晰的被分离开。而且,利用source-level的元数据功能,还可以将各种行为信息合并到你的代码中。
6、Spring Web
Spring中的 Web 包提供了基础的针对Web开发的集成特性,例如多方文件上传,利用Servlet listeners进行IOC容器初始化和针对Web的ApplicationContext。当与WebWork或Struts一起使用Spring时,这个包使Spring可与其他框架结合。
7、Spring Web MVC
Spring中的MVC封装包提供了Web应用的Model-View-Controller(MVC)实现。Spring的MVC框架并不是仅仅提供一种传统的实现,它提供了一种清晰的分离模型,在领域模型代码和Web Form之间。并且,还可以借助Spring框架的其他特性。
Spring框架的控制反转:
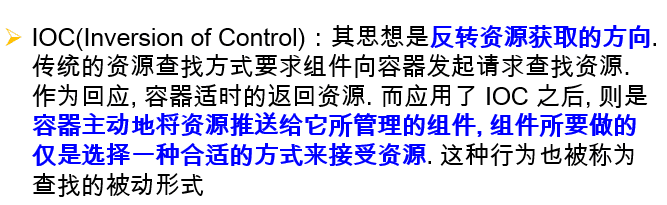
依赖注入:

下面主要结合代码来了解什么是控制反转和依赖注入:
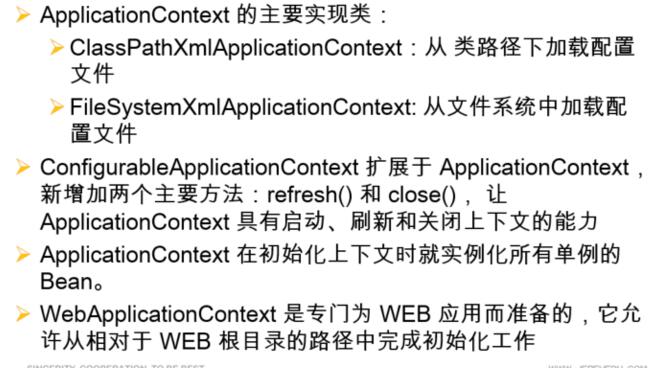
在Spring IOC容器读取Bean,在配置创建Bean实例之前,必须对它进行实例化。只有在容器实例化后,才可以从IOC容器里获取Bean实例并使用。
Spring提供了两种类型的IOC容器实现:
BeanFactory:IOC容器的底层基本实现
ApplicationContext:提供了更多的高级特性,是BeanFactory的子接口。
首先创建一个bean:
package com.jredu.spring1;
public class Hello {
private String name1;
private String laugen1;
private String name2;
private String laugen2;
public String getName1() {
return name1;
}
public void setName1(String name1) {
this.name1 = name1;
}
public String getLaugen1() {
return laugen1;
}
public void setLaugen1(String laugen1) {
this.laugen1 = laugen1;
}
public String getName2() {
return name2;
}
public void setName2(String name2) {
this.name2 = name2;
}
public String getLaugen2() {
return laugen2;
}
public void setLaugen2(String laugen2) {
this.laugen2 = laugen2;
}
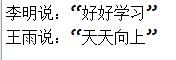
public void showInfo1(){
System.out.println(name1+"说:“"+laugen1+"”");
}
public void showInfo2(){
System.out.println(name2+"说:“"+laugen2+"”");
}
}
<?xml version="1.0" encoding="UTF-8"?>
<beans xmlns="http://www.springframework.org/schema/beans"
	xmlns:xsi="http://www.w3.org/2001/XMLSchema-instance"
	xmlns:p="http://www.springframework.org/schema/p"
    xmlns:context="http://www.springframework.org/schema/context"
    xmlns:mvc="http://www.springframework.org/schema/mvc"
    xmlns:util="http://www.springframework.org/schema/util"
	xsi:schemaLocation="http://www.springframework.org/schema/beans
        http://www.springframework.org/schema/beans/spring-beans.xsd
        http://www.springframework.org/schema/context
        http://www.springframework.org/schema/context/spring-context.xsd
        http://www.springframework.org/schema/util
		http://www.springframework.org/schema/util/spring-util.xsd
        http://www.springframework.org/schema/mvc
        http://www.springframework.org/schema/mvc/spring-mvc.xsd">
	<bean id="laugen" class="com.jredu.spring1.Hello">
		<property name="name1" value="李明"></property>
		<property name="laugen1" value="好好学习"></property>
		<property name="name2" value="王雨"></property>
		<property name="laugen2" value="天天向上"></property>
	</bean>

</beans>
id:Bean的名称在IOC容器中必须是唯一的,若id没有指定,Spring自动将类名作为Bean的名字。
在一个测试类中进行测试:
package com.jredu.spring1;

import org.springframework.context.ApplicationContext;
import org.springframework.context.support.ClassPathXmlApplicationContext;

public class TestHello {

	public static void main(String[] args) {
		ApplicationContext app=new ClassPathXmlApplicationContext("applicationContext.xml");
		Hello hello=(Hello)app.getBean("laugen");
		hello.showInfo1();
		hello.showInfo2();
	}
}
从IOC容器中获取Bean,调用ApplicatonCntext的getBean方法。
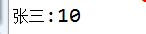
上述代码的运行结果是:
XML配置Bean——依赖注入方式
Spring支持3中依赖注入的方式:属性注入、构造器注入、工厂方式注入(很少使用,不推荐)
属性注入:即通过setter方法注入Bean的属性值或依赖的对象使用<property>元素,使用name属性指定Bean的属性名称,value属性或<value>子节点指定属性值。
属性注入是实际应用中最常用的注入方式。
上述applicationContext.xml配置文件里就是应用的属性注入。
构造注入:通过构造方法注入Bean的属性值或依赖的对象,它保证了Bean实例在实例化后就可以使用。
构造器注入在<constructor-arg>元素里声明属性,常用属性:name、value、type
代码示例:
package com.jredu.spring1;

public class HelloSpring2 {

	private String name;
	private int age;

	//构造注入
	public HelloSpring2(String name, int age) {
		super();
		this.name = name;
		this.age = age;
	}
	public HelloSpring2() {
		super();
	};

	public void showInfo(){
		System.out.println(name+":"+age);
	}
}
在applicationContext.xml中配置:
按索引匹配入参:
<!-- 构造器注入 -->
	<bean id="hello2" class="com.jredu.spring1.HelloSpring2">
		<constructor-arg value="张三" index="0"></constructor-arg>
		<constructor-arg value="10" index="1"></constructor-arg>
	</bean>
在测试类中运行代码:
package com.jredu.spring1;

import org.springframework.context.ApplicationContext;
import org.springframework.context.support.ClassPathXmlApplicationContext;

public class TestHello {

	public static void main(String[] args) {
		ApplicationContext app=new ClassPathXmlApplicationContext("applicationContext.xml");
		HelloSpring2 hello=(HelloSpring2) app.getBean("hello2");
		hello.showInfo();
	}
}
构造注入还有一种方式是:按类型匹配入参:
常用的集合List和Map的注入方式:

实体类:
package com.jredu.spring1;

import java.util.List;
import java.util.Map;
/**
 * 地区
 * @author Administrator
 *
 */
public class Areas {

	private List<String> list;
	private Map<String, String> map;

	public List<String> getList() {
		return list;
	}

	public void setList(List<String> list) {
		this.list = list;
	}

	public Map<String, String> getMap() {
		return map;
	}

	public void setMap(Map<String, String> map) {
		this.map = map;
	}

}
<!--集合  -->
	<bean id="area" class="com.jredu.spring1.Areas">
		<property name="list">
			<list>
				<value>北京</value>
				<value>上海</value>
				<value>杭州</value>
				<value>济南</value>
				<value>烟台</value>
			</list>
		</property>
		<property name="map">
			<map>
				<entry key="a" value="abc"></entry>
				<entry key="b" value="def"></entry>
				<entry key="c" value="ihj"></entry>
			</map>
		</property>
</bean>package com.jredu.spring1;
import org.springframework.context.ApplicationContext;
import org.springframework.context.support.ClassPathXmlApplicationContext;
public class TestHello {
public static void main(String[] args) {
ApplicationContext app=new ClassPathXmlApplicationContext("applicationContext.xml");
Areas area = (Areas) app.getBean("area");
System.out.println(area.getList());
System.out.println(area.getMap());
}
}

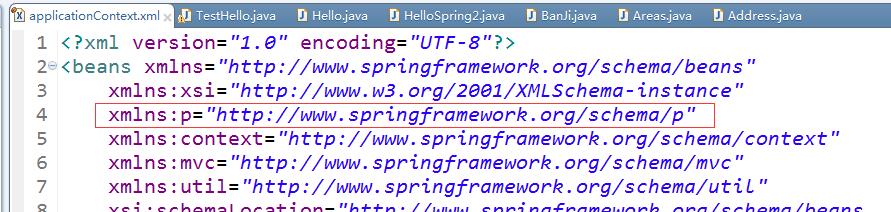
P命名空间:
为了简化XML文件的配置,越来越多的XML文件采用属性而非子元素配置信息。Spring从2.5版本开始引入一个新的p命名空间,可以通过<bean>元素属性的方式配置Bean的属性。使用p命名空间后,基于XML的配置方式将进一步简化。
package com.jredu.spring1;
/**
 * 采用属性注入的方式
 * @author Administrator
 *
 */
public class Address {

	private double latitude;//纬度
	private double longitude;//经度
	private String name;//名称

	public double getLatitude() {
		return latitude;
	}
	public void setLatitude(double latitude) {
		this.latitude = latitude;
	}
	public double getLongitude() {
		return longitude;
	}
	public void setLongitude(double longitude) {
		this.longitude = longitude;
	}
	public String getName() {
		return name;
	}
	public void setName(String name) {
		this.name = name;
	}
}
package com.jredu.spring1;

public class Person {

	private String name;//姓名
	private String sex;//性别
	private Address address;//地区
	public String getName() {
		return name;
	}
	public void setName(String name) {
		this.name = name;
	}
	public String getSex() {
		return sex;
	}
	public void setSex(String sex) {
		this.sex = sex;
	}
	public Address getAddress() {
		return address;
	}
	public void setAddress(Address address) {
		this.address = address;
	}
}
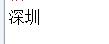
	<bean id="address" class="com.jredu.spring1.Address">
	<property name="latitude" value="23.644543"></property>
	<property name="longitude" value="116.529043"></property>
	<property name="name" value="深圳"></property>
	</bean>


	<bean id="p2" class="com.jredu.spring1.Person"
	p:name="老王"
	p:sex="男"
p:address-ref="address"/>package com.jredu.spring1;
import org.springframework.context.ApplicationContext;
import org.springframework.context.support.ClassPathXmlApplicationContext;
public class TestHello {
public static void main(String[] args) {
ApplicationContext app=new ClassPathXmlApplicationContext("applicationContext.xml");
Person p2= (Person) app.getBean("p2");
System.out.println(p2.getAddress().getName());
}
}
非


 4
4

 被折叠的 条评论
为什么被折叠?
被折叠的 条评论
为什么被折叠?
 到【灌水乐园】发言


