


Fiber, a less known concept compared with coroutine, is a pretty powerful addition to cooperative multitasking. As a graphics programmer in game industry, I totally appreciate the great flexibility that fiber brings on the table. As a matter of fact, I feel the tech is a little bit underappreciated due to the lack of sufficient public materials talking about fibers.
与协程相比,纤程是一个鲜为人知的概念,但它是协作多任务处理的一个非常强大的补充。作为游戏行业的图形程序员,我非常欣赏纤程带来的巨大灵活性。事实上,我觉得由于缺乏足够的公开材料来谈论纤程,这项技术有点被低估了。
In this blog post, I will put down some of my learnings about fiber basics. Everything mentioned in this post will be specifically about C++ even though similar concept exist in other languages as well. Readers who have zero knowledge about fibers will be learning what it is and how we can take advantages of it in graphics rendering.
在这篇博文中,我将写下我对纤程基础知识的一些了解。这篇文章中提到的所有内容都将专门针对 C++,尽管其他语言中也存在类似的概念。对纤程零知识的读者将了解它是什么以及我们如何在图形渲染中利用它。
Multitasking 多任务处理
As we all know that modern games commonly require quite some processing power so that they react to gamers in a timely manner. The performance improvement made in single core CPU could no longer keep up with the sheer computational demand quite a while ago. To no one’s surprise, the industry has shifted from single thread game engine to multithread engine more than a decade ago. Multithreading has became an essential part of game development. It is also a very mature tech that is well supported and optimized by major operation systems.
众所周知,现代游戏通常需要相当高的处理能力,以便及时对玩家做出反应。不久前单核CPU的性能提升已经无法满足纯粹的计算需求。毫不奇怪,十多年前,业界已经从单线程游戏引擎转向多线程引擎。多线程已成为游戏开发的重要组成部分。它也是一项非常成熟的技术,得到各大操作系统的良好支持和优化。
With multithreading, it is necessary to split the computation of a frame into multiple sub tasks depending on their characteristics so that each thread gets something to do. Some tasks process physics, some process rendering, the list goes on. It is inevitable to introduce some dependencies between the tasks. Respecting the dependencies requires careful synchronization. In order to correctly manage the tasks, job systems (sometimes named as task systems) are introduced in game engines. They are used to harness the multi-core power provided by CPUs.
使用多线程,需要根据其特点将一帧的计算拆分为多个子任务,以便每个线程都有事可做。有些任务处理物理,有些任务处理渲染,这样的例子不胜枚举。任务之间不可避免地引入一些依赖关系。尊重依赖关系需要仔细同步。为了正确管理任务,游戏引擎中引入了作业系统(有时称为任务系统)。它们用于利用 CPU 提供的多核功能。
Limitation of Preemptive Multitasking
抢占式多任务处理的局限性
It is not uncommon to see more active threads ‘running’ than the number of physical cores. In order to give users an illusion of multitasking, operating systems commonly execute multiple tasks in an interleaved manner. Each thread gets a fraction of the whole timeline of the physical cores. As long as the frequency of swaping thread is high enough, users will feel like they are running at the same time. This model is what is commonly known as preemtive multitasking[1] .
“运行”的活动线程数量多于物理核心数量的情况并不罕见。为了给用户一种多任务处理的错觉,操作系统通常以交错的方式执行多个任务。每个线程都获得物理核心整个时间线的一小部分。只要交换线程的频率足够高,用户就会感觉他们在同时运行。这种模型就是通常所说的抢占式多任务 [1] 。
Even though this model works fairly well for majority of applications, game development is one of the rare domains where developers will try to squish every tiny bit out of the target platform. There are some loss of flexibility in preemptive multitasking that can be annoying sometimes. Specifically, the following facts about preemptive multitasking are what bother game developers.
尽管这种模型对于大多数应用程序来说都相当有效,但游戏开发是开发人员试图将每一点都挤出目标平台的罕见领域之一。抢占式多任务处理会失去一些灵活性,有时会很烦人。具体而言,以下有关抢占式多任务处理的事实令游戏开发人员感到困扰。
- Context switch happens at a frequency that is not directly controlled by developers. This is exactly how the OS supports multitasking in the first place. However, this is not cheap as it requires a trip in the kernel. And whenever it is not needed, it can be considered as a waste of resource.
上下文切换发生的频率不受开发人员直接控制。这正是操作系统最初支持多任务的方式。然而,这并不便宜,因为它需要在内核中进行一次旅行。当不需要的时候,就可以被认为是资源的浪费。
In order to understand better where this waste comes from, imagine if we have 10 tasks running in the first 2 ms of a frame on a machine with only 4 physical cores, do we really need to create the illusion that the 10 tasks are all running at the same time? The truth is that we don’t, all we care is that within the time limit of a frame that all the tasks within this frame are all finished in a correct order. However, this is not something the OS knows, having to preserve this behavior is the root cause of the waste.
为了更好地理解这种浪费从何而来,想象一下,如果我们在一台只有 4 个物理核心的机器上,在一帧的前 2 毫秒内运行 10 个任务,我们是否真的需要创建 10 个任务都在运行的假象同时?事实上我们并不关心,我们关心的是在一帧的时间限制内,该帧内的所有任务都按正确的顺序完成。然而,这不是操作系统知道的事情,必须保留这种行为是浪费的根本原因。 - Thread scheduler is highly operating system dependent. Whenever an active thread is about to be put on hold, it is the OS who decides which next thread gets the chance to take over the physical core for the next time window. Even though most OS interfaces offer some level of control, like thread priority, the scheduling algorithm is transparent to programmers. And this can be problematic from time to time.
线程调度程序高度依赖于操作系统。每当一个活动线程即将被搁置时,操作系统就会决定下一个线程有机会在下一个时间窗口接管物理核心。尽管大多数操作系统接口提供某种程度的控制(例如线程优先级),但调度算法对程序员来说是透明的。这有时会出现问题。
Again, the scheduler has no prior knowledge about the game engine. It will have to treat the system as no different than a generic system. So the next thread to be ran may not match developers’ expectation sometimes.
同样,调度程序没有关于游戏引擎的先验知识。它必须将该系统视为与通用系统没有什么不同。因此,下一个要运行的线程有时可能与开发人员的预期不符。
To some degree, we can think of the preemptive multithreading as virtual threads fighting for physical resources. No thread is in full control in this game since the scheduler can preemptively pause a thread any time. And this clearly comes at some cost and uncertainty.
在某种程度上,我们可以将抢占式多线程视为虚拟线程争夺物理资源。在这个游戏中没有线程可以完全控制,因为调度程序可以随时抢先暂停线程。这显然是有一定成本和不确定性的。
If these are within tolerance, what further pushed some game studios to move towards a more efficient system design is a problematic case that a task needs to wait for some inputs that is not yet produced by other task.
如果这些在容忍范围内,那么进一步推动一些游戏工作室转向更高效的系统设计的是一个有问题的情况,即任务需要等待其他任务尚未产生的一些输入。
-
An impractical solution would be to schedule more threads than the number of physical cores and yield the thread’s control if it waits for something so that OS can schedule other thread on it. This may sound fine. Unfortunately, it has flaws.
一个不切实际的解决方案是调度比物理核心数量更多的线程,并在线程等待某些事情时放弃线程的控制权,以便操作系统可以在其上调度其他线程。这听起来可能不错。不幸的是,它有缺陷。-
First of all, the OS has no idea when the inputs are ready, it will keep trying to put this thread back on the physical core to make attempts to resume it from time to time. This is clearly very inefficient since until the input is ready, all prior attempts are useless effort that only waste hardware resources.
首先,操作系统不知道输入何时准备好,它会不断尝试将该线程放回到物理核心上,以不时尝试恢复它。这显然是非常低效的,因为在输入准备好之前,所有先前的尝试都是无用的努力,只会浪费硬件资源。 -
If this doesn’t sound scary enough, an even worse situation is that the system could end up in a dead lock state if all threads in the thread pool are waiting for something that are not ready, which will eventually hang the game since pending tasks can’t find a thread to run it on and all threads are yielding due to the lack of inputs. To solve the problem
如果这听起来还不够可怕,更糟糕的情况是,如果线程池中的所有线程都在等待未准备好的东西,系统最终可能会处于死锁状态,这最终会因挂起任务而挂起游戏找不到运行它的线程,并且由于缺少输入,所有线程都在屈服。解决问题- One option is to create new thread in such a case to make sure pending tasks can always find a thread to run on. Put aside the fact that creating a thread is not cost free, this would not only increase the complexity of the system, but also introduce more threads as well, meaning potentially more preemption happening in the future.
在这种情况下,一种选择是创建新线程,以确保挂起的任务始终可以找到要运行的线程。撇开创建线程并不是没有成本的事实不谈,这不仅会增加系统的复杂性,而且还会引入更多的线程,这意味着将来可能会发生更多的抢占。 - A different approach is the job nesting system, which, rather than putting the current job on hold when waiting for something to be ready, grabs another job and execute the new job on top of the existing call stack. A big problem of this solution is that the tasks’ call stack will possibly stack on top of each other and there is no way that the job on bottom of the stack to finish before what is on the top to finish first.
另一种方法是作业嵌套系统,它不是在等待某些内容准备就绪时搁置当前作业,而是获取另一个作业并在现有调用堆栈之上执行新作业。该解决方案的一个大问题是任务的调用堆栈可能会堆叠在彼此的顶部,并且堆栈底部的作业不可能先于顶部的作业完成。
There are other ways to tackle the problem. However, the ideal solution is to yield when a task needs to without paying significant cost. Unfortunately, with preemptive multitasking, this can’t be easily achieved.
还有其他方法可以解决这个问题。然而,理想的解决方案是在任务需要时做出让步,而不需要付出大量成本。不幸的是,对于抢占式多任务处理来说,这并不容易实现。 - One option is to create new thread in such a case to make sure pending tasks can always find a thread to run on. Put aside the fact that creating a thread is not cost free, this would not only increase the complexity of the system, but also introduce more threads as well, meaning potentially more preemption happening in the future.
-
-
An alternative solution would be to split the task into two at the boundary of the wait. Even though this sounds like a more practical solution, this kind of solution is more like a last resort that is very unlikely scalable as certain cases show up more frequently, which will force us to create more tasks.
另一种解决方案是在等待边界将任务分成两部分。尽管这听起来像是一个更实用的解决方案,但这种解决方案更像是最后的手段,不太可能扩展,因为某些情况会更频繁地出现,这将迫使我们创建更多任务。
If there is anything to blame, it is that preemptive multitasking doesn’t allow tasks to yield themselves during execution.
如果有什么可指责的,那就是抢占式多任务处理不允许任务在执行过程中自行产生。
Cooperative Multitasking
协作多任务处理
Cooperative multitasking is different in a way that it allows programmer to take over the scheduling, rather than handling over to the OS. As its name implies, it allows different tasks to cooperatively work with each other. This would mean that they only give control when they yield and other tasks will choose to trust this running task that it will give control to them at a reasonable point. With this trust established, there is no need to preemptively interupt a running task without its permission like the OS does with preemptive multitasking. Rather than tasks fighting for hardware resources, the cooperative multitasking is more like tasks are happily working together like a family.
协作多任务处理的不同之处在于它允许程序员接管调度,而不是交给操作系统处理。顾名思义,它允许不同的任务相互协作。这意味着它们仅在产出时才给予控制权,而其他任务将选择信任此正在运行的任务,它将在合理的时间点给予它们控制权。建立这种信任后,无需像操作系统抢占式多任务处理那样在未经其许可的情况下抢先中断正在运行的任务。与任务争夺硬件资源不同,协作式多任务更像是任务像一个家庭一样愉快地一起工作。
With this design, each task will carry more responsibility as if they don’t give control to others, others will not have any control at all. The need to yield control to other tasks requires the subroutine to yield when they want to. Such a subroutine is commonly viewed as a more generalized version of regular subroutine, it is called corountine. It is the most commonly known solution that allows us to program a thread so that it works cooperatively.
通过这种设计,每个任务都会承担更多的责任,就好像他们不把控制权交给别人一样,其他人根本没有任何控制权。需要让出对其他任务的控制权需要子例程在它们想要的时候让出。这种子程序通常被视为常规子程序的更通用版本,称为协程。这是最常见的解决方案,它允许我们对线程进行编程,使其能够协作工作。
Of course, even a program is fully done through cooperative multitasking, it doesn’t mean that no preemption will happen since the OS will need to schedule other back ground applications, such as email, to run on the shared physical cores from time to time. But minimizing the context switch within our own application already offers a lot of value on the table.
当然,即使一个程序完全通过协作多任务处理完成,也不意味着不会发生抢占,因为操作系统有时需要调度其他后台应用程序(例如电子邮件)在共享物理内核上运行。但是,最大限度地减少我们自己的应用程序中的上下文切换已经提供了很多价值。
Before we move forward, for those who are not familiar with the term of subroutine and coroutine. A quick explanation is as below
在我们继续之前,对于那些不熟悉子程序和协程术语的人来说。快速解释如下
- Subroutine is a thing that can be invoked by the caller and it can return back the control back to the caller, which called it. I believe all programmers would quickly realize that the concept of function is a realization of subroutine.
子程序是一个可以由调用者调用的东西,它可以将控制权返回给调用它的调用者。我相信所有程序员都会很快意识到函数的概念就是子程序的实现。 - Coroutine has all the properties a subroutine has. Besides, it can suspend itself and return the control to the caller. And it can also resume at a later point and pick everything up at the suspended point even on another totally different thread.
协程具有子程序所具有的所有属性。此外,它还可以挂起自身并将控制权返回给调用者。它也可以在稍后恢复,并在挂起点拾取所有内容,甚至在另一个完全不同的线程上也是如此。
In order to keep the post short, it is assumed that readers would have some basic coroutine knowledge. For readers who are not very familiar with coroutine in C++, here is an awesome talk in Cpp con.
为了保持文章简短,假设读者有一些基本的协程知识。对于不太熟悉 C++ 协程的读者,这里有 Cpp con 中的精彩演讲。
Basics about Fibers 纤程基础知识
Apart from Coroutine, Fiber is an interesting addition as a solution to cooperative multi-tasking. Fiber is quite a lightweight thread of execution. Like coroutine, fiber allows yielding at any point inside it. To some degree, we can regard fiber as a form of stackful coroutine, which is not available in C++ programming language. By not available, I mean there is no native language support for that. There are certainly libraries like boost that support this kind of coroutine or even fiber.
除了 Coroutine 之外,纤程 也是一个有趣的补充,可以作为协作多任务处理的解决方案。 纤程 是一个相当轻量级的执行线程。与协程一样,纤程允许在其内部的任何点让出(yeild)。在某种程度上,我们可以将 纤程 视为 Stackful Coroutine 的一种形式,这是 C++ 编程语言所不具备的。我所说的“不可用”是指没有本地语言支持。当然有像 boost 这样的库支持这种协程甚至纤程。
Don’t be intimidated by its fancy name, fiber really is just a method that allows programmers to jump between different stack memory without regular return command. Since it offers the ability for us to jump between different call stacks, we can allocate our own stack memory and use it as our fiber stack.
不要被它花哨的名字吓到,纤程实际上只是一种允许程序员在不同堆栈内存之间跳转而无需常规返回命令的方法。由于它为我们提供了在不同调用堆栈之间跳转的能力,因此我们可以分配自己的堆栈内存并将其用作纤程堆栈。
Below is a diagram that demonstrates how fibers fit in a program.
下图展示了纤程如何融入程序。
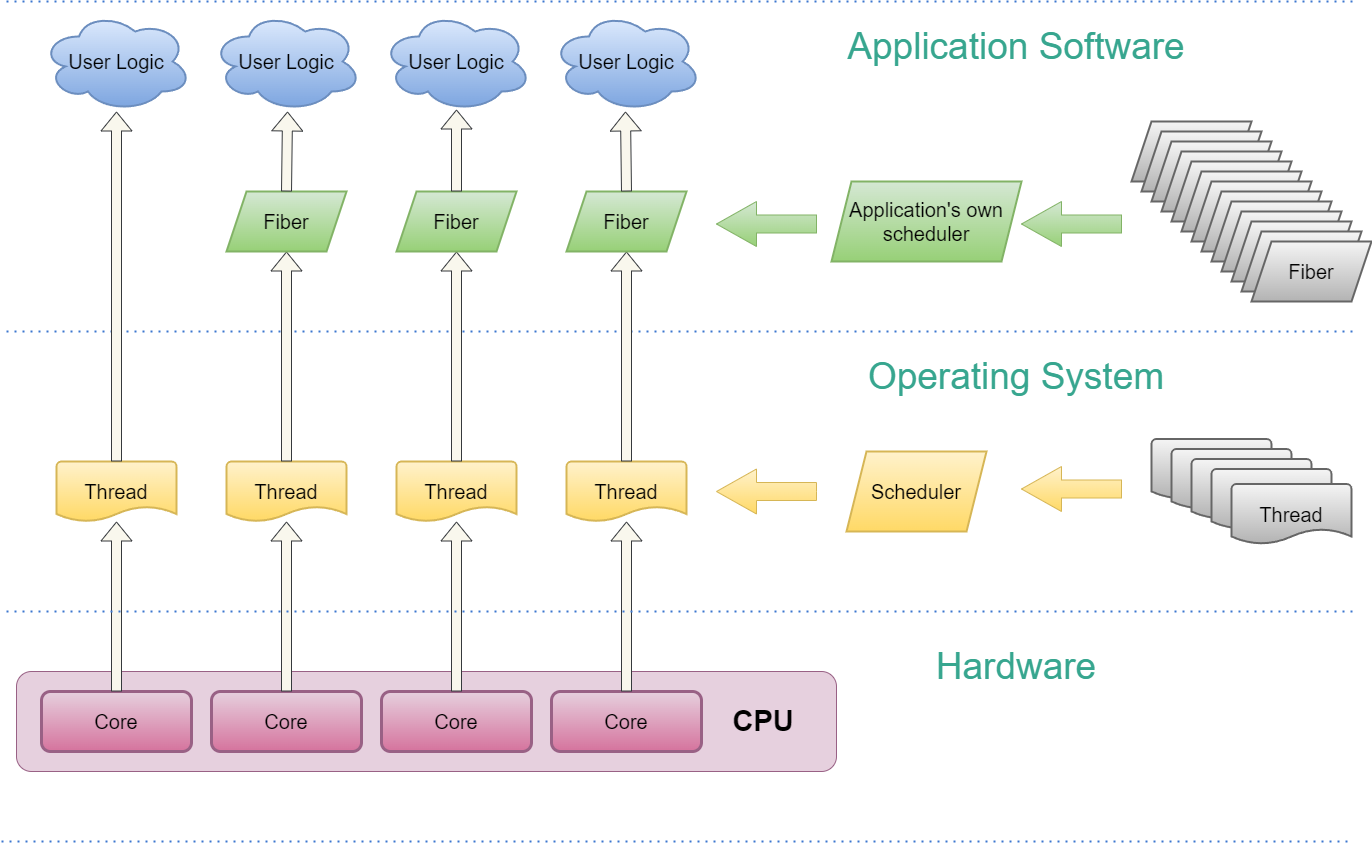
We can see a few things from this diagram
从这张图中我们可以看出一些事情
- User logic code can be ran on either a regular thread or a fiber, which itself runs on a thread.
用户逻辑代码可以在常规线程或纤程上运行,纤程本身在线程上运行。 - Unlike thread, fiber’s scheduler is application specific, meaning software developer needs to carry over the responsibility to schedule fibers. OS will no longer help with this.
与线程不同,纤程的调度程序是特定于应用程序的,这意味着软件开发人员需要承担调度纤程的责任。操作系统将不再提供帮助。 - As hinted in the diagram, user can commonly create a lot more fibers than threads as things like stack memory allocation are a lot more controllable by developers.
如图所示,用户通常可以创建比线程更多的纤程,因为开发人员更容易控制堆栈内存分配之类的事情。 - Though not shown in the diagram, a system with fiber commonly use thread affinity to fix threads on dedicated cores for better performance and the number of back ground threads doesn’t need to be high. Commonly only a few low priority threads are needed for blocking operations like IO.
尽管图中未显示,但具有纤程的系统通常使用线程亲和性将线程固定在专用内核上,以获得更好的性能,并且后台线程的数量不需要很高。通常只需要几个低优先级线程来执行 IO 等阻塞操作。
There is a lot more to explore. We will mention them in following chapters with more details.
还有很多值得探索的地方。我们将在接下来的章节中更详细地提到它们。
Difference between Fiber and Thread
纤程和线程的区别
Compared with fiber, thread is a lot well known concept. With the assumption that all readers already have a solid understanding of threads, below are some very obvious difference between a thread and a fiber.
与纤程相比,线程是一个众所周知的概念。假设所有读者都已经对线程有了深入的了解,下面是线程和纤程之间的一些非常明显的区别。
- A thread can be scheduled by the operating system and runs on a physical core of the CPU. While a fiber can only be ran on a thread. We can think of fiber as a more high level concept as it sits on top of a thread.
线程可以由操作系统调度并在CPU的物理核心上运行。而纤程只能在线程上运行。我们可以将纤程视为一个更高层次的概念,因为它位于线程之上。 - Even though, both of them could support multi-tasking. Threads support multi-tasking through the OS’s preemptive style scheduling. Fiber supports multi-tasking by asking the programmer to take the responsibility to schedule them in a well-behaved manner.
尽管如此,它们都可以支持多任务处理。线程通过操作系统的抢占式调度支持多任务处理。 Fiber 通过要求程序员负责以良好的方式安排任务来支持多任务处理。 - Thread switching is a lot more complicated than a fiber switch. Thread switch requires the program to take a trip in the kernel mode and can be a lot more expensive. A fiber switch is nothing but swapping the registers with previously stored fiber context.
线程切换比纤程切换复杂得多。线程切换需要程序在内核模式中走一趟,并且成本可能会高很多。纤程切换只不过是用先前存储的纤程上下文切换寄存器。 - The memory for call stacks for a thread is controlled by the OS, while the memory for a fiber stack can be explicitly controlled by programmers. This offers great flexibility as programmer commonly have knowledge of the system they are building so that they can simplify things with those assupmtions.
线程调用堆栈的内存由操作系统控制,而纤程堆栈的内存可以由程序员显式控制。这提供了极大的灵活性,因为程序员通常了解他们正在构建的系统,以便他们可以利用这些假设来简化事情。 - Thread local storage is safe for threads, but they may not be 100% safe with fibers as some system chooses to schedule fibers on different thread between executions of a same fiber.
线程本地存储对于线程来说是安全的,但对于纤程来说可能不是 100% 安全,因为某些系统选择在同一纤程的执行之间在不同线程上调度纤程。 - Native operating system offerred synchronization primitives, like mutex, will not work on fibers if fibers can resume on other threads than the one they were suspended on. We have to extremely careful when using sychronization primitives within a fiber.
本机操作系统提供的同步原语(如互斥锁)将无法在纤程上工作,如果纤程可以在其他线程(而不是它们挂起的线程)上恢复。在纤程内使用同步原语时,我们必须非常小心。
Difference between Fiber and C++ Coroutine
Fiber 和 C++ 协程之间的区别
It is a lot easiser to compare thread and fiber than comparing fiber and coroutine. Please be mindful that the coroutine concept that we are talking about here is merely the C++ langauge supported coroutine. We are not comparing fiber with any custom implementation of coroutine.
比较线程和纤程比 比较纤程和协程要容易得多。请注意,我们这里讨论的协程概念仅仅是 C++ 语言支持的协程。我们不会将 纤程与协程的任何自定义实现进行比较。
- C++ coroutine is a language concept. As a matter of fact, C++ only started to support language wise coroutine from C++ 20. While fiber is an OS level concept, commonly provided by OS library interface. Fiber can totally be implemented by progarmmers themselves with assembly languages. Later we will see how this can be achieved.
C++协程是一个语言概念。事实上,C++ 从 C++ 20 才开始支持语言智能协程。而 纤程是操作系统级别的概念,通常由操作系统库接口提供。 纤程完全可以由程序员自己用汇编语言来实现。稍后我们将看到如何实现这一点。 - Coroutine functions are generally a bit more complicated to implement. There are a few concept for configurations, like coroutine handle, promise. Programmer will have to either implement their own type or use the types offered by a third party library to implement a coroutine function. While there is really no such a concept as a fiber function, a regular function can take advantage to yield within it without any special treatment.
协程函数的实现通常要复杂一些。配置有一些概念,比如协程句柄、promise。程序员必须实现自己的类型或使用第三方库提供的类型来实现协程函数。虽然确实不存在纤程函数这样的概念,但常规函数可以利用其中的yield点而无需任何特殊处理。 - C++ coroutine will siliently added more configuration code to implement coroutine. Such hidden code is not only compiler dependent and can vary on different platforms as well. Programmers will have little control on how these code are generated. On the other hand, since fiber is not a language level concept, the compiler will do nothing special about it. There is good and bad about the difference here
C++协程会默默地添加更多的配置代码来实现协程。这种隐藏代码不仅依赖于编译器,而且在不同平台上也可能有所不同。程序员几乎无法控制这些代码的生成方式。另一方面,由于 纤程 不是语言级别的概念,因此编译器不会对其执行任何特殊操作。这里的差异有好有坏- One advantages of coroutine is that all variables will get proper destruction when coroutine is ended. It can be ended either by quiting the coroutine function at the co_return command. The other way to end a coroutine’s lifetime is to end the life time of the coroutine handle even if the coroutine is not finished executing yet. Of course, only variables that are actually touched within the execution progress will get destructed. Variables not even touched in coroutines will not be destructed as they never get constructed in the first place.
协程的优点之一是,当协程结束时,所有变量都会得到适当的销毁。它可以通过使用 co_return 命令退出协程函数来结束。结束协程生命周期的另一种方法是结束协程句柄的生命周期,即使协程尚未执行完毕。当然,只有在执行过程中实际触及的变量才会被破坏。协程中甚至没有触及的变量也不会被破坏,因为它们从一开始就不会被构造。
Unfortunately, fiber can’t do so. There is no easy way to track all the local variables in fibers and properly destruct all of them if the fiber gets suspended and got killed. It is programmer’s responsibility to make sure that all the local variables that needs destruction to be destructed at a proper time before killing a fiber.
不幸的是,纤程不能做到这一点。没有简单的方法可以跟踪纤程中的所有局部变量,并在纤程被挂起并被杀死时正确地销毁所有这些变量。程序员有责任确保在杀死纤程之前在适当的时间销毁所有需要销毁的局部变量。
An interesting example is smart pointers. Smart pointers in C++ is done by bundling all heap allocating to a stack allocation. As when the program ends, all stacks are gone, it can be sure that all the heap memory allocation that is bound to smart pointers will be freed as well. However, such a mechanism will fail to protect your heap allocatin memory leak in the context of fiber. We will mention that once we talk about the implementations of fiber later to avoid confusing readers here.
一个有趣的例子是智能指针。 C++ 中的智能指针是通过将所有堆分配捆绑到堆栈分配来完成的。由于当程序结束时,所有堆栈都消失了,因此可以确定绑定到智能指针的所有堆内存分配也将被释放。然而,这样的机制将无法保护纤程上下文中的堆分配内存泄漏。当我们稍后讨论 Fiber 的实现时,我们会提到这一点,以避免读者感到困惑。 - Since C++ coroutine is a language level concept, compilers are in good position to optimize as much as possible. One example is that compiler can choose to inline coroutine function sometimes, even making them disappaar in the thin air[3] . Such an optimization is clearly not possible with fiber. Later we will see, we will have to do something to prevent the compiler to optimize the code so that fiber logic can behave as expected.
由于 C++ 协程是一个语言级别的概念,因此编译器可以尽可能地进行优化。一个例子是,编译器有时可以选择内联协程函数,甚至让它们凭空消失 [3] 。对于纤程来说,这样的优化显然是不可能的。稍后我们会看到,我们必须采取一些措施来阻止编译器优化代码,以便纤程逻辑可以按预期运行。
- One advantages of coroutine is that all variables will get proper destruction when coroutine is ended. It can be ended either by quiting the coroutine function at the co_return command. The other way to end a coroutine’s lifetime is to end the life time of the coroutine handle even if the coroutine is not finished executing yet. Of course, only variables that are actually touched within the execution progress will get destructed. Variables not even touched in coroutines will not be destructed as they never get constructed in the first place.
- Coroutine’s memory management is a bit more transparent than fiber. The size of the memory allocation is highly dependent on the compiler. For fiber, programmers are required to allocate a piece of memory as stack. It is up to programmers to decide how many bytes they need for the fiber execution. Of course, programmers need to make sure what is ran on the fiber will not cause stack overflow by allocating enough memory for the fiber stack. 协程的内存管理比 纤程 更透明一些。内存分配的大小高度依赖于编译器。对于 纤程,程序员需要分配一块内存作为堆栈。由程序员决定纤程执行需要多少字节。当然,程序员需要通过为纤程堆栈分配足够的内存来确保纤程上运行的内容不会导致堆栈溢出。
- Coroutine can return a value, while fiber doesn’t allow programmer to do so in a traditional return value way.
协程可以返回一个值,而 纤程不允许程序员以传统的返回值方式这样做。 - We can finish a coroutine function by running the code through the end. While we can’t proceed to the end of a fiber entry function as there is no proper return address for fiber entry function.
我们可以通过运行代码到最后来完成一个协程函数。虽然我们无法继续到纤程入口函数的末尾,因为纤程入口函数没有正确的返回地址。 - C++ coroutine is asymmetric coroutine, which allows the coroutine to return the control to the caller, only the caller. There is no way for a coroutine function to yield its control to other coroutine that was suspended before. While there is a concept named symmetric coroutine that allows one coroutine to yield its control to another coroutine. Fiber is symmetric by default. It actually never returns to the caller code, it only yields to another fiber.
C++协程是非对称协程,它允许协程将控制权返回给调用者,仅返回给调用者。协程函数无法将其控制权交给之前挂起的其他协程。虽然有一个称为对称协程的概念,它允许一个协程将其控制权交给另一个协程。纤程默认是对称的。它实际上永远不会返回到调用者代码,它只会yield于另一个纤程。 - C++ coroutine is stackless, meaning that it is only allowed to yield within the coroutine function itself. If your coroutine function calls another regular function, it is disallowed to yield the control back to the caller that calls the coroutine function. Fiber does allow yielding the control at any depth in the call stack.
C++ 协程是无堆栈的,这意味着它只允许在协程函数本身内产生。如果您的协程函数调用另一个常规函数,则不允许将控制权交还给调用协程函数的调用者。 纤程确实允许在调用堆栈中的任何深度产生控制权。
Above are some of the major differences between a fiber and C++ language level coroutine. Among all these differences, the last two are almost deal breakers for flexible job system implementation. Of course, there are certainly examples of using coroutine to implement a job system [4] [5] , it is techinically possible. But the flexibility offered by fiber is a lot more powerful than what coroutine offers on the table. Naughty Dog’s game engine’s job system is a successful example of using fibers to parallelize game engine [6] .
以上是 纤程和 C++ 语言级协程之间的一些主要区别。在所有这些差异中,最后两个几乎是弹性工作系统实施的障碍。当然,肯定有使用协程实现作业系统 [4] [5] 的例子,技术上是可行的。但 纤程提供的灵活性比协程提供的灵活性要强大得多。顽皮狗的游戏引擎作业系统是利用纤程并行化游戏引擎 [6] 的成功范例。
Fiber Implementation 纤程实现
Understanding the details in fiber implementation can be rewarding. Even though fiber offers great flexibility on the table, the implementation of fiber is nothing but a few hundred lines of code.
了解纤程实现的细节是有益的。尽管 纤程在桌面上提供了很大的灵活性,但 纤程的实现只不过是几百行代码。
In this section, we will go through a detailed fiber implementation on x64 architecture, a similar version working on arm64 architecture is also provided in the form of source code.
在本节中,我们将详细介绍 x64 架构上的 纤程实现,也以源代码的形式提供了在 arm64 架构上工作的类似版本。
Unlike a high level feature implementation, fiber’s implementation is a bit unnormal and hacky. It requires programmers to have solid understanding of how CPU handles the call stacks during program execution. So before we move forward with a detailed fiber implementation, we will need to take a look at some basics of how CPUs handles call stack on x64 and arm64 respectively.
与高级功能实现不同,纤程的实现有点不正常和黑客。它要求程序员对CPU在程序执行过程中如何处理调用堆栈有深入的了解。因此,在进行详细的 纤程实现之前,我们需要先了解一下 CPU 如何分别在 x64 和 arm64 上处理调用堆栈的一些基础知识。
The implementation detail of fiber in assembly languages on Arm64 architecture is quite similar to what needs to be done on x64. The biggest difference is the registers set is different from each other. So we will not repeat a similar process. Readers who are interested in its implementation can take a look at my implementation with the above link.
纤程在 Arm64 架构上用汇编语言实现的细节与在 x64 上需要完成的非常相似。最大的区别是寄存器组不同。所以我们不会重复类似的过程。对它的实现感兴趣的读者可以通过上面的链接看一下我的实现。
Fiber implementation highly depends on ABI (Application Binary Interface). In this blog post, the fiber implementation on x64 is built upon System V ABI. Different ABI requires a different fiber implementation.
纤程的实现高度依赖于 ABI(应用程序二进制接口)。在这篇博文中,x64 上的 纤程 实现是基于 System V ABI 构建的。不同的 ABI 需要不同的纤程实现。
Target Platform Architecture
目标平台架构
Rather than going through everything, which is clearly not possible, I will only briefly mention what is related to fibers. And we will only spend our time on a 64 bit program. Though, it should work in a similar way in 32 bit programs.
我不会详细介绍所有内容(这显然是不可能的),而是仅简要提及与纤程相关的内容。而且我们只会把时间花在 64 位程序上。不过,它在 32 位程序中应该以类似的方式工作。
In the following two sections, we will be uncover the mystery of how CPU handles call stacks under the hood. Here is the high level program that we will look at. I intensionally keep the program extremely simple and meaningless so that we can focus on the call stack rather than being distracted by something else.
在接下来的两节中,我们将揭开 CPU 如何在幕后处理调用堆栈的奥秘。这是我们将要看到的高级程序。我故意让程序变得极其简单和无意义,以便我们可以专注于调用堆栈,而不是被其他事情分散注意力。
1int Interface(int g) {
2    int k = g * g;
3    return k * k;
4}
5
6int main(int argc, char** argv) {
7    int a = Interface(argc);
8    return a;
9}
x64 Architecture x64架构
There are in total 16 64-bit general purpose registers in modern x64 CPU architecture. They are RAX, RBX, RCX, RDX, RSI, RDI, RBP, RSP, R8 to R16 respectively. Apart from the general purpose registers, there is also a special register named RIP, the instruction pointer, which tells the CPU what to execute next.
现代 x64 CPU 架构中共有 16 个 64 位通用寄存器。它们是 RAX 、 RBX 、 RCX 、 RDX 、 RSI 、 RDI 、分别为 RBP 、 RSP 、 R8 到 R16 。除了通用寄存器外,还有一个名为 RIP 的特殊寄存器,即指令指针,它告诉 CPU 接下来要执行什么。
Besides these registers, there are certainly more. For example, all x86-64 compatible processors support SSE2 and include 16 128-bit SIMD registers, XMM0 to XMM15. It is fairly common to see AVX SIMD as well, this is achieved through another 16 256-bit registers, namely YMM0 to YMM15. Further more, there is AVX-512, which is an extension that allows the CPU to process 16 32-bit number operations at a same time. CPUs that support this have another 16 registers (ZMM0-ZMM15), each of which is 256-bit long.
除了这些寄存器之外,当然还有更多。例如,所有 x86-64 兼容处理器都支持 SSE2 并包括 16 128 位 SIMD 寄存器, XMM0 到 XMM15 。 AVX SIMD 也很常见,这是通过另外 16 256 位寄存器实现的,即 YMM0 到 YMM15 。更进一步,还有AVX-512,它是一个扩展,可以让CPU同时处理16个32位数字运算。支持此功能的 CPU 还有另外 16 个寄存器 ( ZMM0 - ZMM15 ),每个寄存器都是 256 位长。
It is very common that we store something in a register and fetch the value from this register later. However, it is not uncommon that we need to change the value of the register in-between the two instructions, especially if there are function calls inbetween. In order to make sure by the time the register is read, the value is not overwritten, the value has to be stored somewhere (commonly on the stack) before it is changed in between. There are a few registers that are callee-saved, which means that the callee needs to save the register before touching the registers and restore the value of the registers before leaving the function so that the caller does not even know the value of the register is changed. These registers are RBX, RBP, R12 to R15. All other regiters are caller saved, which means the opposite, the callee can change the values of the registers anytime they want by assuming that the caller will make sure the values of the registers will surive the callee’s instructions.
我们通常会在寄存器中存储一些内容,然后从该寄存器中获取值。然而,我们需要在两条指令之间更改寄存器的值的情况并不少见,特别是在中间有函数调用的情况下。为了确保在读取寄存器时,该值不会被覆盖,该值必须在其间更改之前存储在某处(通常在堆栈上)。有一些寄存器是被调用者保存的,这意味着被调用者需要在使用寄存器之前保存寄存器,并在离开函数之前恢复寄存器的值,以便调用者甚至不知道寄存器的值是改变了。这些寄存器是 RBX 、 RBP 、 R12 到 R15 。所有其他寄存器都是调用者保存的,这意味着相反,被调用者可以随时更改寄存器的值,前提是调用者将确保寄存器的值能够满足被调用者的指令。
Next, let’s take a look at the aseembly code produced by g++ compiler below. Please be noted that in order to understand how CPU works with its registers to support stack properly, I will have to disable compiler optimization as otherwise the compiler may choose to optimize them out by avoiding using the rbp register so that it can be used as another general purpose register. Sometimes it even inline the whole function without a jump at all. Here is the assembly code generated by g++ 7.5.0 on Ubuntu,
接下来我们看一下下面g++编译器生成的汇编代码。请注意,为了了解 CPU 如何与其寄存器一起工作以正确支持堆栈,我必须禁用编译器优化,否则编译器可能会选择通过避免使用 rbp 寄存器来优化它们,以便它可以用作另一个寄存器通用寄存器。有时它甚至内联整个函数而根本没有跳转。这是 g++ 7.5.0 在 Ubuntu 上生成的汇编代码,
 10x400667 <Interface(int)>                 push   %rbp
 20x400668 <Interface(int)+1>               mov    %rsp,%rbp
 30x40066b <Interface(int)+4>               mov    %edi,-0x14(%rbp)
 40x40066e <Interface(int)+7>               mov    -0x14(%rbp),%eax
 50x400671 <Interface(int)+10>              imul   -0x14(%rbp),%eax
 60x400675 <Interface(int)+14>              mov    %eax,-0x4(%rbp)
 70x400678 <Interface(int)+17>              mov    -0x4(%rbp),%eax
 80x40067b <Interface(int)+20>              imul   -0x4(%rbp),%eax
 90x40067f <Interface(int)+24>              pop    %rbp
100x400680 <Interface(int)+25>              retq
110x400681 <main(int, char**)>              push   %rbp
120x400682 <main(int, char**)+1>            mov    %rsp,%rbp
130x400685 <main(int, char**)+4>            sub    $0x20,%rsp
140x400689 <main(int, char**)+8>            mov    %edi,-0x14(%rbp)
150x40068c <main(int, char**)+11>           mov    %rsi,-0x20(%rbp)
160x400690 <main(int, char**)+15>           mov    -0x14(%rbp),%eax
170x400693 <main(int, char**)+18>           mov    %eax,%edi
180x400695 <main(int, char**)+20>           callq  0x400667 <Interface(int)>
190x40069a <main(int, char**)+25>           mov    %eax,-0x4(%rbp)
200x40069d <main(int, char**)+28>           mov    -0x4(%rbp),%eax
210x4006a0 <main(int, char**)+31>           leaveq
220x4006a1 <main(int, char**)+32>           retq
What is shown above is the assembly language code for the two functions in the above C++ program. Please be mindful that the same program may produce very different assembly instructions with different compilers, but the general structure of the program should be similar to each other. Rather than going through every single instructions, we will only focus on those that are relevant to our topic. Below is what happens when this program is executed in order with some instructions skipped as they are not relevant.
上面显示的是上述 C++ 程序中两个函数的汇编语言代码。请注意,同一个程序可能会使用不同的编译器产生非常不同的汇编指令,但程序的总体结构应该彼此相似。我们不会仔细阅读每一条指令,而是只关注与我们的主题相关的指令。以下是当该程序按顺序执行并跳过一些不相关的指令时会发生的情况。
- At the very beginning, the
RIP’s value is 0x400681, which means that the next instruction is thepush %rbpthat is located at the begining of main function.
一开始,RIP的值为0x400681,这意味着下一条指令是位于main函数开头的push %rbp。 - Starting from 0x400681, the first thing CPU does is to store the
RBPregister on the stack memory. This push operation will also decrease the value ofRSPby 8.RSPis the stack pointer that points to the current top address of the stack. Please be noted that on x86/x64 architecture, the address of the stack goes downward whenever it grows. In this case, sinceRBPis a 64-bit registers, the stack pointer (RSP) needs to decrease by 8 to avoid the storedRBPbeing overwritten by anything else. Of course, after this instruction is executed, theRIPwill be bumped as well so that CPU knows what to execute next.
从0x400681开始,CPU做的第一件事就是将RBP寄存器存储到堆栈内存中。这个入栈操作也会将RSP的值减8。RSP是指向当前栈顶地址的栈指针。请注意,在 x86/x64 架构上,堆栈地址每当增长时都会向下移动。在这种情况下,由于RBP是 64 位寄存器,因此堆栈指针 (RSP) 需要减 8,以避免存储的RBP被覆盖还要别的吗。当然,这条指令执行后,RIP也会被碰撞,以便CPU知道下一步要执行什么。 - The next thing it does is to set the current stack pointer’s value to the register of
RBP. This will give us some insight of whatRBPis. It is not difficult to see that theRBPregister keeps the value of the bottom of the current function’s stack frame.
它所做的下一步是将当前堆栈指针的值设置为RBP的寄存器。这将使我们对RBP是什么有一些了解。不难看出,RBP寄存器保存的是当前函数栈帧底部的值。 - By skiping some instructions that are not relevant, let’s take a look at the instruction 0x400695. This is the instruction that invokes the
Interfacefunction. What the CPU does here is that it will first push the next instruction’s address, which is 0x40069a, on the stack. Of course, since it is a push, theRSPwill be decreased again to keep the pushed value safe. This is what is commonly known as return address. Specifically, it is the next instruction for the CPU to execute after finishing the callee function, which isInterfacein our case.
跳过一些不相关的指令,我们来看看指令0x400695。这是调用Interface函数的指令。 CPU 在这里所做的是,它首先将下一条指令的地址(0x40069a)压入堆栈。当然,既然是push,那么RSP会再次减少,以保证push的值安全。这就是通常所说的返回地址。具体来说,它是 CPU 在完成被调用函数后要执行的下一条指令,在我们的例子中是Interface。
Of course, besides pushing the next instruction’s address on the stack, the CPU needs to execute the first instruction in theInterfacefunction. This is achieve by changing theRIPregister to 0x400667 so that the CPU knows what to execute next.
当然,除了将下一条指令的地址压入堆栈外,CPU还需要执行Interface函数中的第一条指令。这是通过将RIP寄存器更改为 0x400667 来实现的,以便 CPU 知道下一步要执行什么。 - Looking at the first instruction in the function, which is at the address of 0x400667, this immediately reminds us what is done at the beginning of the main function, pushing the
RBP’s value on the stack. At this point, we know what theRBP’s value is, it is the base address of the main’s call stack frame. Because we are currently in theInterfacefunction, we will need to make sure theRBP’s value is the bottom of theInterfacefunction’s stack frame, rather thanmainfucntion’s stack frame. To do so, we simply need to move the value ofRSPtoRBP. However, themainfunction’s stack frame’s bottom information will be lost. We mentioned above thatRBPis a callee saved register, this means that the callee (Interface) is responsible to make sure it appears that theRBPis not changed from the caller’s perspective. To do so, we simply need to push theRBPon the stack before assigning a new value toRBP. And this is exactly what this line is all about.
查看函数中的第一条指令,即地址 0x400667,这立即提醒我们在主函数的开头做了什么,将RBP的值压入堆栈。此时,我们知道RBP的值是什么,它是 main 的调用堆栈帧的基地址。因为我们当前位于Interface函数中,所以我们需要确保RBP的值是Interface函数堆栈帧的底部,而不是main函数的堆栈框架。为此,我们只需将RSP的值移动到RBP。然而,main函数的栈帧底部信息将会丢失。我们上面提到RBP是被调用者保存的寄存器,这意味着被调用者(Interface)有责任确保RBP没有改变从调用者的角度来看。为此,我们只需在为RBP分配新值之前将RBP压入堆栈即可。这正是这条线的意义所在。 - The next instruction 0x400668 is quite similar to the 0x400682 instruction we visited before. Its sole purpose is to make sure
RBPkeeps the value of the bottom of the current function’s stack frame.
下一条指令 0x400668 与我们之前访问过的 0x400682 指令非常相似。它的唯一目的是确保RBP保留当前函数堆栈帧底部的值。 - Instructions between 0x40066b and 0x40067b (inclusive) are simply the implementation of the body of the function. It is actually quite self-explanatory even to someone who is not familiar with assembly languages. One thing to be mindful here is that the
RSPis not changed throughout the instructions.
0x40066b 到 0x40067b(含)之间的指令只是函数体的实现。即使对于不熟悉汇编语言的人来说,它实际上也是不言自明的。这里需要注意的一件事是RSP在整个指令中没有改变。 - Looking at 0x40067f next, what the CPU does is to increase the
RSPby 8 and take the current value pointed by theRSP. This is what we commonly known as poping the stack. Since theRSPstill points to the next address adjacent to the address that has the oldRBP’s value, the bottom of the main’s call stack frame, this instruction will erase what is currently stored inRBPand restore theRBPvalue before leaving the function.
接下来看 0x40067f,CPU 所做的是将RSP加 8 并获取RSP指向的当前值。这就是我们俗称的出栈。由于RSP仍然指向与具有旧RBP值的地址相邻的下一个地址,即主调用堆栈帧的底部,因此该指令将擦除当前的内容存储在RBP中,并在离开函数之前恢复RBP值。 - Right before quiting the function, CPU will execute
retqinstruction. What this does is to increase the value ofRSPby 8, take the value pointed byRSPand assign it toRIP. Careful readers may have already realized that this is exactly 0x40069a since we stored this value in the instruction of 0x400695.
在退出函数之前,CPU会执行retq指令。其作用是将RSP的值增加 8,获取RSP指向的值并将其分配给RIP。细心的读者可能已经意识到,这正是0x40069a,因为我们将这个值存储在0x400695的指令中。
At this point, we have fully visited how a function is called. As we can see, RBP and RSP play a critical role here in preserving the call stack information and make it visible to the CPU. Again, in reality, a lot of the times compilers will try to optimize it so it is quite possible that we won’t see some of these in release build. Please be noted that this optimization of RBP is by no means the same thing as compiler trying to optimize the function by inlining it. It still jumps the RIP to another different code fragment that belongs to the Interface function.
至此,我们已经完整的了解了函数是如何被调用的。正如我们所看到的, RBP 和 RSP 在保存调用堆栈信息并使其对 CPU 可见方面发挥着关键作用。同样,实际上,很多时候编译器会尝试对其进行优化,因此我们很可能在发布版本中看不到其中的一些内容。请注意,这种对 RBP 的优化与编译器尝试通过内联来优化函数完全不同。它仍然将 RIP 跳转到属于 Interface 函数的另一个不同的代码片段。
10x4004d0 <Interface(int)>             mov    %edi,%eax
20x4004d2 <Interface(int)+2>           imul   %edi,%eax
30x4004d5 <Interface(int)+5>           imul   %eax,%eax
40x4004d8 <Interface(int)+8>           retq
5
60x4003e0 <main(int, char**)>          jmpq   0x4004d0 <Interface(int)>
Above is the assembly code produced with (level 3) optimization by the same compiler. In order to prevent the compiler from inlining this function, I moved the Interface function to a separate compilation unit. As we can see from it, it does incur a jump instruction in the main function rather than expanding what is inside Interface in main.
上面是由同一编译器通过(第 3 级)优化生成的汇编代码。为了防止编译器内联这个函数,我将 Interface 函数移到了一个单独的编译单元。从它可以看出,它确实在 main 函数中产生了跳转指令,而不是扩展 main 中 Interface 内部的内容。
There is an option -flto for the compiler to perform link time optimization, which allows the compiler to optimize across different compilation units. Similar option is available in all major C++ compilers. With this option, the following assembly code will be produced.
有一个选项 -flto 供编译器执行链接时优化,它允许编译器跨不同的编译单元进行优化。所有主要 C++ 编译器都提供类似的选项。使用此选项,将生成以下汇编代码。
10x4003e0 <main(int, char**)>          mov    %edi,%eax
20x4003e2 <main(int, char**)+2>        imul   %edi,%eax
30x4003e5 <main(int, char**)+5>        imul   %eax,%eax
40x4003e8 <main(int, char**)+8>        retq
As we can see from the above code, the jump instruction is fully removed, meaning the function is already inlined with this optimization. Later we will see that we will need to prevent this from happening in the context of fiber switch.
从上面的代码中我们可以看到,跳转指令被完全删除,这意味着该函数已经内联了这种优化。稍后我们将看到,我们需要在纤程交换机的背景下防止这种情况发生。
Arm64 Architecture Arm64架构
Besides x64 architecture, I would also like to briefly mention about the Arm64 architecture in this post due to the growing popularity of the platform, especially after Apple’s new Mac lineup with Apple Silicon. The purpose of the introduction of fiber in this post is mainly targeting on game development. It would be a blocker for commercial adoption of the tech if there is no solution on Arm64 since most mobile devices, along with Apple Silicon Macs, run on this platform.
除了 x64 架构之外,我还想在这篇文章中简要提及 Arm64 架构,因为该平台越来越受欢迎,特别是在 Apple 推出采用 Apple Silicon 的新 Mac 系列之后。本篇文章介绍Fiber的目的主要是针对游戏开发。如果 Arm64 上没有解决方案,这将阻碍该技术的商业采用,因为大多数移动设备以及 Apple Silicon Mac 都在该平台上运行。
Below is a quick summary of registers available on Arm64 CPUs.
以下是 Arm64 CPU 上可用寄存器的快速摘要。
- X0-X29: These 30 registers are mostly for general purpose usage. Programmers can use most of them for anything they want. Though common practice will assume some specific usage of a few registers, like
X29is commonly used as frame pointer, something similar toRBPon x64 arthitecture.
X0-X29:这30个寄存器主要用于通用用途。程序员可以将其中的大部分用于他们想要的任何用途。尽管通常的做法会假设一些寄存器的某些特定用法,例如X29通常用作帧指针,类似于 x64 架构上的RBP。 - X30, LR: Different from x64, there is a dedicated register for keeping track the return address when a function is invoked. And this register is
X30, sometimes also referred asLR.
X30、LR:与 x64 不同,有一个专用寄存器用于在调用函数时跟踪返回地址。这个寄存器是X30,有时也称为LR。 - SP, XZR: This is the stack pointer on Arm64 architecture, the analog of
RSPon x64. However, a minor difference here is that this register can also be used as zero register when used in non-stack related instructions.
SP、XZR:这是Arm64架构上的堆栈指针,类似于x64上的RSP。然而,这里的一个细微差别是,当在非堆栈相关指令中使用时,该寄存器也可以用作零寄存器。 - PC: This is the Arm version
RIP, the instruction pointer or program counter. It records what is to be executed next by the CPU.
PC:这是Arm版本RIP,指令指针或程序计数器。它记录了CPU接下来要执行的内容。 - V0-V31: These are 32 registers that is used for float point operations and Neon, 4-way SIMD, operations.
V0-V31:这些是 32 个寄存器,用于浮点运算和 Neon、4 路 SIMD 运算。
Above are just part of the whole register set. There are more registers like D0-D31, S0-S30 and etc. However, we are only interested in learning the above registers as only these matter when we implement fibers on Arm64 CPUs.
以上只是整个寄存器组的一部分。还有更多寄存器,例如 D0 - D31 、 S0 - S30 等。但是,我们只对了解上述寄存器感兴趣因为当我们在 Arm64 CPU 上实现纤程时,只有这些才重要。
Similar to x64, some of the above registers are callee saved. They are X16-X30, V8-V15. The rest of available registers are all caller-saved.
与x64类似,上面的一些寄存器是被调用者保存的。它们是 X16 - X30 、 V8 - V15 。其余可用寄存器均由调用者保存。
Again, let’s start with the assembly code produced without optimization. In this case, I compiled the source code with Apple clang of version 14.0.0 on MacOS Ventura 13.1.
再次,让我们从未经优化的汇编代码开始。在本例中,我在 MacOS Ventura 13.1 上使用版本 14.0.0 的 Apple clang 编译了源代码。
First, here is the code for the main function
首先,这是main函数的代码
 10x100003f7c <+0>:  sub    sp, sp, #0x30
 20x100003f80 <+4>:  stp    x29, x30, [sp, #0x20]
 30x100003f84 <+8>:  add    x29, sp, #0x20
 40x100003f88 <+12>: stur   wzr, [x29, #-0x4]
 50x100003f8c <+16>: stur   w0, [x29, #-0x8]
 60x100003f90 <+20>: str    x1, [sp, #0x10]
 70x100003f94 <+24>: ldur   w0, [x29, #-0x8]
 80x100003f98 <+28>: bl     0x100003f50               ; Interface at main.cpp:5
 90x100003f9c <+32>: str    w0, [sp, #0xc]
100x100003fa0 <+36>: ldr    w0, [sp, #0xc]
110x100003fa4 <+40>: ldp    x29, x30, [sp, #0x20]
120x100003fa8 <+44>: add    sp, sp, #0x30
130x100003fac <+48>: ret
Since we already have some experience reading assebmly code, let’s go through this one a bit quicker.
由于我们已经有一些阅读汇编代码的经验,所以让我们更快地浏览一下这一点。
- Starting from the beginning, the
PC(Programmer counter) register is 0x100003f7c, meaning the first instruction issub sp, sp, #0x30
从头开始,PC(程序员计数器)寄存器是0x100003f7c,意味着第一条指令是sub sp, sp, #0x30
The first instruction is nothing but to grow the call stack. Similar with x64, the call stack address goes downward as the stack grows. In this example, the call stack is grown by 48 bytes.
第一条指令只不过是增加调用堆栈。与 x64 类似,调用堆栈地址随着堆栈的增长而下降。在此示例中,调用堆栈增长了 48 个字节。 - As we mentioned before,
X29(FP, frame pointer) andX30(LR) are all callee saved, we will have to save the values before moving forward. Instruction 0x100003f80 does exactly this. Later we will see that if we don’t modify any of them in a function, there is no need to store them at the beginning of the function then.
正如我们之前提到的,X29(FP,帧指针)和X30(LR)都是被调用者保存的,我们必须在继续之前保存这些值。指令 0x100003f80 正是这样做的。稍后我们会看到,如果我们不在函数中修改它们中的任何一个,那么就不需要将它们存储在函数的开头。 - Skipping to instruction 0x100003f98, what it does is to store 0x100003f9c into the
x30(LR) register first and then set thePCto 0x100003f50, the first instruction in the functionInterface.
跳到指令 0x100003f98,它的作用是先将 0x100003f9c 存储到x30(LR) 寄存器中,然后将PC设置为 0x100003f50,即函数Interface。
Before we move forward with this program, let’s quickly take a look inside the function Interface.
在我们继续这个程序之前,让我们快速看一下函数 Interface 的内部。
 10x100003f50 <+0>:  sub    sp, sp, #0x10
 20x100003f54 <+4>:  str    w0, [sp, #0xc]
 30x100003f58 <+8>:  ldr    w8, [sp, #0xc]
 40x100003f5c <+12>: ldr    w9, [sp, #0xc]
 50x100003f60 <+16>: mul    w8, w8, w9
 60x100003f64 <+20>: str    w8, [sp, #0x8]
 70x100003f68 <+24>: ldr    w8, [sp, #0x8]
 80x100003f6c <+28>: ldr    w9, [sp, #0x8]
 90x100003f70 <+32>: mul    w0, w8, w9
100x100003f74 <+36>: add    sp, sp, #0x10
110x100003f78 <+40>: ret
- The first instruction (0x100003f50) grows the call stack by 16 bytes.
第一条指令 (0x100003f50) 将调用堆栈增加 16 个字节。 - The instructions between 0x100003f54 and 0x100003f70 performs the calculation inside the
Interfacefunction.
0x100003f54 和 0x100003f70 之间的指令执行Interface函数内部的计算。 - Instruction 0x100003f74 pops the stack.
指令 0x100003f74 弹出堆栈。 - The last ret instruction is simply ask the program to jump to the instruction that
LRregister points to and it is set to 0x100003f9c in the main function by instruction 0x100003f98.
最后一条ret指令只是要求程序跳转到LR寄存器指向的指令,并在主函数中通过指令0x100003f98将其设置为0x100003f9c。
One thing we can notice from this program is that the assembly code in Interface function doesn’t bother to save and restore X29 and X30, this is fine as it never make any changes of these parameters within this function.
从这个程序中我们可以注意到的一件事是 Interface 函数中的汇编代码不会费心保存和恢复 X29 和 X30 ,这很好,因为它永远不会在此函数中对这些参数进行任何更改。
After the Interface function is finished, the PC becomes 0x100003f9c, the next instruction after the invoking Interface function.
Interface 函数完成后, PC 变为0x100003f9c,即调用 Interface 函数之后的下一条指令。
- Looking at 0x100003fa4, what this program does is to restore the
X29andX30registers. It is important to restore these two registers. Specifically in this program, it is theLRthat is important as once the return instruction is called at 0x100003fac, the main function needs to return to whereLRpoints to.
看一下0x100003fa4,这个程序所做的就是恢复X29和X30寄存器。恢复这两个寄存器很重要。具体来说,在这个程序中,LR非常重要,因为一旦在0x100003fac处调用返回指令,主函数就需要返回到LR指向的位置。 - It is certainly the callee’s responsibilty to make sure the
SPregister is unchanged. Since we grow the stack at instruction 0x100003f7c, we will have to pop the stack so that the SP register is intact.
确保SP寄存器不变是被调用者的责任。由于我们在指令 0x100003f7c 处增加堆栈,因此我们必须弹出堆栈以使 SP 寄存器完好无损。
Similarly, let’s take a look at the asm code produced by the same compiler, but with optimization. Below is the code produced by the compiler with the two functions split into two different compilation units.
同样,让我们看一下由同一编译器生成但经过优化的 asm 代码。下面是编译器生成的代码,其中两个函数分为两个不同的编译单元。
Below is the asm code for main.
下面是main的asm代码。
10x100003fa8 <+0>: b 0x100003fac ; Interface at test.cpp:3:15
And here is the asm code for Interface.
这是接口的 asm 代码。
10x100003fac <+0>: mul    w8, w0, w0
20x100003fb0 <+4>: mul    w0, w8, w8
30x100003fb4 <+8>: ret
This is very self-exlanatory. I’d like to point out one interesting trick that the compiler did in this case. Please be mindful that the jump instruction is a b rather than a bl instruction like before. This b instruction will not store the return address in the LR register. This is fine as the compiler is being smart by taking advantage of the fact that there is no further instructions after invoking the Interface function. So after the Interface function is done, it directly jumps to the next instruction of whichever code that calls main.
这是非常不言自明的。我想指出编译器在这种情况下所做的一个有趣的技巧。请注意,跳转指令是 b 而不是之前的 bl 指令。该 b 指令不会将返回地址存储在LR寄存器中。这很好,因为编译器很聪明,利用了调用 Interface 函数后没有进一步指令的事实。所以 Interface 函数执行完成后,直接跳转到调用main的代码的下一条指令。
Last, let’s take a look at the asm code produced with link time optimization.
最后,让我们看一下通过链接时间优化生成的 asm 代码。
10x100003fac <+0>: mul    w8, w0, w0
20x100003fb0 <+4>: mul    w0, w8, w8
30x100003fb4 <+8>: ret
Very simple code and that does exactly what we need.
非常简单的代码,这正是我们所需要的。
Quick Summary Before Moving Forward
继续之前的快速总结
In this section, we briefly mentioned some of the basics of how CPU handles call stack on both x64 and Arm64 architecture. We are also clear by now which registers are callee saved and which are caller saved.
在本节中,我们简要提到了 CPU 如何在 x64 和 Arm64 架构上处理调用堆栈的一些基础知识。现在我们也清楚哪些寄存器是被调用者保存的,哪些是调用者保存的。
Even though what we touched is simply a tip of the iceburg, this should serve as a good foundation for us to keep learning what a fiber is and how it can yield when needed.
尽管我们接触到的只是冰山一角,但这应该为我们继续了解纤程是什么以及它如何在需要时产生作用奠定良好的基础。
Existing Fiber Interface on Windows
Windows 上现有的纤程接口
Next, before we finally dive into the implementation detail of fiber, let’s take a quick look at what kind of interface the Windows operating system offers for fiber. It is actually really easy to use.
接下来,在我们最终深入探讨纤程的实现细节之前,我们先快速了解一下Windows操作系统为纤程提供了什么样的接口。它实际上非常容易使用。
ConvertThreadToFiber: This is a function helps to convert the current thread to a fiber. It is mandatory to convert a thread to a fiber before yielding the control to another fiber.
ConvertThreadToFiber:这是一个帮助将当前线程转换为纤程的函数。在将控制权交给另一个纤程之前,必须将线程转换为纤程。ConvertFiberToThread: This function is the reversed version of the previous function. It converts the current fiber to the original thread that was converted to it in the first place.
ConvertFiberToThread:此函数是上一个函数的反转版本。它将当前纤程转换为最初转换为它的原始线程。CreateFiber: This is the interface for creating a fiber. Programmers can specify the size of the stack and the entry function pointer of the fiber so that when it first gains control, it would run from there.
CreateFiber:这是创建纤程的接口。程序员可以指定堆栈的大小和纤程的入口函数指针,以便当它第一次获得控制权时,它将从那里运行。DeleteFiber: As its name implies, this is to ask the OS to delete the fiber. Of course, it is programmer’s responsibility to make sure a running fiber is not deleted, which will quite possbily cause crash.
DeleteFiber:顾名思义,这是要求操作系统删除纤程。当然,程序员有责任确保正在运行的纤程不被删除,这很可能会导致崩溃。SwitchToFiber: This is the juicy part. This is the interface that allows fiber to yield to another fiber. And this function implementation is quite cheap, the performance cost is no where near a thread switch scheduled by the OS.
SwitchToFiber:这是最有价值的部分。这是允许纤程yield于另一纤程的接口。而且这个函数的实现非常便宜,性能成本远不及操作系统调度的线程切换。
That is it. This is the essential part of fiber interfaces that is required to implement a job system that allows yielding in the middle of a task. As we can see, it is really not complicated at all.
这就对了。这是纤程接口的重要部分,需要实现允许在任务中间进行yield的作业系统。正如我们所看到的,它实际上一点也不复杂。
For readers who still have confusion how to use these, here is a short example that demonstrates how to use the interfaces.
对于仍然对如何使用这些接口感到困惑的读者,这里有一个简短的示例,演示了如何使用这些接口。
 1#include <iostream>
 2#include <Windows.h>
 3
 4#define FiberHandle  LPVOID
 5
 6void RegularFunction(FiberHandle* fiber)
 7{
 8  // We are done executing this fiber, yield control back
 9  SwitchToFiber(fiber);
10
11  std::cout << "Hello Fiber Again" << std::endl;
12}
13
14void WINAPI FiberEntry(PVOID arg)
15{
16  // this is the fiber that yields control to the current fiber
17  FiberHandle* fiber = reinterpret_cast<FiberHandle*>(arg);
18
19  // do whatever you would like to do here.
20  std::cout << "Hello Fiber" << std::endl;
21
22  RegularFunction(fiber);
23
24  // We are done executing this fiber, yield control back
25  SwitchToFiber(fiber);
26}
27
28int main(int argc, char** argv) {
29  // convert the current thread to a fiber
30  FiberHandle fiber = ConvertThreadToFiber(nullptr);
31
32  // create a new fiber
33  FiberHandle new_fiber = CreateFiber(1024, FiberEntry, fiber);
34
35  // yield control to the new fiber
36  SwitchToFiber(new_fiber);
37  SwitchToFiber(new_fiber);
38
39  // convert the fiber back to thread
40  ConvertFiberToThread();
41
42  // delete the fibers
43  DeleteFiber(new_fiber);
44
45  return 0;
46}
In case there is confusion, here is a quick explaination. The execution order is that the main gets executed until line 36, where it gives the control to the new fiber created on line 33. After the yielding, the function main will no longer be in control anymore, CPU will start execute from line 14 then. Please be mindful that on line 9, the program jump directly from within RegularFunction, which as its name implies is just a regular c++ function, to the main function so that it keeps execution on line 37. There is no need to go through FiberEntry for such a jump. It is also possible to jump anywhere deep in the callstack of a fiber. Since line 37 immediately yields control back to the fiber, the new_fiber gains the control the second time except that this time, it resumes executing from where it was suspended before (line 9), rather than starting from scratch again. Last, but not least, it is programmers responsibility to make sure fiber always yields to the correct fiber for execution. In this case, line 25 makes sure that the control is back to main so that the rest of the main function gets execution. Do not expect compiler to help in this case, it doesn’t have enough information to make such a decision.
如果有疑问,这里有一个快速解释。执行顺序是 main 函数执行到第 36 行,将控制权交给第 33 行创建的新纤程。屈服后,main 函数将不再受控制,CPU 将从第 14 行开始执行。请注意,在第 9 行,程序直接从 RegularFunction (顾名思义,它只是一个常规的 C++ 函数)内部跳转到 main 函数,以便它在第 37 行继续执行。没有这样的跳转需要经过 FiberEntry 。也可以跳转到纤程调用堆栈深处的任何位置。由于第 37 行立即将控制权交还给 Fiber,因此 new_fiber 第二次获得控制权,只不过这次它从之前暂停的位置(第 9 行)恢复执行,而不是再次从头开始。最后但并非最不重要的一点是,程序员有责任确保纤程始终屈服于正确的纤程以执行。在本例中,第 25 行确保控制返回到 main,以便 main 函数的其余部分得到执行。不要指望编译器在这种情况下提供帮助,它没有足够的信息来做出这样的决定。
Hopefully, through this simple example, readers can understand the power and flexibility of fiber. It offers greater power that is badly needed in a job system with tons of dependencies.
希望通过这个简单的例子,读者能够了解纤程的强大功能和灵活性。它提供了具有大量依赖项的作业系统急需的更强大的功能。
Implementing Fiber on x64
在 x64 上实施纤程
This blog post wouldn’t exsit if it isn’t this fun part. The real fun begins in this section when we start to mess around with the registers to fool the CPU so that we can switch fiber like the OS provided interface does. In order to make this blog post more educational, I made a tiny library that does just this. Here is the link to the Github gist repo I created. Readers are recommended to read this blog post along with the source code to gain a deeper understanding of the tech.
如果不是这个有趣的部分,这篇博文就不会存在。真正的乐趣从本节开始,我们开始摆弄寄存器来欺骗 CPU,以便我们可以像操作系统提供的接口一样切换纤程。为了使这篇博文更具教育意义,我创建了一个小型库来完成此任务。这是我创建的 Github gist 存储库的链接。建议读者阅读这篇博文和源代码,以更深入地了解该技术。
As a matter of fact, such an implementation is needed on MacOS since the OS doesn’t offer interfaces for fiber control by the time this post was written. There was indeed an ucontext interface exists on MacOS. However, it was deprecated. Using such an interface would be risky in the future. On linux, we can indeed using this for achieving the same thing.
事实上,MacOS 上需要这样的实现,因为在撰写本文时,该操作系统尚未提供纤程控制接口。 MacOS 上确实存在 ucontext 接口。然而,它已被弃用。将来使用这样的接口会有风险。在Linux上,我们确实可以使用它来实现同样的事情。
The process of implemeting the fiber interface should be pretty rewarding. And the x64 fiber implementation that we will mention in this section will work on all platforms that supports System V ABI.
实现纤程接口的过程应该是非常有意义的。我们将在本节中提到的 x64 纤程实现将在所有支持 System V ABI 的平台上运行。
To implement fiber on x64 by ourselves, all we need to do is to implement the 5 interfaces we mentioned above. As a matter of fact, a good news here is that there is very little needs to be done in ConvertThreadToFiber and ConvertFiberToThread. Later we will explain why this is the case. This leaves us only three functions to implement, CreateFiber, DeleteFiber and SwitchToFiber.
要自己在 x64 上实现 Fiber,我们需要做的就是实现上面提到的 5 个接口。事实上,这里的一个好消息是 ConvertThreadToFiber 和 ConvertFiberToThread 中几乎不需要做任何事情。稍后我们会解释为什么会出现这种情况。这使得我们只需要实现三个函数: CreateFiber 、 DeleteFiber 和 SwitchToFiber 。
Fiber Structure Definition
纤程结构定义
To get started, we need to define the fiber structure first. Below is the definition of fiber in my implementation. Let’s take a quick look at it first.
首先,我们需要首先定义纤程结构。以下是我的实现中纤程的定义。我们先快速浏览一下。
1//! Abstruction for fiber struct.
2struct Fiber {
3    /**< Pointer to stack. */
4    void*                   stack_ptr = nullptr;
5    /**< fiber context, this is platform dependent. */
6    FiberContexInternal     context;
7};
As we can see from this data structure, there is only two members in it. stack_ptr, as its name implies, is simply the pointer to the address of the stack, which will be used by the fiber. Different from regular subroutine or language supported coroutine, fiber requires programmers to allocate its own stack memory by themselves. With Windows fiber interface, it is done under the hood of CreateFiber. However, with a low level asm implementation like this, we need to carry over the responsibility of creating the stack memory. In reality, this explicit control of memory allocation is commonly quite welcome by game developers since they are in charge of the memory allocating rather than handling it over to a third party library. Be mindful that there is no real requirement where the memory this pointer has to point to, it is commonly on heap, but it is totally fine if this fiber stack memory is allocated on another stack of either a fiber or a thread as long as the synchronization is done properly that the fiber stack memory won’t get destroyed before it is done being used. The only reason we are keeping track of this is because we would like to properly deallocate this memory properly when the fiber gets destroyed. Assembly code will not use this member to track the stack at all. Instead, it will use a stack pointer, which is stored in FiberContextInternal, to keep track of the stack.
从这个数据结构中我们可以看到,它只有两个成员。 stack_ptr ,顾名思义,只是指向堆栈地址的指针,该堆栈地址将由纤程使用。与常规子例程或语言支持的协程不同,Fiber 需要程序员自己分配自己的堆栈内存。对于 Windows 纤程接口,它是在 CreateFiber 的底层完成的。然而,对于像这样的低级 asm 实现,我们需要承担创建堆栈内存的责任。实际上,这种对内存分配的显式控制通常受到游戏开发人员的欢迎,因为他们负责内存分配,而不是将其处理给第三方库。请注意,这个指针必须指向的内存没有真正的要求,它通常位于堆上,但如果将此纤程堆栈内存分配在纤程或线程的另一个堆栈上,只要同步正确完成,纤程堆栈内存在使用完毕之前不会被破坏。我们跟踪这一点的唯一原因是我们希望在纤程被破坏时正确地重新分配该内存。汇编代码根本不会使用此成员来跟踪堆栈。相反,它将使用存储在 FiberContextInternal 中的堆栈指针来跟踪堆栈。
context is the data structure that keeps track of the registers. The mystery fiber context structure merely keeps track a few registers, specifically defined as below.
context 是跟踪寄存器的数据结构。神秘纤程上下文结构仅跟踪一些寄存器,具体定义如下。
 1struct FiberContexInternal {
 2    // callee-saved registers
 3    Register rbx;
 4    Register rbp;
 5    Register r12;
 6    Register r13;
 7    Register r14;
 8    Register r15;
 9
10    // stack and instruction register
11    Register rsp;
12    Register rip;
13};
Some readers may have a question by now. What is the rationale behind the choices of the registers that need to be stored? This is a very important question for us to understand how it works. To answer the question, let’s take a look at the registers in the data structure.
一些读者现在可能有一个疑问。选择需要存储的寄存器的理由是什么?对于我们了解它是如何工作的,这是一个非常重要的问题。为了回答这个问题,我们先来看看数据结构中的寄存器。
- Why do we need to store
RIP?
为什么我们需要存储RIP?
This is a truly simple question. As mentioned previously, theRIPis the instruction pointer, which points to the next instruction to be executed by the CPU.FiberContextInternalis the data placeholder between a fiber suspension and fiber resume. Upon suspension, the fiber needs to know where it is suspended on so that when it gets resumed, it knows what is the next instruction for the CPU to execute so that it resumes from exactly where it was suspended.
这是一个非常简单的问题。前面提到,RIP是指令指针,它指向CPU要执行的下一条指令。FiberContextInternal是纤程悬浮液和纤程恢复之间的数据占位符。暂停时,纤程需要知道它暂停在哪里,以便当它恢复时,它知道 CPU 执行的下一条指令是什么,以便它从暂停的确切位置恢复。 - Why do we need to store
RSP?
为什么我们需要存储RSP?
This is an easy question to answer as well. Since we allocate our own fiber memory, theRSPhas to point to its own stack. Since the compiler doesn’t know where the stack top is, we need to make sure we know where it is. And thisRSPdoes exactly that.
这也是一个很容易回答的问题。由于我们分配自己的纤程内存,因此RSP必须指向它自己的堆栈。由于编译器不知道堆栈顶部在哪里,因此我们需要确保知道它在哪里。而这个RSP正是这样做的。 - Why do we need to store the callee saved registers?
为什么我们需要存储被调用者保存的寄存器?
Imagine we have a function A made a fiber switch from fiber 0 to fiber 1. Assuming that theR12register written right before the switch. After the swicth, the function A will be suspended and the fiber 1 will be either resumed or launched. If the fiber 1 was suspended before and gets resumed, the following instructions of fiber 1 may read the registerR12as well. However, it is by no means interested in reading the value ofR12written by function A, all it needs to know is what theR12register’s value was before it was suspended. On the other hand, the value written to theR12register by function A may very likely to be read at a later point inside it as well. To prevent this value from getting lost after it is resumed in the future, it needs to be cached somewhere. The same goes true for not onlyR12, but also all callee saved registers. And this is why we need to keep all the callee saved registers.
想象一下,我们有一个函数 A 将纤程从纤程 0 切换到纤程 1。假设R12寄存器就在切换之前写入。切换后,功能A将暂停,纤程1将恢复或启动。如果纤程 1 之前被挂起并恢复,则纤程 1 的后续指令也可以读取寄存器R12。但是,它对读取函数 A 写入的R12的值毫无兴趣,它只需要知道R12寄存器在挂起之前的值是什么。另一方面,由函数 A 写入R12寄存器的值也很可能稍后在其中被读取。为了防止该值在将来恢复后丢失,需要将其缓存在某个地方。同样的情况不仅适用于R12,还适用于所有被调用者保存的寄存器。这就是为什么我们需要保留所有被调用者保存的寄存器。 - Why don’t we care about caller saved registers?
为什么我们不关心调用者保存的寄存器?
If we take a look at the same example as above, we should be mindful that the fiber switch is a function itself. Even if the fiber switch is just a regular subroutine, as long as it is not inlined, the compiler needs to make sure it restores the values of caller saved registers after it is called. In the above example, imagine after the fiber switch if some other fiber overwrites the value of the caller saved registers and switch the control back to fiber 0, it is still the compiler’s responsibility to make sure the caller saved registers are properly restored before reusing them in the caller code. Such a restoring process is commonly performed through caching the value on stack. To some degree, we can regard the call stack itself as the partial cache of our fiber context so that it frees us from the need of doing so.
如果我们看一下与上面相同的示例,我们应该注意纤程开关本身就是一个函数。即使纤程开关只是一个常规子例程,只要它不是内联的,编译器就需要确保它在调用后恢复调用者保存的寄存器的值。在上面的示例中,想象一下,在纤程切换之后,如果其他纤程覆盖了调用者保存的寄存器的值并将控制权切换回纤程 0,编译器仍然有责任确保调用者保存的寄存器在重用之前正确恢复在调用者代码中。这种恢复过程通常是通过将值缓存在堆栈上来执行的。在某种程度上,我们可以将调用堆栈本身视为 Fiber 上下文的部分缓存,这样我们就不需要这样做了。
To emphasize it, it is quite important for us to make sure compiler won’t optimize our fiber switch function into an inline version. As otherwise, we would need to be responsible for storing the caller saved registers in the fiber context as well. Depending on how aggressive compiler optimization is, it may not be good enough to simply put this function definition into another compilation unit, especially when link time optimization is enabled. The most secured way to make sure is to take a look at the assembly code produced by the compiler to be sure it does what we expect.
强调一下,确保编译器不会将我们的 Fiber Switch 函数优化为内联版本对我们来说非常重要。否则,我们还需要负责将调用者保存的寄存器存储在 Fiber 上下文中。根据编译器优化的积极程度,简单地将此函数定义放入另一个编译单元中可能不够好,特别是在启用链接时优化时。最安全的方法是查看编译器生成的汇编代码,以确保它符合我们的预期。
At this point, I believe it should be clear why we are defining the fiber context structure the way it is. Thanks to the fact that all of the SIMD registers are caller saved, we only need to store a few registers in our fiber context.
至此,我相信我们应该清楚为什么我们要这样定义 Fiber 上下文结构。由于所有 SIMD 寄存器都是调用者保存的,因此我们只需要在 Fiber 上下文中存储一些寄存器。
Switch Between Fibers 纤程之间切换
Rather than starting from the CreateFiber, I choose to start with the SwitchFiber interface as the former requires knowledge about how the latter works. We already learned that CPU will only use its registers to talk to the rest of the system unless something could be compile time resolved, for example function addresses. Since static information is the same for all executing threads/fibers, we just care about registers for a fiber switch then. Because we are working with registers, we will have to touch assembly languages in order to achieve it. Below is the switch fiber implementation I’ve done on x64 architecture.
我选择从 SwitchFiber 界面开始,而不是从 CreateFiber 开始,因为前者需要了解后者如何工作。我们已经了解到,CPU 只会使用其寄存器与系统的其余部分通信,除非某些内容可以在编译时解决,例如函数地址。由于静态信息对于所有正在执行的线程/纤程都是相同的,因此我们只关心纤程开关的寄存器。因为我们正在使用寄存器,所以我们必须接触汇编语言才能实现它。下面是我在 x64 架构上完成的交换机纤程实现。
 1.text
 2.align 4
 3_switch_fiber_internal:
 4    // Store callee-preserved registers
 5    movq        %rbx, 0x00(%rdi) /* FIBER_REG_RBX */
 6    movq        %rbp, 0x08(%rdi) /* FIBER_REG_RBP */
 7    movq        %r12, 0x10(%rdi) /* FIBER_REG_R12 */
 8    movq        %r13, 0x18(%rdi) /* FIBER_REG_R13 */
 9    movq        %r14, 0x20(%rdi) /* FIBER_REG_R14 */
10    movq        %r15, 0x28(%rdi) /* FIBER_REG_R15 */
11
12    /* call stores the return address on the stack before jumping */
13    movq        (%rsp), %rcx
14    movq        %rcx, 0x40(%rdi) /* FIBER_REG_RIP */
15
16    /* skip the pushed return address */
17    leaq        8(%rsp), %rcx
18    movq        %rcx, 0x38(%rdi) /* FIBER_REG_RSP */
19
20    // Load context 'to'
21    movq        %rsi, %r8
22
23    // Load callee-preserved registers
24    movq        0x00(%r8), %rbx /* FIBER_REG_RBX */
25    movq        0x08(%r8), %rbp /* FIBER_REG_RBP */
26    movq        0x10(%r8), %r12 /* FIBER_REG_R12 */
27    movq        0x18(%r8), %r13 /* FIBER_REG_R13 */
28    movq        0x20(%r8), %r14 /* FIBER_REG_R14 */
29    movq        0x28(%r8), %r15 /* FIBER_REG_R15 */
30
31    // Load stack pointer
32    movq        0x38(%r8), %rsp /* FIBER_REG_RSP */
33
34    // Load instruction pointer, and jump
35    movq        0x40(%r8), %rcx /* FIBER_REG_RIP */
36    jmp         *%rcx
Below is the declaration of the fucntion interface
下面是函数接口的声明
1void _switch_fiber_internal(FiberContexInternal* src_fiber, const FiberContexInternal* dst_fiber);
There are two parameters in this funciton, src_fiber and dst_fiber. In the above assembly code, RDI is the first parameter (src_fiber) and RSI is the second parameter (dst_fiber). The assembly code is so simple that it doesn’t need detailed explanation. In a nutshell, it takes the contents of the relevant registers (RBX, RBP, R12 to R15, RIP, RSP) and store them in the fiber context that src_fiber points to, after which it also loads the content in the fiber context pointed by dst_fiber into the registers. After swapping the values in the registers, the CPU is then fooled about its execution sequence. It will forget all the previuos instruction context and pretend that this funciton is called from where dst_fiber is left of last time, which also includes the initial state of the dst_fiber.
该函数中有两个参数, src_fiber 和 dst_fiber 。在上面的汇编代码中, RDI 是第一个参数 ( src_fiber ), RSI 是第二个参数 ( dst_fiber )。汇编代码很简单,不需要详细解释。简而言之,它获取相关寄存器的内容( RBX 、 RBP 、 R12 到 R15 、 RIP )并将它们存储在 src_fiber 指向的 Fiber 上下文中,之后还将 dst_fiber 指向的 Fiber 上下文中的内容加载到寄存器。交换寄存器中的值后,CPU 的执行顺序就会被欺骗。它将忘记所有先前的指令上下文,并假装从上次剩下的 dst_fiber 位置调用该函数,其中还包括 dst_fiber 的初始状态。
Next obvious question is that where does the value of the fiber context pointed by the dst_fiber come from. There are two cases then. If the fiber was suspended before, it must have went through the same interface, which must have populated the fiber context with the correct value through the first half of the _switch_fiber_internal function. Of course, it is programmers responsibility to make sure the fiber switch is legit. Incorrect fiber switch will easily crash the program.
下一个明显的问题是 dst_fiber 指向的 Fiber 上下文的值从何而来。那么有两种情况。如果纤程之前被挂起,它必须通过相同的接口,该接口必须通过 _switch_fiber_internal 函数的前半部分使用正确的值填充纤程上下文。当然,程序员有责任确保纤程交换机是合法的。不正确的纤程开关很容易导致程序崩溃。
However, if the fiber is newly created and never gets executed before, we also need to make sure it works as expected.
然而,如果纤程是新创建的并且之前从未执行过,我们还需要确保它按预期工作。
Creating a new Fiber
创造新的纤程
Now that we know how to switch between fibers, a question remained to be answered is how can we create a fiber from scratch so that it can be used as a destination fiber in the above switchfiber call.
现在我们知道如何在纤程之间进行切换,还有一个需要回答的问题是我们如何从头开始创建纤程,以便它可以用作上述 switch纤程调用中的目标纤程。
Let’s first of all define a fiber main function, which serves as the beginning of a fiber’s execution
首先我们定义一个 Fiber 主函数,作为 Fiber 执行的开始
1void FiberMain(){
2    // do whatever you want to do in this fiber
3}
My fiber entry is defined as above. Though, it is totally possible to define it other ways. This is just one possibility. The next step is to hook this function with a fiber so that when it first gains control, it will start from this function.
我的纤程入口定义如上。不过,完全可以用其他方式来定义它。这只是一种可能性。下一步是将这个函数与一个纤程挂钩,这样当它第一次获得控制权时,它将从此函数开始。
 1bool _create_fiber_internal(void* stack, uint32_t stack_size, FiberContexInternal* context) {
 2    // it is the users responsibility to make sure the stack is 16 bytes aligned, which is required by the Arm64 architecture
 3    if((((uintptr_t)stack) & (FIBER_STACK_ALIGNMENT - 1)) != 0)
 4        return false;
 5
 6    uintptr_t* stack_top = (uintptr_t*)((uint8_t*)(stack) + stack_size);
 7    context->rip = (uintptr_t)FiberMain;
 8    context->rsp = (uintptr_t)&stack_top[-3];
 9    stack_top[-2] = 0;
10
11    return true;
12}
Above is an implementation for on x64 architecture. It is actually quite simple, all we need to do is to setup the stack pointer and instruction pointer. Since the instruction pointer points to the FiberMain, the fiber will be launching from this function entry point first, exactly meeting our expectation. For the stack, we can pass in any memory as long as we can be sure during the execution of the fiber, this memory won’t get destroyed. The stack memory has to be 16 bytes aligned, which is required by the ABI. As mentioned before, the stack’s address grows downward, meaning that every time we push something in the stack, the stack top address decreases. And because of this, we have to set the stack pointer to the end of the memory, rather than the beginning of the memory.
以上是 x64 架构上的实现。其实很简单,我们只需要设置堆栈指针和指令指针即可。由于指令指针指向 FiberMain ,所以 Fiber 将首先从该函数入口点启动,完全符合我们的预期。对于堆栈来说,我们可以传入任何内存,只要我们能够确定在纤程执行过程中,该内存不会被破坏。堆栈内存必须是 16 字节对齐,这是 ABI 所要求的。如前所述,堆栈的地址向下增长,这意味着每次我们向堆栈中压入一些内容时,堆栈顶部地址都会减少。正因为如此,我们必须将堆栈指针设置到内存的末尾,而不是内存的开头。
If we think about the first time such a fiber gets executed, the second half of the _switch_fiber_internal function will simply load garbage values in the callee saved registers except rsp and rip, but this is fine as the compiler will make sure that the callee saved registers will not be read before they are written to.
如果我们考虑第一次执行这样的纤程, _switch_fiber_internal 函数的后半部分将简单地将垃圾值加载到被调用者保存的寄存器中,除了 rsp 和 rip
There is one annoying thing in the above design. The FiberMain function doesn’t have any connection with the creation code. Of course, it is possible to pass the information through global data with careful synchronization. A better alternative is to allow programmers to pass in one pointer to the FiberMain so that it can access to basic information from the FiberMain about its creation code. If you can pass in a pointer, you can pass in anything then.
上面的设计中有一件烦人的事情。 FiberMain 函数与创建代码没有任何联系。当然,可以通过仔细同步的全局数据传递信息。更好的替代方法是允许程序员向 FiberMain 传递一个指针,以便它可以从 FiberMain 访问有关其创建代码的基本信息。如果你可以传入一个指针,那么你就可以传入任何东西。
To make it happen, we need to add one more register in our fiber context. And this register is RDI, which is used to represent the first argument passed in a function.
为了实现这一点,我们需要在 Fiber 上下文中再添加一个寄存器。这个寄存器是 RDI ,它用来表示函数中传递的第一个参数。
 1struct FiberContexInternal {
 2    // callee-saved registers
 3    Register rbx;
 4    Register rbp;
 5    Register r12;
 6    Register r13;
 7    Register r14;
 8    Register r15;
 9    // stack and instruction register
10    Register rsp;
11    Register rip;
12    // the first parameter
13    Register rdi;
14};
With this one extra register, we can simply pass a pointer from our redefined interface this way
有了这个额外的寄存器,我们可以通过这种方式简单地从重新定义的接口传递一个指针
 1bool _create_fiber_internal(void* stack, uint32_t stack_size, void* arg, FiberContexInternal* context) {
 2    // it is the users responsibility to make sure the stack is 16 bytes aligned, which is required by the Arm64 architecture
 3    if((((uintptr_t)stack) & (FIBER_STACK_ALIGNMENT - 1)) != 0)
 4        return false;
 5
 6    uintptr_t* stack_top = (uintptr_t*)((uint8_t*)(stack) + stack_size);
 7    context->rip = (uintptr_t)FiberMain;
 8    context->rdi = (uintptr_t)arg;
 9    context->rsp = (uintptr_t)&stack_top[-3];
10    stack_top[-2] = 0;
11
12    return true;
13}
And of course, we need to make some adjustment in our assembly code as well.
当然,我们还需要对汇编代码进行一些调整。
 1.text
 2.align 4
 3_switch_fiber_internal:
 4    // Store callee-preserved registers
 5    movq        %rbx, 0x00(%rdi) /* FIBER_REG_RBX */
 6    movq        %rbp, 0x08(%rdi) /* FIBER_REG_RBP */
 7    movq        %r12, 0x10(%rdi) /* FIBER_REG_R12 */
 8    movq        %r13, 0x18(%rdi) /* FIBER_REG_R13 */
 9    movq        %r14, 0x20(%rdi) /* FIBER_REG_R14 */
10    movq        %r15, 0x28(%rdi) /* FIBER_REG_R15 */
11
12    /* call stores the return address on the stack before jumping */
13    movq        (%rsp), %rcx
14    movq        %rcx, 0x40(%rdi) /* FIBER_REG_RIP */
15
16    /* skip the pushed return address */
17    leaq        8(%rsp), %rcx
18    movq        %rcx, 0x38(%rdi) /* FIBER_REG_RSP */
19
20    // Load context 'to'
21    movq        %rsi, %r8
22
23    // Load callee-preserved registers
24    movq        0x00(%r8), %rbx /* FIBER_REG_RBX */
25    movq        0x08(%r8), %rbp /* FIBER_REG_RBP */
26    movq        0x10(%r8), %r12 /* FIBER_REG_R12 */
27    movq        0x18(%r8), %r13 /* FIBER_REG_R13 */
28    movq        0x20(%r8), %r14 /* FIBER_REG_R14 */
29    movq        0x28(%r8), %r15 /* FIBER_REG_R15 */
30
31    // Load first parameter
32    movq        0x30(%r8), %rdi /* FIBER_REG_RDI */
33
34    // Load stack pointer
35    movq        0x38(%r8), %rsp /* FIBER_REG_RSP */
36
37    // Load instruction pointer, and jump
38    movq        0x40(%r8), %rcx /* FIBER_REG_RIP */
39    jmp         *%rcx
With all the above change, we introduce an argument in the FiberMain. And that single argument allows us to access anything we want within the FiberMain.
通过上述所有更改,我们在 FiberMain 中引入一个参数。这个单一参数允许我们访问 FiberMain 中我们想要的任何内容。
1void FiberMain(void* arg){
2    // do whatever you want to do in a this fiber
3}
Careful readers may already notice a performance inefficiency here. As long as a fiber has been executed, line 32 is useless. In pratice, I doubt this one single cycle of instruction may have any performance impact at all. Similar to this inefficiency, if we have a new fiber gaining control through the fiber switch call, the instructions between 24 and 30 are all useless as well. A solution to this problem is to warm up the fiber upon its creation through a simplified assembly function that doesn’t have line 24 and 30 by switching to the newly created fiber right after creation. And the fiber can switch back at the beginning of its FiberMain to the creation fiber immediately to give its control back. The caller code won’t even notice a thing about such a round trip. And then we can remove the instruction loading the first paremter through a separate assembly function that is only used for future fiber switch. For simplicity, my implementation doesn’t implement this optimization.
细心的读者可能已经注意到这里的性能低下。只要已经执行了一个纤程,第32行就没用了。实际上,我怀疑这一单个指令周期是否会对性能产生任何影响。与这种低效率类似,如果我们有一个新的纤程通过纤程交换机调用获得控制权,那么24到30之间的指令也都是无用的。此问题的解决方案是在创建纤程时通过简化的装配功能(没有第 24 行和第 30 行)在创建后立即切换到新创建的纤程来预热纤程。并且纤程可以在其 FiberMain 的开头立即切换回创建纤程以交回控制权。调用者代码甚至不会注意到这样的往返。然后我们可以通过单独的汇编函数删除加载第一个参数的指令,该函数仅用于将来的纤程交换机。为简单起见,我的实现没有实现此优化。
Converting between a Thread and a Fiber
线程和纤程之间的转换
Now we are able to create a fiber and switch to the fiber from a different fiber. There is one question left. Our program starts from a thread, not a fiber. We need to be able to convert the thread to a fiber so that it allows us to make the switch happens because we can’t switch from a thread to a fiber.
现在我们可以创建纤程并从不同的纤程切换到该纤程。还剩下一个问题。我们的程序从线程开始,而不是纤程。我们需要能够将线程转换为纤程,以便我们能够进行切换,因为我们无法从线程切换到纤程。
In order to do so, we need to implement two different functions, ConvertToFiberFromThread and ConvertToThreadFromFiber. Let’s start with the first one.
为此,我们需要实现两个不同的函数 ConvertToFiberFromThread 和 ConvertToThreadFromFiber 。让我们从第一个开始。
Different from newly created fibers by the function CreateFiber, which are by default in its suspended mode, fibers created through ConvertToFiberFromThread are already running when they are ‘created’, or specifically, converted. This newly converted fiber should be used as source fiber so that it switches to some other fiber. Under no circumstances that we should switch from a fiber to a newly converted fiber produced by ConvertToFiberFromThread, which makes no sense.
与函数 CreateFiber 新创建的纤程不同,默认情况下处于挂起模式,通过 ConvertToFiberFromThread 创建的纤程在“创建”或具体转换时已经在运行。该新转换的纤程应用作源纤程,以便它切换到其他纤程。在任何情况下,我们都不应该从一个 Fiber 切换到由 ConvertToFiberFromThread 生成的新转换的 Fiber,这是没有意义的。
Taking advantages of this fact, we can imagine that the default stack pointer or instruction serves no purpose in such a converted pointer anywhere. No code will ever read those two members (RIP, RSP) in the fiber context before it is first written by a fiber switch. The same goes true for all registers in FiberContexInternal. This gives us the freedom to ignore such fields during a thread to fiber conversion.
利用这一事实,我们可以想象默认的堆栈指针或指令在任何地方的此类转换指针中都没有任何作用。在 Fiber 交换机首次写入之前,任何代码都不会读取 Fiber 上下文中的这两个成员( RIP 、 RSP )。对于 FiberContexInternal 中的所有寄存器也是如此。这使我们可以在线程到纤程转换期间自由地忽略这些字段。
1inline FiberHandle CreateFiberFromThread() {
2    Fiber* ptr = (Fiber*)TINY_FIBER_MALLOC(sizeof(Fiber));
3    ptr->context = {};
4    return ptr;
5}
Above is the function to convert from a thread to a fiber. Apart from allocating the fiber structure memory, not even the fiber stack, nothing else is done. Again, this is totally fine as this fiber context will not be read first.
上面是从线程转换为纤程的函数。除了分配纤程结构内存,甚至不分配纤程堆栈之外,什么也没做。同样,这完全没问题,因为不会首先读取此 Fiber 上下文。
It is pretty straightforward to figure out that ConvertToThreadFromFiber is simply an empty implementation. An alternative solution is to choose deleting the fiber in such a function to be more consistent with the Windows interface. However, in my own implementation, I hided the interface from the library. It is automatically done once the fiber’s lifetime ends.
很容易看出 ConvertToThreadFromFiber 只是一个空的实现。另一种解决方案是选择删除此类功能中的纤程,以与Windows界面更加一致。然而,在我自己的实现中,我从库中隐藏了接口。一旦纤程的使用寿命结束,它就会自动完成。
Deleting a Fiber 删除纤程
Deleting a fiber is the simplest method compared with all the above methods. All we need to do at this point is to free the stack memory and the memory for the fiber structure itself.
与上述所有方法相比,删除纤程是最简单的方法。此时我们需要做的就是释放堆栈内存和纤程结构本身的内存。
To point it out again, deleting a running fiber can result in crash if it is being ran or will be ran in the future. It is programmers’ responsibility to make sure when a fiber is deleted, nothing is using it.
再次指出,删除正在运行的纤程可能会导致正在运行或将来运行的纤程崩溃。程序员有责任确保当纤程被删除时,没有任何东西正在使用它。
Troubles Introduced by Fibers
纤程带来的麻烦
At this point, I believe we have figured out how fiber works under the hood. As we can see from the implementation, fiber works by hacking the registers to fool CPU so that it swaps the call stacks and other relevant information for the CPU to make a switch. It is extremely cheap to make such a switch. There is great flexibility introduced with the tech. And it can be quite useful for game engine’s job system design.
至此,我相信我们已经弄清楚了纤程在幕后的工作原理。从实现中我们可以看到,Fiber 的工作原理是破解寄存器来欺骗 CPU,以便它交换调用堆栈和其他相关信息,以便 CPU 进行切换。进行这样的转换非常便宜。该技术带来了极大的灵活性。这对于游戏引擎的作业系统设计非常有用。
However, while embracing the benefits of fibers, we have to be aware of the risks and responsibilities we are taking in the mean time to avoid problems.
然而,在享受纤程好处的同时,我们必须意识到我们同时承担的风险和责任,以避免出现问题。
Do not Exit the FiberMain
不要退出 FiberMain
As we learned before, there is ways for comiplers to make sure the returned address is properly setup when a function is called. However, we have to be mindful that a fiber entry function has no return address. It is not called in a conventional way. Do not expect the fiber returns its control back to whoever gave its control in the first place, it won’t happen automatically.
正如我们之前了解到的,编译器有多种方法可以确保在调用函数时正确设置返回的地址。然而,我们必须注意,纤程入口函数没有返回地址。它不是以常规方式调用的。不要指望纤程将其控制权返回给最初给予控制权的人,这不会自动发生。
So we have to make sure that the fiber entry function will never exit regularly like other regular functions. What we should do is to make a switch to some other fiber once it is not expected to be executed anymore. It is fine to terminate the fiber even if the fiber entry function is not fully finished. It is actually mandatory to avoid unexpected behavior. An alternative is to setup the return address properly. Though, this will make the fiber implementation a bit more complicated and there is little that we will gain in doing so.
所以我们必须确保纤程入口函数永远不会像其他常规函数那样定期退出。我们应该做的是,一旦预计不再执行它,就切换到其他纤程。即使纤程进入功能尚未完全完成,也可以终止纤程。实际上,避免意外行为是强制性的。另一种方法是正确设置返回地址。不过,这将使纤程的实现变得更加复杂,并且这样做我们不会获得什么好处。
Smart Memory Pointers 智能内存指针
Smart pointers is a mechanism to prevent memory leak. For every piece of heap memory allocation, it will couple this allocation with a smart pointer allocation, which is a small object that controls the life time of the heap memory. As long as the smart pointer itself gets destroyed, the heap allocation coupled with it is gurranteed to be freed as well. If all the smart pointers are allocated on stack, as we know by the end of a program all stack memory gets properly popped, we can easily deduce that all the heap allocation is freed as well. The mechanism also extends to smart pointer themselves allocated on a heap, which itself is controled by another smart pointer on a stack. The memory dellocation will happen recursively to any depth level when the top level smart pointer dies.
智能指针是一种防止内存泄漏的机制。对于每一块堆内存分配,它都会将此分配与智能指针分配耦合起来,智能指针分配是一个控制堆内存生命周期的小对象。只要智能指针本身被破坏,与之相关的堆分配也保证被释放。如果所有智能指针都分配在堆栈上,正如我们所知,在程序结束时所有堆栈内存都会正确弹出,我们可以轻松推断出所有堆分配也被释放。该机制还扩展到在堆上分配的智能指针本身,其本身由堆栈上的另一个智能指针控制。当顶层智能指针死亡时,内存重新分配将递归地发生到任何深度级别。
One of the corner cases that makes this mechanism invalid is fiber. Imagine you have a fiber with its fiber stack on a heap. Inside this fiber, we use a smart pointer allocating some memory on a heap. However, the fiber then gets suspended and never gets resumed before the fiber gets destroyed. What will happen here is that the smart pointer sitting on the fiber stack, which is essentialy on a heap, will be leaked. This is different from allocating a object with a smart pointer as its member variable on a heap, when this object goes out of scope, it will destroy the heap allocation bundled with the smart pointer member. This can be done as the compiler is in a good position to make sure it happens. However, similar case mentioned won’t work for fibers as the compiler knows nothing about how we use our fiber stack.
使该机制无效的极端情况之一是纤程。想象一下,您有一条纤程,其纤程堆栈位于一堆上。在该纤程内部,我们使用智能指针在堆上分配一些内存。然而,纤程随后会被暂停,并且在纤程被破坏之前永远不会恢复。这里会发生的是,位于纤程堆栈(本质上是堆)上的智能指针将被泄漏。这与在堆上分配一个以智能指针作为其成员变量的对象不同,当该对象超出范围时,它将破坏与智能指针成员捆绑的堆分配。这是可以完成的,因为编译器可以很好地确保它发生。然而,提到的类似情况不适用于纤程,因为编译器对我们如何使用纤程堆栈一无所知。
So with fibers, it is techinically possible to introduce memory leak even if your whole program’s memory allocation is guarded with smart pointers. We certainly need to pay attention to avoid it. One way to make sure it won’t happen is to leave a fiber switch right before the end of a FiberMain function and always execute to make the last fiber switch. And even with this, one needs to make sure there is no smart pointer whose life time still exists after the last fiber switch.
因此,对于纤程,即使整个程序的内存分配受到智能指针的保护,从技术上来说也有可能引入内存泄漏。我们当然需要注意避免它。确保不会发生这种情况的一种方法是在 FiberMain 函数结束之前留下纤程切换,并始终执行以进行最后一次纤程切换。即使这样,也需要确保在最后一次纤程切换后没有智能指针的生命周期仍然存在。
Object Destruction 物体破坏
We mentioned that we can’t allow fiber entry function to exit normally. This means that we have to yield control to other fibers before it ends. This could mean we may still have active objects living on that stack, like the smart pointers we talked about. In more generalized sense, any objects, besides smart pointers, may need to destruct properly. Same as smart pointers lose its control over memory management, if we have an object taking advantage of its destructor to do something important, it may get skipped as well.
我们提到我们不能让纤程入口功能正常退出。这意味着我们必须在结束之前将控制权交给其他纤程。这可能意味着我们可能仍然有活动对象存在于该堆栈上,就像我们讨论的智能指针一样。从更广义的意义上来说,除了智能指针之外的任何对象都可能需要正确地析构。就像智能指针失去对内存管理的控制一样,如果我们有一个对象利用其析构函数来做一些重要的事情,它也可能会被跳过。
It is programmers’ responsibility to make sure when a fiber gets destroyed, nothing left in the fiber needs to be executed. Commonly compilers can safe guard it for us, but not in a fiber environment.
程序员有责任确保当纤程被破坏时,纤程中剩余的任何内容都不需要执行。通常编译器可以为我们保护它,但不能在纤程环境中。
To be clear, compiler behavior is totally normal within a fiber stack. This means that if you have an object that lives on a call stack, which gets popped, the compiler will make sure the destroctor gets called properly. What we need to be careful about is to make sure no pending destructor needs to be executed when fiber gets destroyed.
需要明确的是,编译器行为在纤程堆栈中是完全正常的。这意味着,如果您有一个存在于调用堆栈上的对象,该对象被弹出,则编译器将确保正确调用析构函数。我们需要注意的是确保当 Fiber 被破坏时不需要执行挂起的析构函数。
No Fiber Reset in Windows’ Fiber Interface
Windows 纤程接口中没有纤程重置
This is more of an inconvenience than a problem. Fiber is commonly seen in a job system in game engines. Such job systems commonly fixes thread on physical CPU cores through thread affinity. Fiber is like a job container, a job can only be executed when it finds an available idle fiber and a thread. Once it is done executing, the fiber will be put back to a pool of idle fibers. When we put a used fiber back to the idle fiber pool, we don’t really care about its previous execution state anymore. A nice thing that can be done is to reset the fiber to its initial state before putting it in the idle fiber pool. This can be easily achieved through assembly implementation as we can simply reset the fiber context like we did when we created the fiber. Of course, we should not reset a fiber converted from a thread as it makes little sense anyway.
这与其说是一个问题,不如说是一种不便。 Fiber 常见于游戏引擎的作业系统中。此类作业系统通常通过线程关联将线程固定在物理 CPU 核心上。 Fiber 就像一个作业容器,作业只有找到可用的空闲 Fiber 和线程时才能执行。一旦执行完成,纤程将被放回到空闲纤程池中。当我们将使用过的纤程放回空闲纤程池时,我们不再关心它之前的执行状态。可以做的一件好事是在将纤程放入空闲纤程池之前将纤程重置为其初始状态。这可以通过装配实现轻松实现,因为我们可以像创建 Fiber 时一样简单地重置 Fiber 上下文。当然,我们不应该重置从线程转换而来的纤程,因为无论如何它都没有什么意义。
That simple solution has a problem as Windows doesn’t provide an interface to reset a fiber. An unrealistic solution is to delete the fiber and recreate one every time we need to put it back in the idle pool, which pretty much works the same as no idle fiber pool, unfortunately. Since Windows create fiber interface doesn’t allow us to allocate our own stack. Fiber allocation on Windows is couple with a memory allocation under the hood, making it a bit expensive. Given the high frequency of job execution during a frame in a game engine, this is by no means a good solution.
这个简单的解决方案有一个问题,因为 Windows 不提供重置纤程的接口。一种不切实际的解决方案是删除纤程并在每次需要将其放回空闲池时重新创建纤程,不幸的是,这与没有空闲纤程池的工作原理几乎相同。由于 Windows 创建 Fiber 接口不允许我们分配自己的堆栈。 Windows 上的纤程分配与底层的内存分配相结合,使其有点昂贵。考虑到游戏引擎中一帧期间作业执行的频率很高,这绝不是一个好的解决方案。
There are at least two solutions to this problem. One of the solutions is simply to implement an assebmly based fiber interface on Windows. This shouldn’t be too hard at all since we have already implemented on both of x64 and Arm64 architecture. It is most likely just a matter of toggling a few macros.
这个问题至少有两种解决方案。解决方案之一就是在 Windows 上实现基于组件的纤程接口。这应该不会太难,因为我们已经在 x64 和 Arm64 架构上实现了。这很可能只是切换几个宏的问题。
The other solution is to put an inifinite loop inside a FiberMain function, like this.
另一个解决方案是在 FiberMain 函数中放置一个无限循环,如下所示。
1void FiberMain(void* arg){
2    while(true){
3        // execute the task here
4        DoTask();
5
6        // yield the control back to another fiber
7        SwitchFiber(current_fiber, other_fiber);
8    }
9}
This goes beyond the topic of a fiber library itself. It is more about a job system. I’ll briefly mention a few details here
这超出了纤程库本身的主题。它更多的是关于工作系统。我在这里简单提一下一些细节
- An idle fiber should either start from the first line or line 8, which is the end of the last loop iteration.
空闲纤程应该从第一行或第 8 行开始,这是最后一次循环迭代的末尾。 - Be mindful that it is totally legit for us to yield the control to any other fiber within the
DoTaskfunction. We can yield anywhere deep inside the fiber call stack.
请注意,我们将控制权交给DoTask函数内的任何其他纤程是完全合法的。我们可以在 Fiber 调用堆栈深处的任何地方进行屈服。 - The
other_fibercan be either a waiting-for-task fiber or a previously suspended fiber. Which fiber to pick is topic of job system scheduling problem.
other_fiber可以是等待任务的纤程,也可以是先前挂起的纤程。选择哪条纤程是作业系统调度问题的主题。
Cross Thread Fiber Execution
跨线程纤程执行
Different job systems have different policies. There is one important decision to make in every fiber based job system. That is about whether to allow a suspended fiber to resume on another thread. There is clearly some trade off here to consider.
不同的就业制度有不同的政策。在每一个基于纤程的工作系统中都需要做出一个重要的决定。那是关于是否允许挂起的纤程在另一个线程上恢复。这里显然需要考虑一些权衡。
- If we do allow doing so, we will have to implement all the system provided sychronization primitives like mutex, conditional variable. And we can’t use thread local storage as freely as before. This is not to say we can use TLS at all, we just need to be careful that our TLS access pattern should not cross a fiber switch as before the switch, TLS could be from thread A and after the thread it could be from thread B, this will easily crash the problem.
如果我们允许这样做,我们将必须实现所有系统提供的同步原语,如互斥体、条件变量。而且我们不能像以前那样自由地使用线程本地存储了。这并不是说我们完全可以使用 TLS,我们只是需要小心,我们的 TLS 访问模式不应像交换机之前那样跨越纤程交换机,TLS 可能来自线程 A,也可能来自线程 B ,这很容易导致崩溃问题。 - If we do not allow it. We can use all the above mentioned forbidden things. However, the load balancing may not be as good as the other way around. Think about there 4 threads ( 4 physical cores ), all of which are pulling for tasks. While the first thread somehow pulls 100 tasks, which all gets suspended soon after execution, while other three threads are just pulling tasks that never gets suspended. After the task pool is exhausted, the other three threads may be done executing at a later point. However, since the 100 tasks are already scheduled to thread 1 and if the system doesn’t allow cross thread fiber execution, we will have to wait for thread 1 to finish executing all the 100 tasks to be done, when the other threads are waiting idling.
如果我们不允许的话。我们可以使用上面提到的所有禁止的东西。然而,负载平衡可能不如反之好。想想有 4 个线程(4 个物理核心),所有这些线程都在执行任务。第一个线程以某种方式拉取 100 个任务,这些任务在执行后很快就会挂起,而其他三个线程只是拉取从未挂起的任务。任务池耗尽后,其他三个线程可能会在稍后完成执行。然而,由于这 100 个任务已经被调度到线程 1,并且如果系统不允许跨线程纤程执行,我们将不得不等待线程 1 完成所有要完成的 100 个任务,而其他线程正在等待空转。
In an ideal world, for performance consideration, we should consider allowing cross thread fiber execution. This would certainly mean that we are taking a lot more responsibility than the other way around.
在理想的情况下,出于性能考虑,我们应该考虑允许跨线程纤程执行。这肯定意味着我们要承担比相反更多的责任。
Stay Vigelent Against Compiler Optimization
对编译器优化保持警惕
Compiler optimization has always been our best friend. It optimizes code for us without us doing anything low level. However, in such a fiber environment, where we hack low level registers, things can go very wrong if we are not careful enough.
编译器优化一直是我们最好的朋友。它为我们优化代码,而无需我们做任何低级的事情。然而,在这样的纤程环境中,如果我们不够小心,我们会破解低级寄存器,事情可能会变得非常错误。
To name a concrete example, just now we briefly mentioned that as long as the TLS memory access pattern is not crossing fiber switch, it should be fine. In reality, this turns out to be problematic due to a low level compiler optimization that the compiler is allowed to optimize TLS memory access with cache for better performance. To make it clear, let’s take a look at the following code snippet.
举个具体的例子,刚才我们简单提到,只要TLS内存访问模式不是跨纤程交换机,就应该没问题。实际上,由于低级编译器优化,允许编译器通过缓存优化 TLS 内存访问以获得更好的性能,因此这是有问题的。为了清楚起见,让我们看一下下面的代码片段。
 1thread_local int tls_data = 0;
 2void WINAPI FiberEntry(PVOID arg)
 3{
 40x00B21010  push        ebp
 50x00B21011  mov         ebp,esp
 60x00B21013  push        ecx
 70x00B21014  push        esi
 80x00B21015  mov         esi,dword ptr fs:[2Ch]
 90x00B2101C  push        edi
100x00B2101D  mov         edi,dword ptr [__imp__SwitchToFiber@4 (0B23004h)]
110x00B21023  nop         dword ptr [eax]
120x00B21027  nop         word ptr [eax+eax]
13  while (true)
14  {
15    volatile int k = tls_data;
160x00B21030  mov         eax,dword ptr [esi]
17    SwitchToFiber(thread_fiber);
180x00B21032  push        dword ptr [thread_fiber (0x0B253F4h)]
190x00B21038  mov         eax,dword ptr [eax+4]
200x00B2103E  mov         dword ptr [k],eax
210x00B21041  call        edi
22  }
230x00B21043  jmp         FiberEntry+20h (0x0B21030h)
24}
Above is a mixed view between c++ and assembly code for better visibility. I purposely mark the temporay variable k with volatile to avoid compiler optimizing it out since it is not read anywhere.
上面是 C++ 和汇编代码之间的混合视图,以获得更好的可见性。我特意将临时变量 k 标记为 易失性,以避免编译器优化它,因为它在任何地方都不会被读取。
A very subtle bug is hidden in this code. We can notice that the value of the volatile variable k is set from the register eax through line 20. And the eax comes from the esi through instruction at line 16. However, the esi value is loaded before the program enters the loop. So that said the compiler is trying to be smart by assuming that the code loop will always run on the same thread so that it can cache the memory fetch through line 8. This is not a bad assumption most of the time. However, we know that there is a legit risk that loop iterations could been executed on different threads. And this optimization will lead the program to read the TLS of incorrect thread, easily causing crash.
这段代码中隐藏着一个非常微妙的错误。我们可以注意到,易失性变量 k 的值是从寄存器 eax 到第20行设置的。 eax 来自 esi 值在程序进入循环之前加载。也就是说,编译器试图变得聪明,假设代码循环始终在同一个线程上运行,以便它可以缓存第 8 行的内存获取。大多数时候,这不是一个坏假设。但是,我们知道存在循环迭代可能在不同线程上执行的合法风险。而这种优化会导致程序读取到错误线程的TLS,容易导致崩溃。
On Windows, there is a dedicated flag /GT for avoiding such fiber unfriendly optimization. However, such a flag doesn’t exist on some other platforms. In that case, what we can do is to prevent the compiler from being smart by isolating the access to TLS inside a non-inlined function. A common approach is to define the access method in a different compilation unit. As mentioned before, we still need to be careful about compilers’ link time optimization to inline it again.
在 Windows 上,有一个专用标志 /GT 来避免这种纤程不友好的优化。但是,其他一些平台上不存在这样的标志。在这种情况下,我们能做的就是通过隔离非内联函数内部对 TLS 的访问来防止编译器变得聪明。一种常见的方法是在不同的编译单元中定义访问方法。如前所述,我们仍然需要小心编译器的链接时间优化以再次内联它。
Stepping into a FiberSwitch
步入纤程切换
Besides functionality, debugability is almost equally important.
除了功能之外,可调试性几乎同样重要。
Different from threads, suspended fibers are pretty much invisible to debuggers. For example, if we pause a function in a fiber, even if we have other suspended fibers in the air, Visual Studio’s parallel call stack will not have visibility of the suspended fibers. This certainly makes debugging a bit tricky in some cases, especially when it involves sychronization issues. I personally found out that printing log is a viable option to gain more information about suspended fibers.
与线程不同,暂停的纤程对于调试器来说几乎是不可见的。例如,如果我们暂停某个 纤程 中的某个函数,即使空中还有其他暂停的 Fiber,Visual Studio 的并行调用堆栈也不会看到暂停的 Fiber 的可见性。在某些情况下,这肯定会使调试变得有点棘手,特别是当涉及同步问题时。我个人发现打印日志是获取有关暂停纤程的更多信息的可行选择。
Another detail that we need to pay attention is the ability to step into a fiber switch call. Most of the time, we don’t care about the detailed implementation in it, but our bottom line is that we should be able to step through this call to get over to the other side of the fiber switch, the target fiber code. GDB and LLDB work pretty well for this as fiber implementation is done through assembly code. However, Visual Studio has a flag that has big impact on the behavior whenever it comes to steping into a fiber switch. One can locate this flag with the following setup, Project Property Page -> Configuration Properties -> Advanced -> Advanced Properties -> Use Debug Library. If we want to step into the fiber switch function like we do with other regular functions, this needs to be set to true. Otherwise, the debugger will simply step over it without going to the other side of the fiber switch.
我们需要注意的另一个细节是进入纤程交换机呼叫的能力。大多数时候,我们并不关心其中的详细实现,但我们的底线是我们应该能够单步执行此调用以到达 Fiber 交换机的另一端,即目标 Fiber 代码。 GDB 和 LLDB 对此工作得很好,因为 Fiber 实现是通过汇编代码完成的。然而,Visual Studio 有一个标志,每当涉及到进入纤程交换机时,该标志都会对行为产生很大影响。可以通过以下设置找到此标志: Project Property Page -> Configuration Properties -> Advanced -> Advanced Properties -> Use Debug Library
Avoid Making Any Blocking Calls
避免拨打任何阻塞电话
Certain opertions, like IO read, will block the thread execution for a while because of the wait. When such a block happens, the OS commonly put this thread on hold and assign some other thread to the physical core for further execution to utilize the available hardware cores.
某些操作(例如 IO 读取)会因为等待而阻塞线程执行一段时间。当发生此类阻塞时,操作系统通常会暂停该线程,并将其他线程分配给物理核心以进一步执行,以利用可用的硬件核心。
However, fiber based job system commonly use thread affinity to fix threads on physical cores. The number of threads should be the same with the number of physically available cores. Fiber is our new user mode thread concept that allows task switching a lot faster. We should be extremely careful to avoid making blocking calls in a fiber, there will be no other thread in the same application for the OS to schedule anymore to fill in the gap while waiting for IO.
然而,基于纤程的作业系统通常使用线程关联来固定物理核心上的线程。线程数应与物理可用核心数相同。 Fiber 是我们新的用户模式线程概念,它允许任务切换速度更快。我们应该非常小心,避免在纤程中进行阻塞调用,因为在等待 IO 时,同一应用程序中不会再有其他线程可供操作系统调度来填补间隙。
However, we can’t avoid IO calls in a game. A solution in game engine is to allocate background threads that is dedicated for such calls. And only execute blocking calls on those threads rather than any fibers to avoid it.
然而,我们无法避免游戏中的 IO 调用。游戏引擎中的一个解决方案是分配专用于此类调用的后台线程。并且仅在这些线程而不是任何纤程上执行阻塞调用来避免这种情况。
Summary 概括
In summary, we mentioned a lot about fibers in this post. Starting from the very basics about CPU architecture, and then a detailed fiber implementation, all the way to the problems with fibers.
总之,我们在这篇文章中提到了很多关于纤程的内容。从 CPU 架构的基础知识开始,然后是详细的纤程实现,一直到纤程的问题。
As we can see, fiber offer great flexibility that is commonly not available through other methods, which is why it is favored by game studios seeking for better performance. Of course, the power of fiber is clearly not limited to game development alone. It can be used in mostly all CPU computational intensive software that cares about performance.
正如我们所看到的,纤程提供了其他方法通常无法提供的巨大灵活性,这就是为什么它受到寻求更好性能的游戏工作室的青睐。当然,纤程的力量显然不仅仅局限于游戏开发。它可用于几乎所有关心性能的 CPU 计算密集型软件 。
Reference 参考
[1] Preemption (computing)
[1] 抢占(计算)
[2] Here’s how Intel® Hyper-Threading Technology (Intel® HT Technology) helps processors do more work at the same time
[2] 以下是英特尔® 超线程技术(英特尔® HT 技术)如何帮助处理器同时完成更多工作
[3] C++ Coroutines: Under the covers
[3] C++ 协程:幕后花絮
[4] Building a Coroutine based Job System without Standard Library
[4] 在没有标准库的情况下构建基于协程的作业系统
[5] Combining Co-Routines and Functions into a Job System
[5] 将协程和函数组合成作业系统
[6] Parallelizing the Naughty Dog Engine Using Fibers
[6] 使用纤程并行化顽皮狗引擎
[7] Computer multitasking
[7] 计算机多任务处理
[8] Cooperative multitasking
[8] 协作多任务处理
[9] Introduction to C++ Coroutines
[9]C++协程简介
[10] Fibers, Oh My!
[10] 纤程,天哪!
[11] Modern x86 Assembly Language Programming
[11] 现代 x86 汇编语言编程
[12] AVX-512
[13] x86 Assembly Guide
[13]x86 组装指南
[14] System V Application Binary Interface AMD64 Architecture Processor Supplement
[14] System V 应用程序二进制接口 AMD64 架构处理器补充
[15] Programming with 64-Bit Arm Assembly Language
[15] 使用 64 位 Arm 汇编语言进行编程
[16] Parameters in NEON and floating-point registers
[16] NEON 和浮点寄存器中的参数
[17] Procedure Call Standard
[17] 过程调用标准
[18] Fiber (computer science)
[18] 纤程(计算机科学)
[19] Back to Basics: C++ Smart Pointers
[19] 回归基础:C++ 智能指针
[20] System V ABI
[20] 系统 V ABI


 1014
1014


 被折叠的 条评论
为什么被折叠?
被折叠的 条评论
为什么被折叠?
 到【灌水乐园】发言


