


关于Knopflerfish框架的设计
在开始,我们将看一下KF框架的设计。Main
在阅读了KF框架的一些代码后,从KF框架的主程序入手(org.knopflerfish.framework.Main)我们可以看出,KF除了实现OSGi规范,实现了自己的framework(org.knopflerfish.framework.Framework)外,主要是围绕它的框架启动类:org.knopflerfish.framework.Main做了一 系列的铺垫:比如所实现的OSGi规范的版本(我的版本是OSGi 4.0.6版本),存储Bundle的文件位置,操作系统版本,等等。这个Main类,主要做的是命令行参数(启动参数)的处理,因为KF框架启动的时候可以用xargs文件(把所有参数写成一个文件),所以处理上比较繁琐。在Main下面的handleArgs方法可以看出,所有的Bundles的基本操作(start、stop、install、etc.)都是调用org.knopflerfish.framework.Framework这个类实现的,这个类就是KF框架的基本实现,已经把功能封装地相当好用了!
那我们应该直接使用Framework类吗?
我们应该直接使用KF实现的Framework类,但是整个框架的启动铺垫是很繁琐的。从Main还有其相关的Utils的代码量就可以看出。在整个框架启动之前,要做一系列的铺垫。这里,结合我自己的项目,由于时间比较紧了,再重写这些可能时间不允许,所以我选择的是改写Main,把那个Main类作为自己应用框架的一个对KF的基本封装。具体做法就是委托Framework类的一些方法,暴露这些方法在Main外部。
总之,要基于Knopflerfish,完成自己的一个应用框架还是比较简单的 :-)
让我们简单实践一下!
准备
同 上一次 :-)开工:
1. 创建工程
打开NB6,创建一个普通Java应用工程——MyOSGiFramework: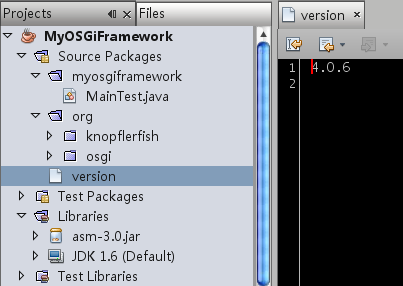
注意那个version文件,这个文件是指KF实现的OSGi的版本,在OSGi框架实现里,有一个Version类,用于版本的管理。要在我们的src目下建立一个version文件。
2.改写Knopflerfish的Main类
添加对Bundle的基本操作到Main类里,达到封装KF框架的目的。下面是添加的一些示例方法:/**
* Get the bundle context used by the system bundle.
* @return system <code>BundleContext</code>
*/
public static BundleContext getBundleContext() {
return framework.getSystemBundleContext();
}
/**
* Start a bundle.
* @param id Id of bundle to start
*/
public static void startBundle( long id) {
try {
framework.startBundle(id);
} catch (BundleException ex) {
Logger.getLogger(Main. class .getName()).log(Level.SEVERE, null , ex);
}
}
/**
* Stop a bundle.
* @param id Id of bundle to stop
*/
public static void stopBundle( long id) {
try {
framework.stopBundle(id);
} catch (BundleException ex) {
Logger.getLogger(Main. class .getName()).log(Level.SEVERE, null , ex);
}
}
这里,做的工作就是“纯”委托。
编写我们对Main的测试类:
/*
* @(#)MainTest.java
*
* This program is free software; you can redistribute it and/or modify
* it under the terms of the GNU General Public License as published by
* the Free Software Foundation; either version 3 of the License, or
* (at your option) any later version.
*
* This program is distributed in the hope that it will be useful,
* but WITHOUT ANY WARRANTY; without even the implied warranty of
* MERCHANTABILITY or FITNESS FOR A PARTICULAR PURPOSE. See the
* GNU Library General Public License for more details.
*
* You should have received a copy of the GNU General Public License
* along with this program; if not, write to the Free Software
* Foundation, Inc., 59 Temple Place - Suite 330, Boston, MA 02111-1307, USA.
*/
package myosgiframework;
import org.knopflerfish.framework.Main;
import org.osgi.framework.Bundle;
import org.osgi.framework.BundleContext;
/**
* A test case of <code>org.knopflerfish.framework.Main</code>.
* <p>
* Base on knopflerfish framework, modify some source in <code>Main</code>,
* annotate these modifications with <code> @since </code> mark,
* mark as <tt> @since 4.0.6</tt>.
* </p>
* @author 88250
* @version 1.0.0.0, Feb 15, 2008
*/
public class MainTest {
/**
* Program entry point.
* @param args should be <code>null</code>
*/
public static void main(String[] args) {
Main.main(args);
Main.startBundle( 1 );
displayBundlesStatus();
Main.stopBundle( 1 );
displayBundlesStatus();
Main.shutdown( 0 );
}
private static void displayBundlesStatus() {
BundleContext bc = Main.getBundleContext();
Bundle[] b = bc.getBundles();
for ( int i = 0 ; i < b.length;
i ++ ) {
Bundle bundle = b[i];
System.out.println( " ID: # " + bundle.getBundleId() +
" Location: " + bundle.getLocation() +
" Status: " + bundle.getState());
}
}
}
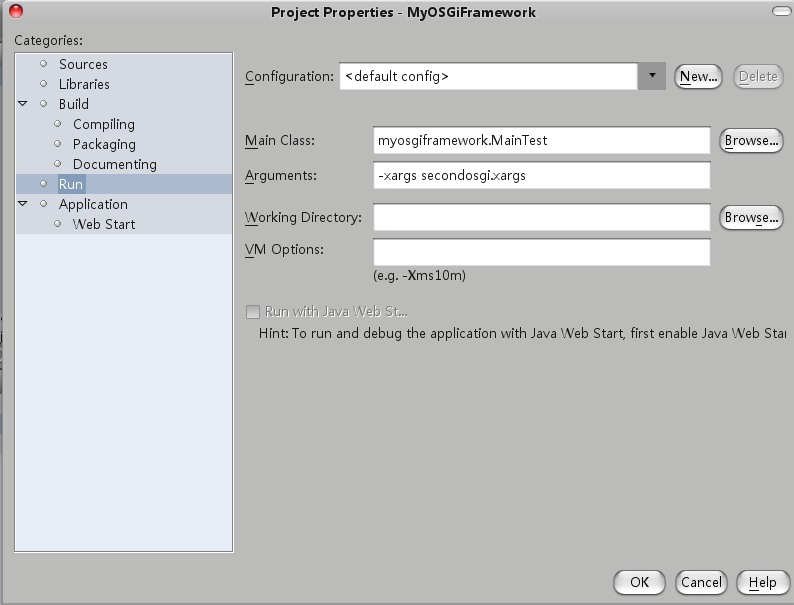
3. 测试
还记得 上一次我们的那个Bundle吗?为了它启动在我们的框架里,编写一个启动参数文件secondosgi.xargs:
 -istart /home/daniel/Work/Sources/Java/SecondOSGi/dist/SecondOSGi.jar
然后,修改启动参数:
测试输出:
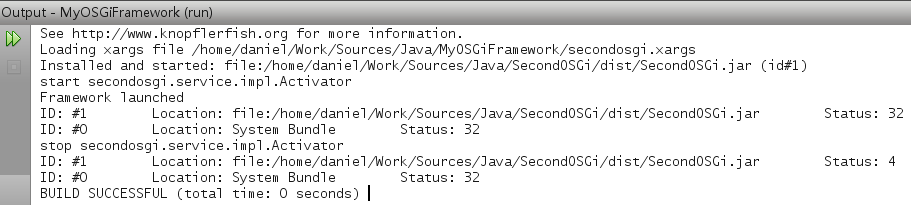


 514
514

 被折叠的 条评论
为什么被折叠?
被折叠的 条评论
为什么被折叠?
 到【灌水乐园】发言


