


Fragment是Android 3.0 引入的新API,他使开发的效率更加高效,在前面的例子我们也看到Fragment不止能解决Android Pad屏幕比较大,空间不能充分利用的问题,即使只是在手机上,也有很多的场景可以运用到Fragment,我们可能会注意到很多手机应用都会有一个非常类似的功能——即屏幕的下方显示一行Tab标签选项,点击不同的标签就可以切换到不同的界面,例如微信、QQ、支付宝等。大家可能马上就想到了TabHost,但是殊不知,TabHost并非是那么的简单,它的可扩展性非常的差,不能随意地定制Tab项显示的内容,而且运行还要依赖于ActivityGroup。ActivityGroup原本主要是用于为每一个TabHost的子项管理一个单独的Activity,但目前已经被废弃了。为什么呢?当然就是因为Fragment的出现了!查看Android官方文档中ActivityGroup的描述,如下所示:
可以看到,在API 13的时候Android就已经将ActivityGroup废弃掉了,并且官方推荐的替代方式就是使用Fragment,因为它使用起来更加的灵活。我就直接盗用郭霖大神的例子了,哈哈,大家想看的更明白,可以看原文(Android Fragment应用实战,使用碎片向ActivityGroup说再见
),我这里直接贴代码了。下面只贴出界面最下方的TabHost部分,Fragment部分大家可以下载源码查看
在activity_main.xml主布局文件,在里面加入如下代码:
<LinearLayout xmlns:android="http://schemas.android.com/apk/res/android"
android:layout_width="match_parent"
android:layout_height="match_parent"
android:orientation="vertical" >
<FrameLayout
android:id="@+id/content"
android:layout_width="match_parent"
android:layout_height="0dp"
android:layout_weight="1" >
</FrameLayout>
<LinearLayout
android:layout_width="match_parent"
android:layout_height="60dp"
android:background="@drawable/tab_bg" >
<RelativeLayout
android:id="@+id/message_layout"
android:layout_width="0dp"
android:layout_height="match_parent"
android:layout_weight="1" >
<LinearLayout
android:layout_width="match_parent"
android:layout_height="wrap_content"
android:layout_centerVertical="true"
android:orientation="vertical" >
<ImageView
android:id="@+id/message_image"
android:layout_width="wrap_content"
android:layout_height="wrap_content"
android:layout_gravity="center_horizontal"
android:src="@drawable/message_unselected" />
<TextView
android:id="@+id/message_text"
android:layout_width="wrap_content"
android:layout_height="wrap_content"
android:layout_gravity="center_horizontal"
android:text="消息"
android:textColor="#82858b" />
</LinearLayout>
</RelativeLayout>
<RelativeLayout
android:id="@+id/contacts_layout"
android:layout_width="0dp"
android:layout_height="match_parent"
android:layout_weight="1" >
<LinearLayout
android:layout_width="match_parent"
android:layout_height="wrap_content"
android:layout_centerVertical="true"
android:orientation="vertical" >
<ImageView
android:id="@+id/contacts_image"
android:layout_width="wrap_content"
android:layout_height="wrap_content"
android:layout_gravity="center_horizontal"
android:src="@drawable/contacts_unselected" />
<TextView
android:id="@+id/contacts_text"
android:layout_width="wrap_content"
android:layout_height="wrap_content"
android:layout_gravity="center_horizontal"
android:text="联系人"
android:textColor="#82858b" />
</LinearLayout>
</RelativeLayout>
<RelativeLayout
android:id="@+id/news_layout"
android:layout_width="0dp"
android:layout_height="match_parent"
android:layout_weight="1" >
<LinearLayout
android:layout_width="match_parent"
android:layout_height="wrap_content"
android:layout_centerVertical="true"
android:orientation="vertical" >
<ImageView
android:id="@+id/news_image"
android:layout_width="wrap_content"
android:layout_height="wrap_content"
android:layout_gravity="center_horizontal"
android:src="@drawable/news_unselected" />
<TextView
android:id="@+id/news_text"
android:layout_width="wrap_content"
android:layout_height="wrap_content"
android:layout_gravity="center_horizontal"
android:text="动态"
android:textColor="#82858b" />
</LinearLayout>
</RelativeLayout>
<RelativeLayout
android:id="@+id/setting_layout"
android:layout_width="0dp"
android:layout_height="match_parent"
android:layout_weight="1" >
<LinearLayout
android:layout_width="match_parent"
android:layout_height="wrap_content"
android:layout_centerVertical="true"
android:orientation="vertical" >
<ImageView
android:id="@+id/setting_image"
android:layout_width="wrap_content"
android:layout_height="wrap_content"
android:layout_gravity="center_horizontal"
android:src="@drawable/setting_unselected" />
<TextView
android:id="@+id/setting_text"
android:layout_width="wrap_content"
android:layout_height="wrap_content"
android:layout_gravity="center_horizontal"
android:text="设置"
android:textColor="#82858b" />
</LinearLayout>
</RelativeLayout>
</LinearLayout>
</LinearLayout>
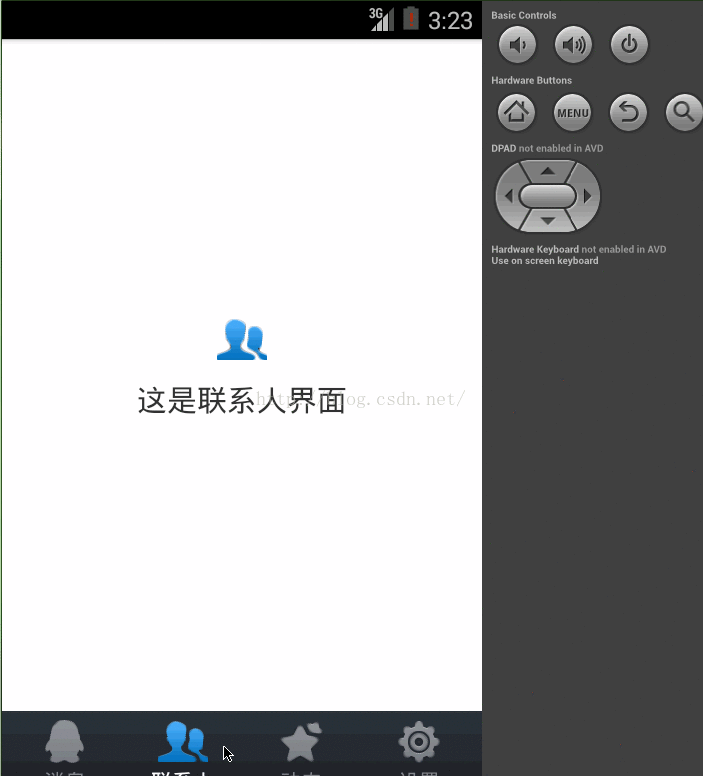
这段布局代码主要就分为两部分。第一个部分就是FrameLayout,这里只是给FrameLayout的id设置成 content,也就是将要显示Fragment内容的部分。第二个部分就是FrameLayout下面的 LinearLayout,这个LinearLayout中包含的就是整个类似于TabHost的布局。可以看到,我们将这个LinearLayout又 等分成了四份,每一份中都会显示一个ImageView和一个TextView。ImageView用于显示当前Tab的图标,TextView用于显示当前Tab的标题。至于java实现代码大家就看源码吧,我想大家也能想到了。看下实现效果:
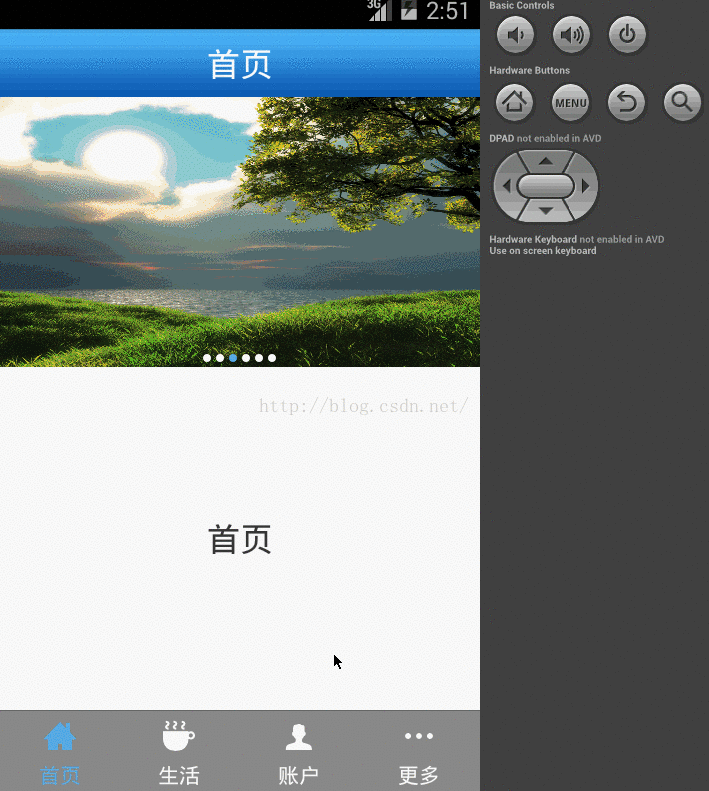
好了,既然Tabhost已经不推荐使用了,我们可以使用Fragment实现相应的功能,那么深挖下有没有更好的方案呢?看看官网,哈哈,原来TabHost是有替代品的——FragmentTabhost,下面简单给个例子,相当于一个抛砖引玉的作用吧
好了,既然Tabhost已经不推荐使用了,我们可以使用Fragment实现相应的功能,那么深挖下有没有更好的方案呢?看看官网,哈哈,原来TabHost是有替代品的——FragmentTabhost,下面简单给个例子,相当于一个抛砖引玉的作用吧
系统大致结构:
一共四个选项卡,点击不同的选项卡切换到不同的fragment,在第一个fragment界面,我用ViewPager实现了一个图片轮播的功能,在第二个fragment界面实现了一个动态添加数据到GridView中的功能。
先看下activity_main.xml
<LinearLayout xmlns:android="http://schemas.android.com/apk/res/android"
xmlns:tools="http://schemas.android.com/tools"
android:layout_width="match_parent"
android:layout_height="match_parent"
android:orientation="vertical" >
<FrameLayout
android:id="@+id/fl_main_content"
android:layout_width="match_parent"
android:layout_height="0dp"
android:layout_weight="1" >
</FrameLayout>
<android.support.v4.app.FragmentTabHost
android:id="@android:id/tabhost"
android:layout_width="match_parent"
android:layout_height="wrap_content" >
<TabWidget
android:id="@android:id/tabs"
android:layout_width="match_parent"
android:layout_height="wrap_content" >
</TabWidget>
<FrameLayout
android:id="@android:id/tabcontent"
android:layout_width="0dp"
android:layout_height="0dp" >
</FrameLayout>
</android.support.v4.app.FragmentTabHost>
</LinearLayout>
MainActivity.java如下
public class MainActivity extends FragmentActivity implements
OnTabChangeListener {
private final static String TAB_HOME = "home";
private final static String TAB_LIFE = "life";
private final static String TAB_ACCOOUNT = "account";
private final static String TAB_MORE = "more";
private long mExitTime = 0;
private TabIndicatorView homeIndicator;
private TabIndicatorView lifeIndicator;
private TabIndicatorView accountIndicator;
private TabIndicatorView moreIndicator;
@Override
protected void onCreate(Bundle savedInstanceState) {
super.onCreate(savedInstanceState);
requestWindowFeature(Window.FEATURE_NO_TITLE);
setContentView(R.layout.activity_main);
FragmentTabHost tabhost = (FragmentTabHost) findViewById(android.R.id.tabhost);
tabhost.setup(this, getSupportFragmentManager(), R.id.fl_main_content);
//首页选项卡
TabSpec spec = tabhost.newTabSpec(TAB_HOME);
homeIndicator = new TabIndicatorView(this);
homeIndicator.setTitle("首页");
homeIndicator.setData(R.drawable.home_normal, R.drawable.home_press);
spec.setIndicator(homeIndicator);
tabhost.addTab(spec, HomeFragment.class, null);
//生活选项卡
spec = tabhost.newTabSpec(TAB_LIFE);
lifeIndicator = new TabIndicatorView(this);
lifeIndicator.setTitle("ͨ生活");
lifeIndicator.setData(R.drawable.lifeon_normal,
R.drawable.lifeon_press);
spec.setIndicator(lifeIndicator);
tabhost.addTab(spec, LifeFragment.class, null);
//帐号选项卡
spec = tabhost.newTabSpec(TAB_ACCOOUNT);
accountIndicator = new TabIndicatorView(this);
accountIndicator.setTitle("账户");
accountIndicator.setData(R.drawable.zhanghu_normal,
R.drawable.zhanghu_press);
spec.setIndicator(accountIndicator);
tabhost.addTab(spec, AccountFragment.class, null);
//更多选项卡
spec = tabhost.newTabSpec(TAB_MORE);
moreIndicator = new TabIndicatorView(this);
moreIndicator.setTitle("更多");
moreIndicator.setData(R.drawable.gengduo_normal,
R.drawable.gengduo_press);
spec.setIndicator(moreIndicator);
tabhost.addTab(spec, MoreFragment.class, null);
tabhost.getTabWidget().setDividerDrawable(android.R.color.white);
tabhost.setCurrentTabByTag(TAB_HOME);
homeIndicator.setSelect(true);
// 点击tab事件
tabhost.setOnTabChangedListener(this);
}
@Override
public void onTabChanged(String tabId) {
homeIndicator.setSelect(false);
lifeIndicator.setSelect(false);
accountIndicator.setSelect(false);
moreIndicator.setSelect(false);
if (TAB_HOME.equals(tabId)) {
homeIndicator.setSelect(true);
} else if (TAB_LIFE.equals(tabId)) {
lifeIndicator.setSelect(true);
} else if (TAB_ACCOOUNT.equals(tabId)) {
accountIndicator.setSelect(true);
} else if (TAB_MORE.equals(tabId)) {
moreIndicator.setSelect(true);
}
}
看下第一个fragment的实现吧,剩下的可以下载下来自己看下
public class HomeFragment extends Fragment {
private View homeView;
private ViewPager viewPager;
private LinearLayout dot;
private int[] images = new int[] { R.drawable.a, R.drawable.b,
R.drawable.c, R.drawable.d, R.drawable.e, R.drawable.f };
private ImageView[] mImageViews;
private Handler mHandler = new Handler() {
public void handleMessage(Message msg) {
viewPager.setCurrentItem(viewPager.getCurrentItem() + 1);
mHandler.sendEmptyMessageDelayed(0, 4000);
};
};
@Override
public View onCreateView(LayoutInflater inflater, ViewGroup container,
Bundle savedInstanceState) {
homeView = inflater.inflate(R.layout.fragment_home, container, false);
initView();
initData();
return homeView;
}
/**
* 初始化组件
*/
private void initView() {
viewPager = (ViewPager) homeView.findViewById(R.id.viewPager);
dot = (LinearLayout) homeView.findViewById(R.id.dot);
}
private void initData() {
initDots();
mImageViews = new ImageView[images.length];
for (int i = 0; i < mImageViews.length; i++) {
mImageViews[i] = new ImageView(getActivity());
;
mImageViews[i].setBackgroundResource(images[i]);
}
HomeAdapter adapter = new HomeAdapter();
viewPager.setAdapter(adapter);
viewPager.setOnPageChangeListener(new OnPageChangeListener() {
@Override
public void onPageSelected(int position) {
updateDot();
}
@Override
public void onPageScrolled(int arg0, float arg1, int arg2) {
}
@Override
public void onPageScrollStateChanged(int arg0) {
// TODO Auto-generated method stub
}
});
int centerValue = Integer.MAX_VALUE / 2;
int value = centerValue % images.length;
viewPager.setCurrentItem(centerValue - value);
updateDot();
mHandler.sendEmptyMessageDelayed(0, 4000);
}
/**
* 初始化dot点
*/
private void initDots() {
for (int i = 0; i < images.length; i++) {
View view = new View(getActivity());
LayoutParams params = new LayoutParams(8, 8);
if (i != 0) {
params.leftMargin = 5;
}
view.setLayoutParams(params);
view.setBackgroundResource(R.drawable.selecter_dot);
dot.addView(view);
}
}
// 改变dot
private void updateDot() {
int currentPage = viewPager.getCurrentItem() % images.length;
for (int i = 0; i < dot.getChildCount(); i++) {
dot.getChildAt(i).setEnabled(i == currentPage);
}
}
class HomeAdapter extends PagerAdapter {
@Override
public int getCount() {
return Integer.MAX_VALUE;
}
@Override
public boolean isViewFromObject(View arg0, Object arg1) {
return arg0 == arg1;
}
@Override
public Object instantiateItem(ViewGroup container, int position) {
((ViewPager) container).addView(mImageViews[position
% mImageViews.length], 0);
return mImageViews[position % mImageViews.length];
}
@Override
public void destroyItem(ViewGroup container, int position, Object object) {
container.removeView((View) object);
}
}
}
布局文件如下:
<?xml version="1.0" encoding="utf-8"?>
<LinearLayout xmlns:android="http://schemas.android.com/apk/res/android"
android:layout_width="match_parent"
android:layout_height="match_parent"
android:orientation="vertical" >
<RelativeLayout
android:layout_width="match_parent"
android:layout_height="45dp"
android:background="@drawable/blue_bg" >
<TextView
android:layout_width="wrap_content"
android:layout_height="wrap_content"
android:layout_centerHorizontal="true"
android:layout_centerVertical="true"
android:text="首页"
android:textColor="#fff"
android:textSize="22sp" />
</RelativeLayout>
<RelativeLayout
android:layout_width="match_parent"
android:layout_height="180dp" >
<android.support.v4.view.ViewPager
android:id="@+id/viewPager"
android:layout_width="match_parent"
android:layout_height="wrap_content" />
<LinearLayout
android:layout_width="match_parent"
android:layout_height="wrap_content"
android:layout_alignBottom="@+id/viewPager"
android:orientation="vertical" >
<LinearLayout
android:id="@+id/dot"
android:layout_width="wrap_content"
android:layout_height="wrap_content"
android:layout_gravity="center_horizontal"
android:layout_marginBottom="3dp"
android:orientation="horizontal" >
</LinearLayout>
</LinearLayout>
</RelativeLayout>
<RelativeLayout
android:layout_width="match_parent"
android:layout_height="0dp"
android:layout_weight="1" >
<TextView
android:layout_width="wrap_content"
android:layout_height="wrap_content"
android:layout_centerHorizontal="true"
android:layout_centerVertical="true"
android:text="首页"
android:textSize="22sp" />
</RelativeLayout>
</LinearLayout>


 4470
4470

 被折叠的 条评论
为什么被折叠?
被折叠的 条评论
为什么被折叠?
 到【灌水乐园】发言


