


 本文指导读者如何下载Tomcat源码,添加缺失的pom文件以便于在IDEA中编译,以及如何导入项目并解决可能遇到的问题,如端口冲突和依赖管理,最终实现Tomcat源码的本地运行。
前面我们看了很多理论,但是总感觉少了什么?少了什么呢?亲手搞一下Tomcat源码,至少要将源码运行起来玩玩吧。今天我们就来看一下如何在idea中运行Tomcat源码。
目录
1.下载源码
Apache Tomcat® - Welcome! 这里下载
然后在左侧有版本栏:
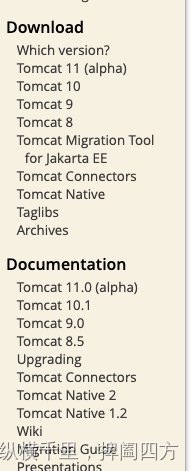
可以看到这里Tomcat已经进化到11了,我们还是先研究一下经典版本的9吧,有时候如果着急使用使用最新发布的版本往往会被迫升级JDK等等,太麻烦了,不想折腾这些。
然后进来之后看到如下内容

这里上策是二进制文件,也就是jar包,复制到工程里是可以直接运行的,我们要下的是下侧的source code,两种格式都可以,下载就行了。
2.增加pom文件
Tomcat里有些依赖的文件是不完整的,我们如果想用idea来编译,需要手动增加一个pom.xml文件,内容如下:
<?xml version="1.0" encoding="UTF-8"?>
<project xmlns="http://maven.apache.org/POM/4.0.0"
         xmlns:xsi="http://www.w3.org/2001/XMLSchema-instance"
         xsi:schemaLocation="http://maven.apache.org/POM/4.0.0 http://maven.apache.org/xsd/maven-4.0.0.xsd">

    <modelVersion>4.0.0</modelVersion>
    <groupId>org.apache.tomcat</groupId>
    <artifactId>Tomcat9.0.55</artifactId>
    <name>Tomcat9.0.55</name>
    <version>c</version>

    <build>
        <finalName>Tomcat9.0.55</finalName>
        <sourceDirectory>java</sourceDirectory>
        <!--<testSourceDirectory>test</testSourceDirectory>-->
        <resources>
            <resource>
                <directory>java</directory>
            </resource>
        </resources>
        <testResources>
            <testResource>
                <directory>test</directory>
            </testResource>
        </testResources>
        <plugins>
            <plugin>
                <groupId>org.apache.maven.plugins</groupId>
                <artifactId>maven-compiler-plugin</artifactId>
                <version>3.6.1</version>
                <configuration>
                    <encoding>UTF-8</encoding>
                    <source>1.8</source>
                    <target>1.8</target>
                </configuration>
            </plugin>
        </plugins>
    </build>

    <dependencies>
      <dependency>
        <groupId>junit</groupId>
        <artifactId>junit</artifactId>
        <version>4.12</version>
        <scope>test</scope>
      </dependency>
      <dependency>
        <groupId>org.easymock</groupId>
        <artifactId>easymock</artifactId>
        <version>4.0.2</version>
        <scope>test</scope>
      </dependency>
      <dependency>
        <groupId>org.apache.ant</groupId>
        <artifactId>ant</artifactId>
        <version>1.10.8</version>
      </dependency>
      <dependency>
        <groupId>wsdl4j</groupId>
        <artifactId>wsdl4j</artifactId>
        <version>1.6.2</version>
      </dependency>
      <dependency>
        <groupId>javax.xml</groupId>
        <artifactId>jaxrpc</artifactId>
        <version>1.1</version>
      </dependency>

      <dependency>
        <groupId>org.eclipse.jdt.core.compiler</groupId>
        <artifactId>ecj</artifactId>
        <version>4.6.1</version>
      </dependency>
      <dependency>
        <groupId>biz.aQute.bnd</groupId>
        <artifactId>biz.aQute.bndlib</artifactId>
        <version>5.1.1</version>
      </dependency>

      <dependency>
        <groupId>com.unboundid</groupId>
        <artifactId>unboundid-ldapsdk</artifactId>
        <version>4.0.13</version>
        <scope>test</scope>
      </dependency>

    </dependencies>
</project>
然后就可以使用 mvn clean install 来执行一下看看,正常情况下应该将所有的文件都下载下来,并且没有问题才对。
如果出错,说明你的mvn需要配置一下,使用阿里云代理就可以了,如果你的mvn的settings.xml已经配置了公司的,不想改,怕乱了,可以这么做,先创建一个新目录,例如outside/,然后在里面创建settings.xml,然后编译的时候这么写就可以了:
mvn clean install --settings ~/.m2/outside/settings.xml
注意上面将settings.xml地址改成你设置的,我的是mac电脑,所以地址可以用上面这个样子。
然后settings.xml中的文件是这样的:
<?xml version="1.0" encoding="UTF-8"?>
<settings xmlns="http://maven.apache.org/SETTINGS/1.0.0"
    xmlns:xsi="http://www.w3.org/2001/XMLSchema-instance" xsi:schemaLocation="http://maven.apache.org/SETTINGS/1.0.0 http://maven.apache.org/xsd/settings-1.0.0.xsd">

    <!-- 本地仓库的位置 -->
    <localRepository>${user.home}/.m2/repository</localRepository>

    <!-- Apache Maven 配置 -->
    <pluginGroups/>
    <proxies/>

    <!-- 私服发布的用户名密码 -->
    <servers>
        <server>
            <id>releases</id>
            <username>deployment</username>
            <password>He2019</password>
        </server>
        <server>
            <id>snapshots</id>
            <username>deployment</username>
            <password>He2019</password>
        </server>
    </servers>

    <!-- 阿里云镜像 -->
    <mirrors>
        <mirror>
            <id>alimaven</id>
            <name>aliyun maven</name>
            <!-- https://maven.aliyun.com/repository/public/ -->
            <url>http://maven.aliyun.com/nexus/content/groups/public/</url>
            <mirrorOf>central</mirrorOf>
        </mirror>
    </mirrors>

    <!-- 配置: java8, 先从阿里云下载, 没有再去私服下载  -->
    <!-- 20190929 hepengju 测试结果: 影响下载顺序的是profiles标签的配置顺序(后面配置的ali仓库先下载), 而不是activeProfiles的顺序 -->
    <profiles>
        <!-- 全局JDK1.8配置 -->
        <profile>
            <id>jdk1.8</id>
            <activation>
                <activeByDefault>true</activeByDefault>
                <jdk>1.8</jdk>
            </activation>
            <properties>
                <project.build.sourceEncoding>UTF-8</project.build.sourceEncoding>
                <maven.compiler.source>1.8</maven.compiler.source>
                <maven.compiler.target>1.8</maven.compiler.target>
                <maven.compiler.compilerVersion>1.8</maven.compiler.compilerVersion>
            </properties>
        </profile>


        <!-- Nexus私服配置: 第三方jar包下载, 比如oracle的jdbc驱动等 -->
        <profile>
            <id>dev</id>
            <repositories>
                <repository>
                    <id>nexus</id>
                    <url>http://nexus.hepengju.cn:8081/nexus/content/groups/public/</url>
                    <releases>
                        <enabled>true</enabled>
                    </releases>
                    <snapshots>
                        <enabled>true</enabled>
                    </snapshots>
                </repository>
            </repositories>
            <pluginRepositories>
                <pluginRepository>
                    <id>public</id>
                    <name>Public Repositories</name>
                    <url>http://nexus.hepengju.cn:8081/nexus/content/groups/public/</url>
                </pluginRepository>
            </pluginRepositories>
        </profile>

        <!-- 阿里云配置: 提高国内的jar包下载速度 -->
        <profile>
            <id>ali</id>
            <repositories>
                <repository>
                    <id>alimaven</id>
                    <name>aliyun maven</name>
                    <url>http://maven.aliyun.com/nexus/content/groups/public/</url>
                    <releases>
                        <enabled>true</enabled>
                    </releases>
                    <snapshots>
                        <enabled>true</enabled>
                    </snapshots>
                </repository>
            </repositories>
            <pluginRepositories>
                <pluginRepository>
                    <id>alimaven</id>
                    <name>aliyun maven</name>
                    <url>http://maven.aliyun.com/nexus/content/groups/public/</url>
                </pluginRepository>
            </pluginRepositories>
        </profile>

    </profiles>

    <!-- 激活配置 -->
    <activeProfiles>
        <activeProfile>jdk1.8</activeProfile>
        <activeProfile>dev</activeProfile>
        <activeProfile>ali</activeProfile>
    </activeProfiles>
</settings>
这个也是花了很多时间测试出来。
之后就可以继续执行mvn,直到成功。
3.idea导入Tomcat源码
不同版本的idea操作略有不同,但是基本策略都是file->New Project->Import from existing Project,将我们的Tomcat源码导入。
导入之后要打开run->edit configrations,这里我发现idea已经自动导入了一些配置,如下:
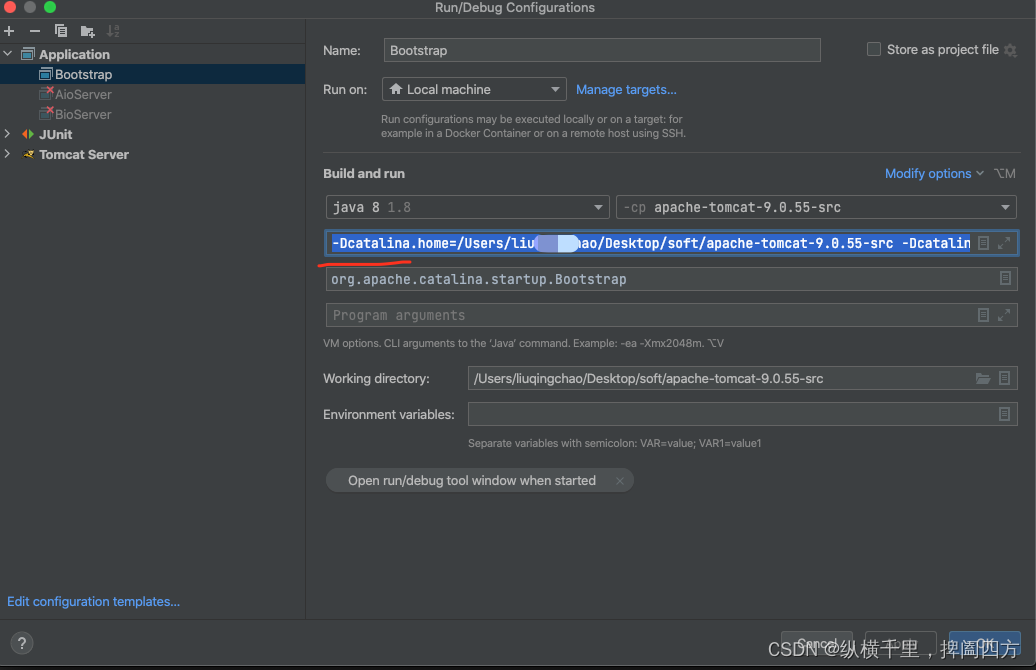
网上看说这里要增加配置,但是貌似牛逼的idea自动都导入过来了,不用配置了。
然后就可以执行了吗?原则上是的,但是有时候执行会出问题,这时候就需要我们仔细看一下输入的日志提示什么了。我的提示里有这么两行:

Tomcat默认使用的端口号是8080,这个很容易被其他服务占用,我的第一反应是端口号被占用了,所以打开server.xml文件,找到下面这地方:
    <Connector port="8080" protocol="HTTP/1.1" executor="tomcatThreadPool"
               connectionTimeout="20000"
               redirectPort="8443" URIEncoding="UTF-8"/>
将8080改成8030,然后点启动来执行就好了。
此时出现这个信息,基本就是启动成功了:

然后打开浏览器输入http://localhost:8030/
然后就看到了熟悉的界面:

搞定了


 823
823


 被折叠的 条评论
为什么被折叠?
被折叠的 条评论
为什么被折叠?
 到【灌水乐园】发言


