


3.2.1TextView
对齐方式 android:gravity = "center"
指定文字大小 android:textSize="24sp"
指定文字颜色
android:textColor="#ff0f"
3.2.2Button
系统会对所有Button中的英文字母进行大小写转换,可以使用
android:textAllCaps = "false"来禁用这一默认特性
为Button 的点击事件注册一个监听器
1.使用匿名类
     first = (Button) findViewById(R.id.StartFirst);
      first.setOnClickListener(new View.OnClickListener() {
            @Override
            public void onClick(View v) {
               FirstActivity.actionStart(MainActivity.this);
            }
        });
2.实现接口
public class MainActivity extends BaseActivity implements View.OnClickListener {
Button first,second;
    @Override
    protected void onCreate(Bundle savedInstanceState) {
        super.onCreate(savedInstanceState);
        setContentView(R.layout.activity_main);
        first = (Button) findViewById(R.id.StartFirst);
        second = (Button) findViewById(R.id.StartSecond);
        first.setOnClickListener(this);
        second.setOnClickListener(this);

    }
    @Override
    public void onClick(View v) {
        switch (v.getId()){
            case R.id.StartFirst:
                FirstActivity.actionStart(MainActivity.this);
                break;
            case R.id.StartSecond: {
                String mydata = "test";
                SecondActivity.actionStart(MainActivity.this, mydata);
            }
                break;
            default:
                break;
        }
    }
}
3.2.3EditText
在输入框中显示一些提示性的文字 android:hint="Something here"
指定EditText的最大行数 android:maxLines ="2" 这样当输入的内容超过两行时,文本就会向上滚动而
EditText不会再继续拉伸
获取
EditText中输入的内容
      editText = (EditText) findViewById(R.id.edittext);
        String inputEdit = editText.getText().toString();
3.2.4ImageView
android:src属性给ImageView指定一张图片
android:src="@drawable/apple_pic"通过代码更改ImageView的图片
        imageView = (ImageView) findViewById(R.id.imag);
        imageView.setImageResource(R.drawable.banana_pic);
3.3.4百分比布局
在LinearLayout,RelativeLayout,FrameLayout中只有LinearLayout支持使用layout_weight属性来实现按比例指定控件大小的功能
按照书上的写导入依赖会出错
解决方法:在sdk下的这个路径去看自己的百分比布局库的版本号
D:\Androidsdk\sdk\extras\android\m2repository\com\android\support\appcompat-v7

添加依赖就可以了 另外添加的这个版本号不能比support:appcompat-v7的这个版本号低
dependencies {
    compile fileTree(dir: 'libs', include: ['*.jar'])
    testCompile 'junit:junit:4.12'
    compile 'com.android.support:appcompat-v7:25.3.1'
    compile 'com.android.support:percent:25.3.1'
}
布局文件
<?xml version="1.0" encoding="utf-8"?>
<android.support.percent.PercentFrameLayout
    xmlns:android ="http://schemas.android.com/apk/res/android"
    xmlns:app ="http://schemas.android.com/apk/res-auto"
    android:layout_width="match_parent"
    android:layout_height="match_parent"
    >
    <Button
        android:layout_width="0dp"
        android:layout_height="0dp"
        android:layout_gravity="left|top"
        app:layout_heightPercent="20%"
        app:layout_widthPercent ="40%"
        android:textColor="#00f"
        android:text="height:20%.width:40%"
        />
<Button
    android:layout_width="0dp"
    android:layout_height="0dp"
    app:layout_widthPercent="60%"
    app:layout_heightPercent="80%"
    android:textColor="#ff0"
    android:layout_gravity="bottom|right"
    android:text="height:80%.width:60%"
    />
</android.support.percent.PercentFrameLayout>
注意要定义一个app的命名空间,这样才能使用百分比布局的自定义属性
xmlns:app ="http://schemas.android.com/apk/res-auto"
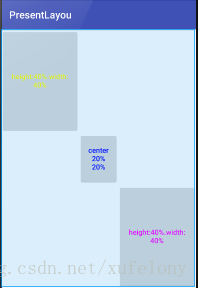
在手机上的误差像素好像太高了一点,中间缝隙好大.......不知道是不是因为大屏
对照大神的代码发现好像是因为背景的原因
用PercentRelativeLayout 布局
<?xml version="1.0" encoding="utf-8"?>
<android.support.percent.PercentRelativeLayout
xmlns:android ="http://schemas.android.com/apk/res/android"
xmlns:app ="http://schemas.android.com/apk/res-auto"
android:layout_width="match_parent"
android:layout_height="match_parent"
>
<Button
android:layout_width="0dp"
android:layout_height="0dp"
android:id="@+id/center"
android:layout_centerInParent="true"
android:textColor="#00f"
android:text="center 20% 20%"
android:textAllCaps="false"
app:layout_heightPercent="20%"
app:layout_widthPercent ="20%"
/>
<Button
android:layout_width="0dp"
android:layout_height="0dp"
android:layout_toLeftOf="@id/center"
android:layout_above="@id/center"
android:textAllCaps="false"
android:text="height:40%.width:40%"
android:textColor="#ff0"
app:layout_widthPercent="40%"
app:layout_heightPercent="40%"
/>
<Button
android:layout_width="0dp"
android:layout_height="0dp"
android:layout_alignParentBottom="true"
android:layout_alignParentRight="true"
android:text="height:40%.width:40%"
android:textAllCaps="false"
android:textColor="#f0f"
app:layout_widthPercent="40%"
app:layout_heightPercent="40%"
/>
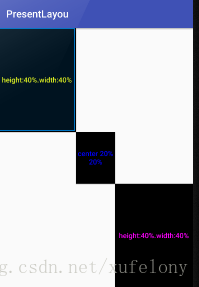
</android.support.percent.PercentRelativeLayout>添加android:background测试
<?xml version="1.0" encoding="utf-8"?>
<android.support.percent.PercentRelativeLayout
    xmlns:android ="http://schemas.android.com/apk/res/android"
    xmlns:app ="http://schemas.android.com/apk/res-auto"
    android:layout_width="match_parent"
    android:layout_height="match_parent"
    >
    <Button
        android:layout_width="0dp"
        android:layout_height="0dp"
        android:id="@+id/center"
        android:layout_centerInParent="true"
        android:textColor="#00f"
        android:text="center 20% 20%"
        android:textAllCaps="false"
        app:layout_heightPercent="20%"
        app:layout_widthPercent ="20%"
        android:background="#000"
        />
    <Button
        android:layout_width="0dp"
        android:layout_height="0dp"
        android:layout_toLeftOf="@id/center"
        android:layout_above="@id/center"
        android:textAllCaps="false"
        android:text="height:40%.width:40%"
        android:textColor="#ff0"
        app:layout_widthPercent="40%"
        app:layout_heightPercent="40%"
        android:background="#000"
        />
    <Button
        android:layout_width="0dp"
        android:layout_height="0dp"
        android:layout_alignParentBottom="true"
        android:layout_alignParentRight="true"
        android:text="height:40%.width:40%"
        android:textAllCaps="false"
        android:textColor="#f0f"
        app:layout_widthPercent="40%"
        app:layout_heightPercent="40%"
        android:background="#000"
        />
</android.support.percent.PercentRelativeLayout>
果然没有缝隙了
源码 https://github.com/onlyfelony/PresentLayou


 853
853

 被折叠的 条评论
为什么被折叠?
被折叠的 条评论
为什么被折叠?
 到【灌水乐园】发言


