


输入法的例子和源代码看了不少时间了,看得头很晕,很郁闷。静下心来把整个代码想了一遍,其实大部分代码都在处理绘制界面,以及事件的处理,核心代码很少,都被底层封装得很完美了。
先看看一般输入法的界面:
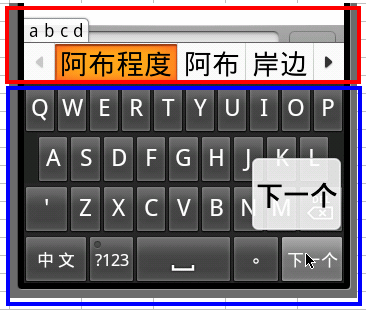
分为两个部分,上部分是候选窗口(CandidateView),用来显示候选词,现在常用的输入法都有这个功能,如在搜狗、google输入法中输入abc,输入框中就会显示很多相关联的中文词。下部分就是软键盘了,这个没什么好说的。
输入法中核心类是InputMethodService
其次就是:CandidateView 和KeyboardView
CandidateView为候选窗口,InputMethodService在启动过程中会调用接口public View onCreateCandidatesView() ,在这个方法
中把CandidateView对象返回后,InputMethodService内部会将其布局到相应的位置。
在android中没有CandidateView父类,得自己从头写,一般的做法是:
通过方法public void setService(InputMethodService listener) 将Service类传进来,然后再通过public void setSuggestions(List suggestions…) 方法将候选词列表传递过来,CandidateView将其显示到界面上,用户选择结束后,再通过service的方法pickSuggestionManually(mSelectedIndex) ,将选择的候选词在列表中的序号传递回去。至此, CandidateView 就完成了它神圣的使命。
android中KeyboardView有一个通用类,继承它可以通过简单的配置文件就显示出很专业软键盘。在源代码中,它绝大部分代码都在做 绘 制工作和事件处理,不过就其本质功能来说是相当地简单,用户摁下软键盘上的某个键后,它把这个键所代表的值传递给InputMethodService类 也完成了它的使命。InputMethodService在public View onCreateInputView() 方法中获得该View。
InputMethodService就是输入法的核心了,该类是一个Service,跟其它默默无闻的Service不同的是,它是一个带有View的Service。其内部有几个个重要的接口:
InputMethodImpl
InputMethodSessionImpl
InputConnection
InputMethodService通过这几个个类跟系统和输入框进行交互的。
输入框从InputMethodService获取信息是通过InputConnection来实现的, 在启动输入法时,InputConnection由客户端控件创建,并传递给输入法应用,由输入法应用调用,进行信息反馈
InputMethod接口定义了一套操纵输入法应用的方法。 如,bindInput, hideInput, startInput等。为了系统安全,这类接口只有系统可以访问,客户端控件无法直接调用这个接口。所有的输入法应用都需要客户端控件具有 BIND_INPUT_METHOD权限,作为系统的安全机制,否则将无法与输入法服务交互。
InputMethodSession作为InputMethod的辅助接口类,为 客户端控件开放了可直接调用的函数接口。包括向输入法应用分发键盘事件,更新光标位置,更新编辑区域内选择的问题信息等。客户端控件通过 IIputMethodSession对于输入法应用的交互是单向的,即只能向输入法应用传递信息,无法获取信息
以上几个点是从网上copy过来的,感觉这几点对于理解InputMethodService特别有用。
代码看得太多反而看不清本质,这几个类中最实用的是InputConnection的
public boolean commitText(CharSequence text, int newCursorPosition)
通过KeyboardView和CandidateView, InputMethodService类已经获得了想要的内容,然后通过这个方法把值传递给输入框。
按奈不住心中读源代码的郁闷,先来写一个输入法发泄一下:
先来一个CandidateView,设想的布局如下:

这个View中不进行任何自绘制,用android现有的View,两边各一个按钮(Button),用来滚动多个候选词,中间显示候选词(TextView),为了方便CandidateView继承RelativeLayout的内部类,便于加入子控件和控制,setService和 setSuggestions两个方法可以不用,反正是内部类,不过为了配合上面的说明,思量再三还是加上了:
public class helloIme extends InputMethodService {
    class CandidateView extends RelativeLayout {
        TextView tv; // 中间显示候选词
        Button btLeft, btRight; // 左右按钮
        helloIme listener; // helloIme 用于返回选中的 候选词下标
        List<String> suggestions; // 候选词列表, KeyboardView 不同的键按下后会设置相关的列表
        int mSelectedIndex = -1; // 当前 候选词下标

        public CandidateView(Context context) {
            super(context);
            tv = new TextView(context);
            tv.setId(1);
            RelativeLayout.LayoutParams lpCenter = new RelativeLayout.LayoutParams(200,
                    ViewGroup.LayoutParams.WRAP_CONTENT);
            lpCenter.addRule(RelativeLayout.CENTER_IN_PARENT);
            addView(tv, lpCenter);
            tv.setOnClickListener(new OnClickListener() {
                public void onClick(View v) {
                     listener.pickSuggestionManually(mSelectedIndex);
                }
            });
            btLeft = new Button(context);
            btLeft.setText("<");
            btLeft.setOnClickListener(new OnClickListener() {
                public void onClick(View arg0) {
                    mSelectedIndex = mSelectedIndex > 0 ? (mSelectedIndex - 1) : 0;
                    tv.setText(suggestions.get(mSelectedIndex));
                }
            });
            RelativeLayout.LayoutParams lpLeft = new RelativeLayout.LayoutParams(60,
                    ViewGroup.LayoutParams.WRAP_CONTENT);
            lpLeft.addRule(RelativeLayout.LEFT_OF, 1);
            addView(btLeft, lpLeft);
            btRight = new Button(context);
            btRight.setText(">");
            btRight.setOnClickListener(new OnClickListener() {
                public void onClick(View v) {
                    mSelectedIndex = mSelectedIndex >= suggestions.size() - 1 ? suggestions.size() - 1
                            : mSelectedIndex + 1;
                    tv.setText(suggestions.get(mSelectedIndex));
                }
            });
            RelativeLayout.LayoutParams lpRight = new RelativeLayout.LayoutParams(60,
                    ViewGroup.LayoutParams.WRAP_CONTENT);
            lpRight.addRule(RelativeLayout.RIGHT_OF, 1);
            addView(btRight, lpRight);
        }

        public void setService(helloIme listener) {
            this.listener = listener;
        }

        public void setSuggestions(List<String> suggestions) {
            mSelectedIndex = 0;
            tv.setText(suggestions.get(mSelectedIndex));
            this.suggestions = suggestions;
        }
    }
}
上面最重要的是粗体的那两行,View的布局还是花费了很多代码:(
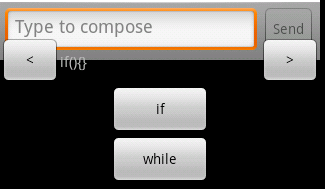
KeyboardView的布局预想如下:

就两个按钮,点if时往输入框中输出if(){}, if(){}else if(){}…,whie时往输入框中输出whie(){},这个类同样是继承于RelativeLayout的内部类:
class KeyboardView extends RelativeLayout {
    public KeyboardView(Context context) {
        super(context);
        Button btIf = new Button(context);
        btIf.setText("if");
        btIf.setId(1);
        RelativeLayout.LayoutParams lpIf = new RelativeLayout.LayoutParams(100, 50);
        lpIf.addRule(RelativeLayout.CENTER_HORIZONTAL);
        btIf.setOnClickListener(new OnClickListener() {
            public void onClick(View v) {
                setCandidatesViewShown(true); // 显示 CandidateView
                helloIme.this.onKey("if"); // 将点击按钮的值传回给 InputMethodService
            }
        });
        addView(btIf, lpIf);
        Button btWhile = new Button(context);
        btWhile.setText("while");
        RelativeLayout.LayoutParams lpWhile = new RelativeLayout.LayoutParams(100, 50);
        lpWhile.addRule(RelativeLayout.BELOW, 1);
        lpWhile.addRule(RelativeLayout.ALIGN_LEFT, 1);
        btWhile.setOnClickListener(new OnClickListener() {
            public void onClick(View v) {
                setCandidatesViewShown(true);
                helloIme.this.onKey("while");
            }
        });
        addView(btWhile, lpWhile);
    }
}
CandidateView默认是不显示的,所以需要调用InputMethodService 的setCandidatesViewShown()方法。
接下来把helloIme的代码贴出来:
public class helloIme extends InputMethodService {
    private List<String> suggestionlist; // 当前候选词表
    private Hashtable<String, List<String>> data; // 词典数据
    private KeyboardView mkeyView;
    private CandidateView mCandView;

    public void onInitializeInterface() { // InputMethodService在启动时,系统会调用该方法,具体内容下回再表
        // 初始化 词典数据
        data = new Hashtable<String, List<String>>();
        List<String> list = new ArrayList<String>();
        list.add("if(){}");
        list.add("if(){}else if(){}");
        list.add("if(){}else{}");
        data.put("if", list);
        list = new ArrayList<String>();
        list.add("while(){}");
        data.put("while", list);
    }

    public View onCreateInputView() {
        mkeyView = new KeyboardView(this);
        return mkeyView;
    }

    public View onCreateCandidatesView() {
        mCandView = new CandidateView(this);
        mCandView.setService(this);
        return mCandView;
    }

    public void pickSuggestionManually(int mSelectedIndex) {
        getCurrentInputConnection().commitText(suggestionlist.get(mSelectedIndex), 0); // 往输入框输出内容
        setCandidatesViewShown(false); // 隐藏 CandidatesView
    }

    public void onKey(CharSequence text) {
        // 根据按下的按钮设置候选词列表
        suggestionlist = data.get(text);
        mCandView.setSuggestions(suggestionlist);
    }

    class KeyboardView extends RelativeLayout {
        // ......
    }

    class CandidateView extends RelativeLayout {
        // ......
    }
}
代码写完,再来写配置文件,
在res目录下面建立一个新目录xml,然后创建一个method.xml
<?xml version="1.0" encoding="utf-8"?>
<!-- The attributes in this XML file provide configuration information -->
<!-- for the Search Manager. -->
<input-method
    xmlns:android="http://schemas.android.com/apk/res/android" />
设置Manifest.xml:
<?xml version="1.0" encoding="utf-8"?>
<manifest xmlns:android="http://schemas.android.com/apk/res/android"
      package="test.helloIme"
      android:versionCode="1"
      android:versionName="1.0">
    <application android:icon="@drawable/icon" android:label="@string/app_name">
        <service android:name="helloIme"
        android:permission="android.permission.BIND_INPUT_METHOD">
            <intent-filter>
                <action android:name="android.view.InputMethod"/>
            </intent-filter>
            <meta-data android:name="android.view.im" android:resource="@xml/method"/>
        </service>
    </application>
    <uses-sdk android:minSdkVersion="5" />
</manifest>
直接运行程序,eclipse输出如下Log:
[2010-08-25 17:16:48 - helloIme]Installing helloIme.apk…
[2010-08-25 17:16:50 - helloIme]Success!
[2010-08-25 17:16:50 - helloIme]/helloIme/bin/helloIme.apk installed on device
[2010-08-25 17:16:50 - helloIme]Done!
嗯,安装成功了!呵呵,革命尚未成功,还需在模拟器上进行设置:
点击settings->Language & keyboard,在下部出现了一个test,右边有个checkbox,选上它。
找一个有输入框的应用,最简单到写短消息的画面,左键长按输入框,会弹出一个输入法选择提示框,点进去就会看到刚才创建的输入法了,点击右边的单选框,oh,my ime,漂亮的hello输入法就展现在面前了:
android果然很强大啊


 3111
3111

 被折叠的 条评论
为什么被折叠?
被折叠的 条评论
为什么被折叠?
 到【灌水乐园】发言


