


SringBoot 如何使用HTTPS请求及Nginx配置Https
SringBoot 如何使用HTTPS请求
生成证书
由于业务数据在传输过程中需要保密,我们组小同学写了一个HTTPS接口。该接口用到的证书是通过JDK自带的证书生成工具keytool,使用keytool来生成证书。打开终端或者命令行输入命令,回车,然后输入信息,其中秘钥库口令和秘要口令最好输入同一个,并且记下这个口令。
//keytool -genkey -alias tomcat  -storetype PKCS12 -keyalg RSA -keysize 2048  -keystore keystore.p12 -validity 3650
keytool -genkey -alias kshttps -keyalg RSA -keysize 2048 -validity 36524 -keystore kshttps.jks
keytool -importkeystore -srckeystore kshttps.jks -destkeystore kshttps.pkcs12 -deststoretype pkcs12
openssl pkcs12 -nodes -in kshttps.pkcs12 -out kshttps.pem
openssl pkcs12 -nocerts -nodes -in kshttps.pkcs12 -out kshttps.key
- key -genkey 生成
- -alias 别名
- -storetype 指定密钥库的类型,eg:JKS 、PKCS12(通常以.p12或.pfx两种文件形式出现)、PKCS11、BCFKS、DKS、Windows-MY、Windows-ROOT、PEM(不能直接用Keytool导出,但可用OpenSSL工具一起使用)
- -keyalg RSA 代表算法.RSA是非对称加密
- -keysize 密钥长度
- -keystore 生成路径文件名
- -validity有效期
导入证书及配制
证书生成完成后,可以导入到到项目中,将其复制到Springboot项目的resources目录下
配置yml配置文件即可
server:
 port: 8080
   ssl:
    #开启https
    enabled: true
    #指定存放证书的密钥库文件的位置
    key-store: classpath:springboot.keystore
    #密钥库文件的格式
    key-store-type: PKCS12
    #别名,需要与创建密钥库时的别名一致
    key-alias: springboot-https
    key-password: 123456
key-store-password: 123456
http:
  port: 8090
创建配置类
@Configuration
public class HttpsConfig {

    @Value("${http.port}")
    private Integer httpPort;


    @Bean
    public ServletWebServerFactory  servletContainer() {
        Connector connector = new Connector(TomcatServletWebServerFactory.DEFAULT_PROTOCOL);
        connector.setPort(httpPort);
        final TomcatServletWebServerFactory tomcat = new TomcatServletWebServerFactory();

        tomcat.addAdditionalTomcatConnectors(connector);
        return tomcat;
    }
}
将pfx转成.key和.pem
为什么转呢,因为Nginx的配置中是要求一个.key和.pem格式的,其他可否,我没有验证。大家可以自己查询。但我是直接转成两后缀的文件了。转换工具可能过openssl转,参考命令如下所示:
openssl pkcs12 -in keystore.pfx -out cert.key -nocerts
openssl pkcs12 -in keystore.pfx -out cert.pem -nodes
其他转换当了解了,也附在本文中,不想学习的可跳过这部分
1.pem转换pfx

openssl pkcs12 -export -in 'test.pem' -inkey 'test.key' -out 'test.p12' -passout pass:123456

2.pem转换jks

openssl pkcs12 -export -in 'test.pem' -inkey 'test.key' -out 'test.p12' -passout pass:123456

keytool -importkeystore -srckeystore 'test.p12' -srcstoretype PKCS12 -destkeystore 'test.jks' -srcstorepass 123456 -deststorepass 123456

3.pfx转换pem

openssl pkcs12 -in test.p12 -passin pass:123456 -out test3.pem -nodes

4.pfx转换jks

keytool -importkeystore -srckeystore 'test.p12' -srcstoretype PKCS12 -destkeystore 'test.jks' -srcstorepass 123456 -deststorepass 123456

5.jks转换pem

keytool -importkeystore -srckeystore 'test.jks' -srcstoretype jks -destkeystore 'test.p12' -deststoretype PKCS12 -srcstorepass 123456 -deststorepass 123456

openssl pkcs12 -in test.p12 -passin pass:123456 -out test3.pem -nodes

6.jks转化pfx

keytool -importkeystore -srckeystore 'test.jks' -srcstoretype jks -destkeystore 'test.p12' -deststoretype PKCS12 -srcstorepass 123456 -deststorepass 123456
Nginx 安装SSL依赖
Nginx配置HTTPS,需要先安装依赖。否用支报如下错误

如上所示,我们可以执行以下命令解决
./configure 安装依赖
./configure --prefix=/usr/local/nginx --user=nginx --group=nginx --with-http_ssl_module
如果报以下错误提示,请顺序读完,如果不报请跳至下一章节
You can either do not enable the modules, or install the OpenSSL library
into the system, or build the OpenSSL library statically from the source
with nginx by using --with-openssl=<path> option.
解决这个问题,首先需要检查是否安装了OpenSSL,通过openssl version查看,未安装可以参考以下命令进行安装
yum -y install openssl openssl-devel
如果确定已安装,可找下安装位置。使用which openssl 命令。但需要注意,通过此命令如果找到的是安装后的命令则无效,仍不好使,需要找到安装源路径,如无法找到,可以通过https://www.openssl.org/source/ 下载进行安装。安装成功后,重新执行以下命令和make && install。 出现了新错误,莫慌,请看下去
./configure --with-openssl=/usr/openssl --prefix=/usr/local/nginx --user=nginx --group=nginx --with-http_ssl_module
find / -name ssl.h
编译
make && make install
安装完openssl后报了新错
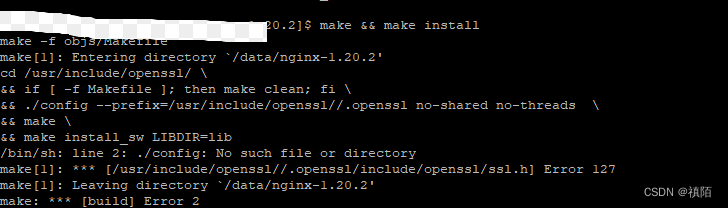
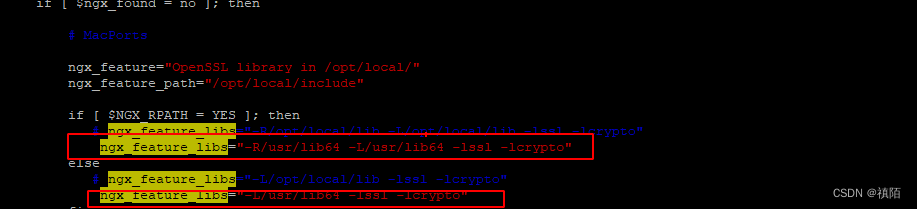
到这步后,需要修改下Nginx源路径下的 auto/lib/openssl/conf
vi auto/lib/openssl/conf
修改内容如下所示:
Nginx配置
 server {
        listen       443 ssl;
        server_name  127.0.0.1;

        ssl_certificate      cert.pem;
        ssl_certificate_key  cert.key;

        ssl_session_cache    shared:SSL:1m;
        ssl_session_timeout  5m;

    #    ssl_ciphers  HIGH:!aNULL:!MD5;
    #    ssl_prefer_server_ciphers  on;

        location /wscc-interface {
    #        root   html;
    #       index  index.html index.htm;
            proxy_pass http://127.0.0.1:443/;
        }
    }


 1175
1175


 被折叠的 条评论
为什么被折叠?
被折叠的 条评论
为什么被折叠?
 到【灌水乐园】发言


