


Json接口开发
在使用 Spring 开发项目,向前端返回数据时,需要借助第三方json工具包将java数据类型转化为json,等前端数据类型,在spring boot默认引入jackson工具包,直接返回java对象,会自动转化为json。
但需要在@ResController下或者使用@ResponseBody注解。
自定义Filter(过滤器)
项目中会使用 filters 用于录调用日志、排除有 XSS 威胁的字符、执行权限验证等等。Spring Boot 自动添加了 OrderedCharacterEncodingFilter 和 HiddenHttpMethodFilter,并且我们可以自定义 Filter。
主要实现两个步骤:
- 实现 Filter 接口,实现 Filter 方法
- 添加@Configuration 注解,将自定义Filter加入过滤链,或者使用@
Order和@ServletComponentScan将过滤器加到IoC容器
//自定义过滤器,只用@Order和@ServletComponentScan将filter加到ioc容器
@Order(1)
@WebFilter(urlPatterns = "/*")
public class filter1 implements Filter {
    @Override
    public void doFilter(ServletRequest servletRequest, ServletResponse servletResponse, FilterChain filterChain) throws IOException, ServletException {
        System.out.println("执行了Filter1");
        filterChain.doFilter(servletRequest,servletResponse);
    }
}

//@ServletComponentScan注解在主程序上
@SpringBootApplication
@ServletComponentScan
public class SpringbootApplication{

    public static void main(String[] args) {
        SpringApplication.run(SpringbootApplication.class, args);
    }
}
//创建配置类实现fileter注入
@WebFilter("/first/*")
public class Filter2 implements Filter {
    @Override
    public void doFilter(ServletRequest servletRequest, ServletResponse servletResponse, FilterChain filterChain) throws IOException, ServletException {
        System.out.println("注入的bean执行了");
    }
}

@Configuration
public class indexFilter {
    @Bean
    public FilterRegistrationBean MyFilter(){
        FilterRegistrationBean filterRegistrationBean=new FilterRegistrationBean();
        Filter2 filter=new Filter2();
        filterRegistrationBean.setFilter(filter);

        ArrayList<String> urlList=new ArrayList();
        urlList.add("/index/*");
        filterRegistrationBean.setUrlPatterns(urlList);
        return filterRegistrationBean;
    }
}

//该方法按配置顺序执行
//直接在Configuration配置类中bean注入
@Bean
    public Filter0 FilterTest(){
        Filter0 filter0=new Filter0();
        return filter0;
    }
自定义监听器
spring监听机制是对java提供的监听机制的封装。java事件的监听机制又以下几个类:
- Event:继承java.util.EventObject类的对象
- 事件源Source:任意Object对象
- 监听器Listenter:实现java.util.EventListenter接口的对象
应用程序运行时
应用程序运行时,应按以下顺序发送应用程序事件:
- 除了注册侦听器和初始化程序之外,在运行开始时但在任何处理之前发送ApplicationStartingEvent。
- 当在上下文中使用的Environment已知但在创建上下文之前,将发送ApplicationEnvironmentPreparedEvent。
- 在刷新开始之前但在加载bean定义之后发送ApplicationPreparedEvent。
- 在刷新上下文之后但在调用任何应用程序和命令行运行程序之前发送ApplicationStartedEvent。
- 在调用任何应用程序和命令行运行程序后发送ApplicationReadyEvent。它表示应用程序已准备好为请求提供服务。
- 如果启动时发生异常,则会发送ApplicationFailedEvent。
应用程序运行前
- ApplicationContextInitializer
- SpringApplicationRunListener
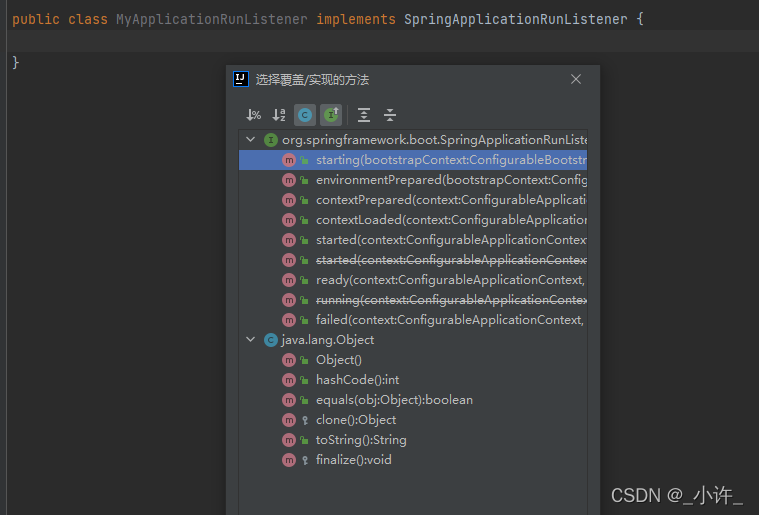
从上到下依次是:项目启动中,环境开始准备,环境准备完毕,上下文开始加载,上下文加载完成,项目启动完成,项目启动失败的项目声明周期函数。
上面要生效需要配置,再spring boot项目中的resources目录下创建MATA-INF/spring.factores并配置:
org.springframework.contex.ApplicationContextInitializer=exanple.text.listenerMyApplicationContextInitializer


//前面是监听器,后面是自定义的实现类
//注意都要写全限定名

//SpringApplicationRunListener的配置一样,再实现类重写方法实现监听

//SpringApplicationRunListener需要重写有参构造方法,参数为事件源和agrs的String数组
前两种接口的三种实现方式:
自定义接口:
public class MyApplicationContextInitializer implements ApplicationContextInitializer {
    @Override
    public void initialize(ConfigurableApplicationContext applicationContext) {
         System.out.println("-----MyApplicationContextInitializer initialize-----");
     }
 }
- main主函数添加
@SpringBootApplication
public class MySpringBootApplication {
    public static void main(String[] args) {
        SpringApplication application = new SpringApplication(MySpringBootApplication.class);
        application.addInitializers(new MyApplicationContextInitializer());
        application.run(args);
    }
}
- 默认配置文件配置
context.initializer.classes=org.springframework.boot.demo.common.MyApplicationContextInitializer
- SpringBoot的SPI扩展—META-INF/spring.factories中配置
org.springframework.context.ApplicationContextInitializer=org.springframework.boot.demo.common.MyApplicationContextInitializer

//需要在主函数加载配置文件
- CommandLineRunner
接口偶一个run方法,当项目启动后执行run方法。 - ApplicationRunner
接口偶一个run方法,当项目启动后执行run方法。
这两个接口使用@Component注解到IoC容器即可。
单元测试
使用@RunWith(SpringJUnit4ClassRunner.class)和@SpringBootTest(classes = Application.class)。
@RunWith(SpringJUnit4ClassRunner.class)
@SpringBootTest(classes = SpringbootupdateApplication.class)
public class Test {


    @org.junit.Test
    public void method1(){
        System.out.println("hello");
    }

}
Thymeleaf模板引擎
Thymeleaf支持 html 原型,然后在 html 标签里增加额外的属性来达到模板+数据的展示方式。浏览器解释 html 时会忽略未定义的标签属性,所以 Thymeleaf 的模板可以静态地运行;当有数据返回到页面时,Thymeleaf 标签会动态地替换掉静态内容,使页面动态显示。
标准表达式语法
它们分为四类:
- 变量表达式
- 选择或星号表达式
- 文字国际化表达式
- URL 表达式
变量表达式
变量表达式即 OGNL 表达式或 Spring EL 表达式,它们将以HTML标签的一个属性来表示:
<span th:text="${book.author.name}">
<li th:each="book : ${books}">
选择(星号)表达式
选择表达式很像变量表达式,不过它们用一个预先选择的对象来代替上下文变量容器(map)来执行,如下:
<div th:object="${book}">
  ...
  <span th:text="*{title}">...</span>
  ...
</div>
文字国际化表达式
文字国际化表达式允许我们从一个外部文件获取区域文字信息(.properties),用 Key 索引 Value,还可以提供一组参数
#{main.title}
#{message.entrycreated(${entryId})}
<!--可以在模板文件中找到这样的表达式代码-->
<table>
  ...
  <th th:text="#{header.address.city}">...</th>
  <th th:text="#{header.address.country}">...</th>
  ...
</table>
URL 表达式
URL 表达式指的是把一个有用的上下文或回话信息添加到 URL,这个过程经常被叫做 URL 重写:@{/order/list}
URL还可以设置参数:@{/order/details(id=${orderId})}
<form th:action="@{/createOrder}">
<a href="main.html" th:href="@{/main}">
变量表达式和星号表达有什么区别吗?
如果不考虑上下文的情况下,两者没有区别;星号语法评估在选定对象上表达,而不是整个上下文。什么是选定对象?就是父标签的值,如下:
<div th:object="${session.user}">
  <p>Name: <span th:text="*{firstName}">Sebastian</span>.</p>
  <p>Surname: <span th:text="*{lastName}">Pepper</span>.</p>
  <p>Nationality: <span th:text="*{nationality}">Saturn</span>.</p>
</div>
这是完全等价于:
<div th:object="${session.user}">
  <p>Name: <span th:text="${session.user.firstName}">Sebastian</span>.</p>
  <p>Surname: <span th:text="${session.user.lastName}">Pepper</span>.</p>
  <p>Nationality: <span th:text="${session.user.nationality}">Saturn</span>.</p>
</div>
当然,美元符号和星号语法可以混合使用:
 <div th:object="${session.user}">
	  <p>Name: <span th:text="*{firstName}">Sebastian</span>.</p>
  	  <p>Surname: <span th:text="${session.user.lastName}">Pepper</span>.</p>
      <p>Nationality: <span th:text="*{nationality}">Saturn</span>.</p>
  </div>
常用th标签都有那些?
| 关键字 | 功能 | 案例 |
|---|---|---|
| th:id | 替换id | <input th:id="'xxx' + ${collect.id}"/> |
| th:text | 文本替换 | <p th:text="${collect.description}">description</p> |
| th:utext | 支持html的文本替换 | <p th:utext="${htmlcontent}">conten</p> |
| th:object | 替换对象 | <div th:object="${session.user}"> |
| th:value | 属性赋值 | <input th:value="${user.name}" /> |
| th:with | 变量赋值运算 | <div th:with="isEven=${prodStat.count}%2==0"></div> |
| th:style | 设置样式 | th:style="'display:' + @{(${sitrue} ? 'none' : 'inline-block')} + ''" |
| th:onclick | 点击事件 | th:onclick="'getCollect()'" |
| th:each | 属性赋值 | tr th:each="user,userStat:${users}"> |
| th:if | 判断条件 | <a th:if="${userId == collect.userId}" > |
| th:unless | 和th:if判断相反 | <a th:href="@{/login}" th:unless=${session.user != null}>Login</a> |
| th:href | 链接地址 | <a th:href="@{/login}" th:unless=${session.user != null}>Login</a> /> |
| th:switch | 多路选择 配合th:case 使用 | <div th:switch="${user.role}"> |
| th:case | th:switch的一个分支 | <p th:case="'admin'">User is an administrator</p> |
| th:fragment | 布局标签,定义一个代码片段,方便其它地方引用 | <div th:fragment="alert"> |
| th:include | 布局标签,替换内容到引入的文件 | <head th:include="layout :: htmlhead" th:with="title='xx'"></head> /> |
| th:replace | 布局标签,替换整个标签到引入的文件 | <div th:replace="fragments/header :: title"></div> |
| th:selected | selected选择框 选中 | th:selected="(${xxx.id} == ${configObj.dd})" |
| th:src | 图片类地址引入 | <img class="img-responsive" alt="App Logo" th:src="@{/img/logo.png}" /> |
| th:inline | 定义js脚本可以使用变量 | <script type="text/javascript" th:inline="javascript"> |
| th:action | 表单提交的地址 | <form action="subscribe.html" th:action="@{/subscribe}"> |
| th:remove | 删除某个属性 | <tr th:remove="all">1.all:删除包含标签和所有的孩子。2.body:不包含标记删除,但删除其所有的孩子。3.tag:包含标记的删除,但不删除它的孩子。4.all-but-first:删除所有包含标签的孩子,除了第一个。5.none:什么也不做。这个值是有用的动态评估。 |
| th:attr | 设置标签属性,多个属性可以用逗号分隔 | 比如th:attr="src=@{/image/aa.jpg},title=#{logo}",此标签不太优雅,一般用的比较少。 |
几种常用的使用方法
赋值、字符串拼接
<p  th:text="${collect.description}">description</p>
<span th:text="'Welcome to our application, ' + ${user.name} + '!'">

<span th:text="|Welcome to our application, ${user.name}!|">
条件判断 If/Unless
<a th:if="${myself=='yes'}" > </i> </a>
<a th:unless=${session.user != null} th:href="@{/login}" >Login</a>
for 循环
<tr  th:each="collect,iterStat : ${collects}">
   <th scope="row" th:text="${collect.id}">1</th>
   <td >
      <img th:src="${collect.webLogo}"/>
   </td>
   <td th:text="${collect.url}">Mark</td>
   <td th:text="${collect.title}">Otto</td>
   <td th:text="${collect.description}">@mdo</td>
   <td th:text="${terStat.index}">index</td>
</tr>
URL
<!-- Will produce 'http://localhost:8080/standard/unread' (plus rewriting) -->
 <a  th:href="@{/standard/{type}(type=${type})}">view</a>

<!-- Will produce '/gtvg/order/3/details' (plus rewriting) -->
<a href="details.html" th:href="@{/order/{orderId}/details(orderId=${o.id})}">view</a>
更改内部css
<div th:style="'background:url(' + @{/<path-to-image>} + ');'"></div>

<div class="media-object resource-card-image"  th:style="'background:url(' + @{(${collect.webLogo}=='' ? 'img/favicon.png' : ${collect.webLogo})} + ')'" ></div>
内联 js
<script th:inline="javascript">
/*<![CDATA[*/
...
var username = /*[[${sesion.user.name}]]*/ 'Sebastian';
var size = /*[[${size}]]*/ 0;
...
/*]]>*/
</script>
内嵌变量
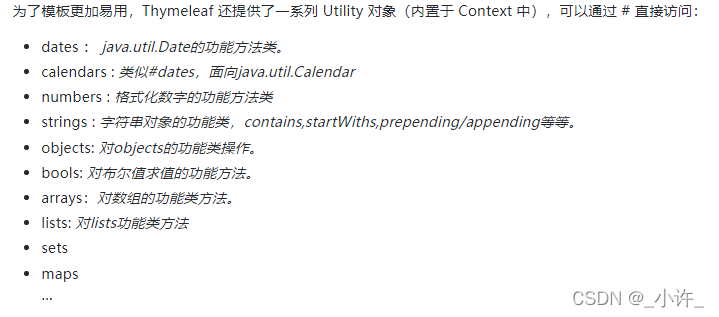
dates

${#dates.format(date, 'dd/MMM/yyyy HH:mm')}
${#dates.arrayFormat(datesArray, 'dd/MMM/yyyy HH:mm')}
${#dates.listFormat(datesList, 'dd/MMM/yyyy HH:mm')}
${#dates.setFormat(datesSet, 'dd/MMM/yyyy HH:mm')}

/*
 * Create a date (java.util.Date) object for the current date and time
 */
${#dates.createNow()}

/*
 * Create a date (java.util.Date) object for the current date (time set to 00:00)
 */
${#dates.createToday()}
strings
${#strings.isEmpty(name)}
${#strings.arrayIsEmpty(nameArr)}
${#strings.listIsEmpty(nameList)}
${#strings.setIsEmpty(nameSet)}
/*
* Check whether a String starts or ends with a fragment
* Also works with arrays, lists or sets
*/
${#strings.startsWith(name,'Don')} // also array*, list* and set*
${#strings.endsWith(name,endingFragment)} // also array*, list* and set*
/*
* Compute length
* Also works with arrays, lists or sets
*/
${#strings.length(str)}
/*
* Null-safe comparison and concatenation
*/
${#strings.equals(str)}
${#strings.equalsIgnoreCase(str)}
${#strings.concat(str)}
${#strings.concatReplaceNulls(str)}
/*
* Random
*/
${#strings.randomAlphanumeric(count)}
使用 Thymeleaf 布局
Spring Boot 2.0 将布局单独提取了出来,需要单独引入依赖:thymeleaf-layout-dialect。
<dependency>
<groupId>org.springframework.boot</groupId>
<artifactId>spring-boot-starter-thymeleaf</artifactId>
</dependency>
<dependency>
<groupId>nz.net.ultraq.thymeleaf</groupId>
<artifactId>thymeleaf-layout-dialect</artifactId>
</dependency>
定义代码片段
<footer th:fragment="copy">
© 2019
</footer>
在页面任何地方引入:
<body>
<div th:insert="layout/copyright :: copyright"></div>
<div th:replace="layout/copyright :: copyright"></div>
</body>
th:insert 和 th:replace 区别,insert 只是加载,replace 是替换。Thymeleaf 3.0 推荐使用 th:insert 替换 2.0 的 th:replace。
返回的 HTML 如下:
<body>
<div> © 2019 </div>
<footer>© 2019 </footer>
</body>
下面是一个常用的后台页面布局,将整个页面分为头部,尾部、菜单栏、隐藏栏,点击菜单只改变 content 区域的页面
<body class="layout-fixed">
<div th:fragment="navbar" class="wrapper" role="navigation">
<div th:replace="fragments/header :: header">Header</div>
<div th:replace="fragments/left :: left">left</div>
<div th:replace="fragments/sidebar :: sidebar">sidebar</div>
<div layout:fragment="content" id="content" ></div>
<div th:replace="fragments/footer :: footer">footer</div>
</div>
</body>
任何页面想使用这样的布局值只需要替换中见的 content 模块即可
<html xmlns:th="http://www.thymeleaf.org" layout:decorator="layout">
<body>
<section layout:fragment="content">
...
也可以在引用模版的时候传参
<head th:include="layout :: htmlhead" th:with="title='Hello'"></head>
layout 是文件地址,如果有文件夹可以这样写fileName/layout:htmlhead,htmlhead 是指定义的代码片段 如th:fragment="copy"
Spring boot整合myabtis
引入mybatis-spring-boot-starter
完全注解开发
添加依赖:
<dependencies>
	<dependency>
        <groupId>org.springframework.boot</groupId>
        <artifactId>spring-boot-starter-web</artifactId>
    </dependency>
	<dependency>
		<groupId>org.mybatis.spring.boot</groupId>
		<artifactId>mybatis-spring-boot-starter</artifactId>
		<version>2.0.0</version>
	</dependency>
     <dependency>
        <groupId>mysql</groupId>
        <artifactId>mysql-connector-java</artifactId>
    </dependency>
</dependencies>
application.properties 添加相关配置
mybatis.type-aliases-package=com.neo.model

spring.datasource.url=jdbc:mysql://localhost:3306/test?serverTimezone=UTC&useUnicode=true&characterEncoding=utf-8&useSSL=true
spring.datasource.username=root
spring.datasource.password=root
spring.datasource.driver-class-name=com.mysql.cj.jdbc.Driver
Spring Boot 会自动加载 spring.datasource.* 相关配置,数据源就会自动注入到 sqlSessionFactory 中,sqlSessionFactory 会自动注入到 Mapper 中.
//在启动类中添加对 mapper 包扫描@MapperScan
@SpringBootApplication
@MapperScan("com.neo.mapper")
public class MybatisAnnotationApplication {

	public static void main(String[] args) {
		SpringApplication.run(MybatisAnnotationApplication.class, args);
	}
}

//或者直接在 Mapper 类上面添加注解@Mapper
开发 Mapper
public interface UserMapper {

	@Select("SELECT * FROM users")
	@Results({
		@Result(property = "userSex",  column = "user_sex", javaType = UserSexEnum.class),
		@Result(property = "nickName", column = "nick_name")
	})
	List<UserEntity> getAll();

	@Select("SELECT * FROM users WHERE id = #{id}")
	@Results({
		@Result(property = "userSex",  column = "user_sex", javaType = UserSexEnum.class),
		@Result(property = "nickName", column = "nick_name")
	})
	UserEntity getOne(Long id);

	@Insert("INSERT INTO users(userName,passWord,user_sex) VALUES(#{userName}, #{passWord}, #{userSex})")
	void insert(UserEntity user);

	@Update("UPDATE users SET userName=#{userName},nick_name=#{nickName} WHERE id =#{id}")
	void update(UserEntity user);

	@Delete("DELETE FROM users WHERE id =#{id}")
	void delete(Long id);

}
@Select 是查询类的注解,所有的查询均使用这个
@Result 修饰返回的结果集,关联实体类属性和数据库字段一一对应,如果实体类属性和数据库属性名保持一致,就不需要这个属性来修饰。
@Insert 插入数据库使用,直接传入实体类会自动解析属性到对应的值
@Update 负责修改,也可以直接传入对象
@delete 负责删除
使用#符号和$符号的不同:
// This example creates a prepared statement, something like select * from teacher where name = ?;
@Select("Select * from teacher where name = #{name}")
Teacher selectTeachForGivenName(@Param("name") String name);

// This example creates n inlined statement, something like select * from teacher where name = 'someName';
@Select("Select * from teacher where name = '${name}'")
Teacher selectTeachForGivenName(@Param("name") String name);
//测试
@RunWith(SpringRunner.class)
@SpringBootTest
public class UserMapperTest {

	@Autowired
	private UserMapper userMapper;

	@Test
	public void testInsert() throws Exception {
		userMapper.insert(new User("aa1", "a123456", UserSexEnum.MAN));
		userMapper.insert(new User("bb1", "b123456", UserSexEnum.WOMAN));
		userMapper.insert(new User("cc1", "b123456", UserSexEnum.WOMAN));

		Assert.assertEquals(3, userMapper.getAll().size());
	}

	@Test
	public void testQuery() throws Exception {
		List<User> users = userMapper.getAll();
		System.out.println(users.toString());
	}


	@Test
	public void testUpdate() throws Exception {
		User user = userMapper.getOne(30l);
		System.out.println(user.toString());
		user.setNickName("neo");
		userMapper.update(user);
		Assert.assertTrue(("neo".equals(userMapper.getOne(30l).getNickName())));
	}
}
极简 xml 开发
xml 版本保持映射文件的老传统,接口层只需要定义空方法,系统会自动根据方法名在映射文件中找对应的 Sql。
mybatis.config-location=classpath:mybatis/mybatis-config.xml
mybatis.mapper-locations=classpath:mybatis/mapper/*.xml

指定了 Mybatis 基础配置文件和实体类映射文件的地址
mybatis-config.xml 配置:
<configuration>
	<typeAliases>
		<typeAlias alias="Integer" type="java.lang.Integer" />
		<typeAlias alias="Long" type="java.lang.Long" />
		<typeAlias alias="HashMap" type="java.util.HashMap" />
		<typeAlias alias="LinkedHashMap" type="java.util.LinkedHashMap" />
		<typeAlias alias="ArrayList" type="java.util.ArrayList" />
		<typeAlias alias="LinkedList" type="java.util.LinkedList" />
	</typeAliases>
</configuration>
映射文件xml配置:
mapper namespace="com.neo.mapper.UserMapper" >
    <resultMap id="BaseResultMap" type="com.neo.entity.UserEntity" >
        <id column="id" property="id" jdbcType="BIGINT" />
        <result column="userName" property="userName" jdbcType="VARCHAR" />
        <result column="passWord" property="passWord" jdbcType="VARCHAR" />
        <result column="user_sex" property="userSex" javaType="com.neo.enums.UserSexEnum"/>
        <result column="nick_name" property="nickName" jdbcType="VARCHAR" />
    </resultMap>

    <sql id="Base_Column_List" >
        id, userName, passWord, user_sex, nick_name
    </sql>

    <select id="getAll" resultMap="BaseResultMap"  >
       SELECT
       <include refid="Base_Column_List" />
	   FROM users
    </select>

    <select id="getOne" parameterType="java.lang.Long" resultMap="BaseResultMap" >
        SELECT
       <include refid="Base_Column_List" />
	   FROM users
	   WHERE id = #{id}
    </select>

    <insert id="insert" parameterType="com.neo.entity.UserEntity" >
       INSERT INTO
       		users
       		(userName,passWord,user_sex)
       	VALUES
       		(#{userName}, #{passWord}, #{userSex})
    </insert>

    <update id="update" parameterType="com.neo.entity.UserEntity" >
       UPDATE
       		users
       SET
       	<if test="userName != null">userName = #{userName},</if>
       	<if test="passWord != null">passWord = #{passWord},</if>
       	nick_name = #{nickName}
       WHERE
       		id = #{id}
    </update>

    <delete id="delete" parameterType="java.lang.Long" >
       DELETE FROM
       		 users
       WHERE
       		 id =#{id}
    </delete>
</mapper>
编写 Mapper 层的代码
public interface UserMapper {

	List<UserEntity> getAll();

	UserEntity getOne(Long id);

	void insert(UserEntity user);

	void update(UserEntity user);

	void delete(Long id);

}
配置类
- 配置类定义
Spring Boot支持基于Java的配置。虽然可以将SpringApplication与XML源一起使用,但我们通常建议您的主要来源是单个@Configuration类。通常,定义main方法的类是主要的@Configuration候选者。
- 导入其他配置类
不需要将所有@Configuration放入一个班级。@Import注释可用于导入其他配置类。或者,您可以使用@ComponentScan自动选取所有Spring组件,包括@Configuration类。
- 导入XML配置
可以使用@ImportResource注释来加载XML配置文件
- 自动配置
通过向@Configuration类之一添加@EnableAutoConfiguration或@SpringBootApplication注释来选择加入自动配置。
自动配置是非侵入性的。在任何时候,您都可以开始定义自己的配置以替换自动配置的特定部分。例如,如果添加自己的DataSource bean,则默认的嵌入式数据库支持会退回。
- 禁用特定的自动配置类
如果发现正在应用您不需要的特定自动配置类,则可以使用@EnableAutoConfiguration的exclude属性禁用它们,如以下示例所示:
@Configuration
@EnableAutoConfiguration(exclude={DataSourceAutoConfiguration.class})
public class MyConfiguration {
}
Spring Beans和依赖注入
spring boot中可以任何标准Spring框架技术来定义beans及其注入的依赖项。为简单起见,我们经常发现使用@ComponentScan(找到你的beans)和使用@Autowired(做构造函数注入)
按照上面的建议构建代码(在根包中定位应用程序类),则可以添加@ComponentScan而不带任何参数。您的所有应用程序组件(@Component,@Service,@Repository,@Controller等)都会自动注册为Spring Beans。
热交换
- Property默认值
Spring Boot支持的几个库使用缓存来提高性能。例如,模板引擎缓存已编译的模板以避免重复解析模板文件。此外,Spring MVC可以在提供静态资源时为响应添加HTTP缓存头。
虽然缓存在生产中非常有用,但在开发过程中可能会适得其反,从而使您无法看到刚刚在应用程序中进行的更改。因此,spring-boot-devtools默认禁用缓存选项。
缓存选项通常由application.properties文件中的设置配置。例如,Thymeleaf提供spring.thymeleaf.cache财产。spring-boot-devtools模块不需要手动设置这些属性,而是自动应用合理的开发时配置。
- 自动重启
只要类路径上的文件发生更改,使用spring-boot-devtools的应用程序就会自动重新启动。在IDE中工作时,这可能是一个有用的功能,因为它为代码更改提供了非常快速的反馈循环。默认情况下,将监视类路径上指向文件夹的任何条目的更改。请注意,某些资源(如静态资产和视图模板)无需重新启动应用程序。
外部配置
您可以使用属性文件,YAML文件,环境变量和命令行参数来外部化配置。Property值可以通过使用@Value注释直接注入beans,通过Spring的Environment抽象访问,或 通过@ConfigurationProperties 绑定到结构化对象。
如果spring.config.location包含目录(而不是文件),则它们应以/结束(并且在运行时,在加载之前附加从spring.config.name生成的名称,包括特定于配置文件的文件名) 。spring.config.location中指定的文件按原样使用,不支持特定于配置文件的变体,并且被任何特定于配置文件的属性覆盖。
以相反的顺序搜索配置位置。默认情况下,配置的位置为classpath:/,classpath:/config/,file:./,file:./config/。生成的搜索顺序如下:
file:./config/
file:./
classpath:/config/
classpath:/
特定于配置文件的属性:
除了application.properties文件之外,还可以使用以下命名约定来定义特定于配置文件的属性:application-{profile}.properties。Environment有一组默认配置文件(默认情况下为[default]),如果未设置活动配置文件,则使用这些配置文件。换句话说,如果没有显式激活配置文件,则会加载application-default.properties中的属性。
这一组配置文件用于满足不同生产环境下的需求,特定于配置文件的属性从标准application.properties的相同位置加载,特定于配置文件的文件始终覆盖非特定文件,无论特定于配置文件的文件是在打包的jar内部还是外部。如果需要改变环境的化需要显示激活配置文件对默认覆盖:spring.profiles.active=true
异常处理即错误页面的定制
在开发和使用的过程中难免遇到各种错误,通过自定义控制器返回特定错误和页面。
@ControllerAdvice注释的类,以自定义要为特定控制器和/或异常类型返回的JSON文档,该类中可以直接返回一个统筹的404错误或使用@ExceptionHandler处理特定错误。
//类使用了@ControllerAdvice注解来修饰,
// 其会被<context:component-scan>扫描,
// 这使得该类中使用@ExceptionHandler注解修饰的方法都被应用到所有请求处理方法上
// 也就是所有请求处理方法抛出的异常都将由该类中对应的@ExceptionHandler注解修饰的方法处理.
@ControllerAdvice
public class GlobalExceptionHandler
{
	// 处理Exception类型异常
	@ExceptionHandler(value = Exception.class)
	public ModelAndView globalErrorHandler(Exception e) throws Exception
	{
		ModelAndView mav = new ModelAndView();
		mav.addObject("ex", e);
		mav.setViewName("error");
		return mav;
	}
	// 处理OrderException自定义异常
	@ExceptionHandler(value = OrderException.class)
	// 返回的结果将会被封装成JSON数据,并返回给客户端
	@ResponseBody
	public Object OrderErrorHandler(Exception e) throws Exception
	{
		// 创建返回对象Map并设置属性,会被@ResponseBody注解转换为JSON返回
		Map<String, Object> map = new HashMap<>();
		map.put("code", 100);
		map.put("message", e.getMessage());
		map.put("data", "请求失败");
		return map;
	}
}
使用@ExceptionHandler在控制器定义异常
@Controller
public class TestController
{
	@GetMapping("/test")
	public String test() throws Exception
	{
		// 模拟异常,调用本类中定义的异常处理方法
		@SuppressWarnings("unused")
		int i = 5 / 0;
		return "success";
	}
	// 在异常抛出的时候,Controller会使用@ExceptionHandler注解的方法去处理异常
	// value=Exception.class表示处理所有的Exception类型异常。
	@ExceptionHandler(value = Exception.class)
	public ModelAndView testErrorHandler(Exception e)
	{
		ModelAndView mav = new ModelAndView();
		mav.setViewName("error");
		mav.addObject("ex", e);
		return mav;
	}
}
跨域问题CORS
跨源资源共享 (CORS)是大多数浏览器实现 的W3C规范,允许您以灵活的方式指定授权何种跨域请求。
在Spring Boot应用程序中使用带有 注释的控制器方法CORS配置@CrossOrigin不需要任何特定配置。
// 允许所有域发送过来的请求
@CrossOrigin(maxAge = 3600)
@Controller
public class CrossOriginController
{
	// 只允许origins属性中指定的域的请求
	@CrossOrigin(origins = "http://localhost:8080/VariableTest")
	@GetMapping(value = "/welcome")
	public String welcome()
	{
		System.out.println("处理跨域请求");
		return "welcome";
	}
}
也可以通过使用自定义的addCorsMappings(CorsRegistry)方法注册WebMvcConfigurer bean来定义全局CORS配置:
@Configuration
public class MyConfiguration {

	@Bean
	public WebMvcConfigurer corsConfigurer() {
		return new WebMvcConfigurer() {
			@Override
			public void addCorsMappings(CorsRegistry registry) {
				registry.addMapping("/api/**");
			}
		};
	}
}
Cookie和Session
通过@CookieValue来获取cookie的值
@Controller
public class CookieValueController
{
	// 测试@CookieValue注解
	// 该方法映射的请求为 /cookieValueTest
	@GetMapping(value = "/cookieValueTest")
	// 将cookie中的JSESSIONID值赋值给方法的参数sessionId
	public void cookieValueTest(
			@CookieValue(value = "JSESSIONID", defaultValue = "") String sessionId)
	{
		System.out.println("通过@CookieValue获得JSESSIONID: " + sessionId);
	}
}
通过@SessionAttribute获取session值,通过HttpSession对象存session。当然也可以全部使用HttpServletResquest和HttpServletResponse来存取session。
Spring Boot单元测试
Spring Boot提供了@SpringBootTest注释,当您需要Spring引导功能时,可以将其用作标准spring-test @ContextConfiguration注释的替代。注释的工作原理是 通过SpringApplication创建测试中使用的ApplicationContext。
如果您使用的是JUnit 4,请不要忘记在测试中添加@RunWith(SpringRunner.class),否则注解将被忽略。
@RunWith(SpringRunner.class)
@SpringBootTest
public class RandomPortTestRestTemplateExampleTests {

	@Autowired
	private TestRestTemplate restTemplate;

	@Test
	public void exampleTest() {
		.....
	}

}


 1万+
1万+


 被折叠的 条评论
为什么被折叠?
被折叠的 条评论
为什么被折叠?
 到【灌水乐园】发言


