


文章目录
SpringSecurity基本配置
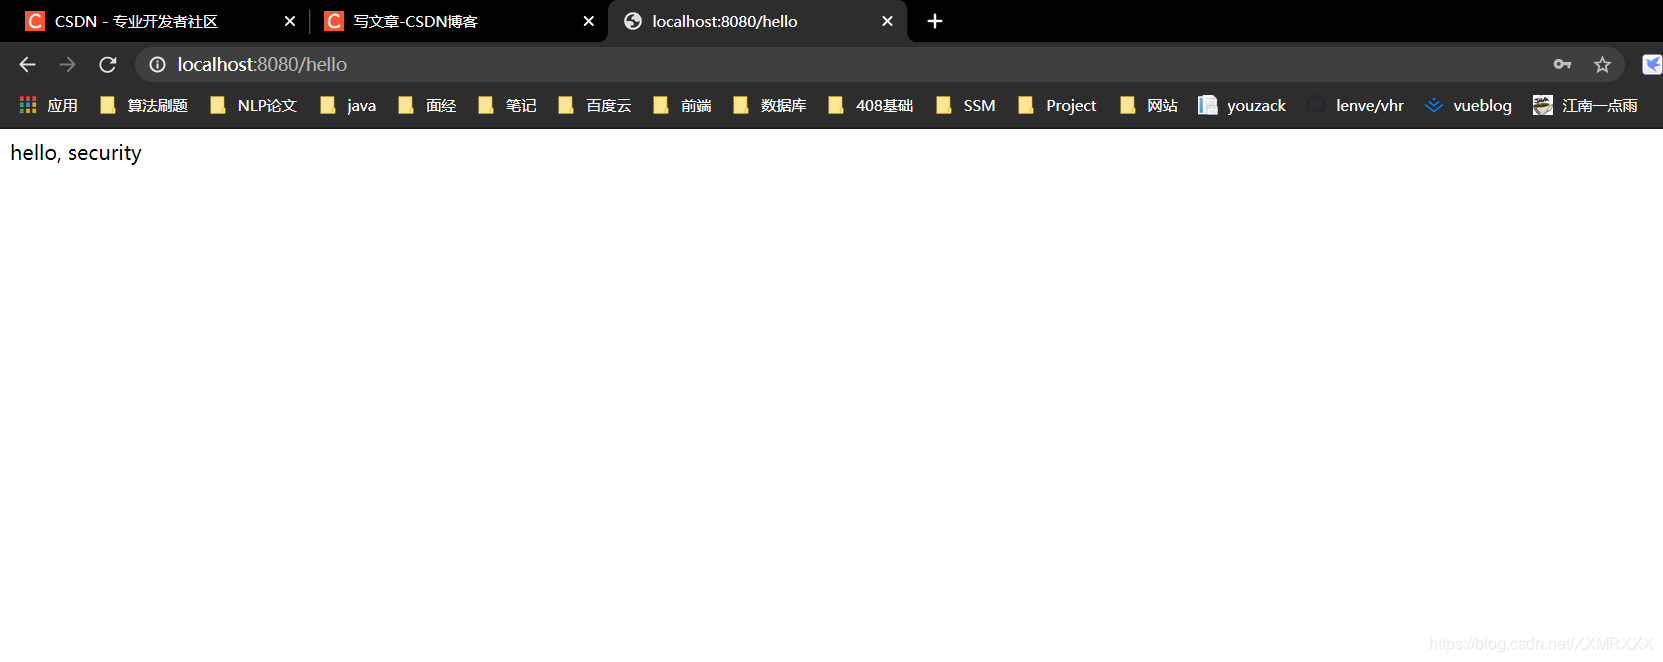
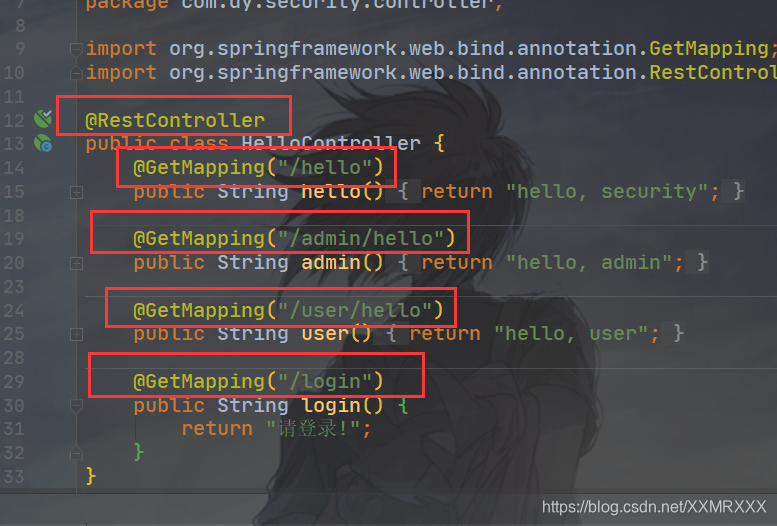
hello, security
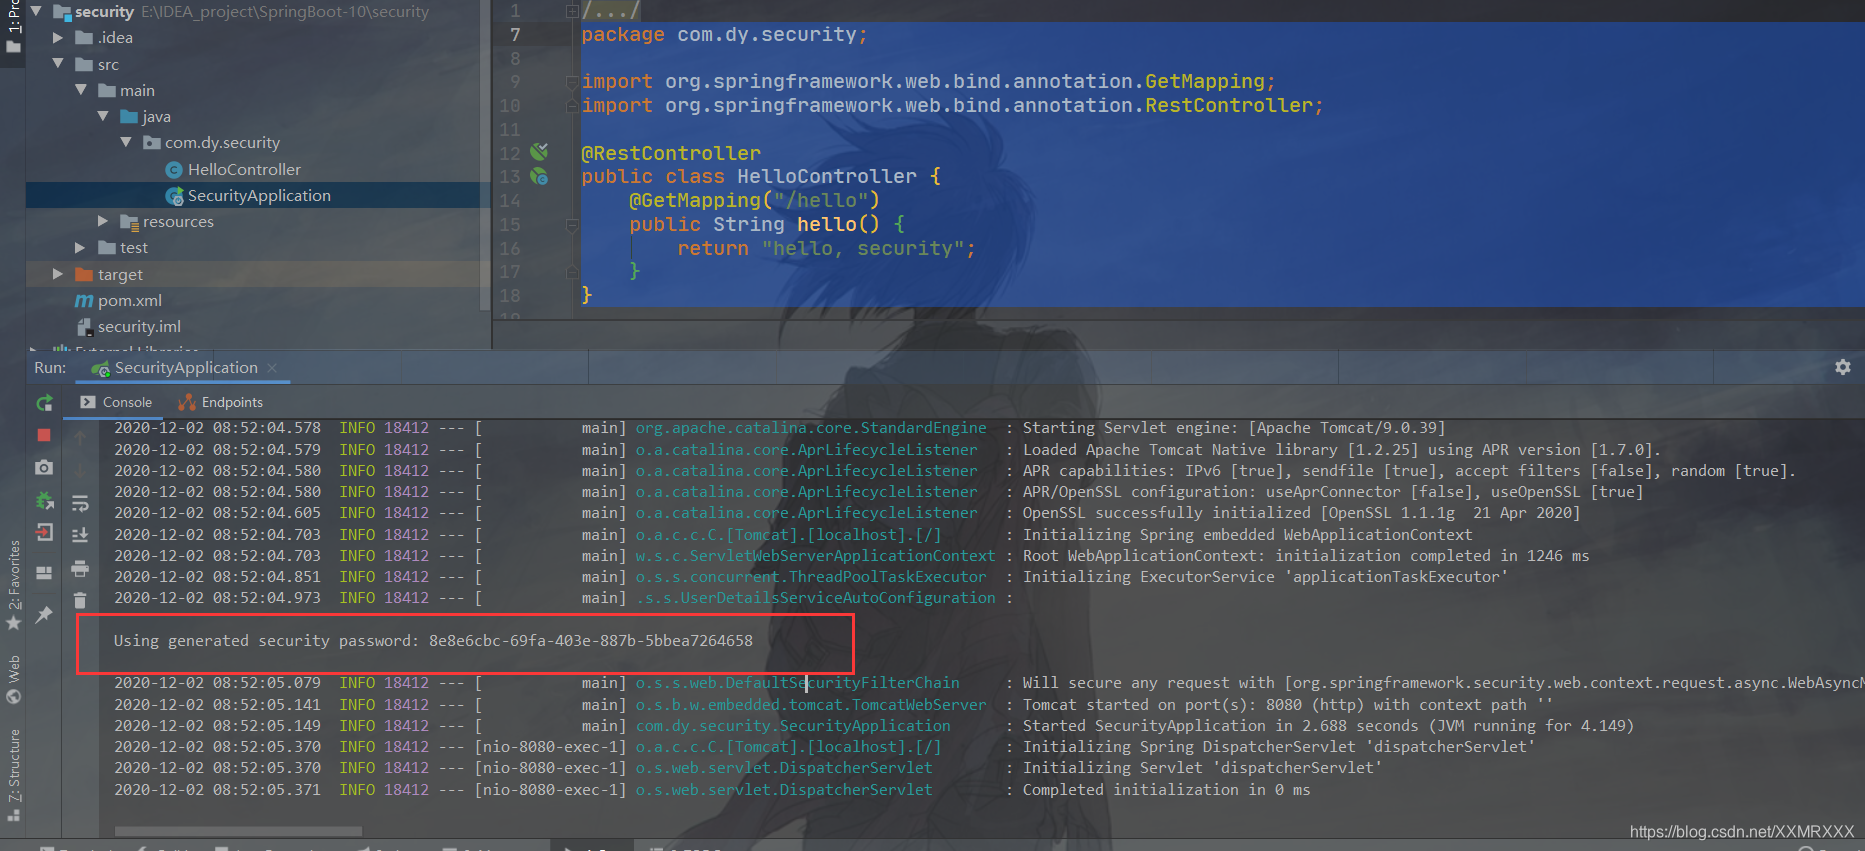
- 创建一个springboot项目,添加springsecurity依赖
package com.dy.security;

import org.springframework.web.bind.annotation.GetMapping;
import org.springframework.web.bind.annotation.RestController;

@RestController
public class HelloController {
    @GetMapping("/hello")
    public String hello() {
        return "hello, security";
    }
}
- 写一个controller去进行访问,会被强制登录,登录的用户名为user,密码为SpringSecurity生成的临时密码
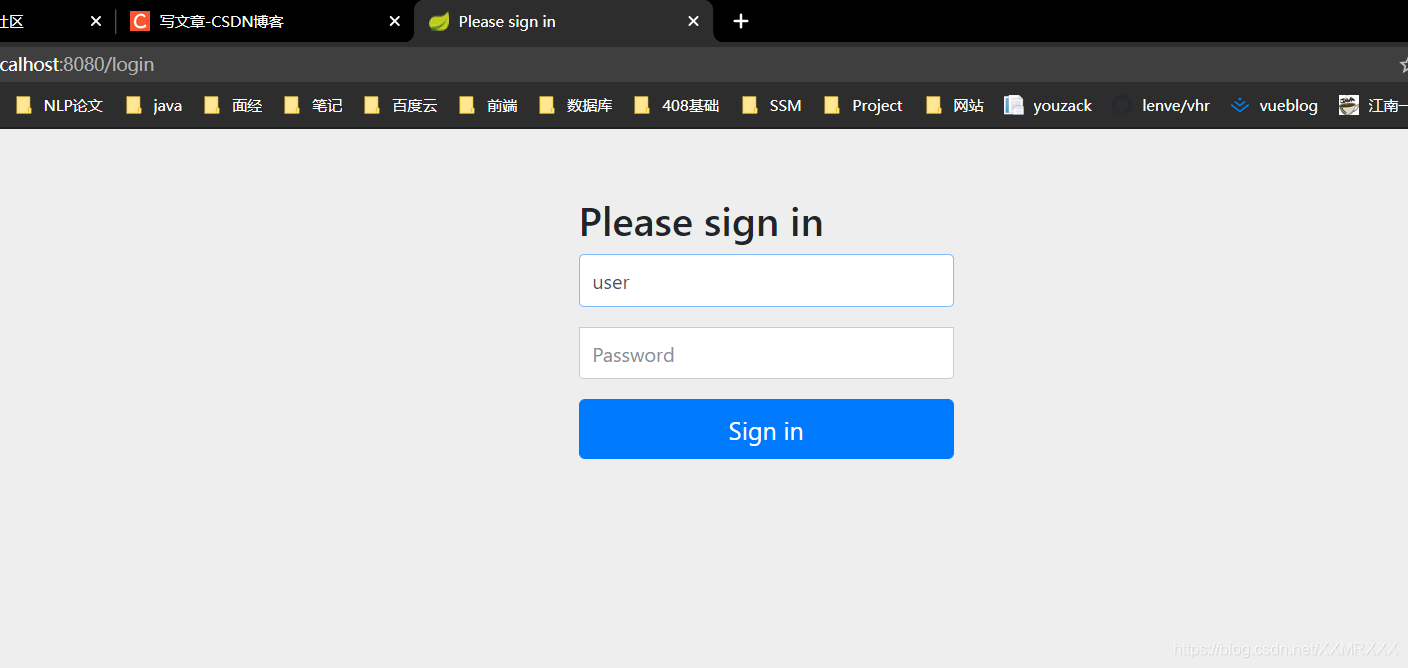
登录后即可访问
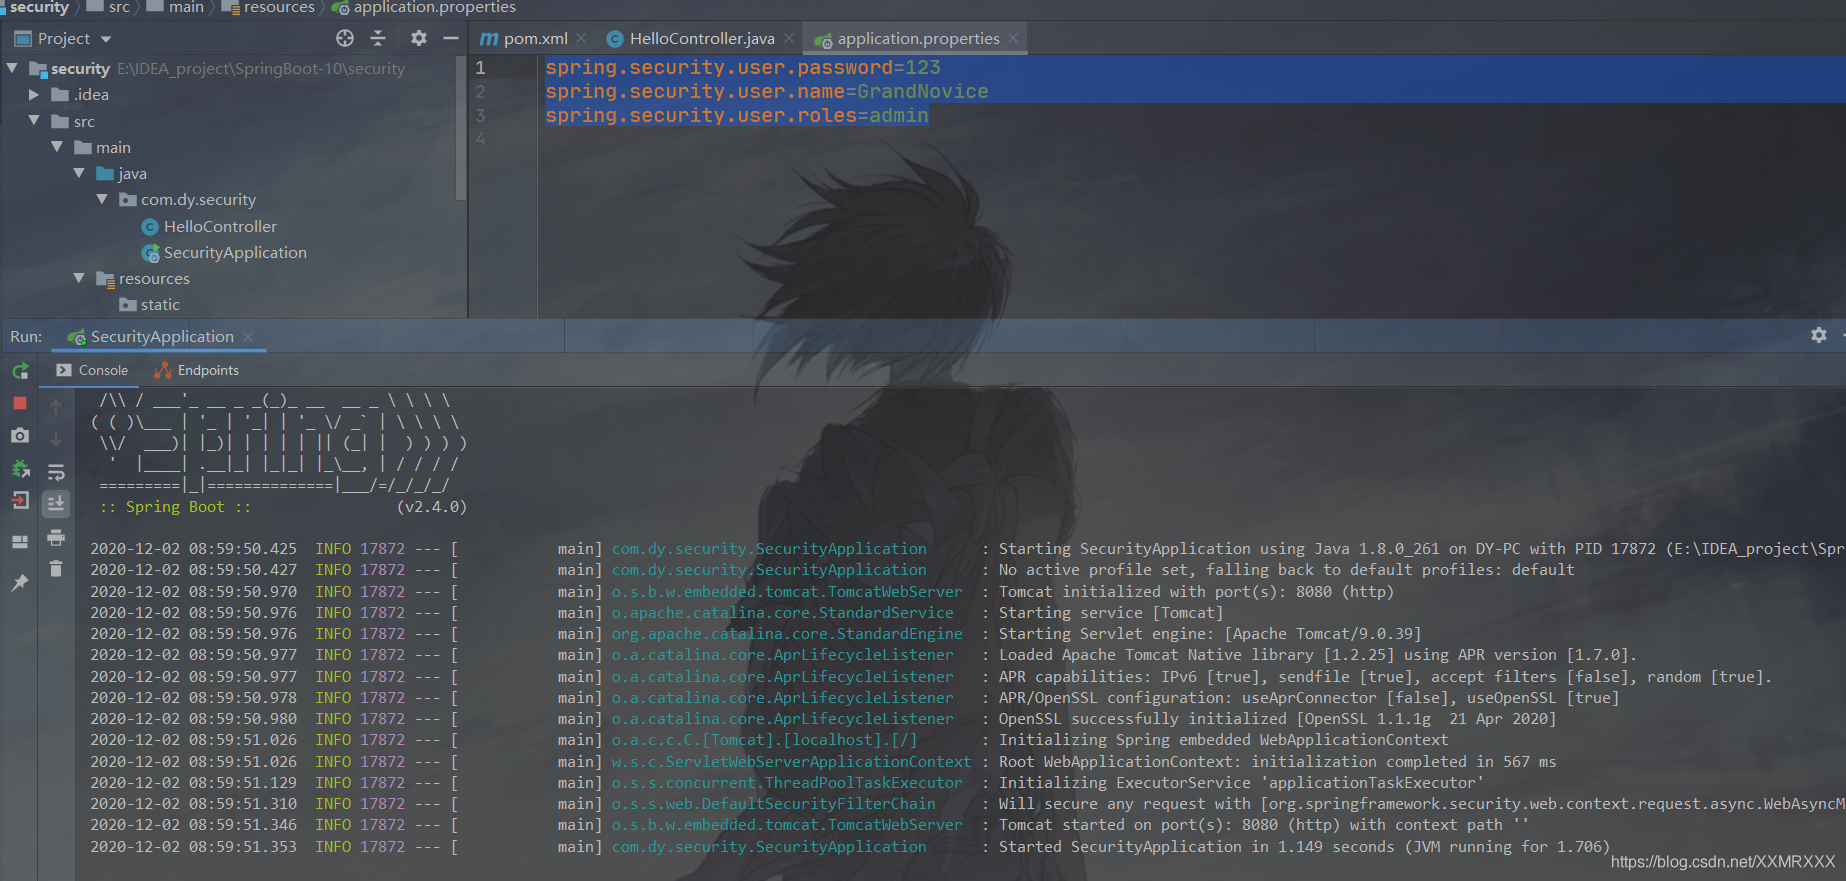
application.properties配置
spring.security.user.password=123
spring.security.user.name=GrandNovice
spring.security.user.roles=admin
重启项目,发现没有了security生成的密码
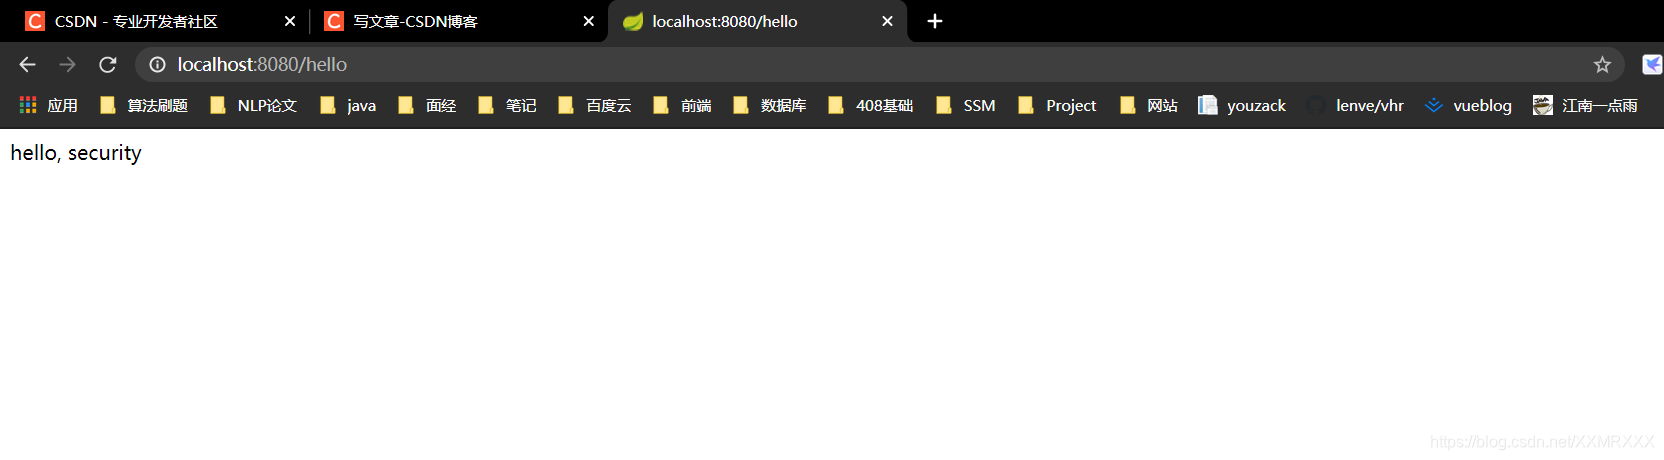
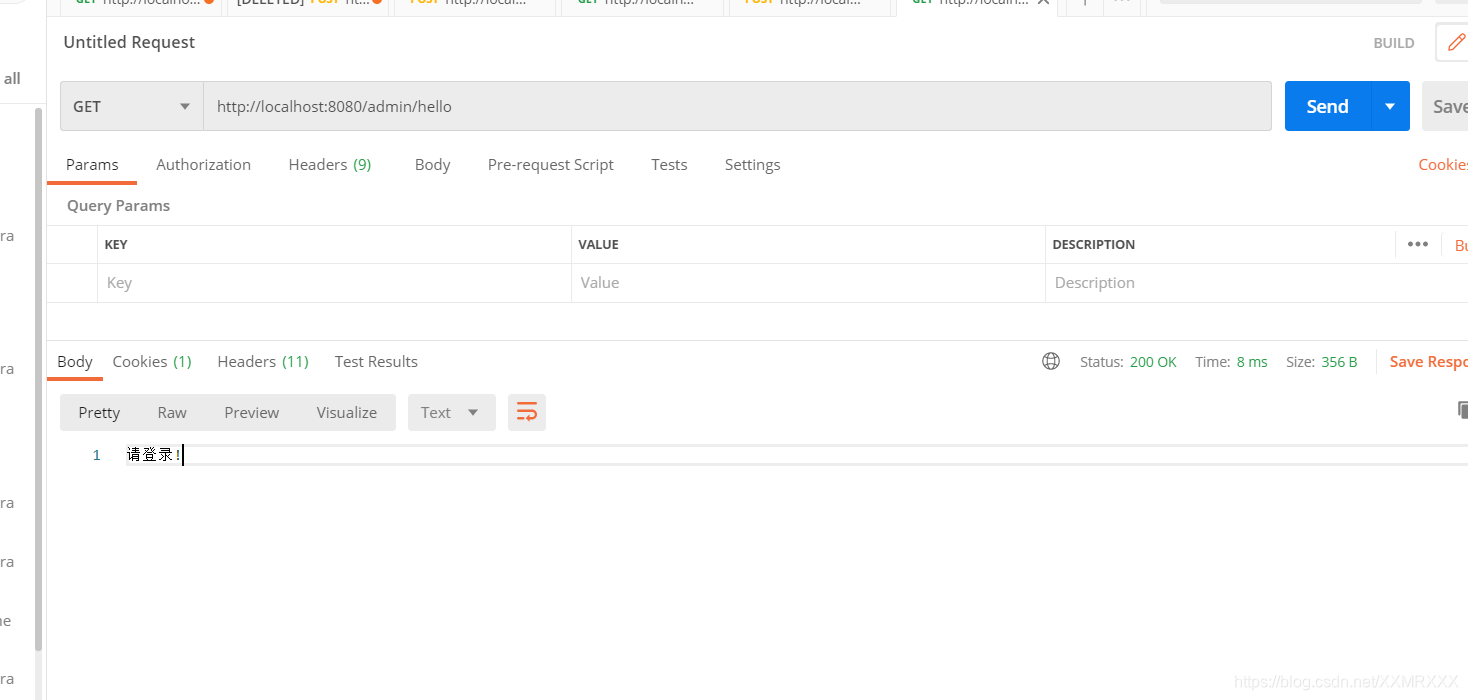
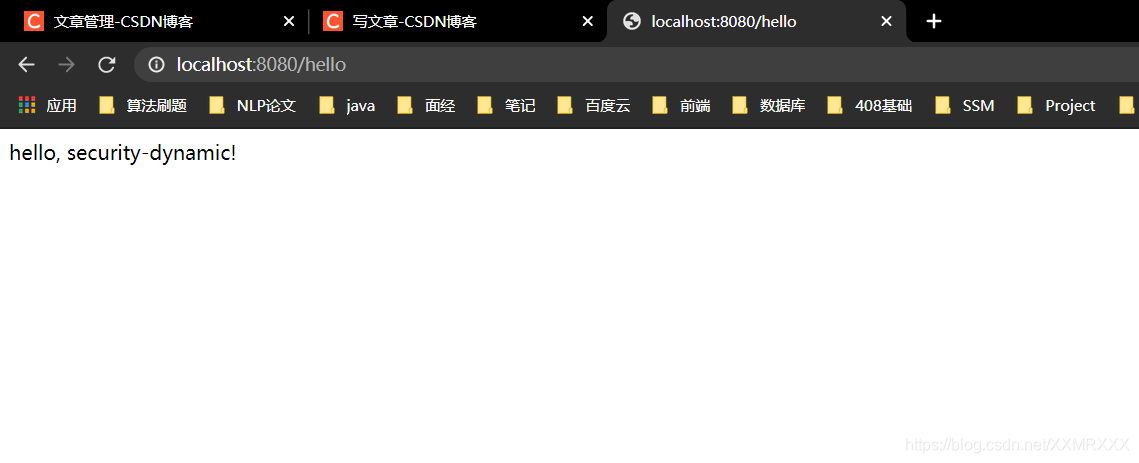
访问http://localhost:8080/hello
跳转到登录页
输入配置文件中的用户名和密码

登录成功
代码配置用户名和密码
- 创建一个SecurityConfig类继承WebSecurityConfigurerAdapter类,因为要修改用户名和密码,所以我们需要重写configure(AuthenticationManagerBuilder auth)方法,配置类不要忘记加配置注解@Configuration
- 基于内存认证添加两个用户名和密码,并添加密码不加密登录保证(spring5要求)
- 详细代码
@Configuration
public class SecurityConfig extends WebSecurityConfigurerAdapter {

    // 密码加密
    @Bean
    PasswordEncoder passwordEncoder() {
        return NoOpPasswordEncoder.getInstance();  // 保证密码不加密可以登录,后续介绍密码加密方法
    }

    @Override
    protected void configure(AuthenticationManagerBuilder auth) throws Exception {
        auth.inMemoryAuthentication()  // 基于内存的认证
                // 用户名.密码.用户角色
                // spring5之后密码需要加密,下面这种写法不对
                .withUser("GrandNovice").password("123").roles("admin")
                // and()再添加一个角色
                .and()
                .withUser("dy").password("456").roles("user");
    }
}
测试:两个用户都可访问成功
HttpSecurity配置
需求:并不是所有请求都需要登录才可以访问,针对不同的url,我们需要配置不同的权限,采取不同策略!
- 在配置类SecurityConfig中重写configure(HttpSecurity http)方法
- 配置如下
@Override
protected void configure(HttpSecurity http) throws Exception {
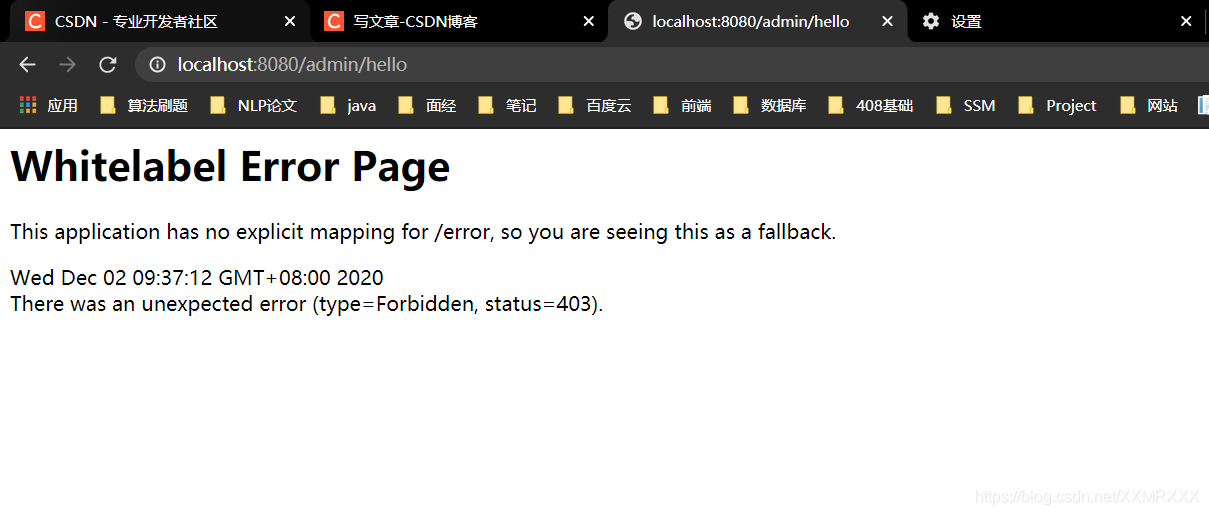
http.authorizeRequests() // 开启配置
.antMatchers("/admin/**") // 设置路径
.hasRole("admin") // 要访问上述路径需要角色为admin
.antMatchers("/user/**").hasAnyRole("admin", "user") // admin和user任意角色都可以访问/user/**
// .antMatchers("/user/**").access("hasAnyRole('admin', 'user')") // 等效于上面一句
.anyRequest() // 剩余其他请求
.authenticated() // 登录之后即可访问
.and()
.formLogin() // 表单登录
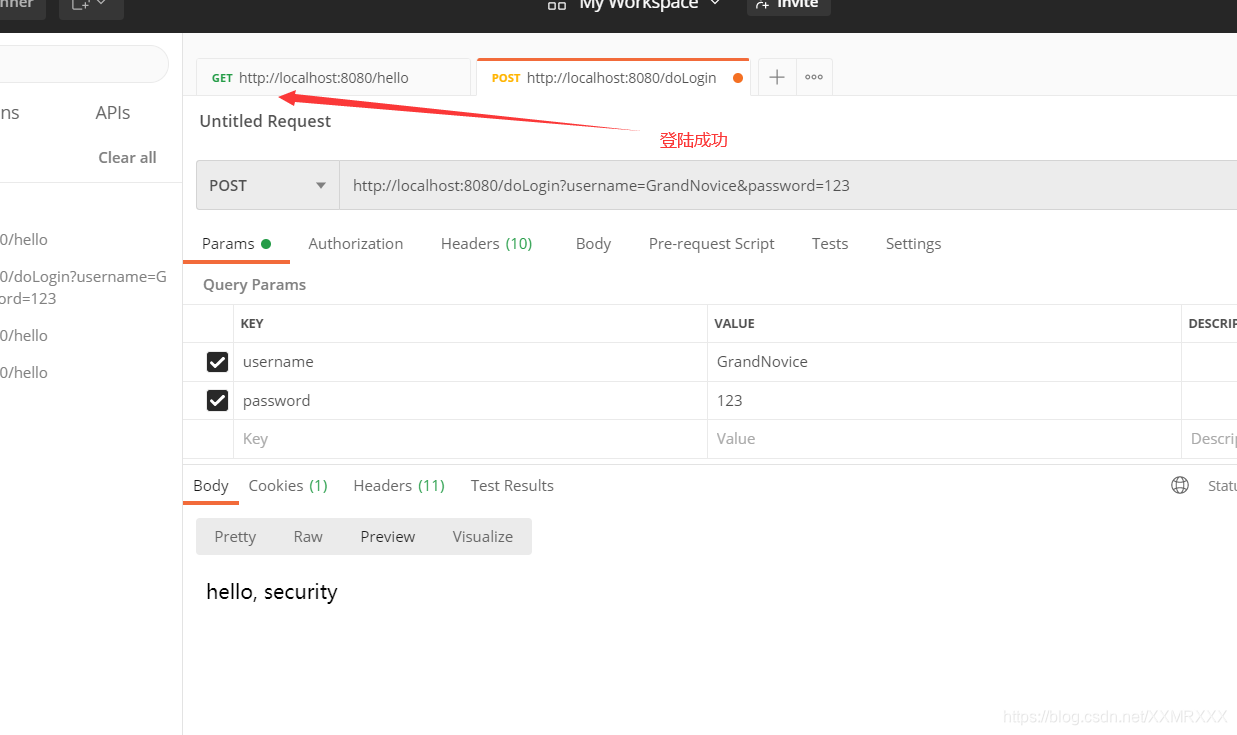
.loginProcessingUrl("/doLogin") // 处理登录请求的url
.permitAll() // 允许所有的跟登录相关的接口可以通过上述url
.and()
.csrf().disable(); // 使用postman测试,需要关闭csrf攻击
}
测试:dy用户访问/admin/hello请求失败
postman测试doLogin请求
配置登录表单formLogin()
- loginPage
- loginProcessingUrl
- usernameParameter
- passwordParameter
- successHandler
- new AuthenticationSuccessHandler() { } - failureHandler
- new AuthenticationFailureHandler() { }
.formLogin() // 表单登录
.loginPage("/login") // 自定义的登录页面
.loginProcessingUrl("/doLogin") // 处理登录请求的url
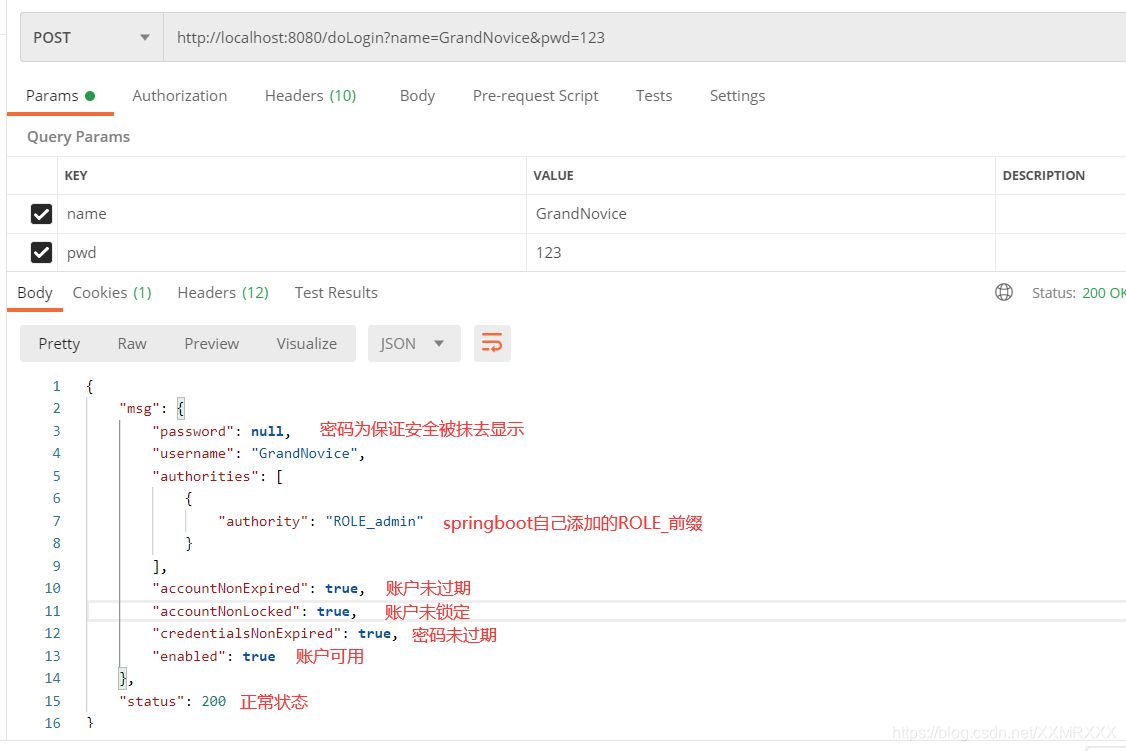
.usernameParameter("name") // url路径里的参数 http://localhost:8080/doLogin?username=GrandNovice&password=123 现在换成 http://localhost:8080/doLogin?name=GrandNovice&pwd=123
.passwordParameter("pwd")
// .successForwardUrl("/succ") // 前后端不分离的页面需要提供登录成功后要跳转的url(一般是首页)
.successHandler(new AuthenticationSuccessHandler() { // 前后端分离项目只需要提供接口告诉前端登录成功还是失败,前端负责跳转,返回json
@Override
public void onAuthenticationSuccess(HttpServletRequest req, HttpServletResponse resp, Authentication authentication) throws IOException, ServletException {
resp.setContentType("application/json; charset=UTF-8"); // 返回值类型和编码格式
PrintWriter writer = resp.getWriter();
Map<String, Object> map = new HashMap<>();
map.put("status", 200);
map.put("msg", authentication.getPrincipal()); // authentication.getPrincipal()获取登录成功的用户对象
// map集合转化成json字符串
String json = new ObjectMapper().writeValueAsString(map);
writer.write(json); // 写出到前端
writer.flush();
writer.close();
}
})
.failureHandler(new AuthenticationFailureHandler() {
@Override
public void onAuthenticationFailure(HttpServletRequest req, HttpServletResponse resp, AuthenticationException e) throws IOException, ServletException {
resp.setContentType("application/json; charset=UTF-8");
PrintWriter writer = resp.getWriter();
Map<String, Object> map = new HashMap<>();
map.put("status", 400);
if (e instanceof LockedException) {
map.put("msg", "账户被锁定,登录失败!");
}else if (e instanceof BadCredentialsException) {
map.put("msg", "用户名或密码输入错误,登录失败!");
}else if (e instanceof DisabledException) {
map.put("msg", "账户被禁用,登录失败!");
}else if (e instanceof AccountExpiredException) {
map.put("msg", "账户过期,登录失败!");
}else if (e instanceof CredentialsExpiredException) {
map.put("msg", "密码过期,登录失败!");
}else {
map.put("msg", "登录失败!");
}
String json = new ObjectMapper().writeValueAsString(map);
writer.write(json); // 写出到前端
writer.flush();
writer.close();
}
})
Exception:

使用http://localhost:8080/doLogin?name=GrandNovice&pwd=123请求登录成功
删除cookies
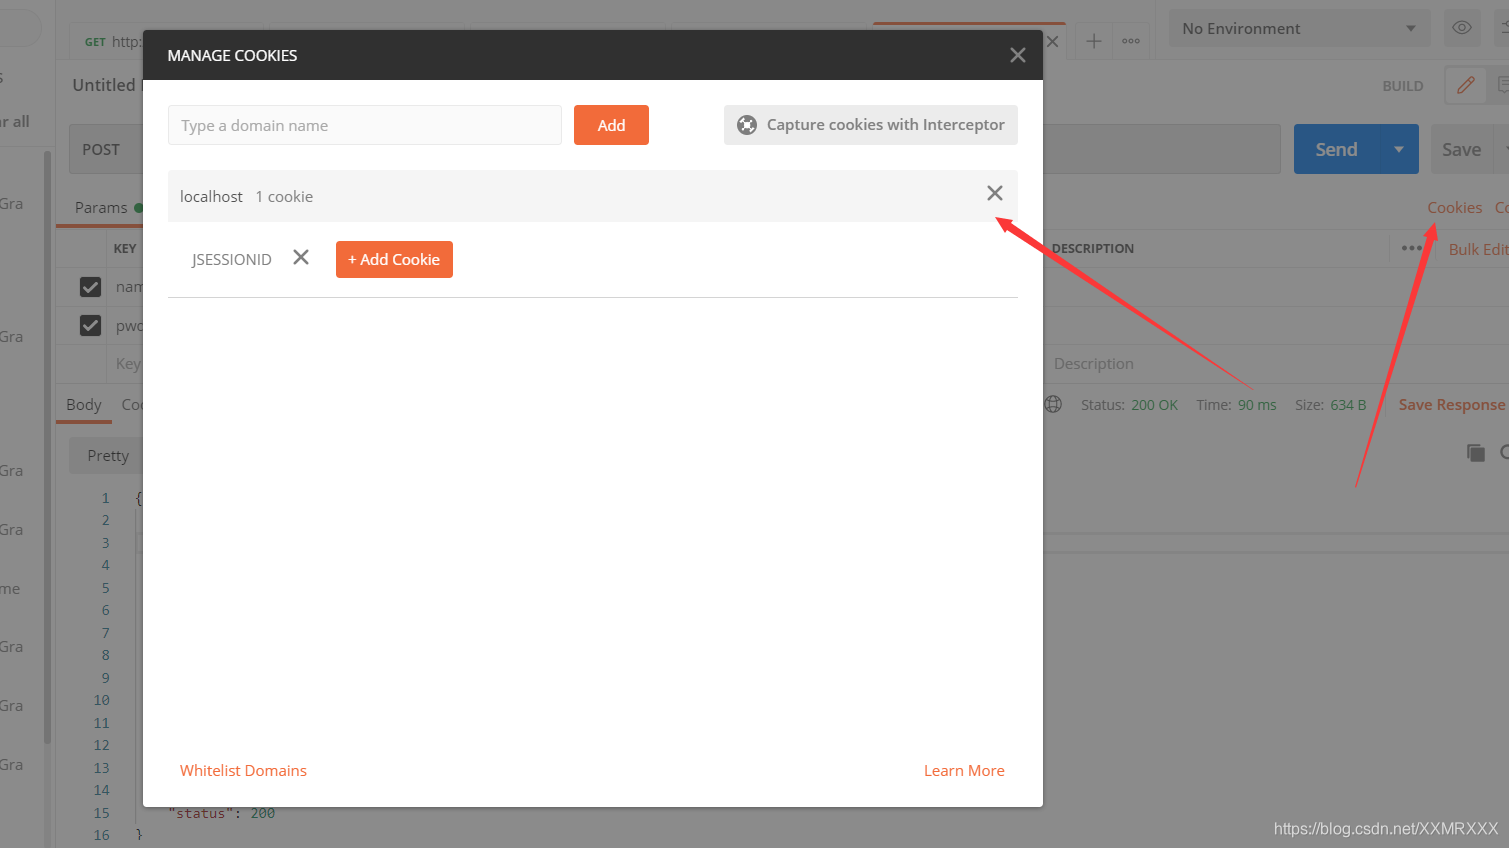
再次请求http://localhost:8080/admin/hello
易错点:
@GetMapping
@PostMapping
@RequestMapping
看清楚!!!
配置注销登录logout
	.logout()
	.logoutUrl("/logout")
	.logoutSuccessHandler(new LogoutSuccessHandler() {  // 注销成功回调
	    @Override
	    public void onLogoutSuccess(HttpServletRequest req, HttpServletResponse resp, Authentication authentication) throws IOException, ServletException {
	        resp.setContentType("application/json; charset=UTF-8");  // 返回值类型和编码格式
	        PrintWriter writer = resp.getWriter();
	        Map<String, Object> map = new HashMap<>();
	        map.put("status", 200);
	        map.put("msg", "注销成功!");
	        // map集合转化成json字符串
	        String json = new ObjectMapper().writeValueAsString(map);
	        writer.write(json);  // 写出到前端
	        writer.flush();
	        writer.close();
	    }
	})

配置多个HttpSecurity
记得注释掉原来的配置类的配置注解
/**
* @program: security
* @description:
* @author: GrandNovice
* @create: 2020-12-02 11:14
**/
package com.dy.security.config;
import com.fasterxml.jackson.databind.ObjectMapper;
import org.springframework.beans.factory.annotation.Autowired;
import org.springframework.context.annotation.Bean;
import org.springframework.context.annotation.Configuration;
import org.springframework.core.annotation.Order;
import org.springframework.security.authentication.*;
import org.springframework.security.config.annotation.authentication.builders.AuthenticationManagerBuilder;
import org.springframework.security.config.annotation.web.builders.HttpSecurity;
import org.springframework.security.config.annotation.web.configuration.WebSecurityConfigurerAdapter;
import org.springframework.security.core.Authentication;
import org.springframework.security.core.AuthenticationException;
import org.springframework.security.crypto.password.NoOpPasswordEncoder;
import org.springframework.security.crypto.password.PasswordEncoder;
import org.springframework.security.web.authentication.AuthenticationFailureHandler;
import org.springframework.security.web.authentication.AuthenticationSuccessHandler;
import org.springframework.security.web.authentication.logout.LogoutSuccessHandler;
import javax.servlet.ServletException;
import javax.servlet.http.HttpServletRequest;
import javax.servlet.http.HttpServletResponse;
import java.io.IOException;
import java.io.PrintWriter;
import java.util.HashMap;
import java.util.Map;
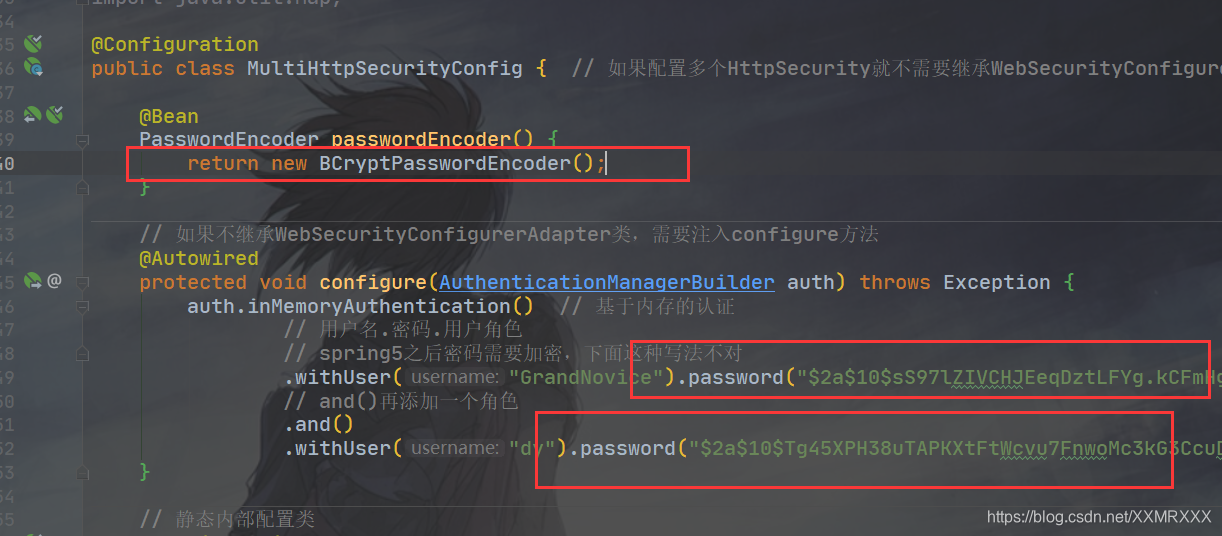
@Configuration
public class MultiHttpSecurityConfig { // 如果配置多个HttpSecurity就不需要继承WebSecurityConfigurerAdapter类了
@Bean
PasswordEncoder passwordEncoder() {
return NoOpPasswordEncoder.getInstance();
}
// 如果不继承WebSecurityConfigurerAdapter类,需要注入configure方法
@Autowired
protected void configure(AuthenticationManagerBuilder auth) throws Exception {
auth.inMemoryAuthentication() // 基于内存的认证
// 用户名.密码.用户角色
// spring5之后密码需要加密,下面这种写法不对
.withUser("GrandNovice").password("111").roles("admin")
// and()再添加一个角色
.and()
.withUser("dy").password("222").roles("user");
}
// 静态内部配置类
@Configuration
@Order(1) // 权限匹配优先级1
public static class AdminSecurityConfig extends WebSecurityConfigurerAdapter {
@Override
protected void configure(HttpSecurity http) throws Exception {
http.antMatcher("/admin/**").authorizeRequests().anyRequest().hasAnyRole("admin");
/*
http.authorizeRequests() // 开启配置
.antMatchers("/admin/**").hasAnyRole("admin")
.anyRequest() // 剩余其他请求
.authenticated() // 登录之后即可访问
.and()
.formLogin()
.loginProcessingUrl("/doLogin")
.successHandler(new AuthenticationSuccessHandler() {
@Override
public void onAuthenticationSuccess(HttpServletRequest req, HttpServletResponse resp, Authentication authentication) throws IOException, ServletException {
resp.setContentType("application/json; charset=UTF-8");
PrintWriter writer = resp.getWriter();
Map<String, Object> map = new HashMap<>();
map.put("status", 200);
map.put("msg", "登录成功");
writer.write(new ObjectMapper().writeValueAsString(map));
writer.flush();
writer.close();
}
})
.and()
.csrf().disable(); // 使用postman测试,需要关闭csrf攻击
*/
}
}
@Configuration
// @Order(2) // 权限匹配优先级2 (如果只有两个类需要比较优先级的话,其中一个优先级高的设置了值为1,第二个可以不用添加@Order注解)
public static class OtherSecurityConfig extends WebSecurityConfigurerAdapter {
@Override
protected void configure(HttpSecurity http) throws Exception {
http.authorizeRequests().anyRequest().authenticated()
.and()
.formLogin()
.loginProcessingUrl("/doLogin")
.permitAll()
.and()
.csrf().disable();
}
}
}
密码加密BCryptPasswordEncoder
@Test
    public void contextLoads() {
        for (int i = 0; i < 10; i++) {
            BCryptPasswordEncoder encoder = new BCryptPasswordEncoder();
            System.out.println(encoder.encode("123"));
            // 输出发现同样的密码加密每次输出都不一样,SpringSecurity提供的密码加密
        }
    }
输出:
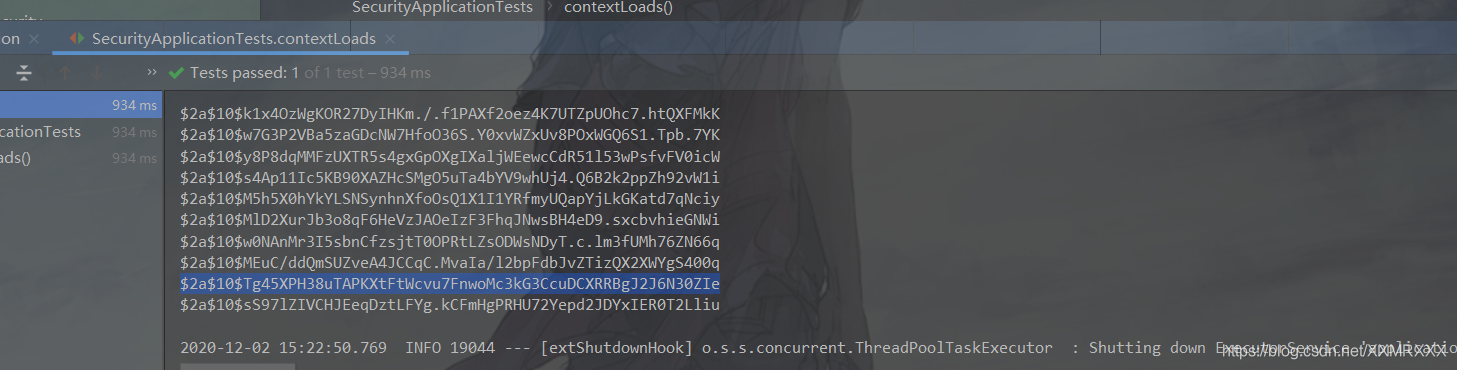
我们随便复制一个填写到配置类中用作用户密码,然后将原来在PasswordEncoder中的取消密码加密修改成new BCryptPasswordEncoder();
发现我们仍可以用密码123登录,实际上我们存到数据库中的用户密码就是这种被加密的字符串。
方法安全
启用方法安全首先需要在配置类上加一个注解@EnableGlobalMethodSecurity(prePostEnabled = true, securedEnabled = true) ,分别表示在方法执行前后进行校验和表达式校验。
创建一个service包,在包内创建一个MethodService类测试方法安全,记得service包内的类添加@Service注解
/**
* @program: security
* @description:
* @author: GrandNovice
* @create: 2020-12-02 15:34
**/
package com.dy.security.service;
import org.springframework.security.access.annotation.Secured;
import org.springframework.security.access.prepost.PreAuthorize;
import org.springframework.stereotype.Service;
@Service
public class MethodService {
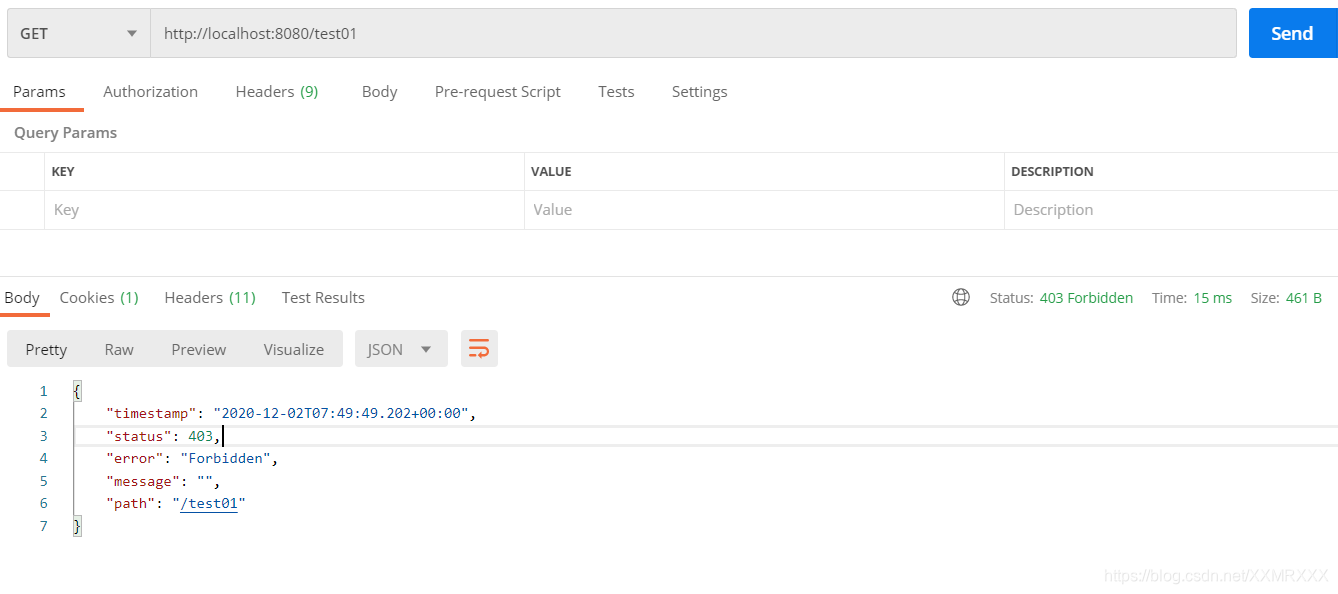
@PreAuthorize("hasRole('admin')")
public String admin() {
return "hello, admin!";
}
@Secured("ROLE_user")
public String user() {
return "hello, user!";
}
@PreAuthorize("hasAnyRole('admin', 'user')")
public String anyone() {
return "hello, anyone!";
}
}
在HelloController中进行测试,需要将Methodservice注入
@Autowired
MethodService methodService;
@RequestMapping("/test01")
public String test01() {
return methodService.admin();
}
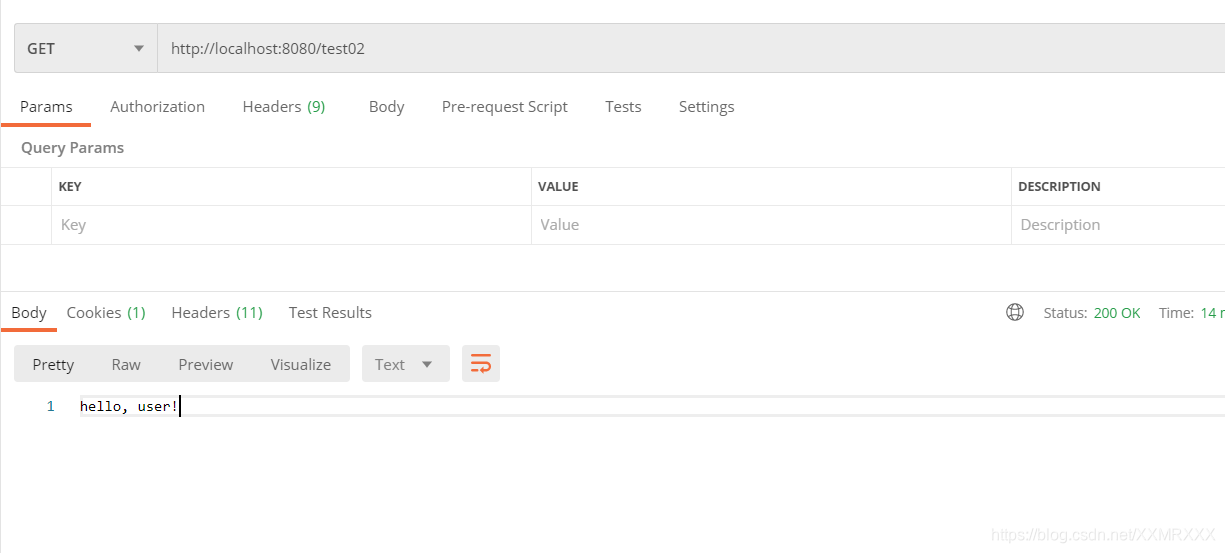
@RequestMapping("/test02")
public String test02() {
return methodService.user();
}
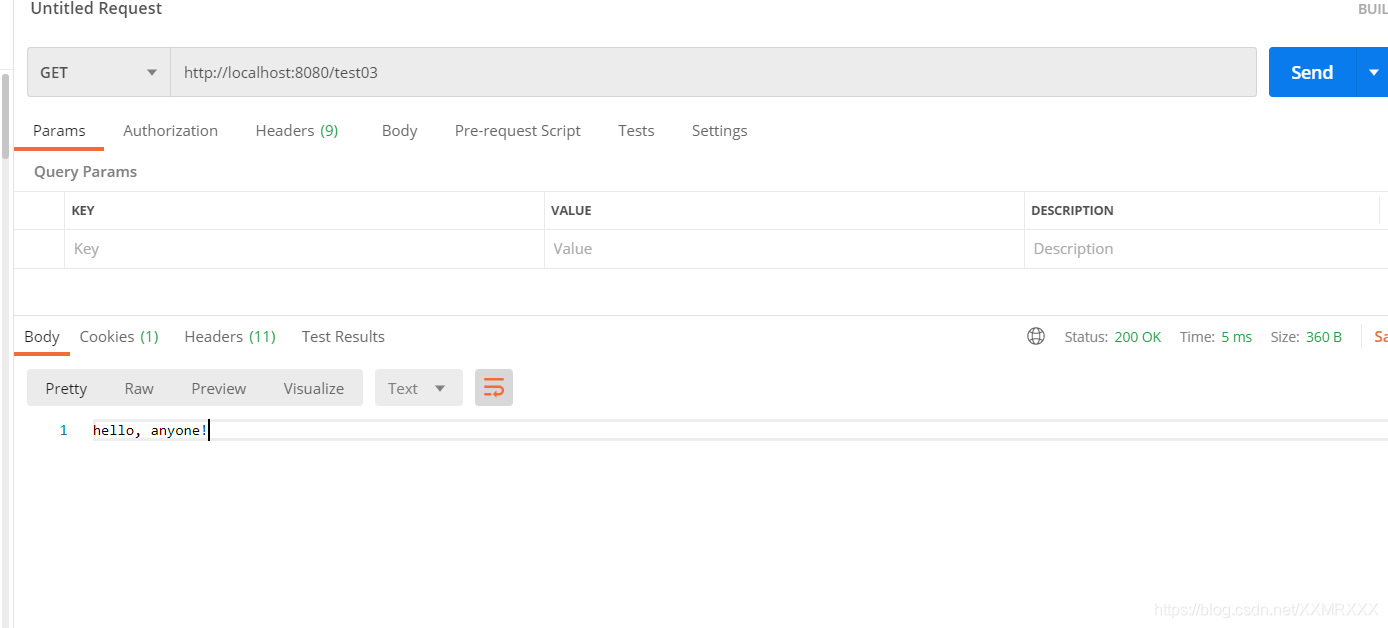
@RequestMapping("/test03")
public String test03() {
return methodService.anyone();
}
测试:
登录GrandNovice 角色为admin,测试test01,test02,test03请求

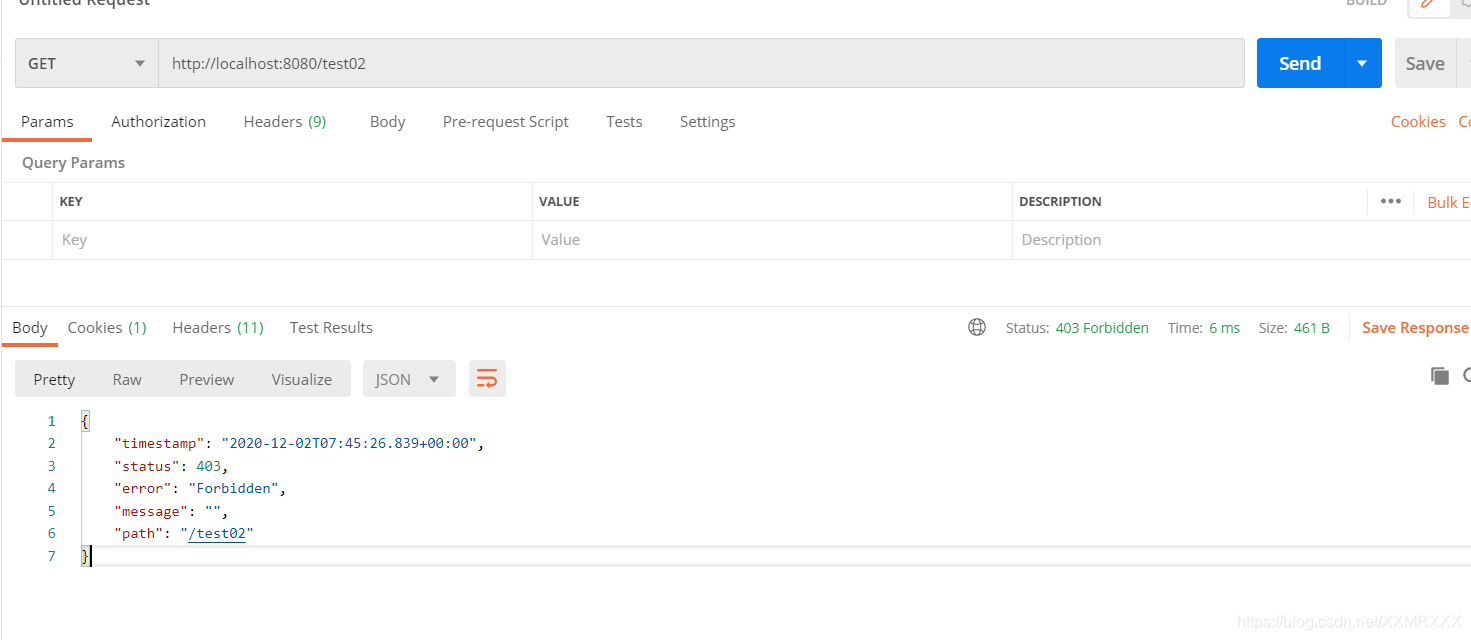
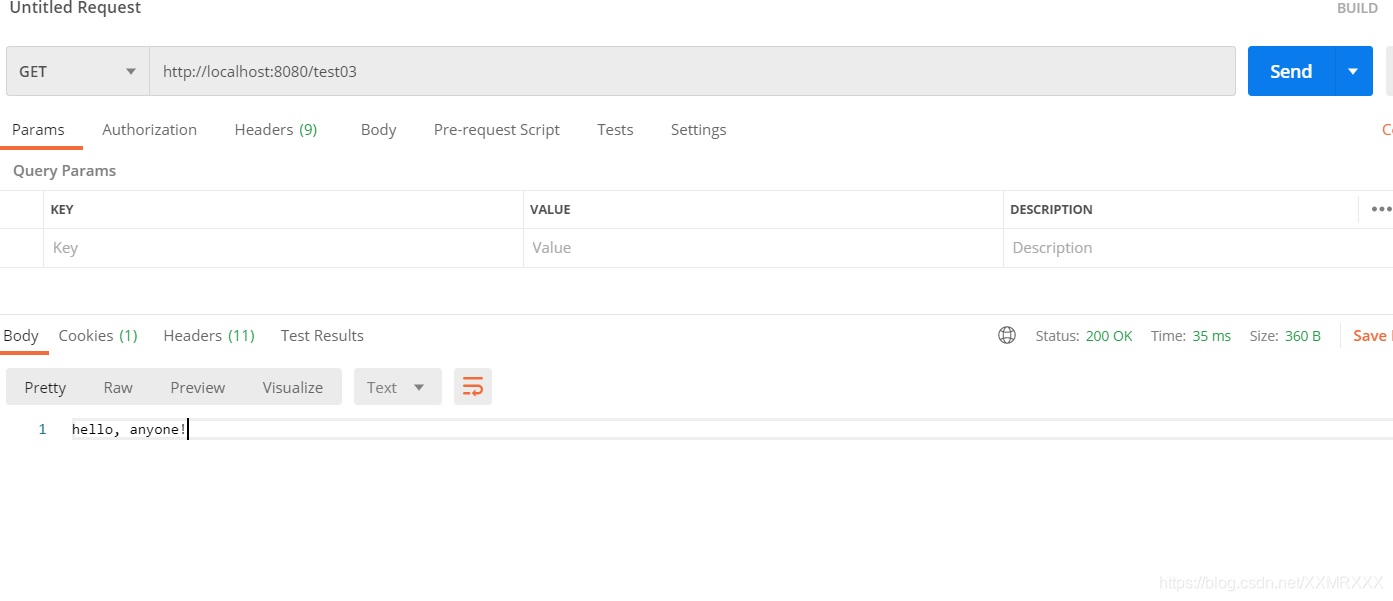
登录dy,角色为user
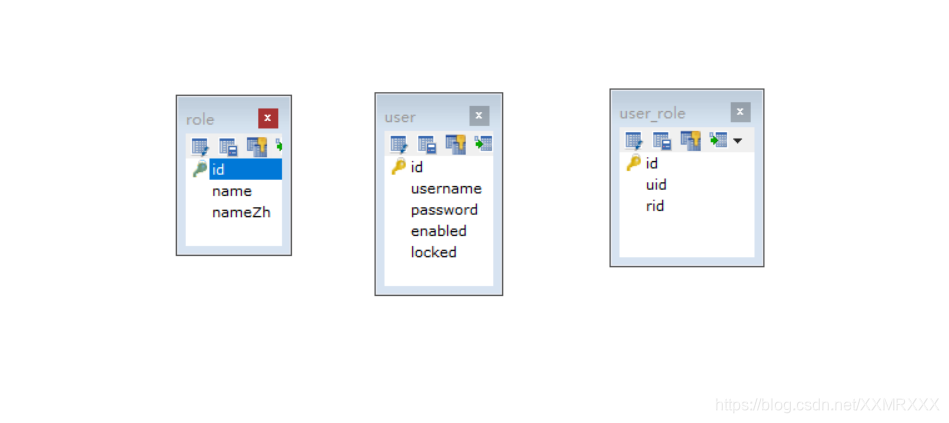
基于数据库的认证
- 建立数据库,并在项目中配置连接数据库
spring.datasource.url=jdbc:mysql://localhost:3306/security
spring.datasource.type=com.alibaba.druid.pool.DruidDataSource
spring.datasource.username=root
spring.datasource.password=123456
- 创建对应的实体类,生成对应的get set方法

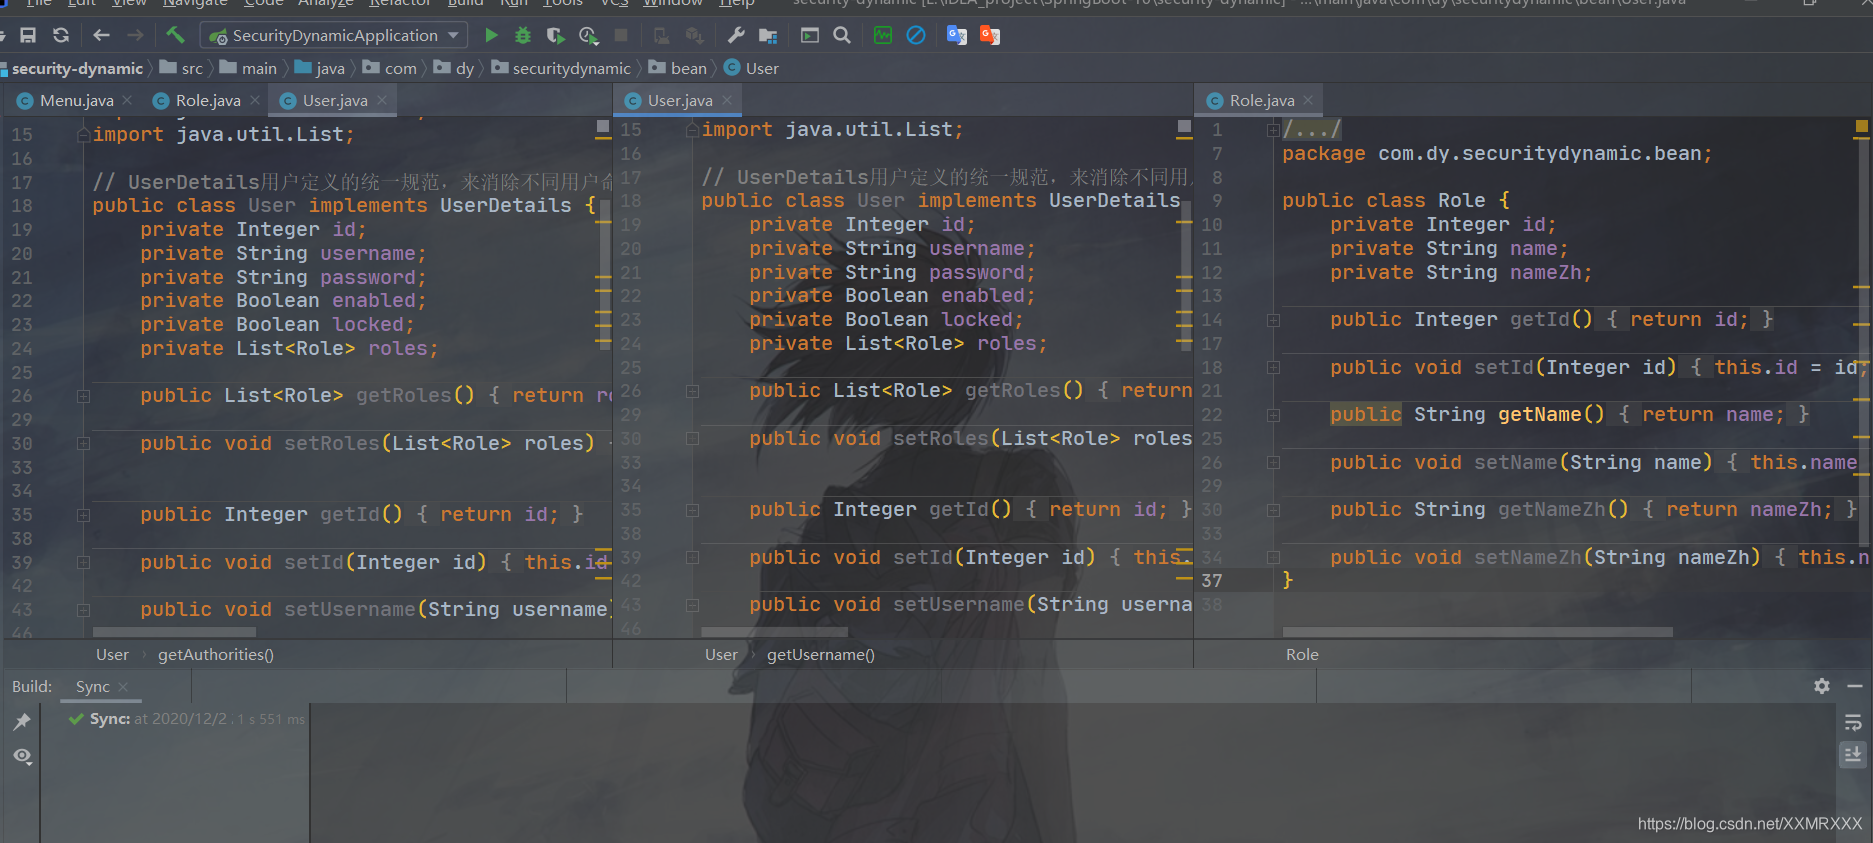
- 在User类中添加role属性,并生成对应get set方法
private List<Role> roles;
- 使得User类实现 UserDetails接口,并重写其方法
/**
 * @program: security-db
 * @description:
 * @author: GrandNovice
 * @create: 2020-12-02 16:42
 **/
package com.dy.securitydb.bean;

import org.springframework.security.core.GrantedAuthority;
import org.springframework.security.core.authority.SimpleGrantedAuthority;
import org.springframework.security.core.userdetails.UserDetails;

import java.util.ArrayList;
import java.util.Collection;
import java.util.List;


// UserDetails用户定义的统一规范,来消除不同用户命名属性名不一致的问题
public class User implements UserDetails {
    private Integer id;
    private String username;
    private String password;
    private Boolean enabled;
    private Boolean locked;
    private List<Role> roles;

    public List<Role> getRoles() {
        return roles;
    }

    public void setRoles(List<Role> roles) {
        this.roles = roles;
    }


    public Integer getId() {
        return id;
    }

    public void setId(Integer id) {
        this.id = id;
    }

    public void setUsername(String username) {
        this.username = username;
    }

    @Override
    public String getUsername() {
        return username;
    }

    @Override  // 账户是否未过期——需要去联系数据库中的对应字段,因为我们数据库中没有定义这个字段,所以这里我们固定值为true
    public boolean isAccountNonExpired() {
        return true;
    }

    @Override  // 密码是否未过期——同上
    public boolean isCredentialsNonExpired() {
        return true;
    }

    @Override  // Collection用于返回用户的所有角色,集合中定义的泛型是? extends GrantedAuthority,但是User类中拿到的是roles,需要修改一下
    public Collection<? extends GrantedAuthority> getAuthorities() {
        // 自己定义一个List<SimpleGrantedAuthority>用于存放role
        List<SimpleGrantedAuthority> authorities = new ArrayList<>();
        for (Role role : roles) {
            authorities.add(new SimpleGrantedAuthority("ROLE_" + role.getName()));
        }
        return authorities;
    }

    @Override
    public String getPassword() {
        return password;
    }

    @Override  // 账户是否未锁定
    public boolean isAccountNonLocked() {
        return !locked;  // 相当于getLocked(),因此要去掉原来生成的getLocked()方法,记得取反
    }

    @Override  // 是否可用——同上
    public boolean isEnabled() {
        return enabled;
    }

    public void setPassword(String password) {
        this.password = password;
    }

    public void setEnabled(Boolean enabled) {
        this.enabled = enabled;
    }

    public void setLocked(Boolean locked) {
        this.locked = locked;
    }
}
- 在service包中创建一个UserService类,添加@Service注解,实现UserDetailsService接口,重写接口的方法loadUserByUsername
@Service
public class UserService implements UserDetailsService {

    @Autowired
    UserMapper userMapper;

    @Override  // 根据用户名加载用户
    public UserDetails loadUserByUsername(String username) throws UsernameNotFoundException {
        User user = userMapper.loadUserByUsername(username);
        if (user == null) {
            throw new UsernameNotFoundException("用户不存在!");
        }
        user.setRoles(userMapper.getUserRolesById(user.getId()));
        return user;
    }
}
- 在mapper包中创建一个UserMapper类,添加注解Mapper,并创建刚才在UserService中定义的两个方法
@Mapper
public interface UserMapper {
    User loadUserByUsername(String username);

    List<Role> getUserRolesById(Integer id);
}
- 在mapper包中创建对应的UserMapper.xml完成对UserMapper中定义的方法的sql实现
<?xml version="1.0" encoding="UTF-8" ?>
<!DOCTYPE mapper
        PUBLIC "-//mybatis.org//DTD Config 3.0//EN"
        "http://mybatis.org/dtd/mybatis-3-mapper.dtd">

<mapper namespace="com.dy.securitydb.mapper.UserMapper">
    <select id="loadUserByUsername" resultType="com.dy.securitydb.bean.User">
        select * from security.user where username = #{username};
    </select>

    <select id="getUserRolesById" resultType="com.dy.securitydb.bean.Role">
        select * from security.role r, security.user_role ur
        where r.id = ur.rid and ur.uid = #{id};
    </select>

</mapper>
- 在config包中创建SecurityConfig继承WebSecurityConfigurerAdapter,添加注解,注入userService,重写configure方法,添加加密的passwordEncoder ()方法,并将其注入到spring容器中
/**
 * @program: security-db
 * @description:
 * @author: GrandNovice
 * @create: 2020-12-02 17:28
 **/
package com.dy.securitydb.config;

import com.dy.securitydb.service.UserService;
import org.springframework.beans.factory.annotation.Autowired;
import org.springframework.context.annotation.Bean;
import org.springframework.context.annotation.Configuration;
import org.springframework.security.config.annotation.authentication.builders.AuthenticationManagerBuilder;
import org.springframework.security.config.annotation.web.configuration.WebSecurityConfigurerAdapter;
import org.springframework.security.crypto.bcrypt.BCryptPasswordEncoder;
import org.springframework.security.crypto.password.PasswordEncoder;

@Configuration
public class SecurityConfig extends WebSecurityConfigurerAdapter {
    @Autowired
    UserService userService;

    @Bean
    PasswordEncoder passwordEncoder() {
        return new BCryptPasswordEncoder();
    }

    @Override
    protected void configure(AuthenticationManagerBuilder auth) throws Exception {
        auth.userDetailsService(userService);  // 相当于之前的注入用户(用户名,密码,角色)
    }
}
- pom文件资源过滤
<build>
        <resources>
            <resource>
                <directory>src/main/java</directory>
                <includes>
                    <include>**/*.xml</include>
                </includes>
            </resource>
            <resource>
                <directory>src/main/resources</directory>
            </resource>
        </resources>
    </build>
- 在controller中创建HelloController进行测试
/**
 * @program: security-db
 * @description:
 * @author: GrandNovice
 * @create: 2020-12-02 17:38
 **/
package com.dy.securitydb.controller;

import org.springframework.web.bind.annotation.RequestMapping;
import org.springframework.web.bind.annotation.RestController;

@RestController
public class HelloController {
    @RequestMapping("/hello")
    public String hello() {
        return "hello, security-db!";
    }
}
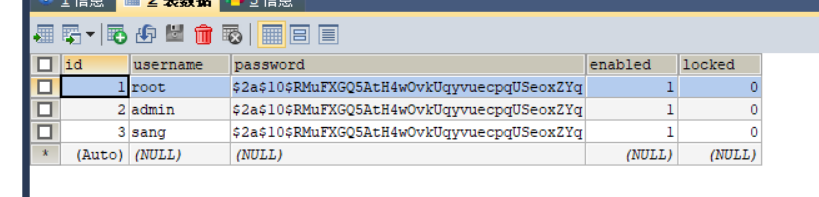
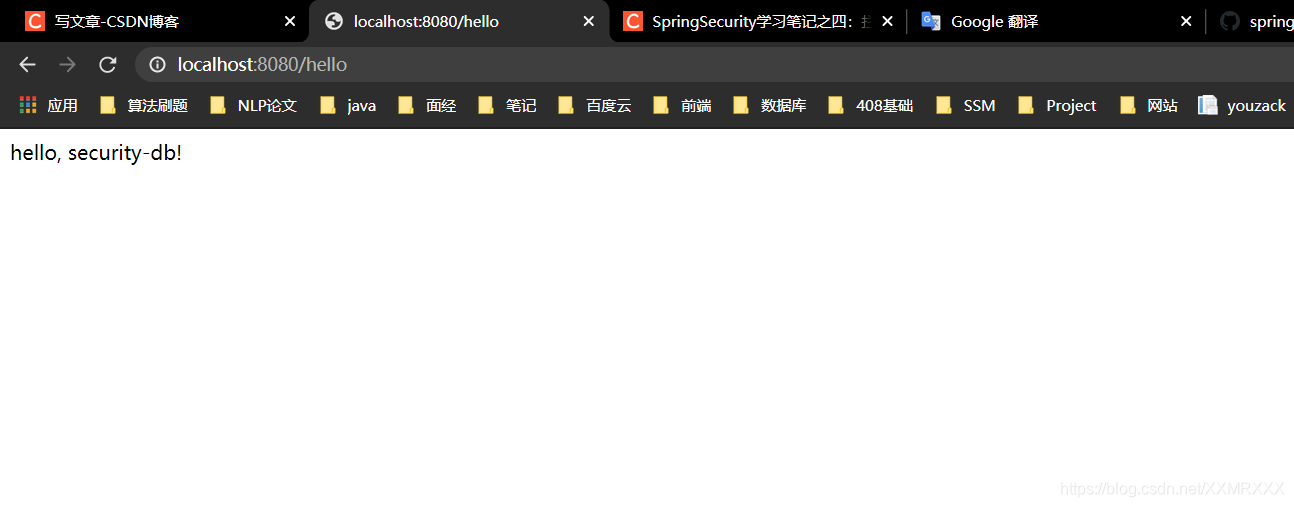
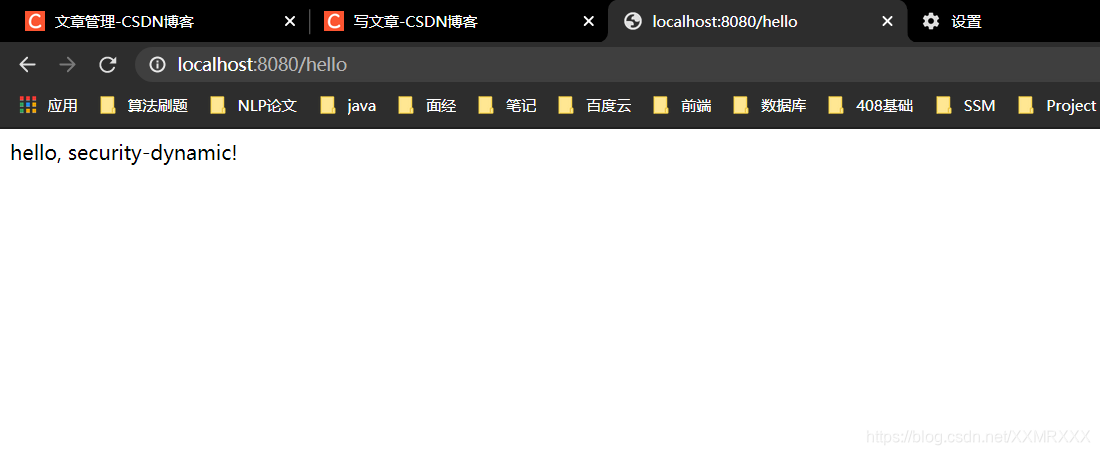
- 访问请求http://localhost:8080/hello,提示登录 root 123,访问成功!
- 权限问题测试,首先编写三个请求controller,然后在配置类中配置
@RequestMapping("/dba/hello")
    public String dba() {
        return "hello, dba!";
    }

    @RequestMapping("/admin/hello")
    public String admin() {
        return "hello, admin!";
    }

    @RequestMapping("/user/hello")
    public String user() {
        return "hello, user!";
    }
@Override
    protected void configure(HttpSecurity http) throws Exception {
        http.authorizeRequests()
                .antMatchers("/dba/**").hasRole("dba")
                .antMatchers("/admin/**").hasRole("admin")
                .antMatchers("/user/**").hasRole("user")
                .anyRequest().authenticated()
                .and()
                .formLogin()
                .permitAll()
                .and()
                .csrf().disable();

    }
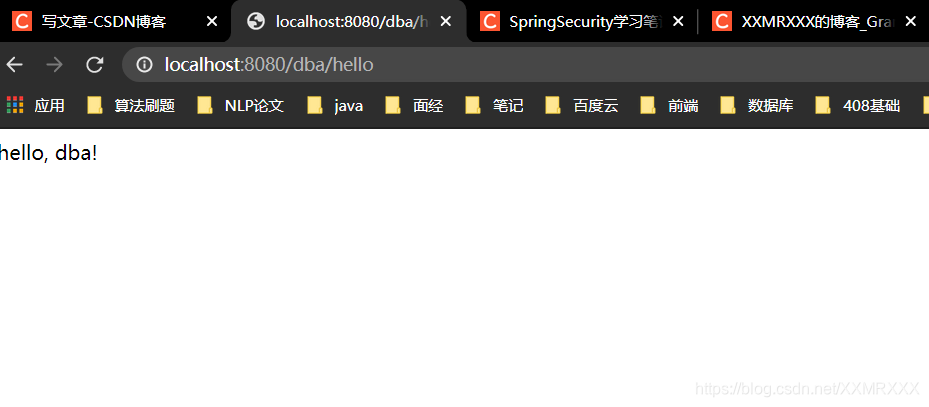
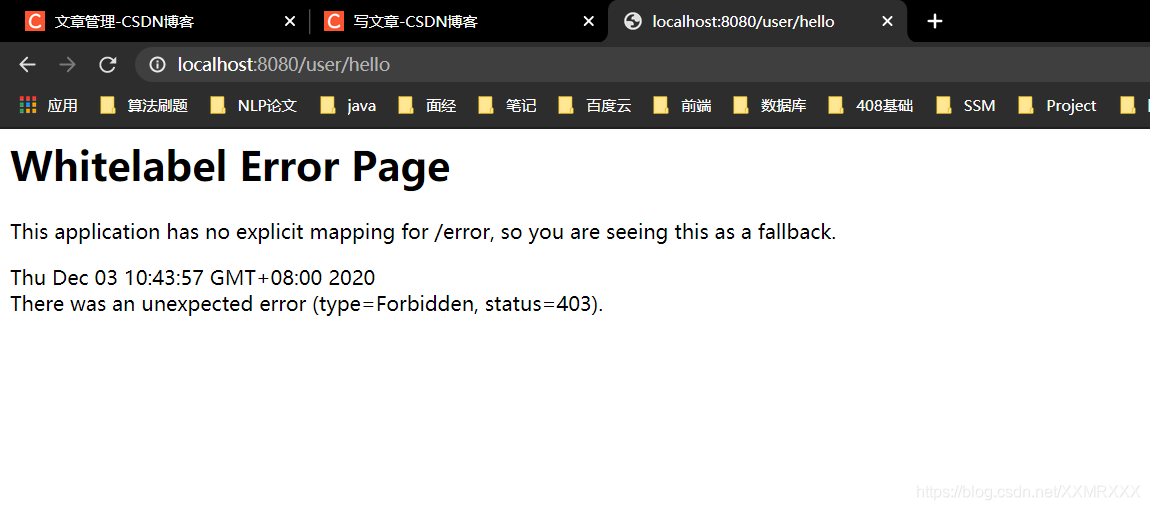
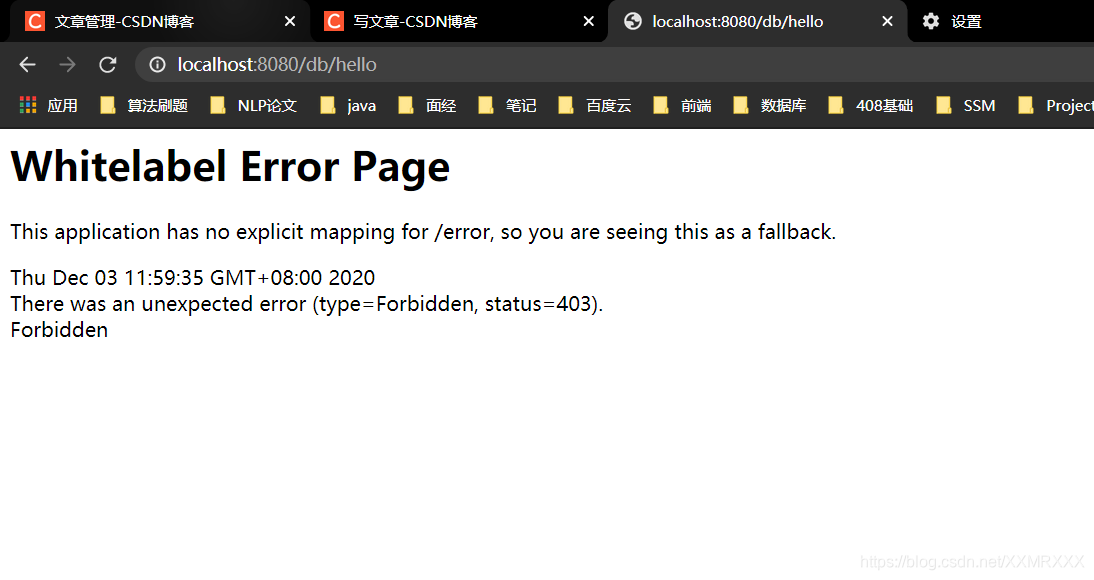
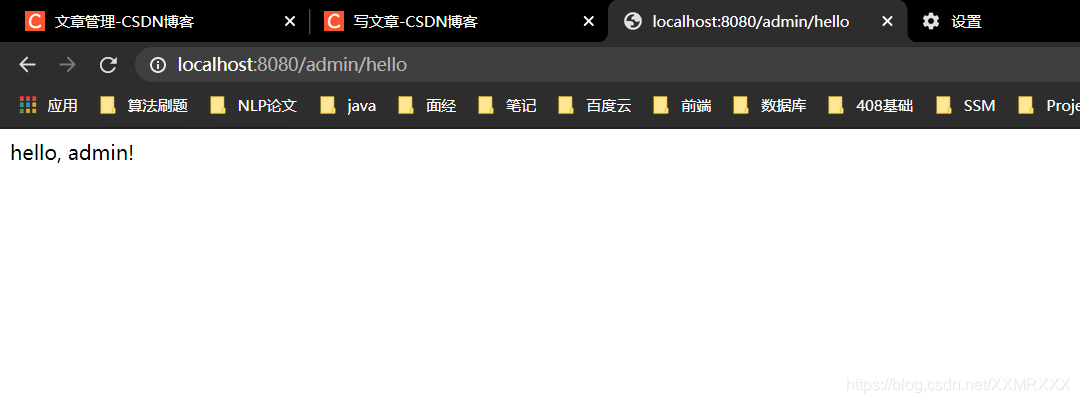
root用户拥有dba和admin角色可以访问admin,dba请求
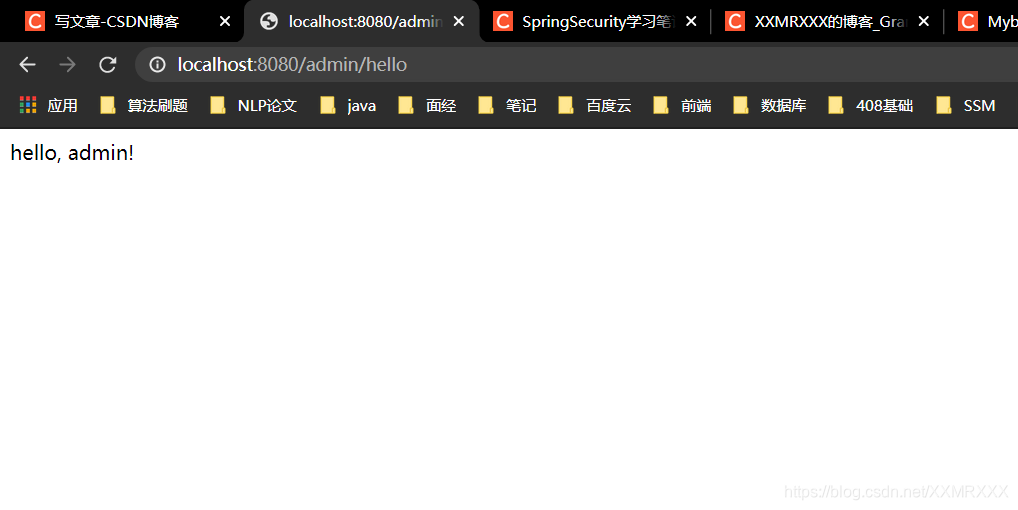
admin用户拥有admin角色可以访问admin请求
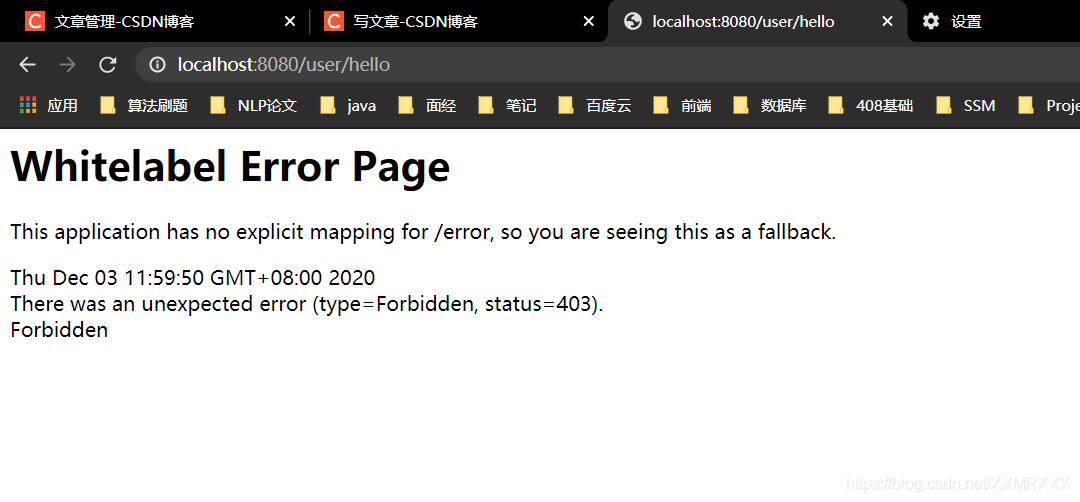
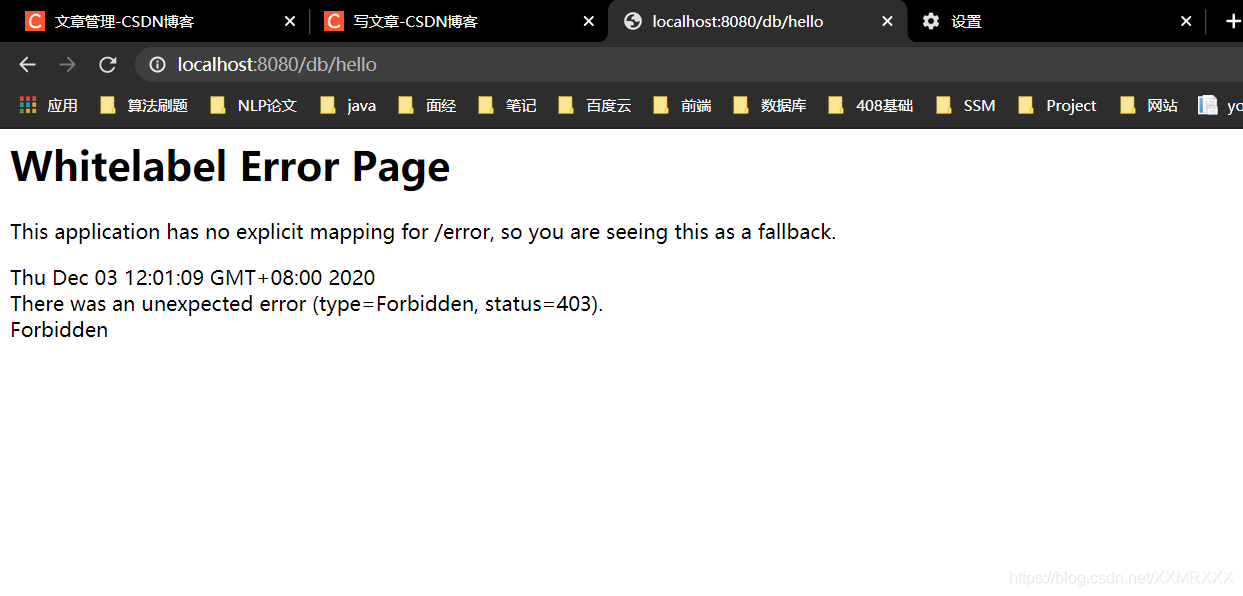
root用户访问http://localhost:8080/user/hello请求失败,没有实现角色继承,看下文实现
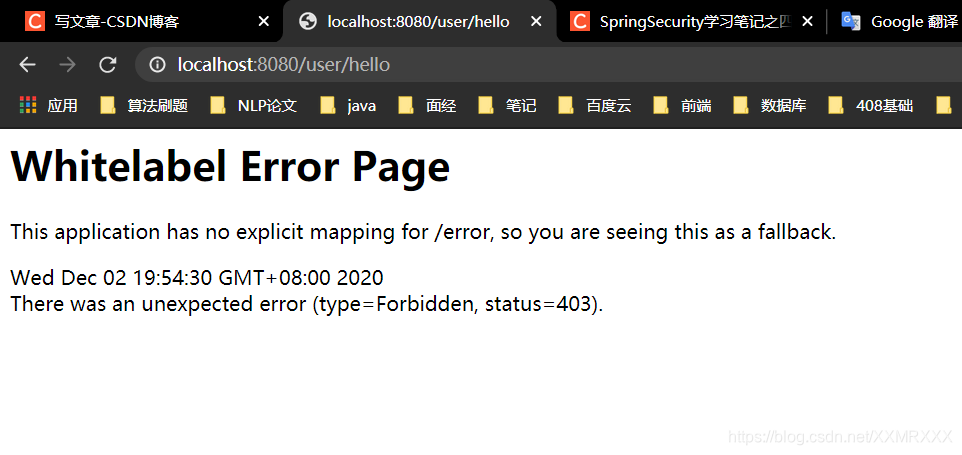
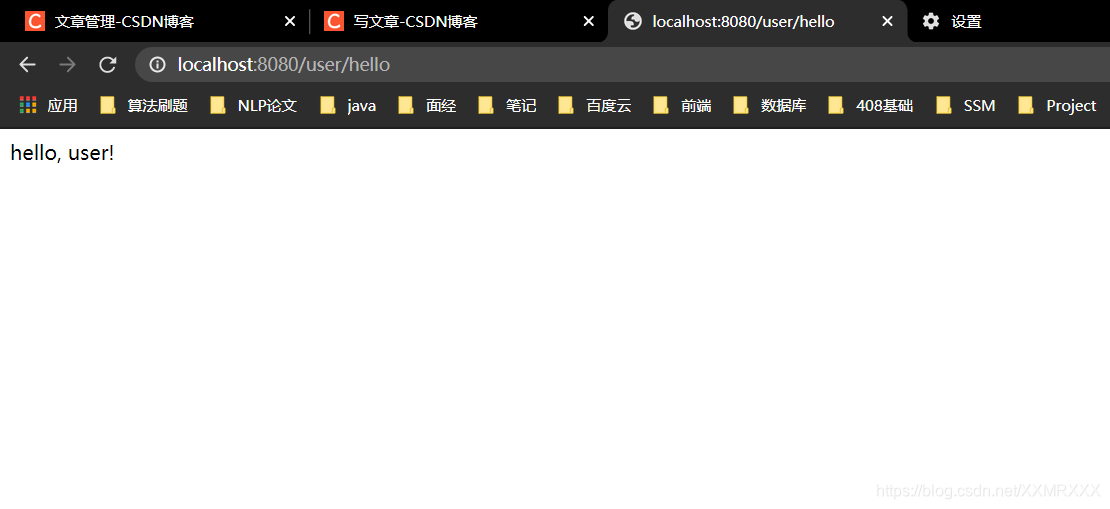
sang用户拥有user角色可以访问user请求
角色继承
角色继承实际上是一个很常见的需求,因为大部分公司治理可能都是金字塔形的,上司可能具备下属的部分甚至所有权限,这一现实场景,反映到我们的代码中,就是角色继承了。 Spring Security 中为开发者提供了相关的角色继承解决方案。
实现方式
@Bean
RoleHierarchy roleHierarchy() {
    RoleHierarchyImpl roleHierarchy = new RoleHierarchyImpl();
    String hierarchy = "ROLE_dba > ROLE_admin \n ROLE_admin > ROLE_user";
    roleHierarchy.setHierarchy(hierarchy);
    return roleHierarchy;
}
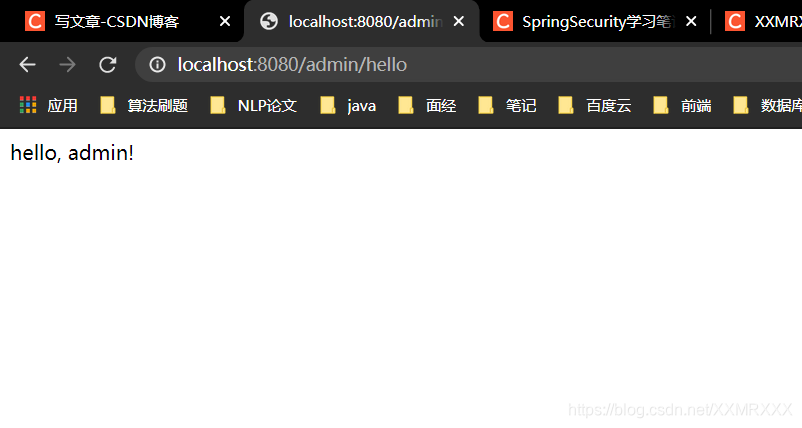
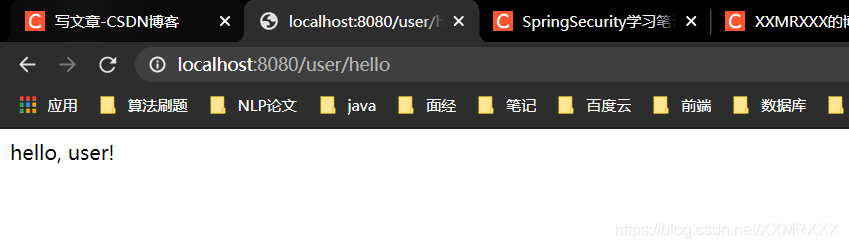
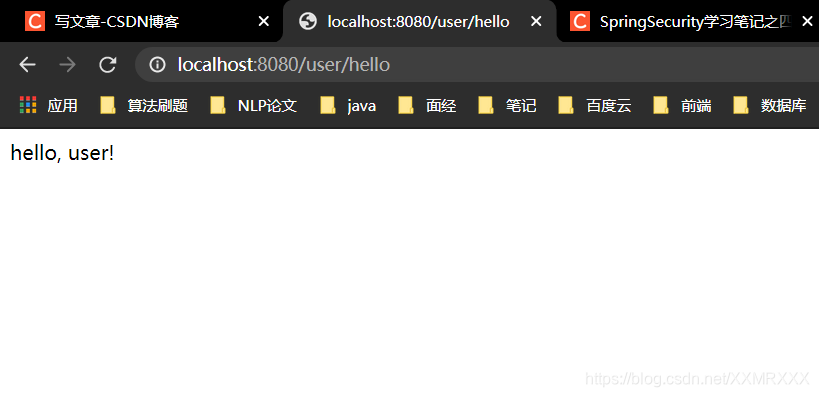
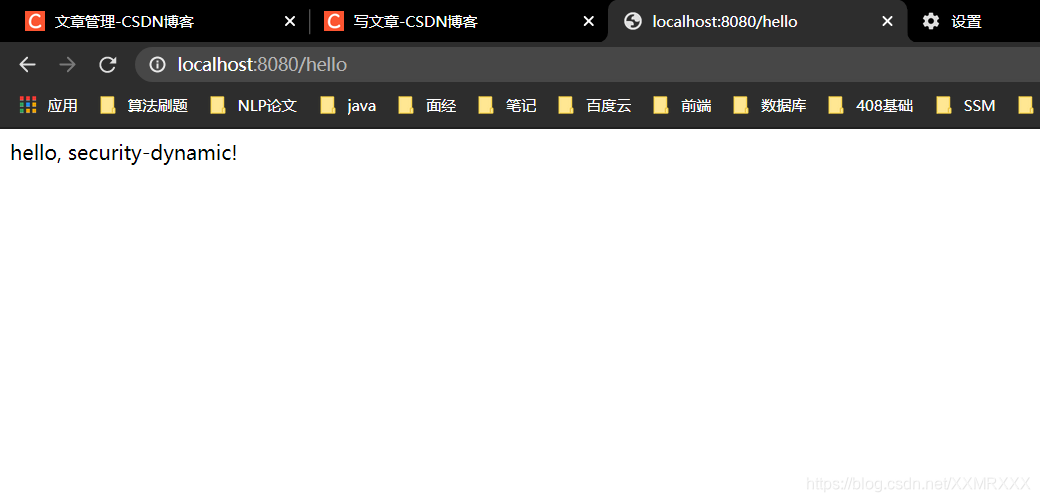
将上述代码添加到SecurityConfig中,则可以实现root用户对user的请求,以及admin用户对user的请求——角色继承
@Configuration
public class SecurityConfig extends WebSecurityConfigurerAdapter {
    @Autowired
    UserService userService;

    @Bean
    PasswordEncoder passwordEncoder() {
        return new BCryptPasswordEncoder();
    }

    @Bean
    RoleHierarchy roleHierarchy() {
        RoleHierarchyImpl roleHierarchy = new RoleHierarchyImpl();
        String hierarchy = "ROLE_dba > ROLE_admin \n ROLE_admin > ROLE_user";
        roleHierarchy.setHierarchy(hierarchy);
        return roleHierarchy;
    }

    @Override
    protected void configure(AuthenticationManagerBuilder auth) throws Exception {
        auth.userDetailsService(userService);  // 相当于之前的注入用户(用户名,密码,角色)
    }

    @Override
    protected void configure(HttpSecurity http) throws Exception {
        http.authorizeRequests()
                .antMatchers("/dba/**").hasRole("dba")
                .antMatchers("/admin/**").hasRole("admin")
                .antMatchers("/user/**").hasRole("user")
                .anyRequest().authenticated()
                .and()
                .formLogin()
                .permitAll()
                .and()
                .csrf().disable();

    }
}
root请求http://localhost:8080/user/hello
源码分析
这样两种不同的写法,其实也对应了两种不同的解析策略,角色继承关系的解析在 RoleHierarchyImpl 类的 buildRolesReachableInOneStepMap 方法中,Spring Boot2.0.8(含)之前该方法的源码如下:
private void buildRolesReachableInOneStepMap() {
	Pattern pattern = Pattern.compile("(\\s*([^\\s>]+)\\s*>\\s*([^\\s>]+))");
	Matcher roleHierarchyMatcher = pattern
			.matcher(this.roleHierarchyStringRepresentation);
	this.rolesReachableInOneStepMap = new HashMap<GrantedAuthority, Set<GrantedAuthority>>();
	while (roleHierarchyMatcher.find()) {
		GrantedAuthority higherRole = new SimpleGrantedAuthority(
				roleHierarchyMatcher.group(2));
		GrantedAuthority lowerRole = new SimpleGrantedAuthority(
				roleHierarchyMatcher.group(3));
		Set<GrantedAuthority> rolesReachableInOneStepSet;
		if (!this.rolesReachableInOneStepMap.containsKey(higherRole)) {
			rolesReachableInOneStepSet = new HashSet<>();
			this.rolesReachableInOneStepMap.put(higherRole,
					rolesReachableInOneStepSet);
		}
		else {
			rolesReachableInOneStepSet = this.rolesReachableInOneStepMap
					.get(higherRole);
		}
		addReachableRoles(rolesReachableInOneStepSet, lowerRole);
		logger.debug("buildRolesReachableInOneStepMap() - From role " + higherRole
				+ " one can reach role " + lowerRole + " in one step.");
	}
}
从这段源码中我们可以看到,角色的继承关系是通过正则表达式进行解析,通过空格进行切分,然后构建相应的 map 出来。
Spring Boot2.1.0(含)之后该方法的源码如下:
private void buildRolesReachableInOneStepMap() {
	this.rolesReachableInOneStepMap = new HashMap<GrantedAuthority, Set<GrantedAuthority>>();
	try (BufferedReader bufferedReader = new BufferedReader(
			new StringReader(this.roleHierarchyStringRepresentation))) {
		for (String readLine; (readLine = bufferedReader.readLine()) != null;) {
			String[] roles = readLine.split(" > ");
			for (int i = 1; i < roles.length; i++) {
				GrantedAuthority higherRole = new SimpleGrantedAuthority(
						roles[i - 1].replaceAll("^\\s+|\\s+$", ""));
				GrantedAuthority lowerRole = new SimpleGrantedAuthority(roles[i].replaceAll("^\\s+|\\s+$
				Set<GrantedAuthority> rolesReachableInOneStepSet;
				if (!this.rolesReachableInOneStepMap.containsKey(higherRole)) {
					rolesReachableInOneStepSet = new HashSet<GrantedAuthority>();
					this.rolesReachableInOneStepMap.put(higherRole, rolesReachableInOneStepSet);
				} else {
					rolesReachableInOneStepSet = this.rolesReachableInOneStepMap.get(higherRole);
				}
				addReachableRoles(rolesReachableInOneStepSet, lowerRole);
				if (logger.isDebugEnabled()) {
					logger.debug("buildRolesReachableInOneStepMap() - From role " + higherRole
							+ " one can reach role " + lowerRole + " in one step.");
				}
			}
		}
	} catch (IOException e) {
		throw new IllegalStateException(e);
	}
}
从这里我们可以看到,这里并没有一上来就是用正则表达式,而是先将角色继承字符串转为一个 BufferedReader ,然后一行一行的读出来,再进行解析,最后再构建相应的 map。从这里我们可以看出为什么前后版本对此有不同的写法。
动态权限配置(重难点)
之前用户对应的权限都是在代码中写死的,实际需求中可能需要通过后台管理去动态的配置用户的权限!即修改用户角色或修改角色可访问资源等操作。
解决方法:将权限放在数据库中
通过user和user_role查询到用户角色,通过menu_role和menu查询角色对应的权限(可操作具体资源)
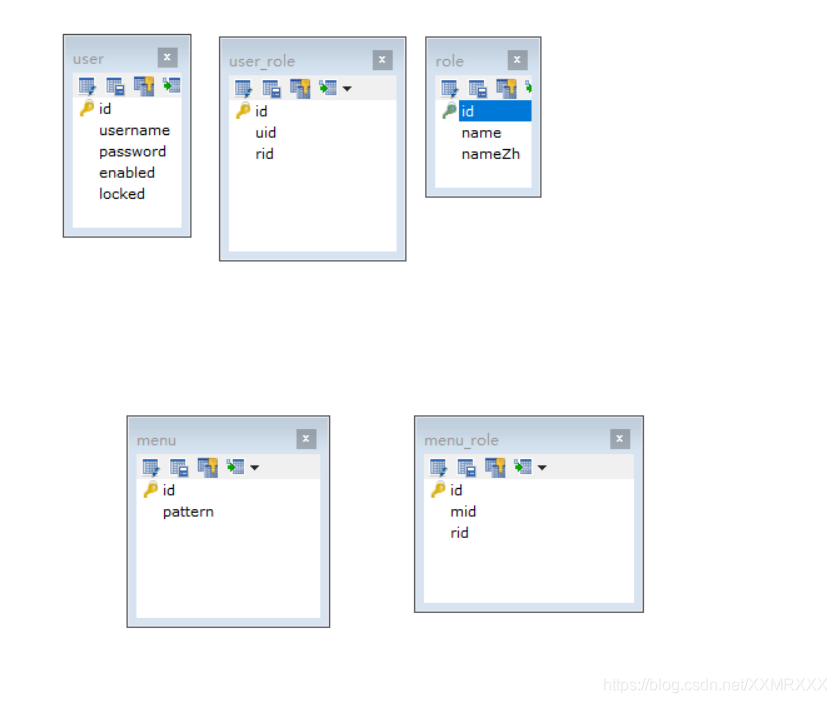
-
库表设计,实体类建立,资源过滤
-
创建UserMapper
启动类添加mapper包扫描@MapperScan(basePackages = "com.dy.securitydynamic.mapper")后就不用在每个mapper上添加@Mapper注解 -
创建UserMapper.xml
-
创建SecurityConfig
-
创建HelloController测试

-
SecurityConfig中重写configure(HttpSecurity http)方法
-
在config中创建一个MyFilter类实现FilterInvocationSecurityMetadataSource接口并重写该接口的方法,目的是实现角色对应访问资源的过滤(原来是在configure(HttpSecurity http)方法中用代码将访问路径直接写死)
MyFilter
// 该类的作用是分析出请求地址匹配需求的角色
@Component  //泛指各种组件,就是说当我们的类不属于各种具体归类时(不属于@Controller、@Services等时),就可以使用@Component来标注这个类
public class MyFilter implements FilterInvocationSecurityMetadataSource {

    // 路径匹配符——用于解析路径(相当于专用于url的正则表达式)
    AntPathMatcher pathMatcher = new AntPathMatcher();

    @Override  // 关键方法
    public Collection<ConfigAttribute> getAttributes(Object object) throws IllegalArgumentException {
        return null;
    }

    @Override
    public Collection<ConfigAttribute> getAllConfigAttributes() {
        return null;
    }

    @Override  // 是否支持,直接返回true
    public boolean supports(Class<?> clazz) {
        return true;
    }
}
因为资源要跟角色匹配,因此要在Menu实体类中添加一个Role属性——private List<Role> roles;及其get set方法
- 创建MenuService类来通过
getAllMenus()方法获取所有的资源
MenuService
@Service
public class MenuService {
    @Autowired
    MenuMapper menuMapper;

    public List<Menu> getAllMenus() {
        return menuMapper.getAllMenus();
    }
}
- 需要在MenuService中注入MenuMapper,因此创建一个MenuMapper类并写出相应的xml实现getAllMenus()方法,因为是一个pattern跟roles的一对多的关系,所以xml中需要使用resultMap
MenuMapper
public interface MenuMapper {
    List<Menu> getAllMenus();
}
MenuMapper.xml
<?xml version="1.0" encoding="UTF-8" ?>
<!DOCTYPE mapper
        PUBLIC "-//mybatis.org//DTD Config 3.0//EN"
        "http://mybatis.org/dtd/mybatis-3-mapper.dtd">

<mapper namespace="com.dy.securitydynamic.mapper.MenuMapper">
    <resultMap id="BaseResultMap" type="com.dy.securitydynamic.bean.Menu">
        <id property="id" column="id"/>
        <result property="pattern" column="pattern"/>
        <collection property="roles" ofType="com.dy.securitydynamic.bean.Role">
            <id column="rid" property="id"/>
            <result column="rname" property="name"/>
            <result column="rnameZh" property="nameZh"/>
        </collection>
    </resultMap>
    <select id="getAllMenus" resultMap="BaseResultMap">
        select m.*, r.id as rid, r.name as rname, r.nameZh as rnameZh
        from securitydy.menu m
        left join securitydy.menu_role mr
        on m.id = mr.mid
        left join securitydy.role r
        on mr.rid = r.id;
    </select>
</mapper>
- 考虑到代码量过大,需要提前进行单元测试,我们在Menu和Role实体类分别加toString()方法,在单元测试中执行一下MenuService中的方法
- 单元测试
@SpringBootTest
class SecurityDynamicApplicationTests {

    @Autowired
    MenuService menuService;

    @Test
    void contextLoads() {
        System.out.println(menuService.getAllMenus());
    }

}

- 实现MyFilter中分析请求地址匹配角色的功能,因为要使用资源,所以注入MenuService,使用其getAllMenus()方法,完善getAttributes(Object object)方法,实现资源到角色的映射。
@Override  // 关键方法  object是FilterInvocation的对象
public Collection<ConfigAttribute> getAttributes(Object object) throws IllegalArgumentException {
    // 1. 先强转成FilterInvocation类型,然后调用getRequestUrl()方法,得到请求地址requestUrl
    String requestUrl = ((FilterInvocation) object).getRequestUrl();
    // 2. 得到所有menus
    List<Menu> allMenus = menuService.getAllMenus();  // 这里可以加入到redis缓存中,因为资源一般不变,不用每次都要查
    // 3. 遍历
    for (Menu menu : allMenus) {
        // 4. 判断资源(数据库中)和路径(浏览器中)是否匹配,匹配上之后就查询哪些角色拥有访问权限
        if (pathMatcher.match(menu.getPattern(), requestUrl)) {
            // 5. 取出角色
            List<Role> roles = menu.getRoles();
            // 6. 因为方法的返回值类型是Collection<ConfigAttribute>,所以需要把List<Role>转成List<ConfigAttribute>
            // 首先需要得到以角色名为元素的字符串数组
            String[] rolesStr = new String[roles.size()];
            for (int i = 0; i < roles.size(); i++) {
                rolesStr[i] = roles.get(i).getName();
            }
            // 7. 使用方法SecurityConfig.createList(rolesStr)把字符串数组(每个元素为role的name)转换成List<ConfigAttribute>类型
            List<ConfigAttribute> list = SecurityConfig.createList(rolesStr);
            return list;
        }
    }
    // 8. 匹配不上返回默认值["ROLE_login"]的List<ConfigAttribute>类型,拿到这个值的情况下再做额外处理
    return SecurityConfig.createList("ROLE_login");
}
- 创建
MyAccessDecisionManager类实现AccessDecisionManager接口,并重写该接口的方法,添加注解@Component,并将下面两个support方法直接返回true,表示支持。作用是将MyFilter中查询出的资源对应的角色跟我们拥有的角色进行对比,如果我们拥有该角色,就执行该请求,否则就不执行。
// 作用:将MyFilter中查询出的资源对应的角色跟我们拥有的角色进行对比,如果我们拥有该角色,就执行该请求,否则就不执行。
@Component
public class MyAccessDecisionManager implements AccessDecisionManager {

    /**
     * 关键方法
     * @param authentication  保存了当前登录用户的信息
     * @param object  用来获取当前请求对象,即拥有的角色
     * @param collection  MyFilter中getAttributes(Object object)方法的返回值,即资源需要的角色
     * @throws AccessDeniedException
     * @throws InsufficientAuthenticationException
     */
    @Override
    public void decide(Authentication authentication, Object object, Collection<ConfigAttribute> collection) throws AccessDeniedException, InsufficientAuthenticationException {
        // 1. 先获取资源需要的角色,遍历collection
        for (ConfigAttribute attribute : collection) {
            if ("ROLE_login".equals(attribute.getAttribute())) {  // 如果需要的角色是ROLE_login,说明跟资源都没有匹配上
                // 即登录后即可访问,需要判断有没有登录
                if (authentication instanceof AnonymousAuthenticationToken) {
                    // 匿名用户说明没登录直接抛异常
                    throw new AccessDeniedException("非法请求!");
                } else {  // 这里剩余不作详细判断了
                    break;  // 说明已经登录,符合了需求角色权限,即跳出判断即可
                }
            }
            // 如果不是ROLE_login角色,则需要将需要角色跟我们现有的角色进行对比,先通过authentication.getAuthorities()获取我们现有的角色进行遍历
            Collection<? extends GrantedAuthority> authorities = authentication.getAuthorities();
            for (GrantedAuthority authority : authorities) {
                if (authority.getAuthority().equals(attribute.getAttribute())) {  // 如果匹配就跳出循环
                    break;
                }
            }
        }
        throw new AccessDeniedException("非法请求!");  // 没有匹配上的角色
    }

    @Override
    public boolean supports(ConfigAttribute attribute) {
        return true;
    }

    @Override
    public boolean supports(Class<?> clazz) {
        return true;
    }
}
- 在SecurityConfig注入MyFilter,MyAccessDecisionManager,在configure(HttpSecurity http)方法中使用
@Override
protected void configure(HttpSecurity http) throws Exception {
    http.authorizeRequests()
            .withObjectPostProcessor(new ObjectPostProcessor<FilterSecurityInterceptor>() {
                @Override
                public <O extends FilterSecurityInterceptor> O postProcess(O o) {
                    o.setAccessDecisionManager(myAccessDecisionManager);
                    o.setSecurityMetadataSource(myFilter);
                    return o;
                }
            })
            .and()
            .formLogin()
            .permitAll()
            .and()
            .csrf().disable();
}
- 测试root用户,角色dba,admin


登录admin,角色admin
登录sang,角色user

tips:
- 业务逻辑
- 单元测试
- 一对多sql
- 断点调试
卧槽,完结,泪目!!!
遇到的坑,在复制xml中的sql的时候,数据库名未修改!!!
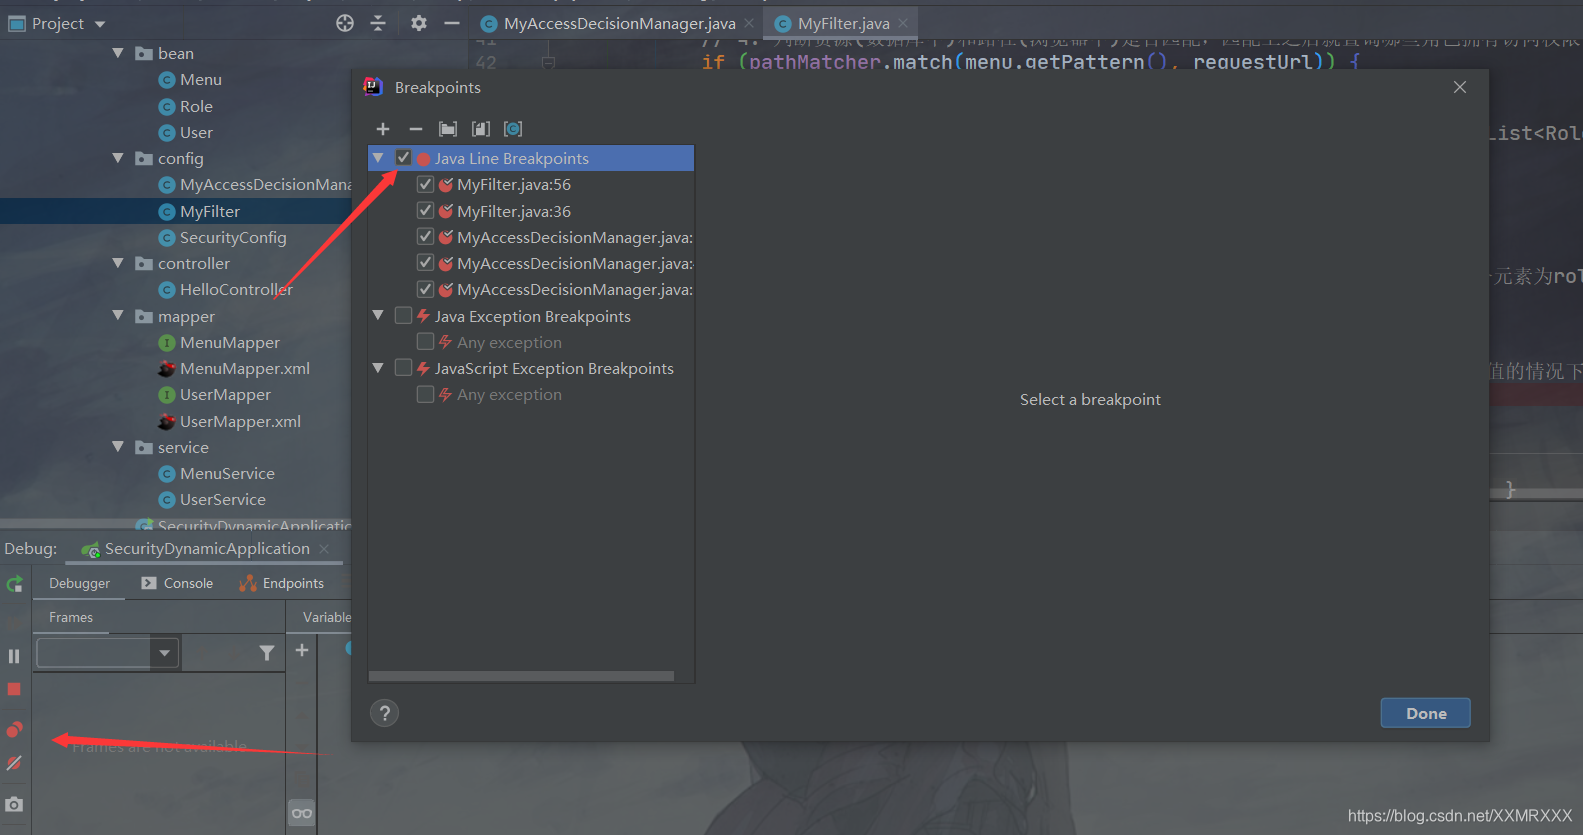
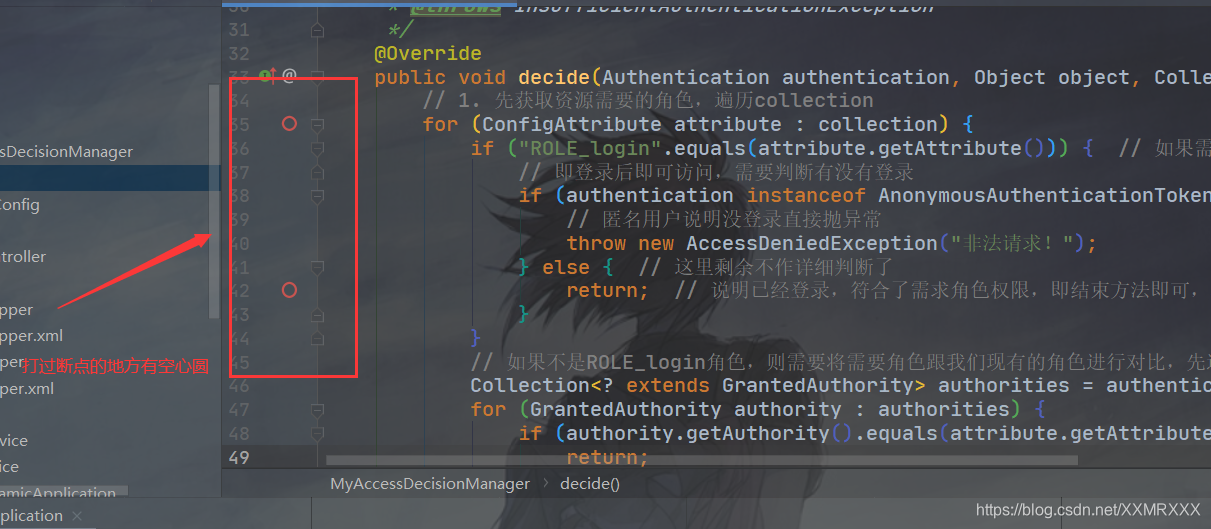
断点debug调试
tips:取消所有断点,但是仍然保留断点的痕迹
SpringSecurity结合OAuth2.0
OAuth2.0是OAuth协议的延续版本,但不向前兼容OAuth 1.0(即完全废止了OAuth1.0)。 OAuth 2.0关注客户端开发者的简易性。要么通过组织在资源拥有者和HTTP服务商之间的被批准的交互动作代表用户,要么允许第三方应用代表用户获得访问的权限。同时为Web应用,桌面应用和手机,和起居室设备提供专门的认证流程。2012年10月,OAuth 2.0协议正式发布为RFC 6749。
点我
- 创建Springboot项目,导入依赖,配置redis
<dependencies>
        <!-- https://mvnrepository.com/artifact/org.springframework.security.oauth/spring-security-oauth2 -->
        <dependency>
            <groupId>org.springframework.security.oauth</groupId>
            <artifactId>spring-security-oauth2</artifactId>
            <version>2.3.5.RELEASE</version>
        </dependency>

        <dependency>
            <groupId>org.springframework.boot</groupId>
            <artifactId>spring-boot-starter-data-redis</artifactId>
        </dependency>

        <dependency>
            <groupId>org.springframework.boot</groupId>
            <artifactId>spring-boot-starter-security</artifactId>
        </dependency>
        <dependency>
            <groupId>org.springframework.boot</groupId>
            <artifactId>spring-boot-starter-web</artifactId>
        </dependency>

        <dependency>
            <groupId>org.springframework.boot</groupId>
            <artifactId>spring-boot-starter-test</artifactId>
            <scope>test</scope>
        </dependency>
        <dependency>
            <groupId>org.springframework.security</groupId>
            <artifactId>spring-security-test</artifactId>
            <scope>test</scope>
        </dependency>
    </dependencies>
spring.redis.host=192.168.1.246
spring.redis.port=6379
spring.redis.database=0
- 配置授权服务器(用于获取令牌)和资源服务器,创建
AuthorizationServerConfig继承AuthorizationServerConfigurerAdapter添加注解@Configuration和@EnableAuthorizationServer,注入AuthenticationManager以支持password模式,注入RedisConnectionFactory以连接redis,注入UserDetailsService以刷新token,添加PasswordEncoder,重写configure(ClientDetailsServiceConfigurer clients)方法配置授权模式等,重写configure(AuthorizationServerEndpointsConfigurer endpoints)方法配置令牌的存储,重写configure(AuthorizationServerSecurityConfigurer security)方法配置支持。
@Configuration
@EnableAuthorizationServer
public class AuthorizationServerConfig extends AuthorizationServerConfigurerAdapter {
    @Autowired  // 用来支持password认证模式,一共有四种认证模式,这种多用于前后端分离
    AuthenticationManager authenticationManager;
    @Autowired  // redis连接
    RedisConnectionFactory redisCollectionFactory;
    @Autowired  // 刷新token
    UserDetailsService userDetailsService;

    @Bean
    PasswordEncoder passwordEncoder() {
        return new BCryptPasswordEncoder();
    }

    @Override  // 配置授权模式等
    public void configure(ClientDetailsServiceConfigurer clients) throws Exception {
        clients.inMemory()
                .withClient("password")
                .authorizedGrantTypes("password", "refresh_token")  // 授权模式
                .accessTokenValiditySeconds(1800)  // token的过期时间,单位秒
                .resourceIds("rid")  // 资源id
                .scopes("all")  // 作用域
                .secret("$2a$10$YVOjQ0FeXiNd4i2Zk4ywXu4Ysw0Lm/IZGmrzlsjfWs4ADZmr0moSC");  // 加密后的密码
    }

    @Override  // 配置令牌的存储
    public void configure(AuthorizationServerEndpointsConfigurer endpoints) throws Exception {
        endpoints.tokenStore(new RedisTokenStore(redisCollectionFactory))
                .authenticationManager(authenticationManager)
                .userDetailsService(userDetailsService);
    }

    @Override  // 配置支持
    public void configure(AuthorizationServerSecurityConfigurer security) throws Exception {
        security.allowFormAuthenticationForClients()
    }
}
- 配置资源服务器,重写
configure方法
@Configuration
@EnableResourceServer
public class ResourceServerConfig extends ResourceServerConfigurerAdapter {
    @Override
    public void configure(ResourceServerSecurityConfigurer resources) throws Exception {
        resources.resourceId("rid")  // 指定资源id
                    .stateless(true);  // 资源是基于令牌认证的
    }

    @Override
    public void configure(HttpSecurity http) throws Exception {
        http.authorizeRequests()
                .antMatchers("/admin/**").hasRole("admin")
                .antMatchers("/user/**").hasRole("user")
                .anyRequest().authenticated();
    }
}
- 配置
SecurityConfig类,继承自WebSecurityConfigurerAdapter,重写两个bean,AuthenticationManager和UserDetailsService,重写两个configure方法
@Configuration
public class SecurityConfig extends WebSecurityConfigurerAdapter {

    @Override
    @Bean
    protected AuthenticationManager authenticationManager() throws Exception {
        return super.authenticationManager();
    }

    @Override
    @Bean
    protected UserDetailsService userDetailsService() {
        return super.userDetailsService();
    }

    @Override
    protected void configure(AuthenticationManagerBuilder auth) throws Exception {
        auth.inMemoryAuthentication()
                .withUser("admin").password("$2a$10$YVOjQ0FeXiNd4i2Zk4ywXu4Ysw0Lm/IZGmrzlsjfWs4ADZmr0moSC").roles("admin")
                .and()
                .withUser("dy").password("$2a$10$YVOjQ0FeXiNd4i2Zk4ywXu4Ysw0Lm/IZGmrzlsjfWs4ADZmr0moSC").roles("user");
    }

    @Override
    protected void configure(HttpSecurity http) throws Exception {
        http.antMatcher("/oauth/**")
                .authorizeRequests()
                .antMatchers("/oauth/**").permitAll()
                .and()
                .csrf().disable();
    }
}
- postman测试
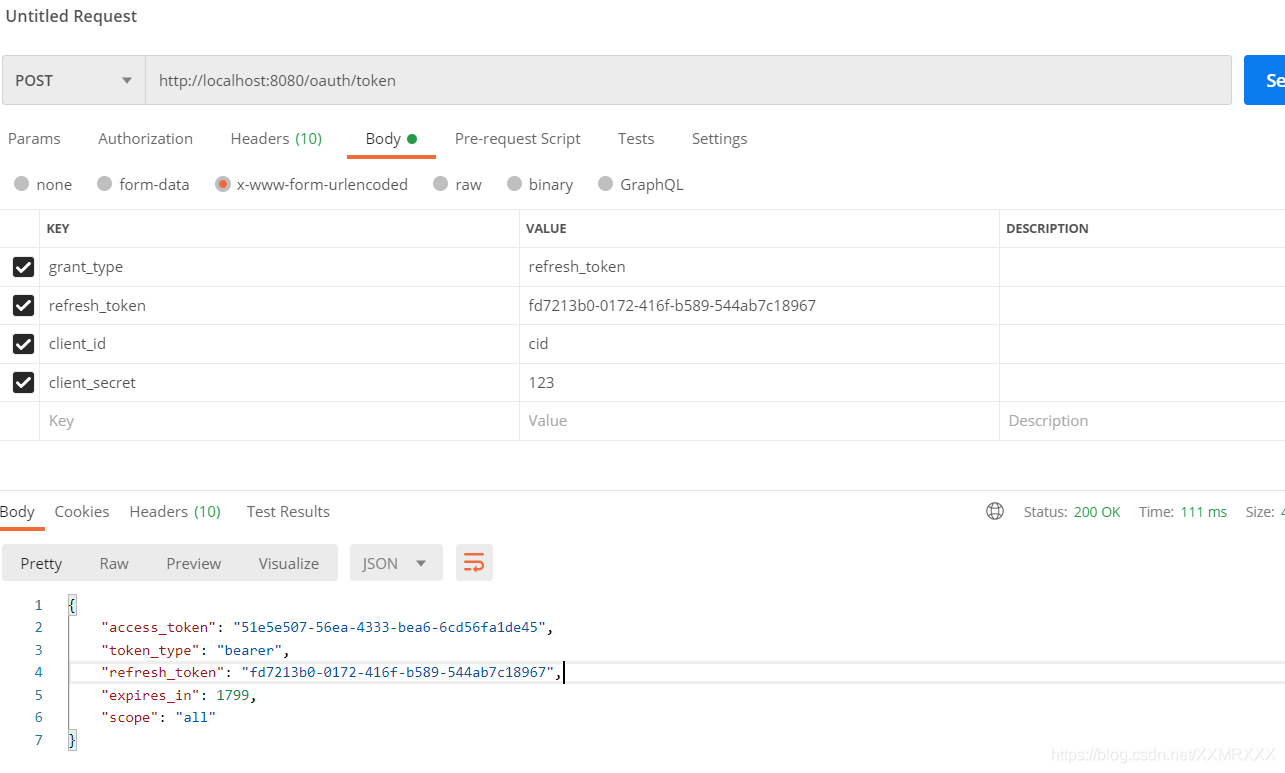
申请token
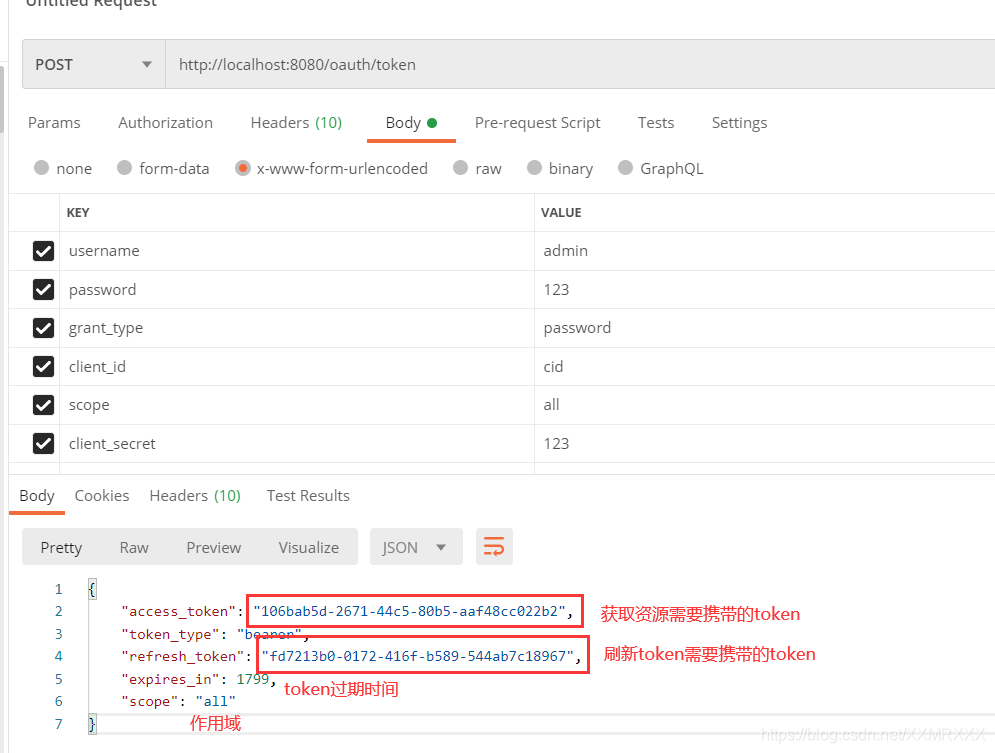
admin用户
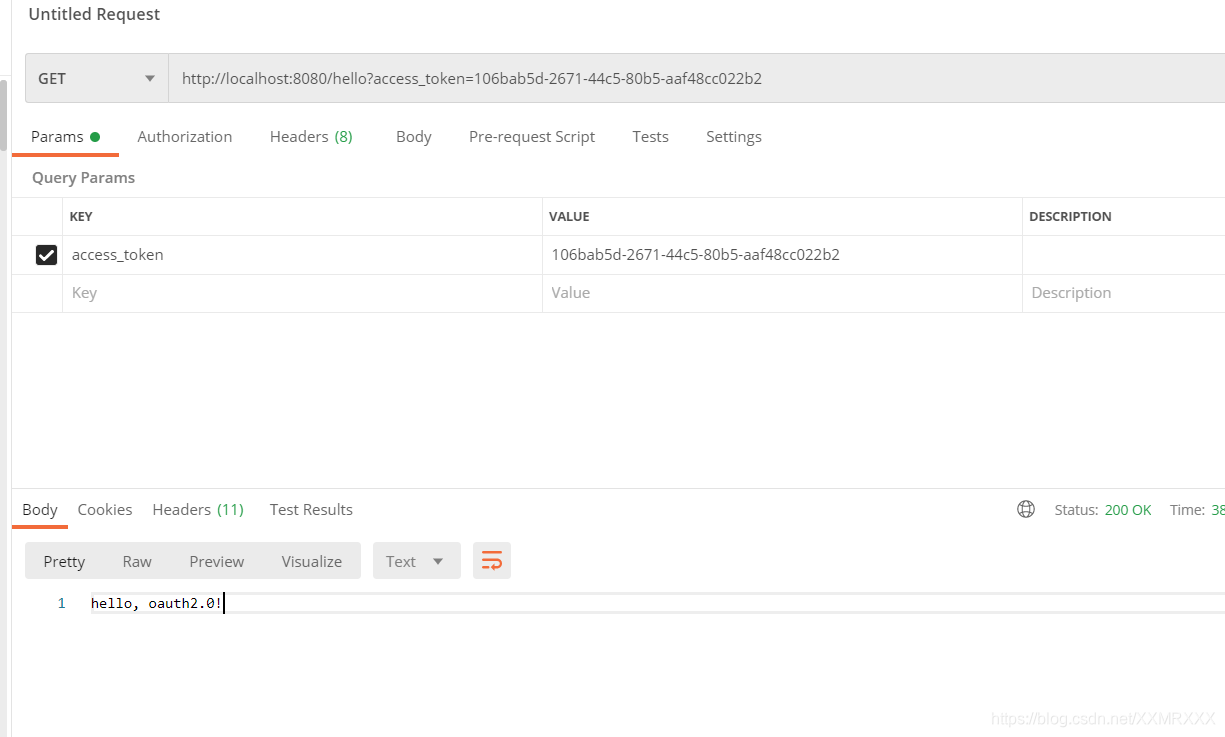
访问hello
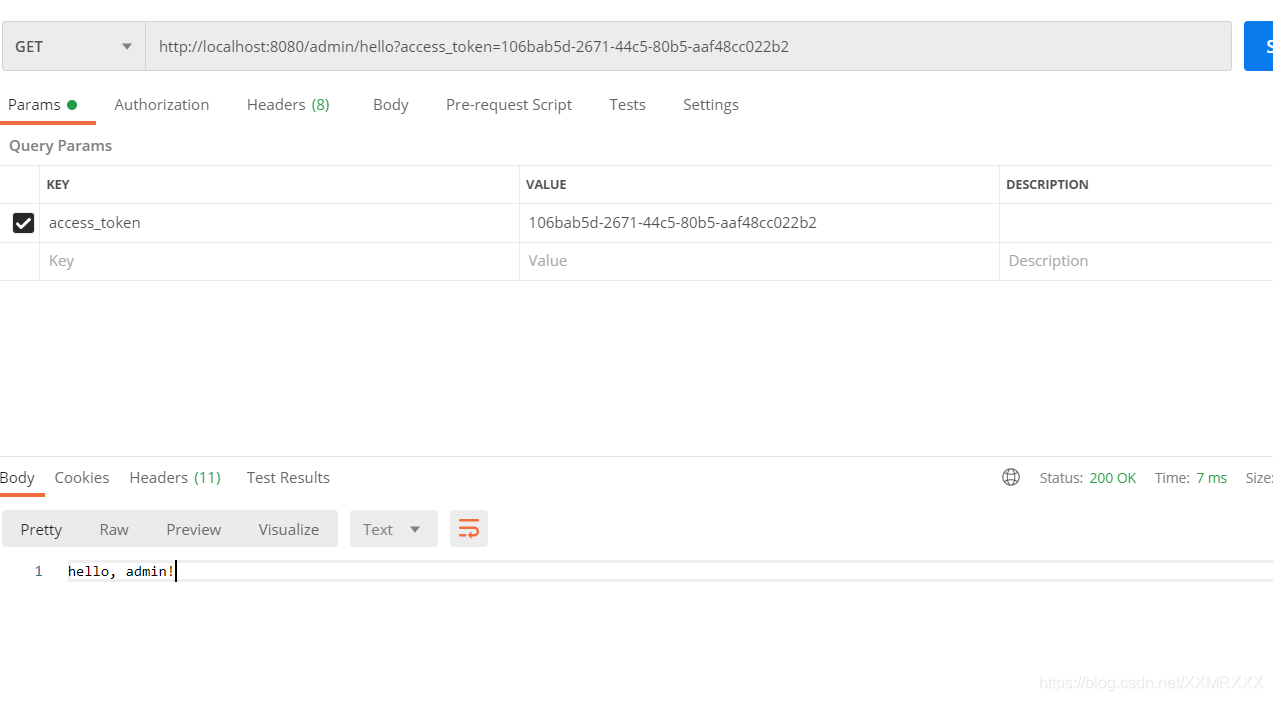
访问/admin/hello
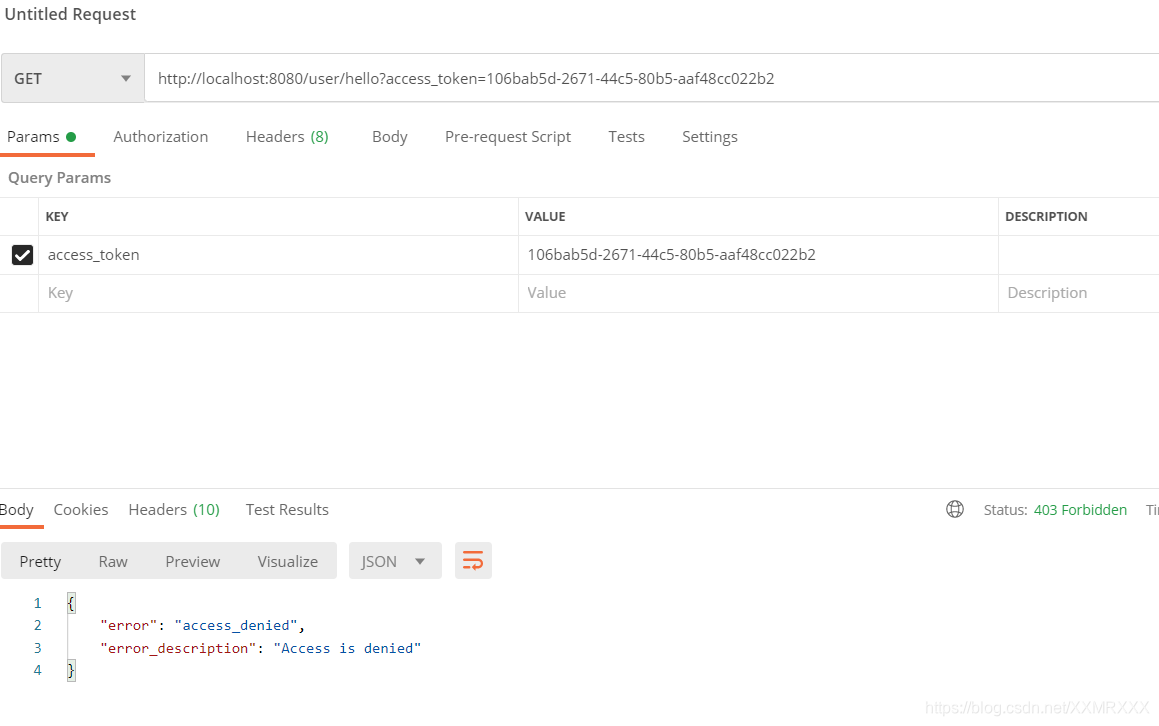
访问/user/hello
刷新token
注意:
密码模式一般用于前后端分离项目。
授权码模式一般用于第三方登录验证模式。
SpringBoot整合shiro
一般的搭配是SpringBoot + SpringSecurity / SSM + Shiro
方式一
- 创建SpringBoot项目,添加依赖
<dependency>
    <groupId>org.apache.shiro</groupId>
    <artifactId>shiro-web</artifactId>
    <version>1.4.0</version>
</dependency>
<dependency>
    <groupId>org.apache.shiro</groupId>
    <artifactId>shiro-spring</artifactId>
    <version>1.4.0</version>
</dependency>
- 在realm包中创建MyRealm继承自AuthorizingRealm,并实现父类方法
public class MyRealm extends AuthorizingRealm {
    @Override  // 授权
    protected AuthorizationInfo doGetAuthorizationInfo(PrincipalCollection principals) {
        return null;
    }

    @Override  // 认证
    protected AuthenticationInfo doGetAuthenticationInfo(AuthenticationToken token) throws AuthenticationException {
        String username = (String) token.getPrincipal();
        if ("GrandNovice".equals(username)) {
            return new SimpleAuthenticationInfo(username, "123", getName());
        }
        return null;
    }
}
- 在config包中创建ShiroConfig,配置三个bean
@Configuration
public class ShiroConfig {
    @Bean
    MyRealm myRealm() {
        return new MyRealm();
    }

    @Bean
    SecurityManager securityManager() {
        DefaultWebSecurityManager manager = new DefaultWebSecurityManager();
        manager.setRealm(myRealm());
        return manager;
    }

    @Bean
    ShiroFilterFactoryBean shiroFilterFactoryBean() {
        ShiroFilterFactoryBean bean = new ShiroFilterFactoryBean();
        bean.setSecurityManager(securityManager());
        bean.setLoginUrl("/login");
        bean.setSuccessUrl("/index");
        Map<String, String> map = new LinkedHashMap<>();
        map.put("/doLogin", "anon");
        map.put("/**", "authc");
        bean.setFilterChainDefinitionMap(map);
        return bean;
    }
}
- controller
@RestController
public class HelloController {
    @GetMapping("/login")
    public String loging() {
        return "please login!";
    }

    @PostMapping("/doLogin")
    public void doLogin(String username, String password) {
        Subject subject = SecurityUtils.getSubject();
        try {
            subject.login(new UsernamePasswordToken(username, password));
            System.out.println("success");
        } catch (AuthenticationException e) {
            e.printStackTrace();
            System.out.println("fail => " + e.getMessage());
        }
    }

    @GetMapping("/hello")
    public String hello() {
        return "hello, shiro";
    }
}
测试:
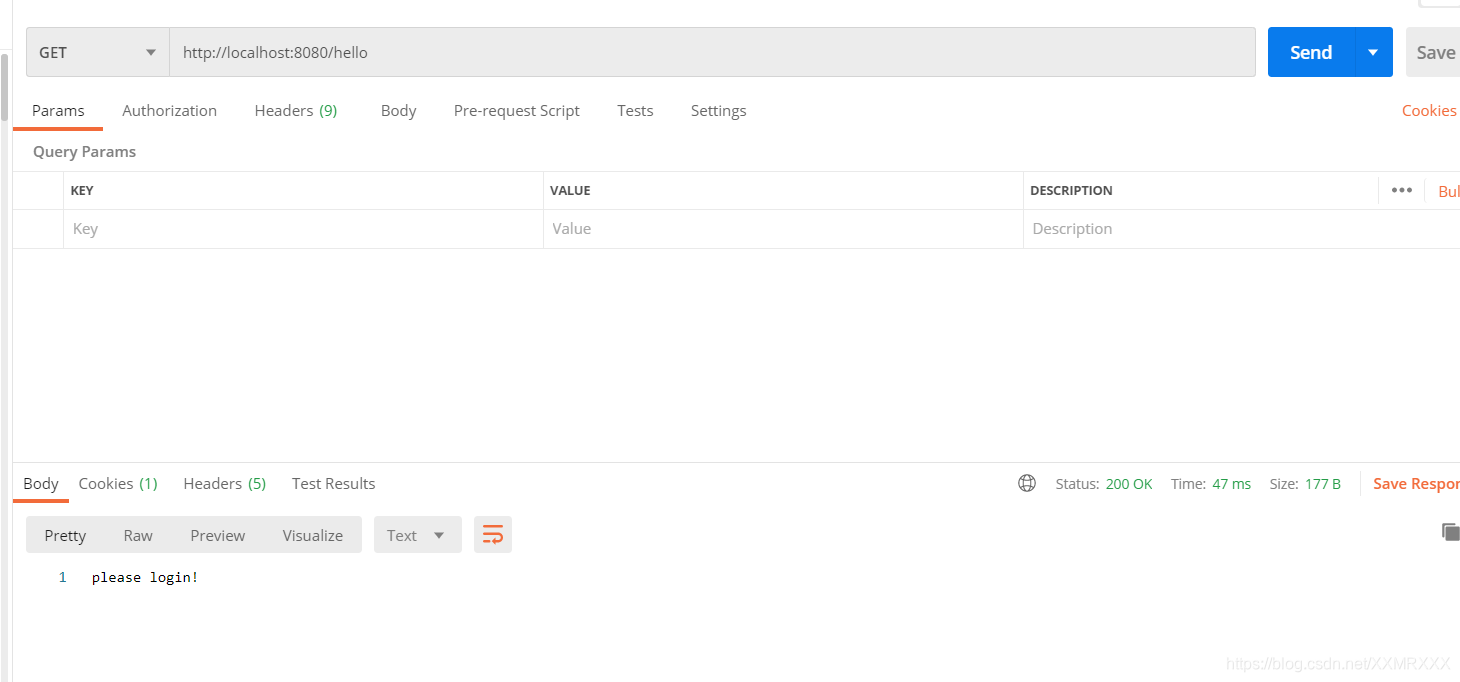
访问http://localhost:8080/hello,提示请登录。
登录


方式二
- 创建SpringBoot项目,导入依赖
<dependency>
    <groupId>org.apache.shiro</groupId>
    <artifactId>shiro-spring-boot-web-starter</artifactId>
    <version>1.7.0</version>
</dependency>
- 配置文件配置shiro
shiro.enabled=true
shiro.unauthorizedUrl=/unauthorizedUrl
shiro.web.enabled=true
shiro.successUrl=/success
shiro.loginUrl=/login
# shiro.sessionManager.sessionIdUrlRewritingEnabled 是否允许通过url参数实现会话跟踪
# shiro.sessionManager.sessionIdCookieEnabled  是否允许通过cookie实现会话跟踪,一般选这种不选上一种
- 配置ShiroConfig中的两个bean
/**
 * @program: shiro-02
 * @description:
 * @author: GrandNovice
 * @create: 2020-12-03 21:29
 **/
@Configuration
public class ShiroConfig {
    @Bean
    Realm realm() {
        TextConfigurationRealm realm = new TextConfigurationRealm();
        realm.setUserDefinitions("GrandNovice=123, user \n admin=123, admin");
        realm.setRoleDefinitions("admin=read, write \n user=read");
        return realm;
    }

    @Bean
    ShiroFilterChainDefinition shiroFilterChainDefinition() {
        DefaultShiroFilterChainDefinition definition = new DefaultShiroFilterChainDefinition();
        definition.addPathDefinition("/doLogin", "anon");
        definition.addPathDefinition("/**", "authc");
        return definition;
    }
}
- controller测试
@RestController
public class LoginController {
    @GetMapping("/hello")
    public String hello() {
        return "hello, shiro!";
    }

    @GetMapping("/login")
    public String login() {
        return "please login";
    }

    @PostMapping("/doLogin")
    public String doLogin(String username, String password) {
        Subject subject = SecurityUtils.getSubject();
        try {
            subject.login(new UsernamePasswordToken(username, password));
            return "login success!";
        } catch (AuthenticationException e) {
            e.printStackTrace();
            return "login fail!";
        }

    }
}
- postman测试
访问/hello
登录admin

SpringSecurity使用 JSON 格式数据登录
- 首先创建 SpringBoot 工程,添加 SpringSecurity 依赖
- 参照源码修改登录使用的数据格式
public class MyAuthenticationFilter extends UsernamePasswordAuthenticationFilter {

    @Override
    public Authentication attemptAuthentication(HttpServletRequest request, HttpServletResponse response) throws AuthenticationException {
        if (!request.getMethod().equals("POST")) {
            throw new AuthenticationServiceException("Authentication method not supported: " + request.getMethod());
        }
        if (request.getContentType().equals(MediaType.APPLICATION_JSON_VALUE)) {
            // 说明用户以json的形式传递参数

            // 改成以json格式获取
            String username = null;
            String password = null;
            try {
                Map<String, String> map = new ObjectMapper().readValue(request.getInputStream(), Map.class);
                username = map.get("username");
                password = map.get("password");
            } catch (IOException e) {
                e.printStackTrace();
            }
            username = (username != null) ? username : "";
            username = username.trim();
            password = (password != null) ? password : "";
            UsernamePasswordAuthenticationToken authRequest = new UsernamePasswordAuthenticationToken(username, password);
            // Allow subclasses to set the "details" property
            setDetails(request, authRequest);
            return this.getAuthenticationManager().authenticate(authRequest);
        }
        return super.attemptAuthentication(request, response);
    }
}
- 编写controller测试
- json格式登录
Spring Security 中使用 JWT
jwt简介
博客
参考文章:什么是 JWT – JSON WEB TOKEN
实战
- 环境搭建,创建SpringBoot项目,导入jjwt依赖
<dependency>
    <groupId>io.jsonwebtoken</groupId>
    <artifactId>jjwt</artifactId>
    <version>0.9.1</version>
</dependency>
- 在model包中创建一个简单的 User 类实现 UserDetails 接口
package com.dy.jwt.model;

import org.springframework.security.core.GrantedAuthority;
import org.springframework.security.core.userdetails.UserDetails;

import java.util.Collection;
import java.util.List;

public class User implements UserDetails {
    private String username;
    private String password;
    private List<GrantedAuthority> authorities;
    @Override
    public Collection<? extends GrantedAuthority> getAuthorities() {
        return authorities;
    }

    @Override
    public String getPassword() {
        return password;
    }

    @Override
    public String getUsername() {
        return username;
    }

    @Override
    public boolean isAccountNonExpired() {
        return true;
    }

    @Override
    public boolean isAccountNonLocked() {
        return true;
    }

    @Override
    public boolean isCredentialsNonExpired() {
        return true;
    }

    @Override
    public boolean isEnabled() {
        return true;
    }

    public void setUsername(String username) {
        this.username = username;
    }

    public void setPassword(String password) {
        this.password = password;
    }

    public void setAuthorities(List<GrantedAuthority> authorities) {
        this.authorities = authorities;
    }
}
- 这个就是我们的用户对象,先放着备用,再创建一个HelloController,内容如下:
@RestController
public class HelloController {
    @GetMapping("/hello")
    public String hello() {
        return "hello, jwt!";
    }

    @GetMapping("/admin")
    public String admin() {
        return "hello, admin!";
    }

}
HelloController 很简单,这里有两个接口,设计是 /hello 接口可以被具有 user 角色的用户访问,而 /admin 接口则可以被具有 admin 角色的用户访问。
- JWT 过滤器配置
第一个是用户登录的过滤器,在用户的登录的过滤器中校验用户是否登录成功,如果登录成功,则生成一个token返回给客户端,登录失败则给前端一个登录失败的提示。
/**
* @program: jwt
* @description:
* @author: GrandNovice
* @create: 2020-12-04 08:08
**/
package com.dy.jwt.filter;
import com.dy.jwt.model.User;
import com.fasterxml.jackson.databind.ObjectMapper;
import io.jsonwebtoken.Jwts;
import io.jsonwebtoken.SignatureAlgorithm;
import org.springframework.security.authentication.AuthenticationManager;
import org.springframework.security.authentication.UsernamePasswordAuthenticationToken;
import org.springframework.security.core.Authentication;
import org.springframework.security.core.AuthenticationException;
import org.springframework.security.core.GrantedAuthority;
import org.springframework.security.web.authentication.AbstractAuthenticationProcessingFilter;
import org.springframework.security.web.util.matcher.AntPathRequestMatcher;
import javax.servlet.FilterChain;
import javax.servlet.ServletException;
import javax.servlet.http.HttpServletRequest;
import javax.servlet.http.HttpServletResponse;
import java.io.IOException;
import java.io.PrintWriter;
import java.util.Collection;
import java.util.Date;
import java.util.HashMap;
import java.util.Map;
public class JwtLoginFilter extends AbstractAuthenticationProcessingFilter {
public JwtLoginFilter(String defaultFilterProcessesUrl, AuthenticationManager authenticationManager) {
super(new AntPathRequestMatcher(defaultFilterProcessesUrl));
setAuthenticationManager(authenticationManager);
}
@Override
public Authentication attemptAuthentication(HttpServletRequest request, HttpServletResponse response) throws AuthenticationException, IOException, ServletException {
// 解析json
User user = new ObjectMapper().readValue(request.getInputStream(), User.class);
return getAuthenticationManager().authenticate(new UsernamePasswordAuthenticationToken(user.getUsername(), user.getPassword()));
}
@Override
protected void successfulAuthentication(HttpServletRequest request, HttpServletResponse response, FilterChain chain, Authentication authResult) throws IOException, ServletException {
Collection<? extends GrantedAuthority> authorities = authResult.getAuthorities();// 获取登录用户的角色
StringBuffer sb = new StringBuffer();
for (GrantedAuthority authority : authorities) {
sb.append(authority.getAuthority()).append(",");
}
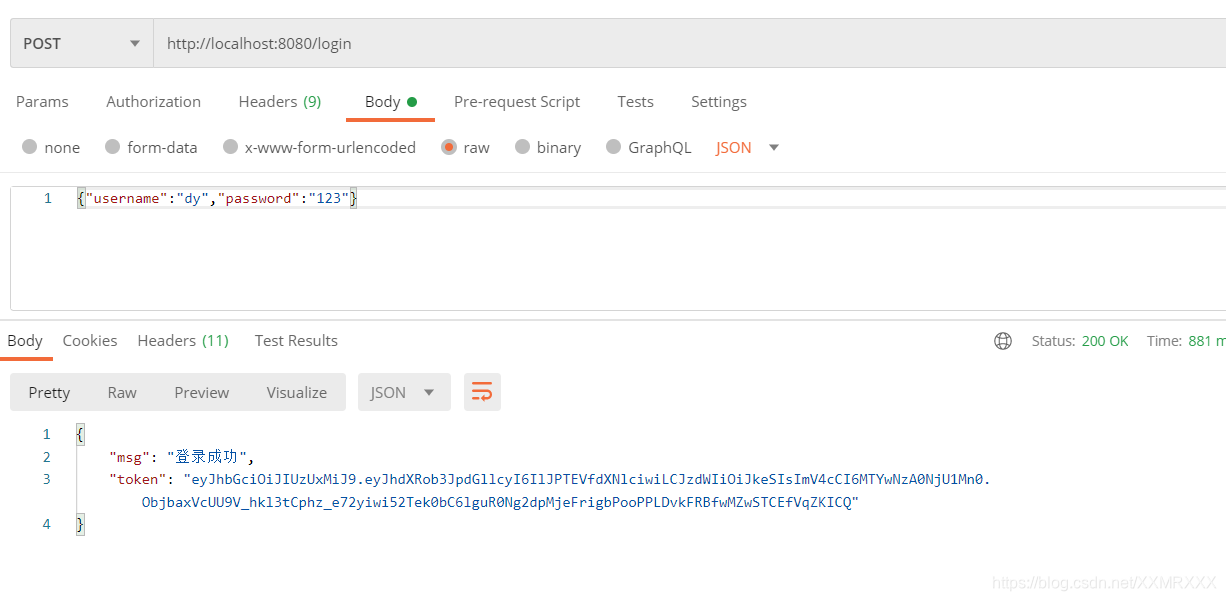
// 生成jwt
String jwt = Jwts.builder()
.claim("authorities", sb)
.setSubject(authResult.getName())
.setExpiration(new Date(System.currentTimeMillis() + 60 * 60 * 1000))
.signWith(SignatureAlgorithm.HS512, "GrandNovice@12138")
.compact();
Map<String, String> map = new HashMap<>();
map.put("token", jwt);
map.put("msg", "登录成功");
response.setContentType("application/json; charset=UTF-8");
PrintWriter writer = response.getWriter();
writer.write(new ObjectMapper().writeValueAsString(map));
writer.flush();
writer.close();
}
@Override
protected void unsuccessfulAuthentication(HttpServletRequest request, HttpServletResponse response, AuthenticationException failed) throws IOException, ServletException {
Map<String, String> map = new HashMap<>();
map.put("msg", "登录失败");
response.setContentType("application/json; charset=UTF-8");
PrintWriter writer = response.getWriter();
writer.write(new ObjectMapper().writeValueAsString(map));
writer.flush();
writer.close();
}
}
关于这个类,注意如下几点:
- 自定义 JwtLoginFilter 继承自 AbstractAuthenticationProcessingFilter,并实现其中的三个默认方法。
- attemptAuthentication方法中,我们从登录参数中提取出用户名密码,然后调用AuthenticationManager.authenticate()方法去进行自动校验。
- 第二步如果校验成功,就会来到successfulAuthentication回调中,在successfulAuthentication方法中,将用户角色遍历然后用一个 , 连接起来,然后再利用Jwts去生成token,按照代码的顺序,生成过程一共配置了四个参数,分别是用户角色、主题、过期时间以及加密算法和密钥,然后将生成的token写出到客户端。
- 第二步如果校验失败就会来到unsuccessfulAuthentication方法中,在这个方法中返回一个错误提示给客户端即可。
第二个过滤器则是当其他请求发送来,校验token的过滤器,如果校验成功,就让请求继续执行。
/**
 * @program: jwt
 * @description:
 * @author: GrandNovice
 * @create: 2020-12-04 08:34
 **/
package com.dy.jwt.filter;

import io.jsonwebtoken.Claims;
import io.jsonwebtoken.Jws;
import io.jsonwebtoken.Jwts;
import org.springframework.security.authentication.UsernamePasswordAuthenticationToken;
import org.springframework.security.core.GrantedAuthority;
import org.springframework.security.core.authority.AuthorityUtils;
import org.springframework.security.core.context.SecurityContextHolder;

import javax.servlet.*;
import javax.servlet.http.HttpServletRequest;
import java.io.IOException;
import java.util.List;

public class JwtFilter extends GenericFilter {
    @Override
    public void doFilter(ServletRequest request, ServletResponse response, FilterChain chain) throws IOException, ServletException {
        HttpServletRequest req = (HttpServletRequest) request;
        String jwtToken = req.getHeader("authorization");
        Jws<Claims> jws = Jwts.parser().setSigningKey("GrandNovice@12138")
                .parseClaimsJws(jwtToken.replace("Bearer", ""));
        Claims claims = jws.getBody();
        String username = claims.getSubject();
        List<GrantedAuthority> authorities = AuthorityUtils.commaSeparatedStringToAuthorityList(((String) claims.get("authorities")));
        UsernamePasswordAuthenticationToken token = new UsernamePasswordAuthenticationToken(username, null, authorities);
        SecurityContextHolder.getContext().setAuthentication(token);
        chain.doFilter(request, response);
    }
}
关于这个过滤器,注意如下几点:
- 首先从请求头中提取出 authorization 字段,这个字段对应的value就是用户的token。
- 将提取出来的token字符串转换为一个Claims对象,再从Claims对象中提取出当前用户名和用户角色,创建一个UsernamePasswordAuthenticationToken放到当前的Context中,然后执行过滤链使请求继续执行下去。
如此之后,两个和JWT相关的过滤器就算配置好了。
- Spring Security 配置
/**
 * @program: jwt
 * @description:
 * @author: GrandNovice
 * @create: 2020-12-04 07:59
 **/
package com.dy.jwt.config;

import com.dy.jwt.filter.JwtFilter;
import com.dy.jwt.filter.JwtLoginFilter;
import org.springframework.context.annotation.Bean;
import org.springframework.context.annotation.Configuration;
import org.springframework.http.HttpMethod;
import org.springframework.security.config.annotation.authentication.builders.AuthenticationManagerBuilder;
import org.springframework.security.config.annotation.web.builders.HttpSecurity;
import org.springframework.security.config.annotation.web.configuration.WebSecurityConfigurerAdapter;
import org.springframework.security.crypto.bcrypt.BCryptPasswordEncoder;
import org.springframework.security.crypto.password.PasswordEncoder;
import org.springframework.security.web.authentication.UsernamePasswordAuthenticationFilter;

@Configuration
public class SecurityConfig extends WebSecurityConfigurerAdapter {
    @Bean
    PasswordEncoder passwordEncoder() {
        return new BCryptPasswordEncoder();
    }

    @Override
    protected void configure(AuthenticationManagerBuilder auth) throws Exception {
        auth.inMemoryAuthentication()
                .withUser("dy")
                .password("$2a$10$OdAdu8YXVuygcrWg/zKs5.tuocZuO.JHpS0dWoei3/ZJSUlsJwQtu")
                .roles("user")
                .and()
                .withUser("admin")
                .password("$2a$10$AbQMG71ZYaETl8/Hnx4ypOXe3ln8MMJUisAejsDDsA.bxgP4Iq0Ri")
                .roles("admin");
    }

    @Override
    protected void configure(HttpSecurity http) throws Exception {
        http.authorizeRequests()
                .antMatchers("/hello").hasRole("user")
                .antMatchers("/admin").hasRole("admin")
                .antMatchers(HttpMethod.POST, "login")
                .permitAll()
                .anyRequest().authenticated()
                .and()
                .addFilterBefore(new JwtLoginFilter("/login", authenticationManager()), UsernamePasswordAuthenticationFilter.class)
                .addFilterBefore(new JwtFilter(), UsernamePasswordAuthenticationFilter.class)
                .csrf().disable();
    }
}
- 简单起见,这里我并未对密码进行加密,因此配置了NoOpPasswordEncoder的实例。
- 简单起见,这里并未连接数据库,我直接在内存中配置了两个用户,两个用户具备不同的角色。
- 配置路径规则时, /hello 接口必须要具备 user 角色才能访问, /admin 接口必须要具备 admin 角色才能访问,POST 请求并且是 /login 接口则可以直接通过,其他接口必须认证后才能访问。
- 最后配置上两个自定义的过滤器并且关闭掉csrf保护。
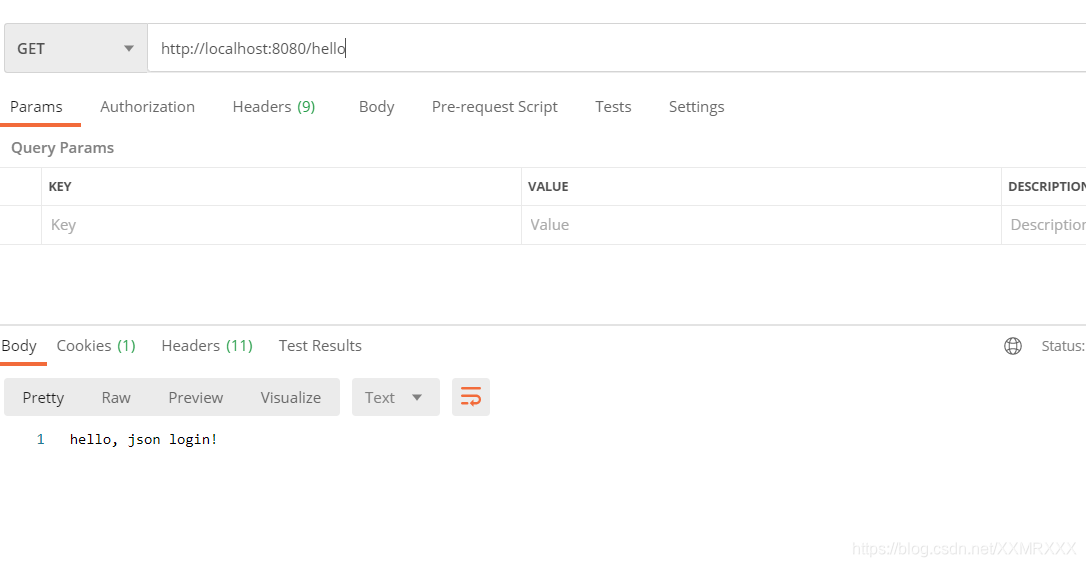
直接访问/hello,访问失败

携带token访问
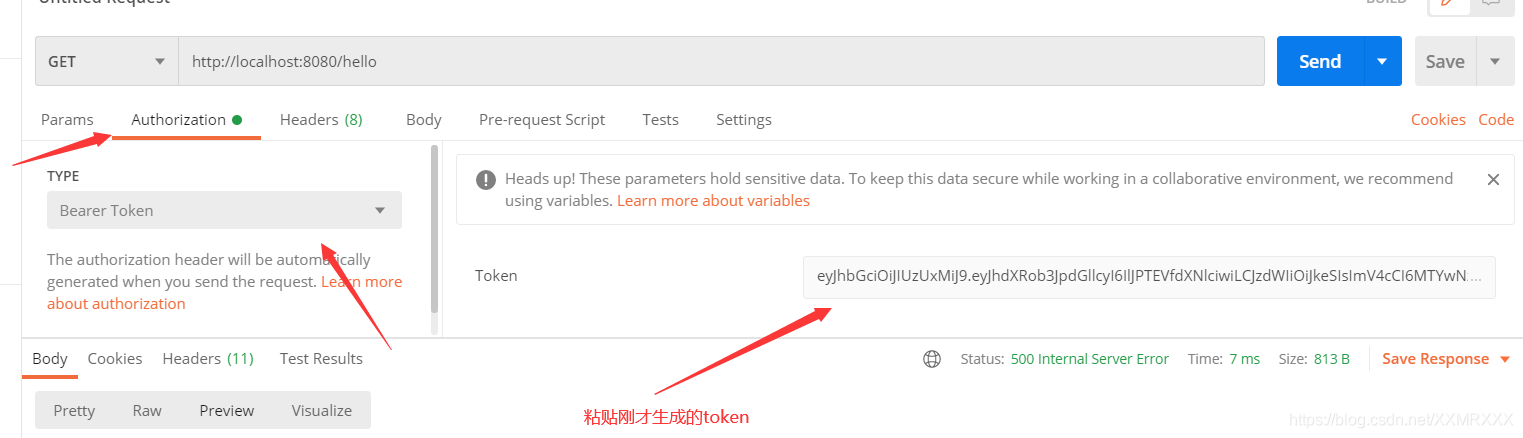
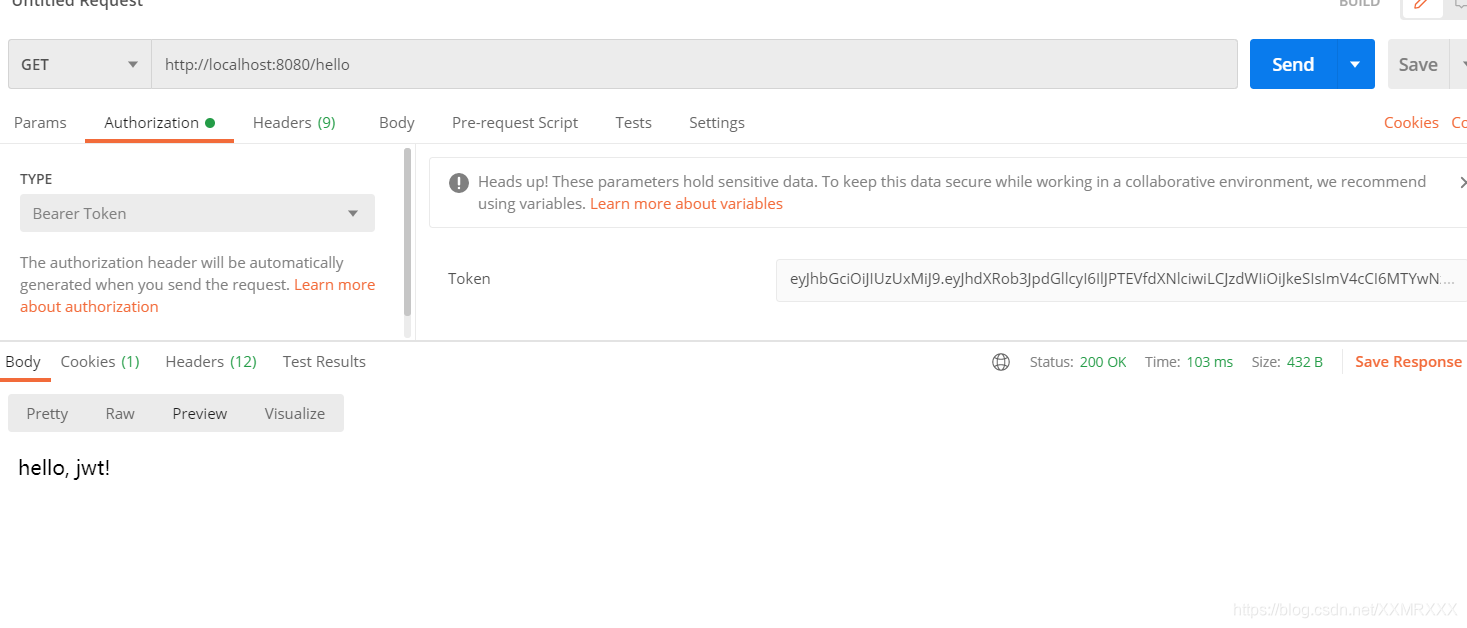
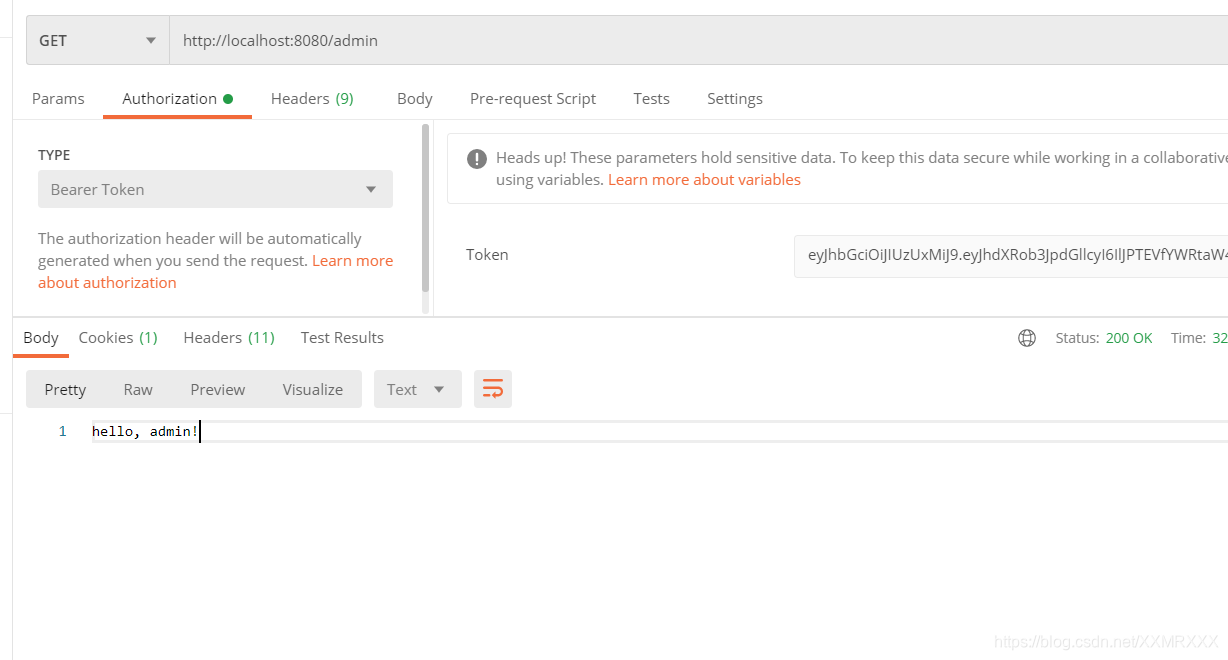
admin登录
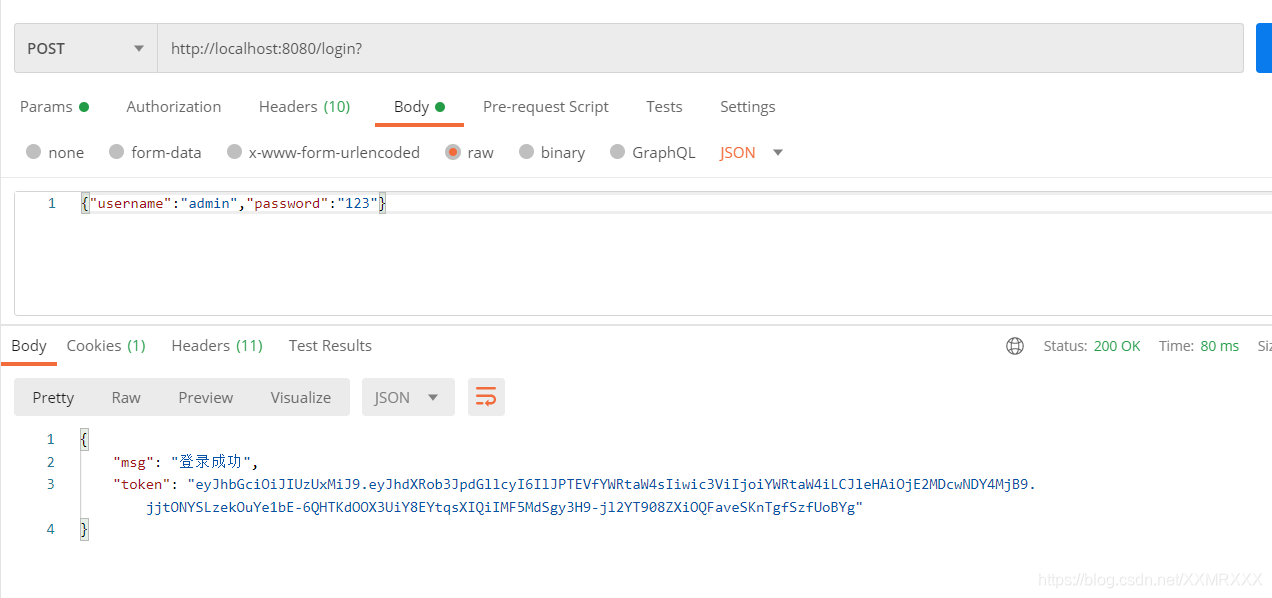
携带刚才生成的token访问/admin


 695
695

 被折叠的 条评论
为什么被折叠?
被折叠的 条评论
为什么被折叠?
 到【灌水乐园】发言


