


学习目标:
做一个图片对比软件
学习内容:
- 图片如何做对比?
ImageChops.difference // 比较图片函数 return:image
- 接口要求色深为24,则需要统一更改图片色深
 1. ImageChops.fromarray()  // 转成array,改色深
 2. image.convert()  // 另存为副本,可以在这更改色深
 3. img.getbands()  // 获取图片色深
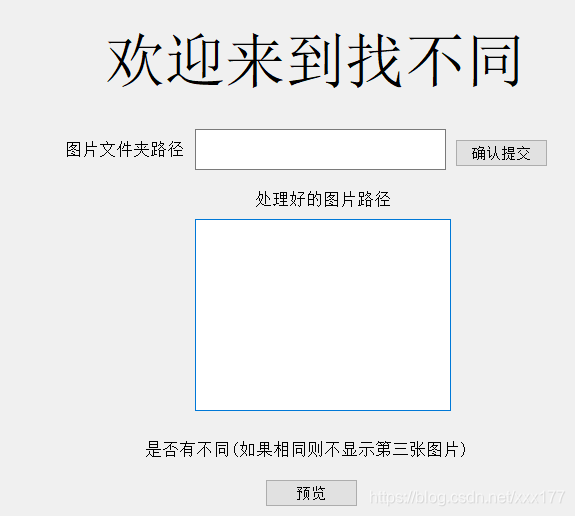
- 制作前台pyqt
功能要求- 一个输入框,用于接收图片文件夹路径
- 俩个按钮,用于预览比对图,以及原图
- 两个label,用于提示用户
- 一个文本框,用于显示处理好的图片路径
- 制作准备
- Anaconda3
- QtDesigner
- Pycharm
我用的就这3个,anaconda3里面用的是pyuic5,配置的会更简单
开始制作!:
后台功能制作
1. 改变色深
#  方法一:此处路径是一个文件夹
#  RGB,RGBA,L,CMYK是分别代表不同的的色深符号  RGB为24位色深,区分大小写
def To_RGB_24():
    files = os.listdir(path)
    for i in files:
        files = os.path.join(path, i)
        # convert
        # 返回此图像的转换后的副本。
        # 当前版本支持 “L”,“RGB” 和 “CMYK” 之间的所有可能转换。
        img = Image.open(files).convert('RGB')
        dirpath = newpath
        file_name, file_extend = os.path.splitext(i)
        dst = os.path.join(os.path.abspath(dirpath), file_name + '.PNG')
        img.save(dst)
# 方法二:网上收的,我测试不行,也贴出来
def test1():
    im = Image.open('1.png')
    # print(im.getbands())
    img_array = np.array(im)
    # print(img_array.dtype)
    ## 此处他是将数组先转为8进制,再转为image图像,此时图像就是8色深
    img = Image.fromarray(np.uint8(img_array))
    # print(img.getbands())
    img.save('1.png')
2.开始做对比
def compare_images(path_one, path_two, diff_save_location):
    """
        比较图片,如果有不同则生成展示不同的图片
        @参数一: path_one: 第一张图片的路径
        @参数二: path_two: 第二张图片的路径
        @参数三: diff_save_location: 不同图的保存路径
    """
    image_one = Image.open(path_one)
    image_two = Image.open(path_two)

    try:
        diff = ImageChops.difference(image_one, image_two)
        if diff.getbbox() is None:
            # 图片间没有任何不同则直接退出
            print("【+】We are the same!")
        else:
            diff.save(diff_save_location)
    except ValueError as e:
        text = "有可能是位深问题,请仔细检查"
        print("【{0}】{1}".format(e, text))
程序界面制作
- 准备工作Pycharm Anaconda3,QtDesigner直接下好安装了,就能用
- 打开pycharm设置就找到这位置

- 点加号
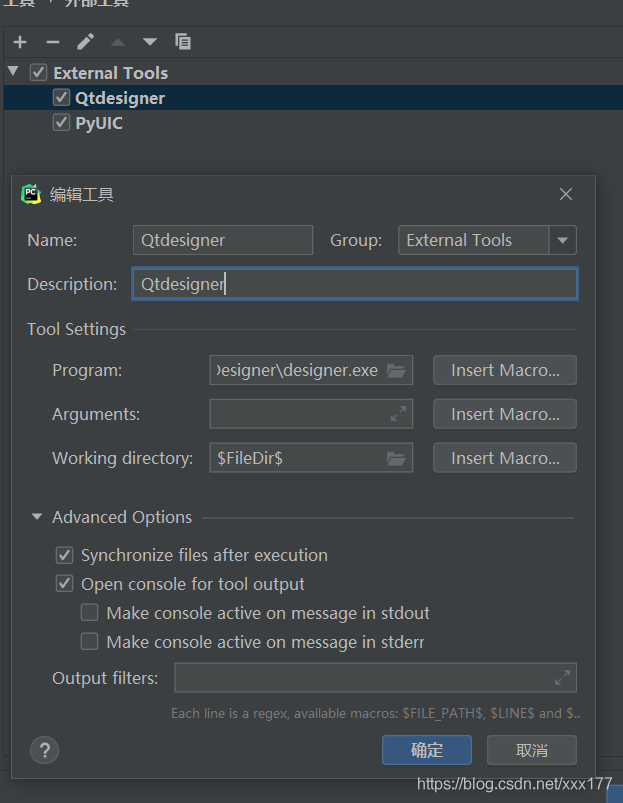
1.创建第一个QtDesigner工具
name:名字
description:描述
program:qt程序路径
working directory:$FileDir$
其它的默认
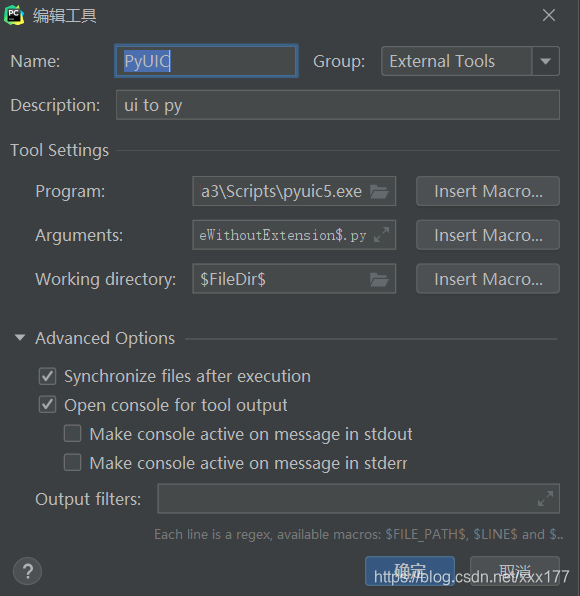
2.创建第二个工具pyuic
progeam: 用户\Anaconda3\Scripts\pyuic5.exe
arguments:$FileName$ -o $FileNameWithoutExtension$.py
working directory:$FileDir$
开始制作
# 项目总结 环境搭建会浪费许多时间,需要耐心,加油!


 3020
3020


 被折叠的 条评论
为什么被折叠?
被折叠的 条评论
为什么被折叠?
 到【灌水乐园】发言


