


5.SpringSecurity 原理总结
5.1SpringSecurity的过滤器介绍
SpirngSecuriyt采用的是责任链的设计模式,它有一条很长的过滤器链,现在对这条过滤器链的15个过滤器进行说明:
(1)WebAsyncManagerIntegrationFilter:将 Security 上下文与 Spring Web 中用于处理异步请求映射的 WebAsyncManager 进行集成。
(2)SecurityContextPersistenceFilter:在每次请求处理之前将该请求相关的安全上下文信息加载到 SecurityContextHolder 中,然后在该次请求处理完成之后,将SecurityContextHolder 中关于这次请求的信息存储到一个“仓储”中,然后将SecurityContextHolder 中的信息清除,例如在 Session 中维护一个用户的安全信息就是这个过滤器处理的。
(3)HeaderWriterFilter:用于将头信息加入响应中。
(4)CsrfFilter:用于处理跨站请求伪造。
(5)LogoutFilter:用于处理退出登录。
(6)UsernamePasswordAuthenticationFilter:用于处理基于表单的登录请求,从表单中获取用户名和密码。默认情况下处理来自 /login 的请求。从表单中获取用户名和密码时,默认使用的表单 name 值为 username 和 password,这两个值可以通过设置这个过滤器的 usernameParameter 和 passwordParameter 两个参数的值进行修改。
(7)DefaultLoginPageGeneratingFilter:如果没有配置登录页面,那系统初始化时就会配置这个过滤器,并且用于在需要进行登录时生成一个登录表单页面。
(8)BasicAuthenticationFilter:检测和处理 http basic 认证。
(9)RequestCacheAwareFilter:用来处理请求的缓存。
(10)SecurityContextHolderAwareRequestFilter:主要是包装请求对象 request。
(11)AnonymousAuthenticationFilter:检测 SecurityContextHolder 中是否存在Authentication 对象,如果不存在为其提供一个匿名 Authentication。
(12)SessionManagementFilter:管理 session 的过滤器
(13)ExceptionTranslationFilter:处理 AccessDeniedException 和AuthenticationException 异常。
(14)FilterSecurityInterceptor:可以看做过滤器链的出口。
RememberMeAuthenticationFilter:当用户没有登录而直接访问资源时, 从 cookie 里找出用户的信息, 如果 Spring Security 能够识别出用户提供的 remember me cookie, 用户将不必填写用户名和密码, 而是直接登录进入系统,该过滤器默认不开启
5.2 SpringSecurity的基本流程
Spring Securiyt采用过滤器链实现认证和授权,只有当前过滤器通过,才能进入下一个过滤器
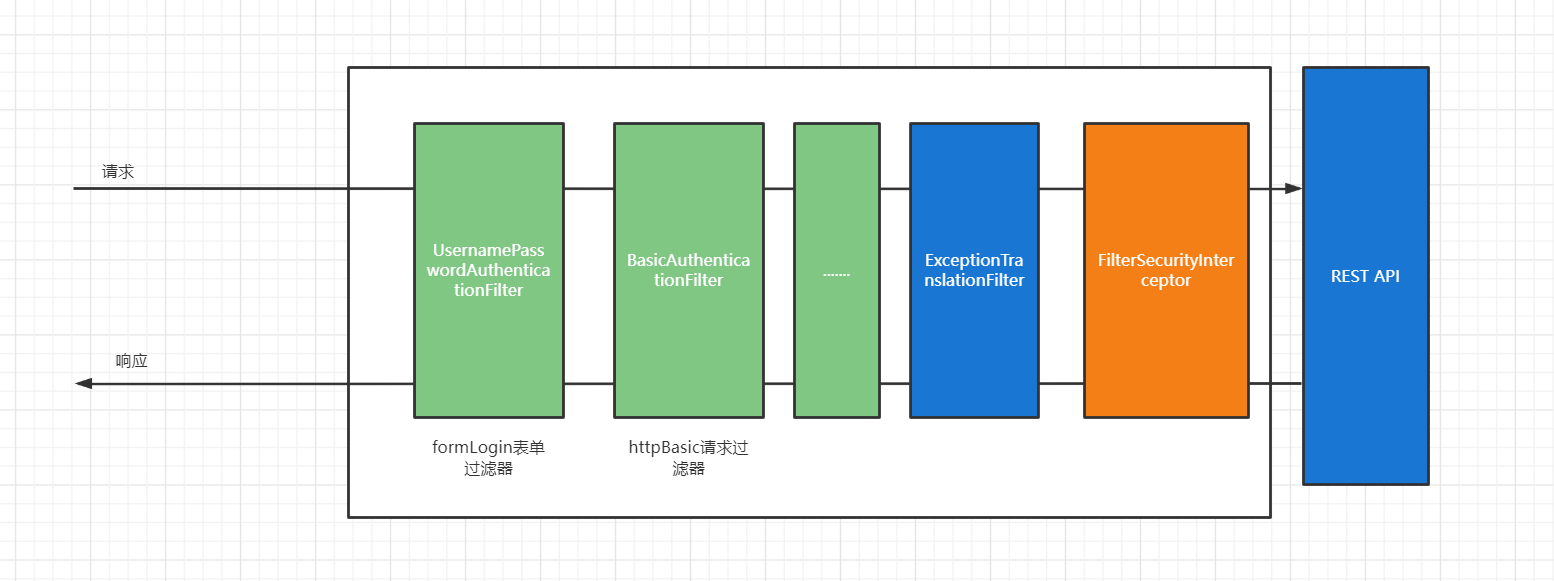
绿色部分是认证过滤器,需要我们自己配置,可以配置多个认证过滤器。认证过滤器可以使用Spring Security 提供的认证过滤器,也可以自定义过滤器(例如:短信验证)。认证过滤器要在configure(HttpSecurity http)方法中配置,没有配置不生效。下面会重点介绍以下三个过滤器:
UsernamePasswordAuthenticationFilter 过滤器:该过滤器会拦截前端提交的 POST 方式的登录表单请求,并进行身份认证。
ExceptionTranslationFilter 过滤器:该过滤器不需要我们配置,对于前端提交的请求会直接放行,捕获后续抛出的异常并进行处理(例如:权限访问限制)。
FilterSecurityInterceptor 过滤器:该过滤器是过滤器链的最后一个过滤器,根据资源权限配置来判断当前请求是否有权限访问对应的资源。如果访问受限会抛出相关异常,并由ExceptionTranslationFilter 过滤器进行捕获和处理。
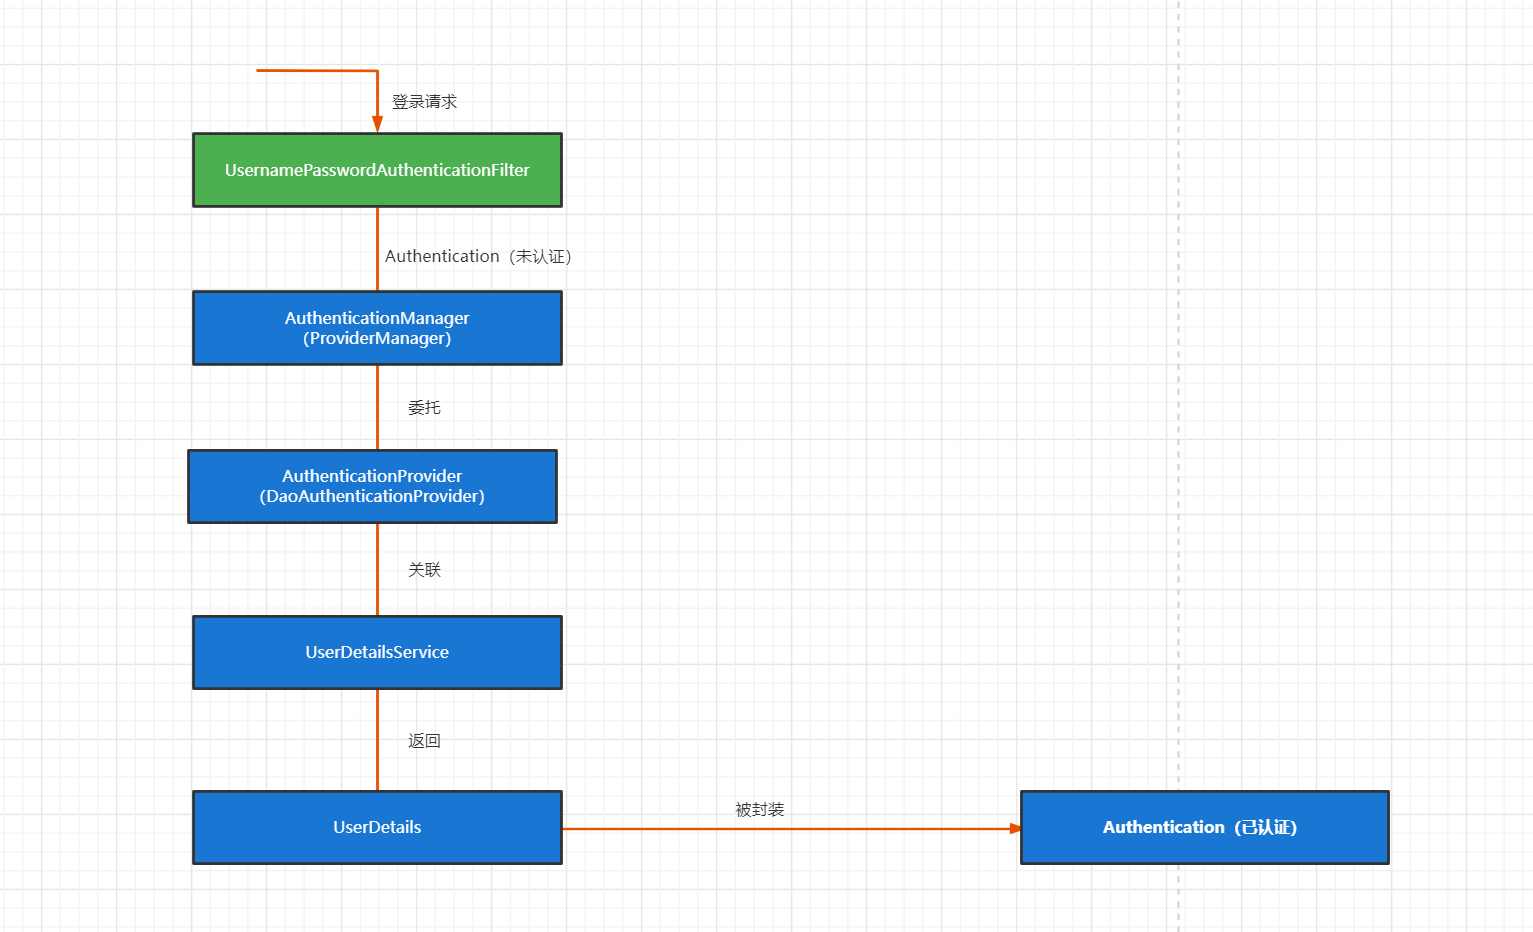
5.3 SpringSecurity认证流程
认证流程是在UsernamePasswordAuthenticationFilter 过滤器中处理的,具体流程如下:
5.3.1 UsernamePasswordAuthenticationFilter源码
当前端提交的是一个 POST 方式的登录表单请求,就会被该过滤器拦截,并进行身份认证。该过滤器的 doFilter() 方法实现在其抽象父类AbstractAuthenticationProcessingFilter中,查看相关源码
AbstractAuthenticationProcessingFilter

    //过滤器dofilter方法
	public void doFilter(ServletRequest req, ServletResponse res, FilterChain chain)
			throws IOException, ServletException {
        //1.判断请求是否伟post方法的登录表单提交请求,如果不是则直接放行,进入下一个过滤器
		HttpServletRequest request = (HttpServletRequest) req;
		HttpServletResponse response = (HttpServletResponse) res;

		if (!requiresAuthentication(request, response)) {
			chain.doFilter(request, response);

			return;
		}

		if (logger.isDebugEnabled()) {
			logger.debug("Request is to process authentication");
		}
        //存储用户认证信息的类
		Authentication authResult;

		try {
            //2.调用子类UsernamePasswordAuthenticationFilter重写的方法进行身份认证
            //返回的authResult对象封装认证后的用户信息
			authResult = attemptAuthentication(request, response);
			if (authResult == null) {
				// return immediately as subclass has indicated that it hasn't completed
				// authentication
				return;
			}
            //3.session策略处理(如果配置了用户session最大并发数,就是再此处进行判断并处理的
			sessionStrategy.onAuthentication(authResult, request, response);
		}
		catch (InternalAuthenticationServiceException failed) {
			logger.error(
					"An internal error occurred while trying to authenticate the user.",
					failed);
            //4.认证失败,调用认证失败的处理器
			unsuccessfulAuthentication(request, response, failed);

			return;
		}
		catch (AuthenticationException failed) {
			// Authentication failed
			unsuccessfulAuthentication(request, response, failed);

			return;
		}
         //4.认证成功的处理
		// Authentication success
		if (continueChainBeforeSuccessfulAuthentication) {
			chain.doFilter(request, response);
		}
         //调用成功的处理器
		successfulAuthentication(request, response, chain, authResult);
	}
上述的 第二 过程调用了 UsernamePasswordAuthenticationFilter 的attemptAuthentication() 方法,源码如下:
public class UsernamePasswordAuthenticationFilter extends
		AbstractAuthenticationProcessingFilter {
	// ~ Static fields/initializers
	// =====================================================================================

    //默认表单用户名参数为username
	public static final String SPRING_SECURITY_FORM_USERNAME_KEY = "username";
     //默认表单密码参数为username
	public static final String SPRING_SECURITY_FORM_PASSWORD_KEY = "password";

	private String usernameParameter = SPRING_SECURITY_FORM_USERNAME_KEY;
	private String passwordParameter = SPRING_SECURITY_FORM_PASSWORD_KEY;
	private boolean postOnly = true;//默认请求方式只能为post

	// ~ Constructors
	// ===================================================================================================

	public UsernamePasswordAuthenticationFilter() {
        //默认登录表单提交路径为/login,Post方式的请求
		super(new AntPathRequestMatcher("/login", "POST"));
	}


    //上述doFilter()方法调用此attemptAuthentication()方法进行身份认证
	public Authentication attemptAuthentication(HttpServletRequest request,
			HttpServletResponse response) throws AuthenticationException {
		if (postOnly && !request.getMethod().equals("POST")) {
            //1.默认情况下,如果请求方式不是post会抛出异常
			throw new AuthenticationServiceException(
					"Authentication method not supported: " + request.getMethod());
		}
        //2.获取携带的username 和 password
		String username = obtainUsername(request);
		String password = obtainPassword(request);

		if (username == null) {
			username = "";
		}

		if (password == null) {
			password = "";
		}

		username = username.trim();
        //3.使用前端传入的username和password构造Authentication对象标记改对象未认证
		UsernamePasswordAuthenticationToken authRequest = new UsernamePasswordAuthenticationToken(
				username, password);
         // 4.将请求中一些属性设置到Authentication对象中,如:remoteAddress,seesionId
		// Allow subclasses to set the "details" property
		setDetails(request, authRequest);
         //5.调用AuthenticationManager类的authenticate()方法进行身份认证
		return this.getAuthenticationManager().authenticate(authRequest);
	}
上述的(3)过程创建的 UsernamePasswordAuthenticationToken 是Authentication 接口的实现类,该类有两个构造器,一个用于封装前端请求传入的未认证的用户信息,一个用于封装认证成功后的用户信息
public class UsernamePasswordAuthenticationToken extends AbstractAuthenticationToken {

	private static final long serialVersionUID = SpringSecurityCoreVersion.SERIAL_VERSION_UID;

	// ~ Instance fields
	// ================================================================================================

	private final Object principal;
	private Object credentials;

	// ~ Constructors
	// ===================================================================================================

	/**
	 * This constructor can be safely used by any code that wishes to create a
	 * <code>UsernamePasswordAuthenticationToken</code>, as the {@link #isAuthenticated()}
	 * will return <code>false</code>.
	 *用户封装前端请求传入的未认证的用户信息,前面的authRequest对象就是调用该构造器进行构造的
	 */
	public UsernamePasswordAuthenticationToken(Object principal, Object credentials) {
		super(null);//用户权限为null
		this.principal = principal;//前端传入的用户名
		this.credentials = credentials;//前端传入的密码
		setAuthenticated(false);//标记未认证
	}

	/**
	 * This constructor should only be used by <code>AuthenticationManager</code> or
	 * <code>AuthenticationProvider</code> implementations that are satisfied with
	 * producing a trusted (i.e. {@link #isAuthenticated()} = <code>true</code>)
	 * authentication token.
	 *用于封装认证成功后的用户信息
	 * @param principal
	 * @param credentials
	 * @param authorities
	 */
	public UsernamePasswordAuthenticationToken(Object principal, Object credentials,
			Collection<? extends GrantedAuthority> authorities) {
		super(authorities);//用户权限的集合
		this.principal = principal;//封装认证用户信息的UserDetails对象,不再是用户名
		this.credentials = credentials;//前端传入的密码
		super.setAuthenticated(true); // must use super, as we override 标记认证成功
	}
Authentication 接口的实现类用于存储用户认证信息,查看该接口具体定义:
public interface Authentication extends Principal, Serializable {
    //用户权限集合
	Collection<? extends GrantedAuthority> getAuthorities();
    //用户密码
	Object getCredentials();
    //请求携带的一些属性信息(例如:remoteAddress,sessionId)
	Object getDetails();
    //未认证时为前端请求传入的用户名,认证成功后为封装认证用户信息UserDetails对象
	Object getPrincipal();
    //是否被认证(true:认证成功,false:未认证)
	boolean isAuthenticated();
	//设置是否被认证(true:认证成功,false:未认证)
	void setAuthenticated(boolean isAuthenticated) throws IllegalArgumentException;
}
5.3.2 ProviderManager 源码
上述过程中,UsernamePasswordAuthenticationFilter 过滤器的attemptAuthentication() 方法的(5)过程将未认证的 Authentication 对象传入ProviderManager 类的 authenticate() 方法进行身份认证。
ProviderManager 是 AuthenticationManager 接口的实现类,该接口是认证相关的核心接口,也是认证的入口。在实际开发中,我们可能有多种不同的认证方式,例如:用户名+ 密码、邮箱+密码、手机号+验证码等,而这些认证方式的入口始终只有一个,那就是AuthenticationManager。在该接口的常用实现类 ProviderManager 内部会维护一个List列表,存放多种认证方式,实际上这是委托者模式(Delegate)的应用。每种认证方式对应着一个 AuthenticationProvider,AuthenticationManager 根据认证方式的不同(根据传入的 Authentication 类型判断)委托对应的 AuthenticationProvider 进行用户认证。
public class ProviderManager implements AuthenticationManager, MessageSourceAware,InitializingBean {

    //未认证的Authentication 对象
public Authentication authenticate(Authentication authentication)
			throws AuthenticationException {
       // 1.获取传入的类型 Authentication,即 UsernamePasswordAuthenticationToken
		Class<? extends Authentication> toTest = authentication.getClass();
		AuthenticationException lastException = null;
		AuthenticationException parentException = null;
		Authentication result = null;
		Authentication parentResult = null;
		boolean debug = logger.isDebugEnabled();
        //2.获取认证方式列表 list<AuthenticationProvider> 的迭代器
		for (AuthenticationProvider provider : getProviders()) {
            //3.判断当前AuthenticationProvider 是否适用UsernamePasswordAuthenticationToken类型的                     // Authentication
			if (!provider.supports(toTest)) {
				continue;
			}

			if (debug) {
				logger.debug("Authentication attempt using "
						+ provider.getClass().getName());
			}
           //成功找到适配当前认证方式的AuthenticationProvider,此处为DaoAuthenticationProvider
			try {
                //4.调用DaoAuthenticationProvider的authenticate()方法进行认证
				result = provider.authenticate(authentication);

				if (result != null) {
                    //5.认证成功后,将传入的Authentication对象中details信息拷贝到已认证的Authenticatio对象中
					copyDetails(authentication, result);
					break;
				}
			}
			catch (AccountStatusException | InternalAuthenticationServiceException e) {
				prepareException(e, authentication);
				// SEC-546: Avoid polling additional providers if auth failure is due to
				// invalid account status
				throw e;
			} catch (AuthenticationException e) {
				lastException = e;
			}
		}

		if (result == null && parent != null) {
			// Allow the parent to try.
			try {
                //5.认证失败,使用父类型AuthenticationManager进行验证
				result = parentResult = parent.authenticate(authentication);
			}
			catch (ProviderNotFoundException e) {
				// ignore as we will throw below if no other exception occurred prior to
				// calling parent and the parent
				// may throw ProviderNotFound even though a provider in the child already
				// handled the request
			}
			catch (AuthenticationException e) {
				lastException = parentException = e;
			}
		}

		if (result != null) {
            //6.认证成功之后,去除result的敏感信息,要求相关类实现CredentialsContainer接口
			if (eraseCredentialsAfterAuthentication
					&& (result instanceof CredentialsContainer)) {
				// Authentication is complete. Remove credentials and other secret data
				// from authentication
				((CredentialsContainer) result).eraseCredentials();
			}
            //发布认证成功的事件

			if (parentResult == null) {
				eventPublisher.publishAuthenticationSuccess(result);
			}
			return result;
	}
上述认证成功之后的(6)过程,调用 CredentialsContainer 接口定义的eraseCredentials() 方法去除敏感信息。查看UsernamePasswordAuthenticationToken 实现的 eraseCredentials() 方法,该方法实现在其父类中:
public abstract class AbstractAuthenticationToken implements Authentication,CredentialsContainer {
    //父类实现了CredentialsContainer接口

    public void eraseCredentials() {
        //前端传入的密码会重置为null
		eraseSecret(getCredentials());
        //r\principal在已认证的Authientication中是UserDetails实现类,如果该实现类想要去除敏感信息,需要实现      CredentialsContainer接口的eraseCredentials的方法,由于我们定义的User类没有实现该接口,所以不进行任何操作。
		eraseSecret(getPrincipal());
		eraseSecret(details);
	}

	private void eraseSecret(Object secret) {
		if (secret instanceof CredentialsContainer) {
			((CredentialsContainer) secret).eraseCredentials();
		}
	}
5.3.3 认证成功/失败
UsernamePasswordAuthenticationFilter 过滤器的 doFilter() 方法,查看认证成功/失败的处理:
	try {
			//........
		}
		catch (InternalAuthenticationServiceException failed) {
			logger.error(
					"An internal error occurred while trying to authenticate the user.",
					failed);
			unsuccessfulAuthentication(request, response, failed);

			return;
		}
		catch (AuthenticationException failed) {
			// Authentication failed
            //调用认证失败的处理器
			unsuccessfulAuthentication(request, response, failed);

			return;
		}

		// Authentication success
		if (continueChainBeforeSuccessfulAuthentication) {
			chain.doFilter(request, response);
		}
         //调用认证成功的处理器
		successfulAuthentication(request, response, chain, authResult);
查看successfulAuthentication()和unsuccessfulAuthentication()源码
public abstract class AbstractAuthenticationProcessingFilter extends GenericFilterBean
		implements ApplicationEventPublisherAware, MessageSourceAware {
    //认证成功的处理
 	protected void successfulAuthentication(HttpServletRequest request,
			HttpServletResponse response, FilterChain chain, Authentication authResult)
			throws IOException, ServletException {

		if (logger.isDebugEnabled()) {
			logger.debug("Authentication success. Updating SecurityContextHolder to contain: "
					+ authResult);
		}
        //1.将认证成功的用户信息对象Authentication封装进SecurityContext
		SecurityContextHolder.getContext().setAuthentication(authResult);
        //2.remberme的处理
		rememberMeServices.loginSuccess(request, response, authResult);

		// 3.发布认证成功的事件
		if (this.eventPublisher != null) {
			eventPublisher.publishEvent(new InteractiveAuthenticationSuccessEvent(
					authResult, this.getClass()));
		}
         // 3.调用认证成功处理器
		successHandler.onAuthenticationSuccess(request, response, authResult);
	}

    //认证失败后的处理器

    	protected void unsuccessfulAuthentication(HttpServletRequest request,
			HttpServletResponse response, AuthenticationException failed)
			throws IOException, ServletException {
            //1.清除该线程在SecurityContextHolder中对应的SecurityContext对象
		SecurityContextHolder.clearContext();

		if (logger.isDebugEnabled()) {
			logger.debug("Authentication request failed: " + failed.toString(), failed);
			logger.debug("Updated SecurityContextHolder to contain null Authentication");
			logger.debug("Delegating to authentication failure handler " + failureHandler);
		}
         //2.remember的处理
		rememberMeServices.loginFail(request, response);
         //3.调用认证失败的处理器
		failureHandler.onAuthenticationFailure(request, response, failed);
	}
5.4 SpringSecurity权限访问流程
上一个部分通过源码的方式介绍了认证流程,下面介绍权限访问流程,主要是对ExceptionTranslationFilter 过滤器和 FilterSecurityInterceptor 过滤器进行介绍。
5.4.1 ExceptionTranslationFilter 过滤器
该过滤器是用于处理异常的,不需要我们配置,对于前端提交的请求会直接放行,捕获后续抛出的异常并进行处理(例如:权限访问限制)。具体源码如下:
public class ExceptionTranslationFilter extends GenericFilterBean {


    	public void doFilter(ServletRequest req, ServletResponse res, FilterChain chain)
			throws IOException, ServletException {
		HttpServletRequest request = (HttpServletRequest) req;
		HttpServletResponse response = (HttpServletResponse) res;

		try {
            //1.对前端提交的请求直接放行,不进行拦截
			chain.doFilter(request, response);

			logger.debug("Chain processed normally");
		}
		catch (IOException ex) {
			throw ex;
		}
		catch (Exception ex) {
			// 2.捕获后续出现的异常进行处理
			Throwable[] causeChain = throwableAnalyzer.determineCauseChain(ex);
            // 访问需要认证的资源,但当前请求未认证抛出异常
			RuntimeException ase = (AuthenticationException) throwableAnalyzer
					.getFirstThrowableOfType(AuthenticationException.class, causeChain);

			if (ase == null) {
				ase = (AccessDeniedException) throwableAnalyzer.getFirstThrowableOfType(
						AccessDeniedException.class, causeChain);
			}

			if (ase != null) {
                //访问权限受限的资源所抛出的异常
				if (response.isCommitted()) {
					throw new ServletException("Unable to handle the Spring Security Exception because the response is already committed.", ex);
				}
				handleSpringSecurityException(request, response, chain, ase);
			}
			else {
				// Rethrow ServletExceptions and RuntimeExceptions as-is
				if (ex instanceof ServletException) {
					throw (ServletException) ex;
				}
				else if (ex instanceof RuntimeException) {
					throw (RuntimeException) ex;
				}

				// Wrap other Exceptions. This shouldn't actually happen
				// as we've already covered all the possibilities for doFilter
				throw new RuntimeException(ex);
			}
		}
	}
5.4.2 FilterSecurityInterceptor 过滤器
FilterSecurityInterceptor 是过滤器链的最后一个过滤器,该过滤器是过滤器链的最后一个过滤器,根据资源权限配置来判断当前请求是否有权限访问对应的资源。如果访问受限会抛出相关异常,最终所抛出的异常会由前一个过滤器ExceptionTranslationFilter 进行捕获和处理。具体源码如下:
public class FilterSecurityInterceptor extends AbstractSecurityInterceptor implements
		Filter {

    	public void doFilter(ServletRequest request, ServletResponse response,
			FilterChain chain) throws IOException, ServletException {
		FilterInvocation fi = new FilterInvocation(request, response, chain);
		invoke(fi);
	}

	public void invoke(FilterInvocation fi) throws IOException, ServletException {
		if ((fi.getRequest() != null)
				&& (fi.getRequest().getAttribute(FILTER_APPLIED) != null)
				&& observeOncePerRequest) {
			// filter already applied to this request and user wants us to observe
			// once-per-request handling, so don't re-do security checking
			fi.getChain().doFilter(fi.getRequest(), fi.getResponse());
		}
		else {
			// first time this request being called, so perform security checking
			if (fi.getRequest() != null && observeOncePerRequest) {
				fi.getRequest().setAttribute(FILTER_APPLIED, Boolean.TRUE);
			}
             // 1.根据资源权限配置来判断当前请求是否有权限访问对应的资源,果果不能则抛出异常
			InterceptorStatusToken token = super.beforeInvocation(fi);

			try {
                //2.访问相关资源,通过SpringMVC的核心组件DispatcherServlet进行访问
				fi.getChain().doFilter(fi.getRequest(), fi.getResponse());
			}
			finally {
				super.finallyInvocation(token);
			}

			super.afterInvocation(token, null);
		}
	}
需要注意,Spring Security 的过滤器链是配置在 SpringMVC 的核心组件DispatcherServlet 运行之前。也就是说,请求通过 Spring Security 的所有过滤器, 不意味着能够正常访问资源,该请求还需要通过 SpringMVC 的拦截器链。
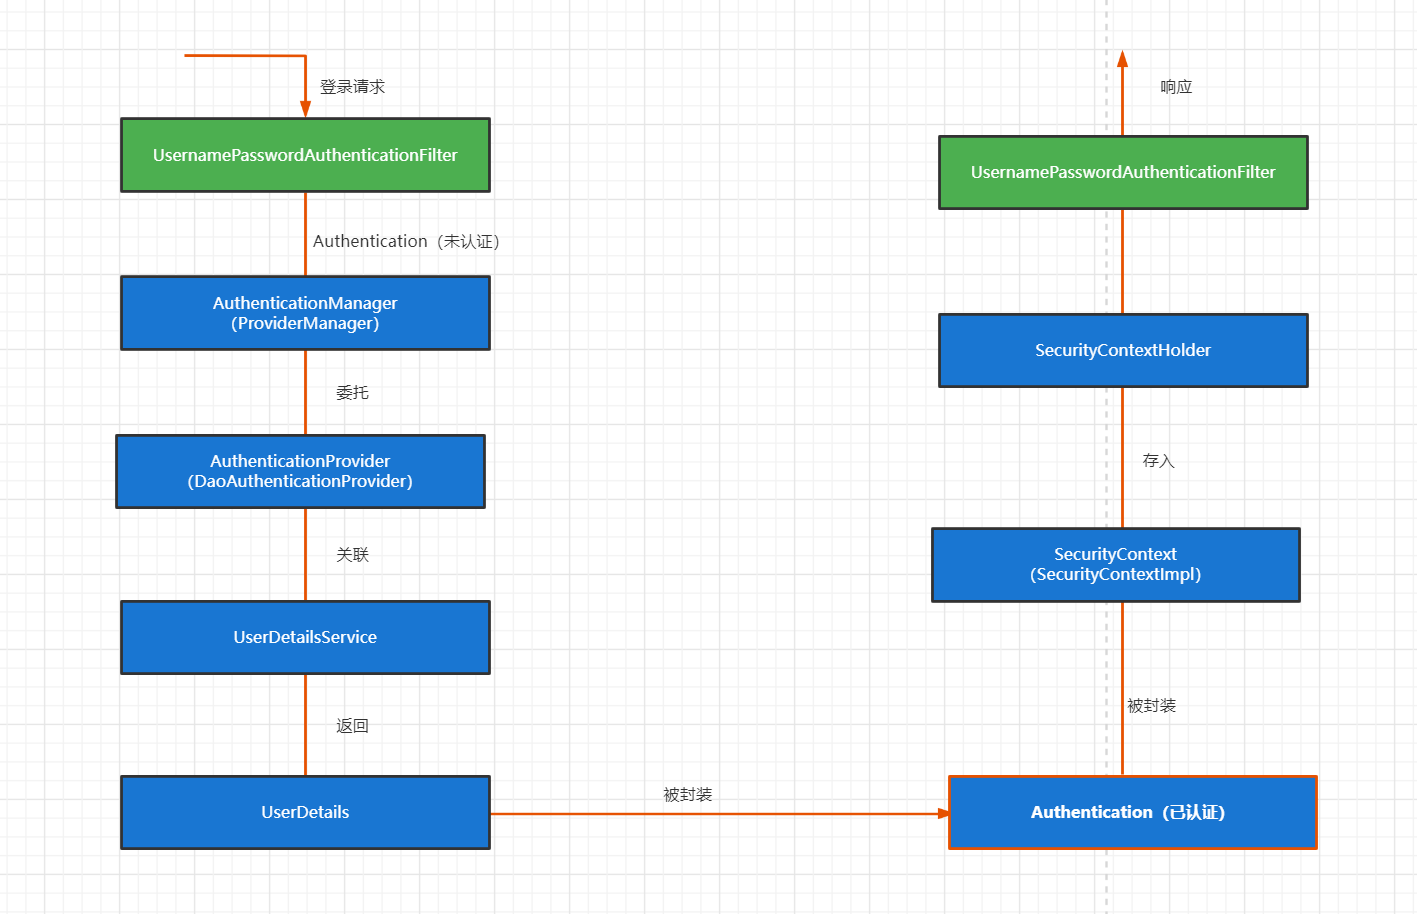
5.5 SrpingSecurity的请求共享认证信息
一般认证成功后的用户信息是通过 Session 在多个请求之间共享,那么 Spring Security 中是如何实现将已认证的用户信息对象 Authentication 与 Session 绑定的进行具体分析。
-
在前面讲解认证成功的处理方法 successfulAuthentication() 时,有以下代码:
protected void successfulAuthentication(HttpServletRequest request, HttpServletResponse response, FilterChain chain, Authentication authResult) throws IOException, ServletException { if (logger.isDebugEnabled()) { logger.debug("Authentication success. Updating SecurityContextHolder to contain: " + authResult); } //将以认证的用户信息对象Authentication封装进SecurityContext对象中,并存入SecurityContextHolder SecurityContextHolder.getContext().setAuthentication(authResult); rememberMeServices.loginSuccess(request, response, authResult); // Fire event if (this.eventPublisher != null) { eventPublisher.publishEvent(new InteractiveAuthenticationSuccessEvent( authResult, this.getClass())); } successHandler.onAuthenticationSuccess(request, response, authResult); } -
查看 SecurityContext 接口及其实现类 SecurityContextImpl , 该类其实就是对Authentication 的封装:
-
l 查看 SecurityContextHolder 类 , 该 类 其 实 是 对 ThreadLocal 的 封 装 , 存 储SecurityContext 对象:
5.5.1 SecurityContextPersistenceFilter 过滤器
前面提到过,在 UsernamePasswordAuthenticationFilter 过滤器认证成功之后,会在认证成功的处理方法中将已认证的用户信息对象 Authentication 封装进SecurityContext,并存入 SecurityContextHolder。
之后,响应会通过 SecurityContextPersistenceFilter 过滤器,该过滤器的位置在所有过滤器的最前面,请求到来先进它,响应返回最后一个通过它,所以在该过滤器中处理已认证的用户信息对象 Authentication 与 Session 绑定。
认证成功的响应通过 SecurityContextPersistenceFilter 过滤器时,会从SecurityContextHolder 中取出封装了已认证用户信息对象 Authentication 的SecurityContext,放进 Session 中。当请求再次到来时,请求首先经过该过滤器,该过滤器会判断当前请求的 Session 是否存有 SecurityContext 对象,如果有则将该对象取出再次放入 SecurityContextHolder 中,之后该请求所在的线程获得认证用户信息,后续的资源访问不需要进行身份认证;当响应再次返回时,该过滤器同样从 SecurityContextHolder 取出SecurityContext 对象,放入 Session 中。具体源码如下:


 2948
2948


 被折叠的 条评论
为什么被折叠?
被折叠的 条评论
为什么被折叠?
 到【灌水乐园】发言


