


最近在整一个android项目,因为p图技术不高。干脆很多地方直接用代码写出那种渐变,形状之类的效果。
android 可以用shape 作为背景,写出android 各种效果。在android drawable 文件夹中新建一个.xml 文件,选择shape 作为 根元素。
shape 包括的属性有:
android:type 形状四种:rectangle,oval,linear,ring
android:visible 表示drawable 初始化时的visible 属性
android:dither 表示抖动,当图片显示像素比较低时,还能有比较好的效果。这个说的貌似更加详细:http://blog.csdn.net/superjunjin/article/details/7670864
下面四个都是用于圆环的。
android:innerRadiusRatio=""
android:thicknessRatio=""
android:thickness=""
android:innerRadius=""
shape 可以选择的子元素有
1.gradient 表示渐变效果。gradient 所有的属性如下:
android:type 渐变类型,linear,radius(放射),sweep。
android:startColor
android:centerColor
android:endColor //结束颜色
android:gradientRadius 放射的半径(超过了这个半径的区域就为endColor 的颜色了)。
android:centerX 表示中间位置。1表示最大x轴终点,0.5 表示x轴中点。0表示x轴起点。,
android:centerY 同上。
android:uselevel 暂时不知道什么意思。不过设置了true 后,下面这段就会报异常,默认是false 。使用type 为sweep 时,效果会相反方向。
android:angle 角度,主要用于linear 渐变,表示渐变的起始位置,radius 是没有效果。只能为90 的倍数。0-270 分别代表左,下,右,上,逆时针。
<shape xmlns:android="http://schemas.android.com/apk/res/android" >
<gradient
android:type="radial"
android:startColor="#406fde" //图中对应颜色更浅的部分
android:centerColor="#2758c9"
android:endColor="#1447bf" //图中颜色深的部分
android:centerX="0.5"
android:centerY="0.5"
android:useLevel="false"
android:gradientRadius="300"
/>
<!--
<solid android:color="#1447bf"/>
使用gradient 就别用solid 了。否则就全部为填充了。
android:gradientRadius 一般跟radial 一起使用 -->
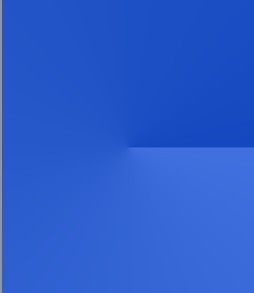
</shape>上面的效果如下:中间蓝色浅颜色值为#406fde

将上面的type 改成sweep 后的效果如下:
type 为linear 。angle=90 的效果。浅蓝色在下面

2.solid 表示填充颜色 。如果使用了solid 那么渐变效果可能就没了。
只有一个属性 : color 如果不设置solid 的话,背景貌似是没有任何颜色。可能默认的为透明的。
3.corners 表示shape 为长方形的圆角,其包括以下属性:
radius
topLeft,topRight,bottomLeft,bottomRight radius 4个,这个就是四个角。
4.padding 这个很容明白。跟布局里面的padding是一样的,四个方向,上下左右四个属性,留出多少位置
5.size 包括两个属性width 和height 表示 shape 的长和宽
6.stroke 表示表示描边
android:width 表示边的宽度
android:color 表示边的颜色
android:dashWith 设置描边为虚线 “- - - ” 表示那条短线的长度。不加dash 属性的话,就不是虚线,效果如下

对应的代码如下:
<?xml version="1.0" encoding="utf-8"?>
<shape xmlns:android="http://schemas.android.com/apk/res/android" >
    <gradient
        android:type="radial"

        android:startColor="#406fde"
        android:centerColor="#2758c9"
        android:endColor="@color/base_color"
   		android:centerX="0.5"
   		android:centerY="0.5"
   		android:useLevel="false"
   		android:angle="270"
   		android:gradientRadius="300"
        />

    <stroke
        android:width="6dp"
        android:color="#ff0000"
        android:dashWidth="4dp"
        android:dashGap="1dp"/>
	<!--  #ff0000 红色

		<solid android:color="@color/base_color"/>
			使用gradient 就别用solid 了。否则就全部为填充了。
		android:gradientRadius    一般跟radial 一起使用  -->
</shape>


 463
463

 被折叠的 条评论
为什么被折叠?
被折叠的 条评论
为什么被折叠?
 到【灌水乐园】发言


