


LeakCanary是一个监测内测泄露的工具,源码地址 https://github.com/square/leakcanary
Android使用方法:
在build.gradle文件中添加
 dependencies {
   debugCompile 'com.squareup.leakcanary:leakcanary-android:1.4-beta2'
   releaseCompile 'com.squareup.leakcanary:leakcanary-android-no-op:1.4-beta2'
   testCompile 'com.squareup.leakcanary:leakcanary-android-no-op:1.4-beta2'
 }
在Application类里引入LeakCanary.install函数
public class ExampleApplication extends Application {
@Override public void onCreate() {
super.onCreate();
LeakCanary.install(this);
}
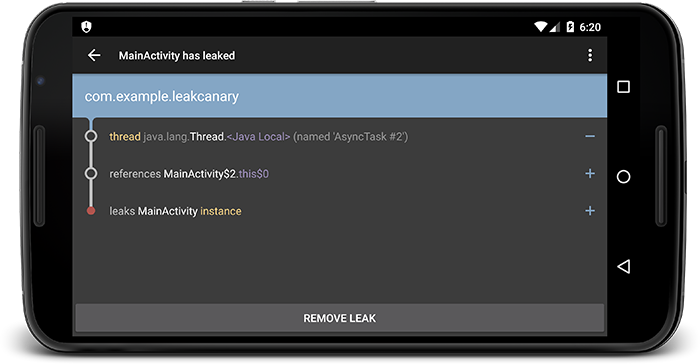
}当出现内存泄漏时,通知栏会弹出通知,点击之后出现详细的内存泄漏信息activity
具体源码分析:
1.先进入LeakCanary.install函数
 /**
   * Creates a {@link RefWatcher} that works out of the box, and           starts watching activity
   * references (on ICS+).
   */
  public static RefWatcher install(Application application) {
    return install(application, DisplayLeakService.class,
        AndroidExcludedRefs.createAppDefaults().build());
  }

  /**
   * Creates a {@link RefWatcher} that reports results to the provided service, and starts watching
   * activity references (on ICS+).
   */
  public static RefWatcher install(Application application,
      Class<? extends AbstractAnalysisResultService> listenerServiceClass,
      ExcludedRefs excludedRefs) {
    if (isInAnalyzerProcess(application)) {
      return RefWatcher.DISABLED;
    }
    enableDisplayLeakActivity(application);
    HeapDump.Listener heapDumpListener =
        new ServiceHeapDumpListener(application, listenerServiceClass);
    RefWatcher refWatcher = androidWatcher(application, heapDumpListener, excludedRefs);
    ActivityRefWatcher.installOnIcsPlus(application, refWatcher);
    return refWatcher;
  }
DisplayLeakService.java类负责显示内存泄漏发生的状况,AndroidExcludedRefs.java中可以查看到 一个已知问题的忽略列表,就是说如果发现AndroidExcludedRefs.java类中维护的列表类的内存泄漏,那么在DisplayLeakService并不会显示出来,同时HeapAnalyzer在计算到GC roots的最短强引用路径,也会忽略这些类。
2.isInAnalyzerProcess函数
 /**
   * Whether the current process is the process running the {@link HeapAnalyzerService}, which is
   * a different process than the normal app process.
   */
  public static boolean isInAnalyzerProcess(Context context) {
    return isInServiceProcess(context, HeapAnalyzerService.class);
  }
调用LeakCanaryInternals类的isInServiceProcess函数
public static boolean isInServiceProcess(Context context, Class<? extends Service> serviceClass) {
    PackageManager packageManager = context.getPackageManager();
    PackageInfo packageInfo;
    try {
      packageInfo = packageManager.getPackageInfo(context.getPackageName(), GET_SERVICES);
    } catch (Exception e) {
      CanaryLog.d(e, "Could not get package info for %s", context.getPackageName());
      return false;
    }
    String mainProcess = packageInfo.applicationInfo.processName;

    ComponentName component = new ComponentName(context, serviceClass);
    ServiceInfo serviceInfo;
    try {
      serviceInfo = packageManager.getServiceInfo(component, 0);
    } catch (PackageManager.NameNotFoundException ignored) {
      // Service is disabled.
      return false;
    }

    if (serviceInfo.processName.equals(mainProcess)) {
      CanaryLog.d("Did not expect service %s to run in main process %s", serviceClass, mainProcess);
      // Technically we are in the service process, but we're not in the service dedicated process.
      return false;
    }

    int myPid = android.os.Process.myPid();
    ActivityManager activityManager =
        (ActivityManager) context.getSystemService(Context.ACTIVITY_SERVICE);
    ActivityManager.RunningAppProcessInfo myProcess = null;
    List<ActivityManager.RunningAppProcessInfo> runningProcesses =
        activityManager.getRunningAppProcesses();
    if (runningProcesses != null) {
      for (ActivityManager.RunningAppProcessInfo process : runningProcesses) {
        if (process.pid == myPid) {
          myProcess = process;
          break;
        }
      }
    }
    if (myProcess == null) {
      CanaryLog.d("Could not find running process for %d", myPid);
      return false;
    }

    return myProcess.processName.equals(serviceInfo.processName);
  }
本函数用于检测传入的参数serviceClass所在的进程是否是服务进程,而不是主进程。首先判断packageInfo.applicationInfo.processName是否和serviceClass所在的进程名相等。然后得到当前进程的pid,遍历目前正在运行的进程,判断pid是否相等,得到当前进程的实例对象,判断是否与serviceClass的所在进程名相等,不在则返回false。
isInAnalyzerProcess函数主要用于判断HeapAnalyzerService函数是否运行在服务进程中,不是则不再执行leakCanary.install函数。
3.enableDisplayLeakActivity(application)函数
public static void enableDisplayLeakActivity(Context context) {
    setEnabled(context, DisplayLeakActivity.class, true);
  }
使能DisplayLeakActivity.class,在Lancher显示LeakCanary图标
4.接下了创建一个heapDumpListener和refWatcher,具体有什么作用,下面的内容会介绍
5.进入 ActivityRefWatcher.installOnIcsPlus函数
  public static void installOnIcsPlus(Application application, RefWatcher refWatcher) {
    if (SDK_INT < ICE_CREAM_SANDWICH) {
      // If you need to support Android < ICS, override onDestroy() in your base activity.
      return;
    }
    ActivityRefWatcher activityRefWatcher = new ActivityRefWatcher(application, refWatcher);
    activityRefWatcher.watchActivities();
  }
new出来一个activityRefWatcher并传入application, refWatcher参数
6.进入activityRefWatcher.watchActivities()
public void watchActivities() {
    // Make sure you don't get installed twice.
    stopWatchingActivities();
    application.registerActivityLifecycleCallbacks(lifecycleCallbacks);
  }

  public void stopWatchingActivities() {
    application.unregisterActivityLifecycleCallbacks(lifecycleCallbacks);
  }
这里注册activity生命周期监听函数
7.让我们来看看它在生命周期监听函数里做了什么
 private final Application.ActivityLifecycleCallbacks lifecycleCallbacks =
      new Application.ActivityLifecycleCallbacks() {
        @Override public void onActivityCreated(Activity activity, Bundle savedInstanceState) {
        }

        @Override public void onActivityStarted(Activity activity) {
        }

        @Override public void onActivityResumed(Activity activity) {
        }

        @Override public void onActivityPaused(Activity activity) {
        }

        @Override public void onActivityStopped(Activity activity) {
        }

        @Override public void onActivitySaveInstanceState(Activity activity, Bundle outState) {
        }

        @Override public void onActivityDestroyed(Activity activity) {
          ActivityRefWatcher.this.onActivityDestroyed(activity);
        }
      };
可以看出关键的函数在onActivityDestroyed监听onDestory()函数里
8.进入 ActivityRefWatcher.this.onActivityDestroyed(activity)
 void onActivityDestroyed(Activity activity) {
    refWatcher.watch(activity);
  }
进入关键函数了,LeakCanary在每个Activity的生命周期onDestory函数里对activity对象进行监听,以此确实这个acitivity是否存在内存泄漏的问题。refWatcher就是刚才传入的RefWatcher实例。
9.进入到生成RefWatcher的LeakCanary.androidWatcher函数
 /**
   * Creates a {@link RefWatcher} with a default configuration suitable for Android.
   */
  public static RefWatcher androidWatcher(Context context, HeapDump.Listener heapDumpListener,
      ExcludedRefs excludedRefs) {
    LeakDirectoryProvider leakDirectoryProvider = new DefaultLeakDirectoryProvider(context);
    DebuggerControl debuggerControl = new AndroidDebuggerControl();
    AndroidHeapDumper heapDumper = new AndroidHeapDumper(context, leakDirectoryProvider);
    heapDumper.cleanup();
    Resources resources = context.getResources();
    int watchDelayMillis = resources.getInteger(R.integer.leak_canary_watch_delay_millis);
    AndroidWatchExecutor executor = new AndroidWatchExecutor(watchDelayMillis);
    return new RefWatcher(executor, debuggerControl, GcTrigger.DEFAULT, heapDumper,
        heapDumpListener, excludedRefs);
  }
androidWatcher函数在这里new出来了debuggerControl,heapDumper,executor这些对象,这些对象是做什么的,接下来有介绍,把这些参数传进new出来的RefWatcher的对象里,这个RefWatcher对象就是第8步里的refWatcher对象,接下来我们看看第8步里具体的refWatcher.watch执行过程
10.RefWatcher.watch函数,从这个函数来分析监听对象是否能被回收
/**
   * Identical to {@link #watch(Object, String)} with an empty string reference name.
   *
   * @see #watch(Object, String)
   */
  public void watch(Object watchedReference) {
    watch(watchedReference, "");
  }

  /**
   * Watches the provided references and checks if it can be GCed. This method is non blocking,
   * the check is done on the {@link Executor} this {@link RefWatcher} has been constructed with.
   *
   * @param referenceName An logical identifier for the watched object.
   */
  public void watch(Object watchedReference, String referenceName) {
    checkNotNull(watchedReference, "watchedReference");
    checkNotNull(referenceName, "referenceName");
    if (debuggerControl.isDebuggerAttached()) {
      return;
    }
    final long watchStartNanoTime = System.nanoTime();
    String key = UUID.randomUUID().toString();
    retainedKeys.add(key);
    final KeyedWeakReference reference =
        new KeyedWeakReference(watchedReference, key, referenceName, queue);

    watchExecutor.execute(new Runnable() {
      @Override public void run() {
        ensureGone(reference, watchStartNanoTime);
      }
    });
  }
debuggerControl就是第9步new出来的AndroidDebuggerControl,其isDebuggerAttached()的实现就是判断是不是在连接了debug调试。如果连接了debug调试,则停止watch。
生成对一个Refercen产生一个唯一的key对象,系统nanoTime的watchStartNanoTime对象,并把key对象加入一个叫retainedKeys的全局Set集。并且将传入此函数的watchedReference,referenceName以及key,queue对象传入KeyedWeakReference生成一个名为reference的弱引用对象。
最后在线程池里运行ensureGone函数,ensureGone函数的参数是reference和watchStartNanoTime对象,线程池为第9步new出来的AndroidWatchExecutor对象
11.ensureGone函数
 void ensureGone(KeyedWeakReference reference, long watchStartNanoTime) {
    long gcStartNanoTime = System.nanoTime();

    long watchDurationMs = NANOSECONDS.toMillis(gcStartNanoTime - watchStartNanoTime);
    removeWeaklyReachableReferences();
    if (gone(reference) || debuggerControl.isDebuggerAttached()) {
      return;
    }
    gcTrigger.runGc();
    removeWeaklyReachableReferences();
    if (!gone(reference)) {
      long startDumpHeap = System.nanoTime();
      long gcDurationMs = NANOSECONDS.toMillis(startDumpHeap - gcStartNanoTime);

      File heapDumpFile = heapDumper.dumpHeap();

      if (heapDumpFile == HeapDumper.NO_DUMP) {
        // Could not dump the heap, abort.
        return;
      }
      long heapDumpDurationMs = NANOSECONDS.toMillis(System.nanoTime() - startDumpHeap);
      heapdumpListener.analyze(
          new HeapDump(heapDumpFile, reference.key, reference.name, excludedRefs, watchDurationMs,
              gcDurationMs, heapDumpDurationMs));
    }
  }
函数首先调用removeWeaklyReachableReferences函数,移除retainedKeys中所有包含所有queue全局变量key的子项,然后使用gone函数判断引用对象是否能被gc,如果没有,使用gcTrigger.runGc()强制执行一边gc,在调用 removeWeaklyReachableReferences(),再次调用gone函数,让我们来看看removeWeaklyReachableReferences和gone函数的源码
 private boolean gone(KeyedWeakReference reference) {
    return !retainedKeys.contains(reference.key);
  }

 private void removeWeaklyReachableReferences() {
    // WeakReferences are enqueued as soon as the object to which they point to becomes weakly
    // reachable. This is before finalization or garbage collection has actually happened.
    KeyedWeakReference ref;
    while ((ref = (KeyedWeakReference) queue.poll()) != null) {
      retainedKeys.remove(ref.key);
    }
  }
为什么将queue里面的弱引用的key在retainedKeys移除,然后判断retainedKeys是否包含这个key就可以判断这个引用是否能被gc呢?
这是LeakCanary的核心原理,关键在于queue这个全局变量
  private final ReferenceQueue<Object> queue;
   public RefWatcher(Executor watchExecutor, DebuggerControl debuggerControl, GcTrigger gcTrigger,

    ......

    queue = new ReferenceQueue<>();
  }
第10步将queue作为KeyedWeakReference的构造参数传入,ReferenceQueue是作为 JVM GC与上层Reference对象管理之间的一个消息传递方式, 软引用、弱引用等的入队操作有vm的gc直接操作,retainedKeys 代表没被gc 回收的对象, 而queue中的弱引用代表的是被gc了的对象,通过这两个结构监控对象是不是被回收了。retainedKeys存放了RefWatcher为每个被监控的对象生成的唯一key。同时每个被监控对象的弱引用(KeyedWeakReference)关联了 其对应的key 和 queue,这样对象若被回收,则其对应的弱引用会被入队到queue中。removeWeaklyReachableReferences(..)所做的就是把存在与queue中的弱引用的key 从 retainedKeys 中删除。这样在gone函数中检测retainedKeys是否包含key就能检测出是否被gc了。
接下来,使用heapDumper.dumpHeap()产生一个dump文件,heapDumper为第9步生成的new AndroidHeapDumper的heapDumper参数其具体实现将Debug.dumpHprofData的数据保存到文件里。
接下来使用 heapdumpListener.analyze对dump文件进行分析,heapdumpListener为第一步里面的ServiceHeapDumpListener类。
12.进入ServiceHeapDumpListener.analyze函数
 @Override public void analyze(HeapDump heapDump) {
    checkNotNull(heapDump, "heapDump");
    HeapAnalyzerService.runAnalysis(context, heapDump, listenerServiceClass);
  }
进入到HeapAnalyzerService.runAnalysis中
  public static void runAnalysis(Context context, HeapDump heapDump,
      Class<? extends AbstractAnalysisResultService> listenerServiceClass) {
    Intent intent = new Intent(context, HeapAnalyzerService.class);
    intent.putExtra(LISTENER_CLASS_EXTRA, listenerServiceClass.getName());
    intent.putExtra(HEAPDUMP_EXTRA, heapDump);
    context.startService(intent);
  }
调用HeapAnalyzerService解析dump文件,HeapAnalyzerService在另外一个进程空间里运行,来看AndroidManifest文件
   <service
        android:name=".internal.HeapAnalyzerService"
        android:process=":leakcanary"
        android:enabled="false"
        />
android:process表明其在单独的leakcanary进程运行
HeapAnalyzerService里的具体操作函数
  @Override protected void onHandleIntent(Intent intent) {
    if (intent == null) {
      CanaryLog.d("HeapAnalyzerService received a null intent, ignoring.");
      return;
    }
    String listenerClassName = intent.getStringExtra(LISTENER_CLASS_EXTRA);
    HeapDump heapDump = (HeapDump) intent.getSerializableExtra(HEAPDUMP_EXTRA);

    HeapAnalyzer heapAnalyzer = new HeapAnalyzer(heapDump.excludedRefs);

    AnalysisResult result = heapAnalyzer.checkForLeak(heapDump.heapDumpFile, heapDump.referenceKey);
    AbstractAnalysisResultService.sendResultToListener(this, listenerClassName, heapDump, result);
  }
heapAnalyzer.checkForLeak对其进行具体分析
AbstractAnalysisResultService.sendResultToListener将结果抛出。
12.进入heapAnalyzer.checkForLeak
 /**
   * Searches the heap dump for a {@link KeyedWeakReference} instance with the corresponding key,
   * and then computes the shortest strong reference path from that instance to the GC roots.
   */
  public AnalysisResult checkForLeak(File heapDumpFile, String referenceKey) {
    long analysisStartNanoTime = System.nanoTime();

    if (!heapDumpFile.exists()) {
      Exception exception = new IllegalArgumentException("File does not exist: " + heapDumpFile);
      return failure(exception, since(analysisStartNanoTime));
    }

    try {
      HprofBuffer buffer = new MemoryMappedFileBuffer(heapDumpFile);
      HprofParser parser = new HprofParser(buffer);
      Snapshot snapshot = parser.parse();
      deduplicateGcRoots(snapshot);

      Instance leakingRef = findLeakingReference(referenceKey, snapshot);

      // False alarm, weak reference was cleared in between key check and heap dump.
      if (leakingRef == null) {
        return noLeak(since(analysisStartNanoTime));
      }

      return findLeakTrace(analysisStartNanoTime, snapshot, leakingRef);
    } catch (Throwable e) {
      return failure(e, since(analysisStartNanoTime));
    }
  }
这一部分包含很多函数,主要是使用haha这库对dump文件进行分析,分析其中是否有还可达的对象,这一部分不在这里具体分析,想要弄清楚的童鞋去看源码吧。
13.当分析出结果后,使用AbstractAnalysisResultService.sendResultToListener抛出结果
 public static void sendResultToListener(Context context, String listenerServiceClassName,
      HeapDump heapDump, AnalysisResult result) {
    Class<?> listenerServiceClass;
    try {
      listenerServiceClass = Class.forName(listenerServiceClassName);
    } catch (ClassNotFoundException e) {
      throw new RuntimeException(e);
    }
    Intent intent = new Intent(context, listenerServiceClass);
    intent.putExtra(HEAP_DUMP_EXTRA, heapDump);
    intent.putExtra(RESULT_EXTRA, result);
    context.startService(intent);
  }
使用intent把结果抛给主进程,其中的listenerServiceClassName的service就是传入ServiceHeapDumpListener的DisplayLeakService.class的name
14.DisplayLeakService里对传过来的结果的处理函数
@Override protected final void onHeapAnalyzed(HeapDump heapDump, AnalysisResult result) {
    String leakInfo = leakInfo(this, heapDump, result, true);
    CanaryLog.d(leakInfo);

    boolean resultSaved = false;
    boolean shouldSaveResult = result.leakFound || result.failure != null;
    if (shouldSaveResult) {
      heapDump = renameHeapdump(heapDump);
      resultSaved = saveResult(heapDump, result);
    }

    PendingIntent pendingIntent;
    String contentTitle;
    String contentText;

    if (!shouldSaveResult) {
      contentTitle = getString(R.string.leak_canary_no_leak_title);
      contentText = getString(R.string.leak_canary_no_leak_text);
      pendingIntent = null;
    } else if (resultSaved) {
      pendingIntent = DisplayLeakActivity.createPendingIntent(this, heapDump.referenceKey);

      if (result.failure == null) {
        String size = formatShortFileSize(this, result.retainedHeapSize);
        String className = classSimpleName(result.className);
        if (result.excludedLeak) {
          contentTitle = getString(R.string.leak_canary_leak_excluded, className, size);
        } else {
          contentTitle = getString(R.string.leak_canary_class_has_leaked, className, size);
        }
      } else {
        contentTitle = getString(R.string.leak_canary_analysis_failed);
      }
      contentText = getString(R.string.leak_canary_notification_message);
    } else {
      contentTitle = getString(R.string.leak_canary_could_not_save_title);
      contentText = getString(R.string.leak_canary_could_not_save_text);
      pendingIntent = null;
    }
    showNotification(this, contentTitle, contentText, pendingIntent);
    afterDefaultHandling(heapDump, result, leakInfo);
  }
这个函数里主要是判断传来的结果有没有找到内存泄漏,如果找到的话把泄漏信息保存到文件,然后使用DisplayLeakActivity.createPendingIntent生成pendingIntent,然后发生通知到系统,DisplayLeakActivity.createPendingIntent里指明了点击通知会进入DisplayLeakActivity,DisplayLeakActivity会显示泄漏的一些具体信息。
LeakCanary的主要内容,到这里就分析完了,有什么错漏请大家批评指正。


 1568
1568

 被折叠的 条评论
为什么被折叠?
被折叠的 条评论
为什么被折叠?
 到【灌水乐园】发言


