


读spring 的源码还是需要跟着debug下来才比较容易理解,如果有什么意见或者发现错误,多谢指正:
入口 main
public static void main(String[] args) {
        AnnotationConfigApplicationContext context = new AnnotationConfigApplicationContext(MainConfig.class);
    }
new AnnotationConfigApplicationContext(MainConfig.class);如下:篇幅有点大,这篇先说明this()的作用。
public AnnotationConfigApplicationContext(Class<?>... annotatedClasses) {
		this();
		register(annotatedClasses);
		refresh();
	}
在new AnnotationConfigApplicationContext()之前this();执行要先去父类实例化父类
父类如下图所示:

①、实例化父类DefaultResourceLoader() 获取当前线程的classLoader
public DefaultResourceLoader() {
		this.classLoader = ClassUtils.getDefaultClassLoader();
	}
②、实例化父类AbstractApplicationContext() 中返回PathMatchingResourcePatternResolver可以用来解析资源文件,主要是用来解析类路径下的资源文件。当然它也可以用来解析其它资源文件,如基于文件系统的本地资源文件。具体查看: https://blog.csdn.net/elim168/article/details/78197596.
public AbstractApplicationContext() {
		this.resourcePatternResolver = getResourcePatternResolver();
	}
③、实例化父类GenericApplicationContext()new DefaultListableBeanFactory() 返回的beanFactory就是我们需要得到的bean工厂容器。
public GenericApplicationContext() {
		this.beanFactory = new DefaultListableBeanFactory();
	}
DefaultListableBeanFactory的继承关系如下图所示:
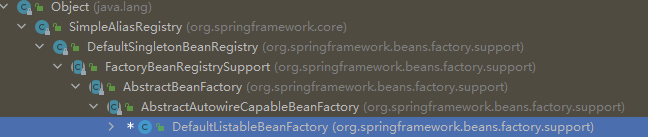
I、实例化父类AbstractAutowireCapableBeanFactory,添加BeanNameAware、BeanFactoryAware、BeanClassLoaderAware到ignoredDependencyInterfaces
public AbstractAutowireCapableBeanFactory() {
		super();
		ignoreDependencyInterface(BeanNameAware.class);
		ignoreDependencyInterface(BeanFactoryAware.class);
		ignoreDependencyInterface(BeanClassLoaderAware.class);
	}
============================================================================================================================================================
至此new AnnotationConfigApplicationContext()的所有父类都实例化完成回到初始的实例化对象构造函数里,忘记请看new AnnotationConfigApplicationContext()
this(); 创建一个读取注解的Bean定义读取器(这里面首次出现了BeanDefinition这个类. Spring的BeanDefinition相当于Java的Class)和创建BeanDefinition扫描器
public AnnotationConfigApplicationContext() {
		/**
		 * 创建一个读取注解的Bean定义读取器
		 * 什么是bean定义?BeanDefinition
		 *
		 * 完成了spring内部BeanDefinition的注册(主要是后置处理器)
		 */
		this.reader = new AnnotatedBeanDefinitionReader(this);

		/**
		 * 创建BeanDefinition扫描器
		 * 可以用来扫描包或者类,继而转换为BeanDefinition
		 *
		 * spring默认的扫描器其实不是这个scanner对象
		 * 而是在后面自己又重新new了一个ClassPathBeanDefinitionScanner
		 * spring在执行工程后置处理器ConfigurationClassPostProcessor时,去扫描包时会new ClassPathBeanDefinitionScanner()
		 *
		 * 这里的scanner仅仅是为了程序员可以手动调用AnnotationConfigApplicationContext对象的scan方法
		 *
		 */
		this.scanner = new ClassPathBeanDefinitionScanner(this);
	}
①、AnnotatedBeanDefinitionReader(this)
作用是创建一个读取注解的Bean定义读取器、完成了spring内部BeanDefinition(主要是后置处理器)的注册,代码如下
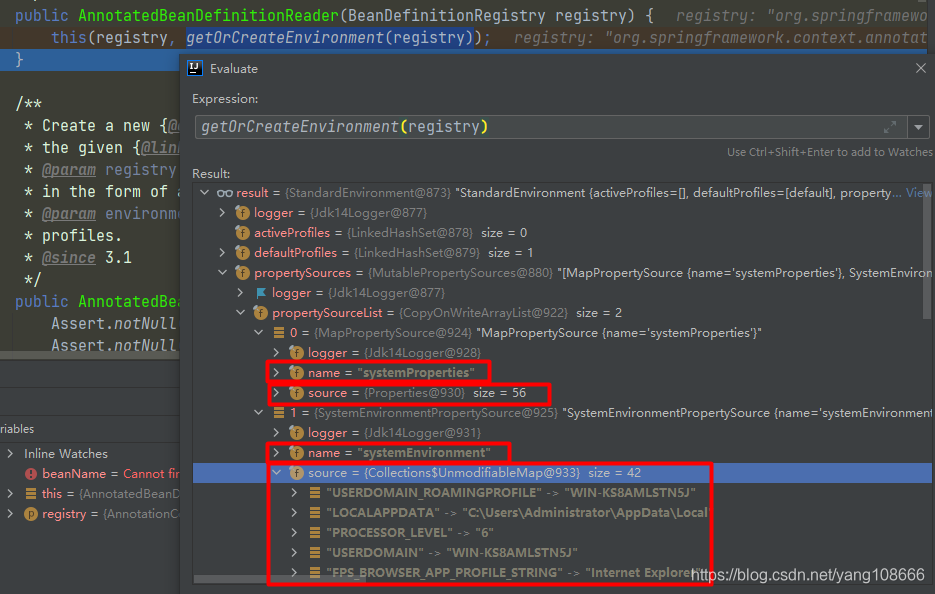
public AnnotatedBeanDefinitionReader(BeanDefinitionRegistry registry) {
		this(registry, getOrCreateEnvironment(registry));
	}
getOrCreateEnvironment(registry)将会获取系统中的参数放入到 StandardEnvironment()中,并返回StandardEnvironment对象。
接下来进入到方法中的registerAnnotationConfigProcessors(BeanDefinitionRegistry registry, Object source) 该方法完成了spring内部BeanDefinition的注册(主要是后置处理器),代码如下,注意看代码中的中文注解:
public static Set<BeanDefinitionHolder> registerAnnotationConfigProcessors(
			BeanDefinitionRegistry registry, Object source) {
		/**
		 获取beanFactory也就是DefaultListableBeanFactory
		 **/
		DefaultListableBeanFactory beanFactory = unwrapDefaultListableBeanFactory(registry);
		if (beanFactory != null) {
			if (!(beanFactory.getDependencyComparator() instanceof AnnotationAwareOrderComparator)) {
			/**
				 * AnnotationAwareOrderComparator主要能解析@Order和@Priority
				 */
				beanFactory.setDependencyComparator(AnnotationAwareOrderComparator.INSTANCE);
			}
			if (!(beanFactory.getAutowireCandidateResolver() instanceof ContextAnnotationAutowireCandidateResolver)) {
			/**
				 * ContextAnnotationAutowireCandidateResolver提供处理延迟加载的功能
				 */
				beanFactory.setAutowireCandidateResolver(new ContextAnnotationAutowireCandidateResolver());
			}
		}

		/**beanDefs 在这里没什么用,主要是registerPostProcessor这里添加的这些后置处理器**/
		Set<BeanDefinitionHolder> beanDefs = new LinkedHashSet<BeanDefinitionHolder>(8);

		-- 注册ConfigurationAnnotationProcessor,很重要,spring启动的时候配置动态beanDefinition都在这个类上做。
		if (!registry.containsBeanDefinition(CONFIGURATION_ANNOTATION_PROCESSOR_BEAN_NAME)) {
			RootBeanDefinition def = new RootBeanDefinition(ConfigurationClassPostProcessor.class);
			def.setSource(source);
			beanDefs.add(registerPostProcessor(registry, def, CONFIGURATION_ANNOTATION_PROCESSOR_BEAN_NAME));
		}

		// 注册AutowiredAnnotationBeanPostProcessor
		if (!registry.containsBeanDefinition(AUTOWIRED_ANNOTATION_PROCESSOR_BEAN_NAME)) {
			RootBeanDefinition def = new RootBeanDefinition(AutowiredAnnotationBeanPostProcessor.class);
			def.setSource(source);
			beanDefs.add(registerPostProcessor(registry, def, AUTOWIRED_ANNOTATION_PROCESSOR_BEAN_NAME));
		}

		// 注册RequiredAnnotationBeanPostProcessor
		if (!registry.containsBeanDefinition(REQUIRED_ANNOTATION_PROCESSOR_BEAN_NAME)) {
			RootBeanDefinition def = new RootBeanDefinition(RequiredAnnotationBeanPostProcessor.class);
			def.setSource(source);
			beanDefs.add(registerPostProcessor(registry, def, REQUIRED_ANNOTATION_PROCESSOR_BEAN_NAME));
		}

		// Check for JSR-250 support, and if present add the CommonAnnotationBeanPostProcessor.
		// 注册CommonAnnotationBeanPostProcessor
		if (jsr250Present && !registry.containsBeanDefinition(COMMON_ANNOTATION_PROCESSOR_BEAN_NAME)) {
			RootBeanDefinition def = new RootBeanDefinition(CommonAnnotationBeanPostProcessor.class);
			def.setSource(source);
			beanDefs.add(registerPostProcessor(registry, def, COMMON_ANNOTATION_PROCESSOR_BEAN_NAME));
		}

		// Check for JPA support, and if present add the PersistenceAnnotationBeanPostProcessor.
		if (jpaPresent && !registry.containsBeanDefinition(PERSISTENCE_ANNOTATION_PROCESSOR_BEAN_NAME)) {
			RootBeanDefinition def = new RootBeanDefinition();
			try {
				def.setBeanClass(ClassUtils.forName(PERSISTENCE_ANNOTATION_PROCESSOR_CLASS_NAME,
						AnnotationConfigUtils.class.getClassLoader()));
			}
			catch (ClassNotFoundException ex) {
				throw new IllegalStateException(
						"Cannot load optional framework class: " + PERSISTENCE_ANNOTATION_PROCESSOR_CLASS_NAME, ex);
			}
			def.setSource(source);
			beanDefs.add(registerPostProcessor(registry, def, PERSISTENCE_ANNOTATION_PROCESSOR_BEAN_NAME));
		}

		// 注册EventListenerMethodProcessor
		if (!registry.containsBeanDefinition(EVENT_LISTENER_PROCESSOR_BEAN_NAME)) {
			RootBeanDefinition def = new RootBeanDefinition(EventListenerMethodProcessor.class);
			def.setSource(source);
			beanDefs.add(registerPostProcessor(registry, def, EVENT_LISTENER_PROCESSOR_BEAN_NAME));
		}
		// 注册DefaultEventListenerFactory
		if (!registry.containsBeanDefinition(EVENT_LISTENER_FACTORY_BEAN_NAME)) {
			RootBeanDefinition def = new RootBeanDefinition(DefaultEventListenerFactory.class);
			def.setSource(source);
			beanDefs.add(registerPostProcessor(registry, def, EVENT_LISTENER_FACTORY_BEAN_NAME));
		}

		return beanDefs;
	}
说说上面的代码:
a、 注册ConfigurationAnnotationProcessor
if (!registry.containsBeanDefinition(CONFIGURATION_ANNOTATION_PROCESSOR_BEAN_NAME)) {
	RootBeanDefinition def = new RootBeanDefinition(ConfigurationClassPostProcessor.class);
	def.setSource(source);
	beanDefs.add(registerPostProcessor(registry, def, CONFIGURATION_ANNOTATION_PROCESSOR_BEAN_NAME));
}
registerPostProcessor(registry, def, ****)方法:
=================AnnotationConfigUtils.java=================
private static BeanDefinitionHolder registerPostProcessor(
	BeanDefinitionRegistry registry, RootBeanDefinition definition, String beanName) {

	definition.setRole(BeanDefinition.ROLE_INFRASTRUCTURE);
	registry.registerBeanDefinition(beanName, definition);
	return new BeanDefinitionHolder(definition, beanName);
}

=================GenericApplicationContext.java=================
public void registerBeanDefinition(String beanName, BeanDefinition beanDefinition)
		throws BeanDefinitionStoreException {
	this.beanFactory.registerBeanDefinition(beanName, beanDefinition);
}

=================DefaultListableBeanFactory.java=================
public void registerBeanDefinition(String beanName, BeanDefinition beanDefinition)
		throws BeanDefinitionStoreException {
		// Still in startup registration phase
		this.beanDefinitionMap.put(beanName, beanDefinition);
		this.beanDefinitionNames.add(beanName);
		this.manualSingletonNames.remove(beanName);
	}

	if (oldBeanDefinition != null || containsSingleton(beanName)) {
		resetBeanDefinition(beanName);
	}
}
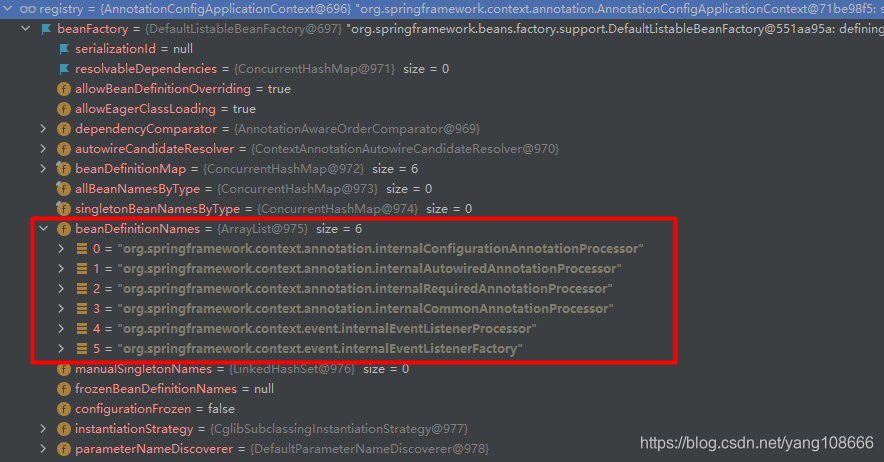
注册bean定义就是把bean定义加入到beanFactory中的beanDefinitionMap和beanDefinitionNames,后面一趴的代码都是注册bean定义的。
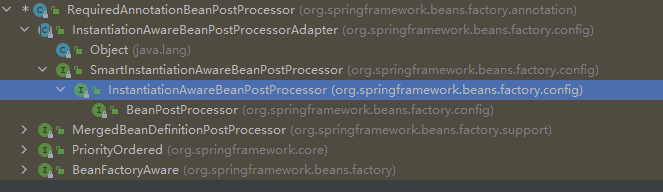
另外ConfigurationAnnotationProcessor这个类也继承了BeanDefinitionRegistryPostProcessor,如下图所示:
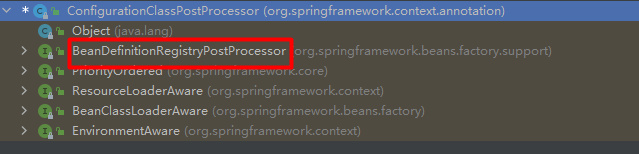
我们看看BeanDefinitionRegistryPostProcessor接口的方法:
public interface BeanDefinitionRegistryPostProcessor extends BeanFactoryPostProcessor {
	void postProcessBeanDefinitionRegistry(BeanDefinitionRegistry registry) throws BeansException;
}
除了继承了BeanFactoryPostProcessor 接口外,还多了postProcessBeanDefinitionRegistry(BeanDefinitionRegistry registry);
这方法里面的BeanDefinitionRegistry提供了丰富的方法来操作BeanDefinition,判断、注册registerBeanDefinition、移除等方法,AnnotationConfigApplicationContext 类也是实现了BeanDefinitionRegistry接口的
BeanDefinitionRegistry接口代码如下所示:
public interface BeanDefinitionRegistry extends AliasRegistry {
	void registerBeanDefinition(String beanName, BeanDefinition beanDefinition)throws BeanDefinitionStoreException;
	void removeBeanDefinition(String beanName) throws NoSuchBeanDefinitionException;
	BeanDefinition getBeanDefinition(String beanName) throws NoSuchBeanDefinitionException;
	boolean containsBeanDefinition(String beanName);
	String[] getBeanDefinitionNames();
	int getBeanDefinitionCount();
	boolean isBeanNameInUse(String beanName);

}
说明一下,BeanFactoryPostProcessor可以修改各个注册的Bean,BeanDefinitionRegistryPostProcessor可以动态将Bean注册。也就是除了xml配置和注解外,代码上实现动态bean注册。
额外话再说多一点:就是平时我们springboot需要什么功能就会有那些@Enablexxxxx的注解,这个注解里面都会有一个@import
注解,例如@EnableAutoConfiguration中的@Import({AutoConfigurationImportSelector.class}),这里其实就会在执行如下代码:
refresh()
—>invokeBeanFactoryPostProcessors()–>invokeBeanDefinitionRegistryPostProcessors()
—>(ConfigurationClassPostProcessor)processConfigBeanDefinitions
—>processImports(configClass, sourceClass, getImports(sourceClass), true);
之后就把@import那些类都加载进来了。
其实就是spring的扩展功能的地方,需要什么功能就由相应的@Enablexxx携带相应的@import导入spring的bean定义中。具体到我们看refresh()方法中的**invokeBeanFactoryPostProcessors()**再讲,
@Enablexxx代码例子如下:
@Target({ElementType.TYPE})
@Retention(RetentionPolicy.RUNTIME)
@Documented
@Inherited
@AutoConfigurationPackage
@Import({AutoConfigurationImportSelector.class})
public @interface EnableAutoConfiguration {
    String ENABLED_OVERRIDE_PROPERTY = "spring.boot.enableautoconfiguration";

    Class<?>[] exclude() default {};

    String[] excludeName() default {};
}
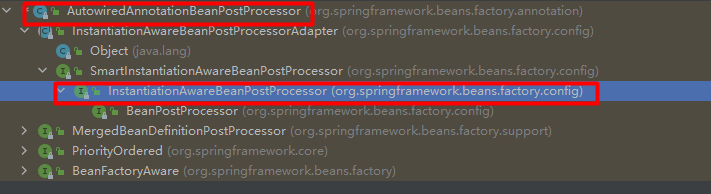
b、注册AutowiredAnnotationBeanPostProcessor
AutowiredAnnotationBeanPostProcessor继承了InstantiationAwareBeanPostProcessor
1.AutowiredAnnotationBeanPostProcessor是BeanPostProcessor的子类,其方法被调用途径:
AbstractAutowireCapableBeanFactory.populateBean->postProcessPropertyValues->findAutowiringMetadata(),查找bean类中的
@Autowired注解的属性与方法。封装成InjectionMetadata对像
2.InjectionMetadata.inject调用。遍历然后根据对像类型调用AutowiredFieldElement与AutowiredMethodElement的inject方法。>在beanFactory中获得相应依赖的对像。如果是field,获得依赖的对像后,通过field.set(bean, value);注入
其中postProcessProperties方法被调用的处理器主要有两个:CommonAnnotationBeanPostProcessor和AutowiredAnnotationBeanPostProcessor。前者处理@Resource注解,后者处理@Autowired注解
c、RequiredAnnotationBeanPostProcessor
RequiredAnnotationBeanPostProcessor也继承了InstantiationAwareBeanPostProcessor
@Required 注解就是 在 RequiredAnnotationBeanPostProcessor 里面 校验是否配置的
在spring5.1 之前如果属性上配置了@Required但是最终在ioc容器中没有找到的是会报错的,
在spring5.1.7.RELEASE 版本 之后就不会报错,只是 返回null

d、CommonAnnotationBeanPostProcessor
顾名思义就是处理一些公共注解的,它是一个bean的后置处理器,可以处理@PostConstruct和@PreDestroy还有@Resource等
提示: 这里有一个jsr250Present校验
private static final boolean jsr250Present =
			ClassUtils.isPresent("javax.annotation.Resource", AnnotationConfigUtils.class.getClassLoader());
e、PersistenceAnnotationBeanPostProcessor
需要对jpa的处理,所以需要引入spring-orm的包,没有引入的话则spring不会注册这个类
private static final boolean jpaPresent =
	ClassUtils.isPresent("javax.persistence.EntityManagerFactory", AnnotationConfigUtils.class.getClassLoader()) &&
	ClassUtils.isPresent(PERSISTENCE_ANNOTATION_PROCESSOR_CLASS_NAME, AnnotationConfigUtils.class.getClassLoader());
//Check for JPA support, and if present add the PersistenceAnnotationBeanPostProcessor.
if (jpaPresent && !registry.containsBeanDefinition(PERSISTENCE_ANNOTATION_PROCESSOR_BEAN_NAME)) {
	RootBeanDefinition def = new RootBeanDefinition();
	try {
		def.setBeanClass(ClassUtils.forName(PERSISTENCE_ANNOTATION_PROCESSOR_CLASS_NAME,
				AnnotationConfigUtils.class.getClassLoader()));
	}
	catch (ClassNotFoundException ex) {
		throw new IllegalStateException(
				"Cannot load optional framework class: " + PERSISTENCE_ANNOTATION_PROCESSOR_CLASS_NAME, ex);
	}
	def.setSource(source);
	beanDefs.add(registerPostProcessor(registry, def, PERSISTENCE_ANNOTATION_PROCESSOR_BEAN_NAME));
}
f、 EventListenerMethodProcessor
这是对@EventListener注解的处理,spring实现事件监听的方式有很多种,其中一种就是在方法上添加@EventListener注解
g、DefaultEventListenerFactory
默认的EventListenerFactory实现,支持常规的EventListener注释。默认情况下用作“catch-all”实现。
所有方法最后都会执行上面已经说过的registerPostProcessor(registry, def, xxxxxxxx))
至此,spring向容器中定义了一下 6个spring bean定义,reder new完毕。
②、new ClassPathBeanDefinitionScanner(this)
public ClassPathBeanDefinitionScanner(BeanDefinitionRegistry registry, boolean useDefaultFilters,
			Environment environment, ResourceLoader resourceLoader) {

		Assert.notNull(registry, "BeanDefinitionRegistry must not be null");
		this.registry = registry;

		if (useDefaultFilters) {
			registerDefaultFilters();
		}
		setEnvironment(environment);
		setResourceLoader(resourceLoader);
	}
上面代码我们只需要关心registerDefaultFilters();
从最终的构造方法我们知道, Scanner在扫描的过程中,会使用过滤策略,并且使用了默认的过滤策略.默认策略就是以下这个方法解析.
protected void registerDefaultFilters() {
    // 扫描@Component注解的类
    this.includeFilters.add(new AnnotationTypeFilter(Component.class));
    ClassLoader cl = ClassPathScanningCandidateComponentProvider.class.getClassLoader();
    try {
        // 扫描所有@ManageBean的类
        this.includeFilters.add(new AnnotationTypeFilter(
                ((Class<? extends Annotation>) ClassUtils.forName("javax.annotation.ManagedBean", cl)), false));
        logger.trace("JSR-250 'javax.annotation.ManagedBean' found and supported for component scanning");
    }
    catch (ClassNotFoundException ex) {
    }
    try {
        // 扫描所有@Named的类
        this.includeFilters.add(new AnnotationTypeFilter(
                ((Class<? extends Annotation>) ClassUtils.forName("javax.inject.Named", cl)), false));
        logger.trace("JSR-330 'javax.inject.Named' annotation found and supported for component scanning");
    }
    catch (ClassNotFoundException ex) {
    }
}
这里的一个知识点:@ManageBean和@Named的作用和@Component是一样的。只是我们通常习惯使用@Component。
为什么这里没有添加默认扫描@Service、@Repository、@Controller呢?原因很简单,这些注解都间接继承了@Component了。到这里,scanner解析完毕,它做的最主要的事情就是添加默认的过滤器策略以便在后续中可以扫描出@Component注解的类。
至此BeanDefinitionScanner实例化完成。this()方法也全部执行完成。


 3481
3481


 被折叠的 条评论
为什么被折叠?
被折叠的 条评论
为什么被折叠?
 到【灌水乐园】发言


