


简介
http://blog.csdn.net/yang786654260/article/details/52613485
ConstraintLayout 字面翻译是 约束布局,是一个 ViewGroup, 可以更加灵活的去布置控件的大小和位置。开发者可以通过支持库在 API 9 及以上使用。有以下几种约束可以使用, 分别是:
Relative positioning
Margins
Centering positioning
Visibility behavior
Dimension constraints
Virtual Helpers objects
1. Relative positioning (相对位置)
跟相对布局类似,可以在水平和垂直两个轴线上约束控件:
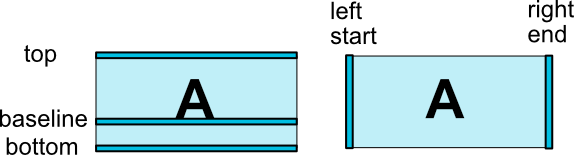
水平轴: Left, Right, Start, End
垂直轴:top, bottom sides,text baseline
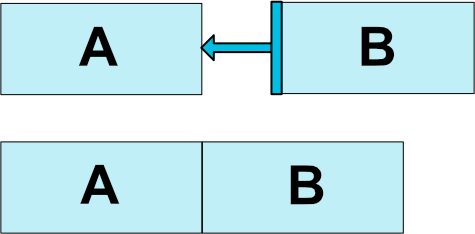
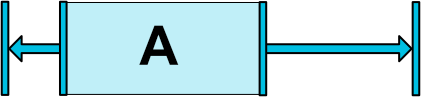
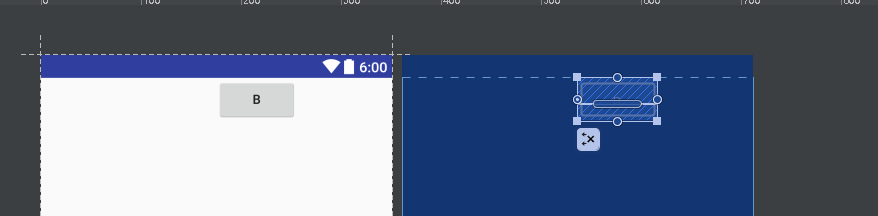
他的思想和 RelativeLayout 的思想差不多,基本一样,都是根据给定的一个控件来放置另一个控件的位置。例如下面这个例子,把 B 控件放到 A 的右面:
布局代码:
<android.support.constraint.ConstraintLayout xmlns:android="http://schemas.android.com/apk/res/android"
    xmlns:app="http://schemas.android.com/apk/res-auto"
    xmlns:tools="http://schemas.android.com/tools"
    android:layout_width="match_parent"
    android:layout_height="match_parent"
    tools:context=".module.shop.ShopFragment">

    <Button
        android:id="@+id/shop_a_btn"
        android:layout_width="wrap_content"
        android:layout_height="wrap_content"
        android:text="A"
        />

    <Button
        android:id="@+id/shop_b_btn"
        android:layout_width="wrap_content"
        android:layout_height="wrap_content"
        android:text="B"
        app:layout_constraintLeft_toRightOf="@+id/shop_a_btn"
        />

</android.support.constraint.ConstraintLayout>
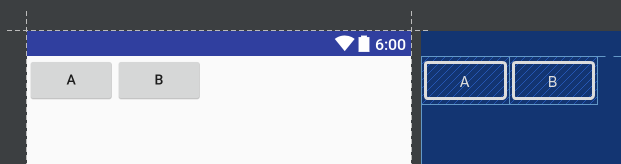
预览图示:
控件的约束条件如下图所示:
各种相对约束的意思都很明显,看名字就知道了, 而且还不用手写,在视图界面拖动连线就行了:
- layout_constraintLeft_toLeftOf
- layout_constraintLeft_toRightOf
- layout_constraintRight_toLeftOf
- layout_constraintRight_toRightOf
- layout_constraintTop_toTopOf
- layout_constraintTop_toBottomOf
- layout_constraintBottom_toTopOf
- layout_constraintBottom_toBottomOf
- layout_constraintBaseline_toBaselineOf
- layout_constraintStart_toEndOf
- layout_constraintStart_toStartOf
- layout_constraintEnd_toStartOf
- layout_constraintEnd_toEndOf
相对控件甚至可以是 ConstraintLayout 父布局:
<android.support.constraint.ConstraintLayout xmlns:android="http://schemas.android.com/apk/res/android"
    xmlns:app="http://schemas.android.com/apk/res-auto"
    xmlns:tools="http://schemas.android.com/tools"
    android:id="@+id/shop_container_cly"
    android:layout_width="match_parent"
    android:layout_height="match_parent"
    tools:context=".module.shop.ShopFragment">

    <Button
        android:id="@+id/shop_a_btn"
        android:layout_width="wrap_content"
        android:layout_height="wrap_content"
        android:text="A"
        app:layout_constraintRight_toLeftOf="@id/shop_container_cly" />

    <Button
        android:id="@+id/shop_b_btn"
        android:layout_width="wrap_content"
        android:layout_height="wrap_content"
        android:text="B"
        app:layout_constraintLeft_toRightOf="@id/shop_container_cly" />

</android.support.constraint.ConstraintLayout>
图示:

2. Margins (间距)
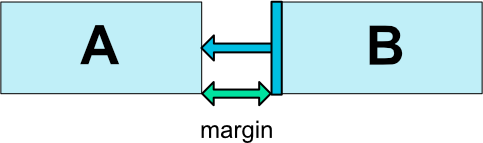
Margins 意如其名,就是设置两个控件的间距。间距的数值只能是 0 或者正数, 设置负数虽然不报错,但是没个毛作用。
- android:layout_marginStart
- android:layout_marginEnd
- android:layout_marginLeft
- android:layout_marginTop
- android:layout_marginRight
- android:layout_marginBottom
更牛的是,他还可以和 gone 掉的 view 约束, 并能设置一个针对 Gone 调的view 的间距,可以使用以下参数:
layout_goneMarginStart
layout_goneMarginEnd
layout_goneMarginLeft
layout_goneMarginTop
layout_goneMarginRight
layout_goneMarginBottom
3. Centering positioning and bias (居中和偏移)
Centering positioning
先看一个叼叼的约束:
<android.support.constraint.ConstraintLayout xmlns:android="http://schemas.android.com/apk/res/android"
    xmlns:app="http://schemas.android.com/apk/res-auto"
    xmlns:tools="http://schemas.android.com/tools"
    android:id="@+id/shop_container_cly"
    android:layout_width="match_parent"
    android:layout_height="match_parent"
    tools:context=".module.shop.ShopFragment">

    <Button
        android:id="@+id/shop_a_btn"
        android:layout_width="wrap_content"
        android:layout_height="wrap_content"
        android:text="A"
        app:layout_constraintLeft_toLeftOf="@id/shop_container_cly"
        app:layout_constraintLeft_toRightOf="@id/shop_container_cly" />

</android.support.constraint.ConstraintLayout>
button 不仅约束在父布局的左边也约束在右边,这肯定不可能,同一时间不能同时满足两边的约束。
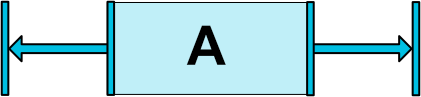
这种情况下,控件会水平居中:
Bias
在上面那种居中的情况下,我想要控件偏向一边,就可以使用如下参数:
layout_constraintHorizontal_bias
layout_constraintVertical_bias
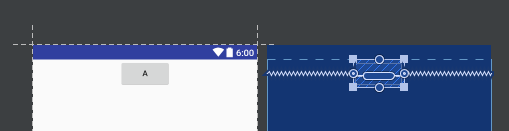
下面的例子是 A 距离父布局左边的距离是整个父布局宽的 70%, B 距离父布局顶部的举例是整个父布局高度的 30%:
<android.support.constraint.ConstraintLayout xmlns:android="http://schemas.android.com/apk/res/android"
    xmlns:app="http://schemas.android.com/apk/res-auto"
    xmlns:tools="http://schemas.android.com/tools"
    android:id="@+id/shop_container_cly"
    android:layout_width="match_parent"
    android:layout_height="match_parent"
    tools:context=".module.shop.ShopFragment">

    <Button
        android:id="@+id/shop_a_btn"
        android:layout_width="wrap_content"
        android:layout_height="wrap_content"
        android:text="A"
        app:layout_constraintHorizontal_bias="0.7"
        app:layout_constraintLeft_toLeftOf="@id/shop_container_cly"
        app:layout_constraintRight_toRightOf="@id/shop_container_cly" />

    <Button
        android:layout_width="wrap_content"
        android:layout_height="wrap_content"
        android:text="B"
        app:layout_constraintBottom_toBottomOf="@id/shop_container_cly"
        app:layout_constraintTop_toTopOf="@id/shop_container_cly"
        app:layout_constraintVertical_bias="0.3" />

</android.support.constraint.ConstraintLayout>
4. Visibility behavior
ConstraintLayout 对 Gone 掉的布局有特殊的处理:
- 宽高尺寸会视作0,在布局中作为一个点存在,而不是消失(其他父布局的处理是,该view 实际宽高尺寸没变,而且不会再布局这个 view),
- Gone掉的 view 的 Margin 的数值都会视为0。

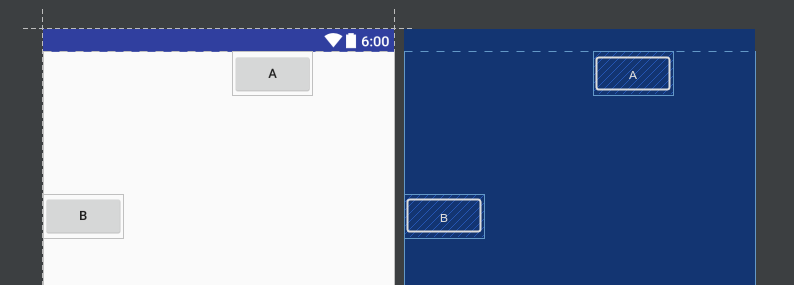
举例 A gone 之前:
<android.support.constraint.ConstraintLayout xmlns:android="http://schemas.android.com/apk/res/android"
    xmlns:app="http://schemas.android.com/apk/res-auto"
    xmlns:tools="http://schemas.android.com/tools"
    android:id="@+id/shop_container_cly"
    android:layout_width="match_parent"
    android:layout_height="match_parent"
    tools:context=".module.shop.ShopFragment">

    <Button
        android:id="@+id/shop_a_btn"
        android:layout_width="wrap_content"
        android:layout_height="wrap_content"
        android:layout_marginLeft="100dp"
        android:layout_marginStart="100dp"
        android:visibility="visible"
        android:text="A"
        app:layout_constraintLeft_toLeftOf="@id/shop_container_cly"
        app:layout_constraintRight_toRightOf="@id/shop_container_cly"
         />

    <Button
        android:id="@+id/shop_b_btn"
        android:layout_width="wrap_content"
        android:layout_height="wrap_content"
        android:text="B"
        app:layout_constraintLeft_toRightOf="@id/shop_a_btn"
        />

</android.support.constraint.ConstraintLayout>

A Gone 之后:
可见 B 依然和A约束着,不过 A 变成了 水平中间点而已,而且 A 的margin 都变成了0。
5. Dimensions constraints (尺寸约束)
控件的尺寸可以通过 android:layout_width, android:layout_height两个属性来设置,有三种:
- 具体的尺寸值(例如 111dp);
- WRAP_CONTENT,根据内容计算自己的尺寸大小;
- 使用 0dp, 等价于 “MATCH_CONSTRAINT”(和 view 的 weight 参数类似);
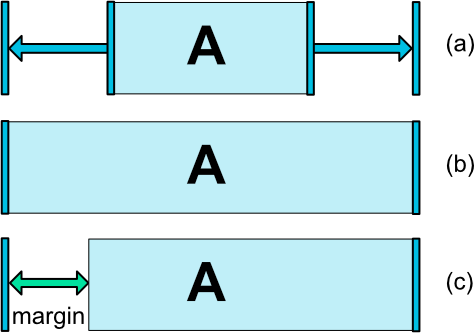
前两点都很好理解,跟其他布局相似。第三种 0dp,通俗点说就是扩充四个边直到到约束的另一个 view,如果没有约束的控件会以 WRAP_CONTENT 的形式显示。上图中 (a) 是 wrap_content, (b)是 0dp, (c) 是 有 margin 的 0dp。
下面举个例子:
<android.support.constraint.ConstraintLayout xmlns:android="http://schemas.android.com/apk/res/android"
    xmlns:app="http://schemas.android.com/apk/res-auto"
    xmlns:tools="http://schemas.android.com/tools"
    android:id="@+id/shop_container_cly"
    android:layout_width="match_parent"
    android:layout_height="match_parent"
    tools:context=".module.shop.ShopFragment">

    <Button
        android:id="@+id/shop_a_btn"
        android:layout_width="0dp"
        android:layout_height="0dp"
        android:text="A"
        app:layout_constraintRight_toRightOf="@id/shop_container_cly" />

    <Button
        android:id="@+id/shop_b_btn"
        android:layout_width="wrap_content"
        android:layout_height="wrap_content"
        android:text="B"
        app:layout_constraintBottom_toBottomOf="@id/shop_container_cly"
        app:layout_constraintLeft_toLeftOf="@id/shop_container_cly"
        app:layout_constraintRight_toRightOf="@id/shop_container_cly"
        app:layout_constraintTop_toTopOf="@id/shop_container_cly" />

    <Button
        android:id="@+id/shop_c_btn"
        android:layout_width="0dp"
        android:layout_height="0dp"
        android:layout_marginBottom="20dp"
        android:text="c"
        app:layout_constraintBottom_toTopOf="@id/shop_b_btn"
        app:layout_constraintRight_toLeftOf="@id/shop_b_btn"
        app:layout_constraintTop_toBottomOf="@id/shop_a_btn" />

</android.support.constraint.ConstraintLayout>
图示:
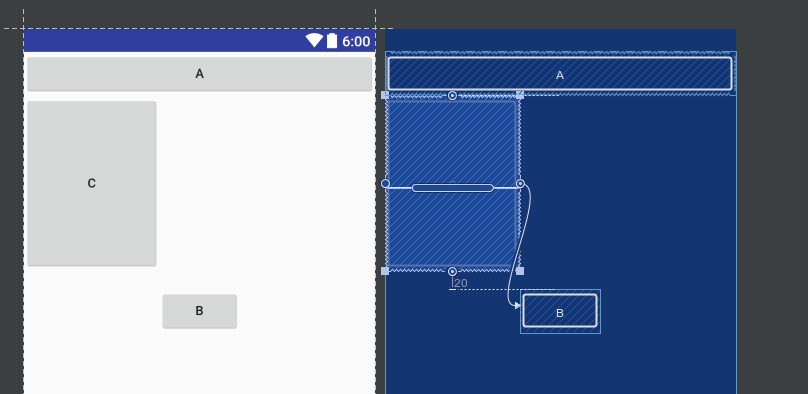
A 位于顶部约束右边与父布局的右边,A 填充了整个宽。B是中心位置,是 wrap_content。 C 的 上边与 A 的下边约束,底边与 B 的顶部约束,且右边与B的左边约束,可见C 的尺寸大小是根据约束的位置来计算的。C 有设置底部Margin。
总的来说 0dp 的 view 大小不由自己定,由约束的其他 view 的位置定。
6. Ratio (比例)
这个需要与MATCH_CONSTRAINT 即 0dp 混合使用,确定一个宽或高的值,另一个高或宽的值或根据比例确定,使用参数 layout_constraintDimentionRatio 来进行设置, 例如:
<Button android:layout_width="wrap_content"
                   android:layout_height="0dp"
                   app:layout_constraintDimensionRatio="1:1" />
这个 Button 的高会和宽一样,是个正方形。
这个比例可用的表达式种类有:
- 浮点数,代表宽高的比例
- “width:height”类型的比例
如果宽高都设置为 MATCH_CONSTRAINT (0dp),则需要 添加 H 或者 W 来指定哪个边应该被约束,如下实例根据宽来根据比例设置高度:
<Button android:layout_width="0dp"
                   android:layout_height="0dp"
                   app:layout_constraintDimensionRatio="H,16:9"
                   app:layout_constraintBottom_toBottomOf="parent"
                   app:layout_constraintTop_toTopOf="parent"/>
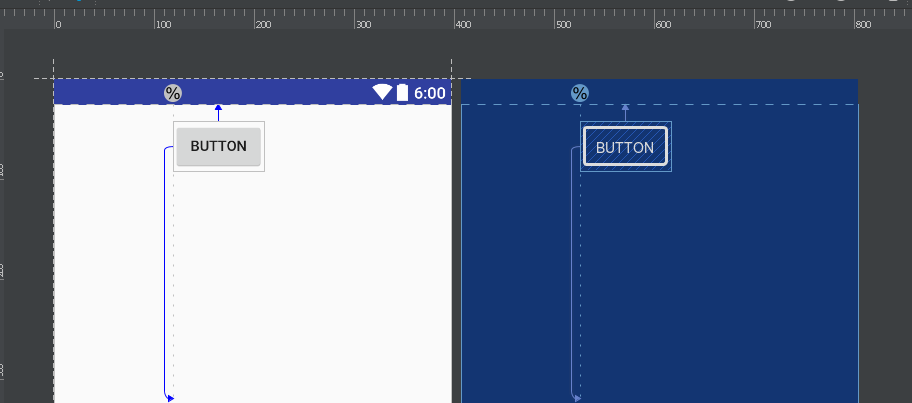
7. Virtual Helper objects (Guideline 辅助线)
android.support.constraint.GuidelineGuideline 允许创建一个 水平 和垂直的辅助线,来帮助 ConstraintLayout 来约束 子 view。
Guideline 就相当于一个 gone 掉的 view ,只是用于辅助放置其他 view,只在 ConstraintLayout 中有用。
垂直辅助线 宽是 0, 高是父布局的高;水平辅助线 宽是父布局的宽,高是0.
辅助线的位置有三种定位方法:
- 使用 参数
layout_constraintGuide_begin来设置辅助线距离父布局左边框(垂直线) 或 顶部(水平线)的一个具体间距值; - 使用 参数
layout_constraintGuide_end来设置辅助线距离父布局右边框(垂直线) 或 底部(水平线)的一个具体间距值; - 使用参数
layout_constraintGuide_percent来设置百分比(值需要设置为浮点数),即垂直线到左边的距离与到右边的距离的比例,或者水平线到顶部的距离与到底部的距离的比例。
举例:
<android.support.constraint.ConstraintLayout xmlns:android="http://schemas.android.com/apk/res/android"
    xmlns:app="http://schemas.android.com/apk/res-auto"
    xmlns:tools="http://schemas.android.com/tools"
    android:layout_width="match_parent"
    android:layout_height="match_parent"
    tools:context=".module.shop.ShopFragment">

    <android.support.constraint.Guideline
        android:layout_width="wrap_content"
        android:layout_height="wrap_content"
        android:id="@+id/guideline"
        app:layout_constraintGuide_percent="0.3"
        android:orientation="vertical"/>

    <Button
        android:text="Button"
        android:layout_width="wrap_content"
        android:layout_height="wrap_content"
        android:id="@+id/button"
        app:layout_constraintLeft_toLeftOf="@+id/guideline"
        android:layout_marginTop="16dp"
        app:layout_constraintTop_toTopOf="parent" />


</android.support.constraint.ConstraintLayout>
图示:
8. Inter Constraints
他的功能很强大,就是一个按钮:

他可以根据你拖动的 view 的位置,自己去推断设置约束。
9. 上面所说的都是可以通过图形界面拖拽实现
还有谁,就说还有谁能比他更叼?
参数详细内容见官网:https://developer.android.com/reference/android/support/constraint/package-summary.html


 被折叠的 条评论
为什么被折叠?
被折叠的 条评论
为什么被折叠?
 到【灌水乐园】发言


