


Centos7 安装 PostgreSql 14 数据库 和 timescaledb 时序库
文章目录
一 准备工作
系统 :Centos7
postgres 14 官网下载地址:https://www.postgresql.org/download/linux/redhat/
二 开始部署 PostgreSql 14 数据库
2.1 下载postgres 14 rpm 安装
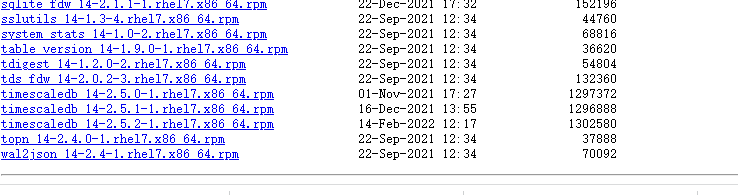
从官网下载,按照图片,根据你电脑,服务器的配置下载rpm包。

下载的地址 :
https://download.postgresql.org/pub/repos/yum/14/redhat/rhel-7.5-x86_64/
(1)下载的包:
postgresql14-14.2-1PGDG.rhel7.x86_64.rpm
postgresql14-contrib-14.2-1PGDG.rhel7.x86_64.rpm
postgresql14-devel-14.2-1PGDG.rhel7.x86_64.rpm
postgresql14-docs-14.2-1PGDG.rhel7.x86_64.rpm
postgresql14-libs-14.2-1PGDG.rhel7.x86_64.rpm
postgresql14-llvmjit-14.2-1PGDG.rhel7.x86_64.rpm
postgresql14-odbc-13.02.0000-1PGDG.rhel7.x86_64.rpm
postgresql14-plperl-14.2-1PGDG.rhel7.x86_64.rpm
postgresql14-plpython3-14.2-1PGDG.rhel7.x86_64.rpm
postgresql14-pltcl-14.2-1PGDG.rhel7.x86_64.rpm
postgresql14-server-14.2-1PGDG.rhel7.x86_64.rpm
postgresql14-tcl-2.7.7-1.rhel7.x86_64.rpm
postgresql-unit_14-7.4-1.rhel7.x86_64.rp
(2)安装
yum install postgresql14-libs-14.2-1PGDG.rhel7.x86_64.rpm -y
yum install postgresql14-14.2-1PGDG.rhel7.x86_64.rpm -y
yum install postgresql14-server-14.2-1PGDG.rhel7.x86_64.rpm -y
2.2 直接安装
(1) 安装yum源(服务器可访问互联网时用)
sudo yum install -y https://download.postgresql.org/pub/repos/yum/reporpms/EL-7-x86_64/pgdg-redhat-repo-latest.noarch.rpm
(2) 安装客户端
yum install postgresql14 –y
(3) 安装服务端
yum install postgresql14-server -y
2.3 初始化数据库
使用yum安装后,会在系统中创建一个postgres的无密码用户。在主节点服务器切换到此用户,然后创建一个数据目录,该目录将存放所有的配置文件、数据库文件和日志文件。
mkdir -p /u01/apps/pgsql14/data
赋权:
chown -R postgres:postgres /u01/apps/pgsql14/
PostgreSQL的安装目录默认存放在/usr/pgsql-14,使用下面的命令初始化数据库目录:
使用postgres用户执行:录
/usr/pgsql-14/bin/initdb -D 【数据目录全路径】
su - postgres
/usr/pgsql-14/bin/initdb -D /u01/apps/pgsql14/data

2.4 修改服务启动脚本
使用root用户修改 /usr/lib/systemd/system/postgresql-14.service 文件,将其中的PGDATA修改为新的数据目录
vim /usr/lib/systemd/system/postgresql-14.service
其中的PGDATA修改为新的数据目录

修改后

2.5 修改数据库配置
使用postgres用户进入自行创建的数据目录
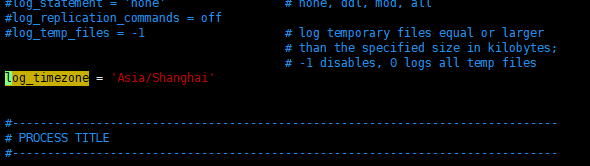
- 修改 postgresql.conf 文件:
必须要修改listen_addresses、port、max_connections、log_timezone、timezone、datestyle。
vim /u01/apps/pgsql14/data/postgresql.conf


- 修改数据目录下的 pg_hba.conf 文件,添加允许连接到本数据库的地址:
vim /u01/apps/pgsql14/data/pg_hba.conf

2.6 开启防火墙端口
firewall-cmd --add-port=5432/tcp --permanent
firewall-cmd --reload
如果端口不开启反防火墙,或导致别的电脑服务器无法连接你的数据库
2.7 启动数据库服务
启动服务:systemctl start postgresql-14
停止服务:systemctl stop postgresql-14
重启服务:systemctl restart postgresql-14
2.8 修改数据库postgres用户密码
修改数据库postgres用户密码,使用系统的postgres用户进入psql,执行以下命令:
ALTER USER postgres ENCRYPTED PASSWORD ‘【密码】’;
ALTER USER postgres ENCRYPTED PASSWORD 'postgres123';
[root@hrmw-web-api ~]# su - postgres
上一次登录:二 2月 22 13:51:56 CST 2022pts/1 上
-bash-4.2$ psql
psql (14.2)
输入 "help" 来获取帮助信息.

postgres=# ALTER USER postgres ENCRYPTED PASSWORD 'postgres123';
ALTER ROLE
2.9 验证数据库
利用navicat 来查看数据库是否能 登陆

这样就可以确认数据库部署完成了 。
三 开始部署 timescaledb 2.5(对应postgres14) 时序库
timescaledb 官网下载地址:
https://download.postgresql.org/pub/repos/yum/14/redhat/rhel-7.5-x86_64/
timescaledb 是postgres的插件,需要先安装完postgres数据库。
3.1 安装 timescaledb
yum install timescaledb_14-2.5.2-1.rhel7.x86_64.rpm -y
[root@timescaledb yum]#  yum install  timescaledb_14-2.5.2-1.rhel7.x86_64.rpm -y
已加载插件:fastestmirror
正在检查 timescaledb_14-2.5.2-1.rhel7.x86_64.rpm: timescaledb_14-2.5.2-1.rhel7.x86_64
timescaledb_14-2.5.2-1.rhel7.x86_64.rpm 将被安装
正在解决依赖关系
--> 正在检查事务
---> 软件包 timescaledb_14.x86_64.0.2.5.2-1.rhel7 将被 安装
--> 解决依赖关系完成

依赖关系解决

=========================================================================================================
 Package              架构         版本                 源                                          大小
=========================================================================================================
正在安装:
 timescaledb_14       x86_64       2.5.2-1.rhel7        /timescaledb_14-2.5.2-1.rhel7.x86_64       8.0 M

事务概要
=========================================================================================================
安装  1 软件包

总计:8.0 M
安装大小:8.0 M
Downloading packages:
Running transaction check
Running transaction test
Transaction test succeeded
Running transaction
  正在安装    : timescaledb_14-2.5.2-1.rhel7.x86_64                                                  1/1
  验证中      : timescaledb_14-2.5.2-1.rhel7.x86_64                                                  1/1

已安装:
  timescaledb_14.x86_64 0:2.5.2-1.rhel7

完毕!
3.2 编辑配置文件
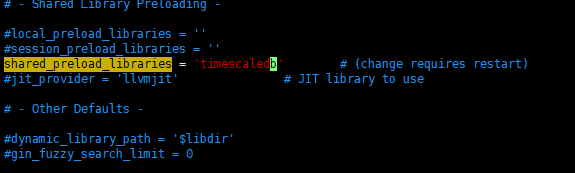
- 修该postgresql.conf配置文件
vim /u01/apps/pgsql14/data/postgresql.conf
修改其中内容
shared_preload_libraries = ‘timescaledb’
创建目录
mkdir -p /etc/postgresql/14/main/
复制文件至目录 /etc/postgresql/14/main/ 下
cp /u01/apps/pgsql14/data/postgresql.conf /etc/postgresql/14/main/
3.3 重启数据库服务
启动服务:systemctl start postgresql-14
停止服务:systemctl stop postgresql-14
重启服务:systemctl restart postgresql-14
3.4 创建 EXTENSION:
切换用户:
su – postgres
-bash-4.2$ psql
postgres=# CREATE DATABASE 数据库名;
postgres=# \c 数据库名
hrmwv2=# CREATE SCHEMA 模式名;
hrmwv2=# set search_path to 模式名; #(这一步一定要执行,指定函数在那个模式下)
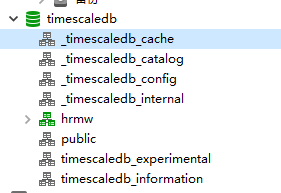
hrmwv2=# CREATE EXTENSION timescaledb;
出现以下效果即安装成功
WELCOME TO
 _____ _                               _     ____________
|_   _(_)                             | |    |  _  \ ___ \
  | |  _ _ __ ___   ___  ___  ___ __ _| | ___| | | | |_/ /
  | | | |  _ ` _ \ / _ \/ __|/ __/ _` | |/ _ \ | | | ___ \
  | | | | | | | | |  __/\__ \ (_| (_| | |  __/ |/ /| |_/ /
  |_| |_|_| |_| |_|\___||___/\___\__,_|_|\___|___/ \____/
               Running version 2.5.2
For more information on TimescaleDB, please visit the following links:

 1. Getting started: https://docs.timescale.com/timescaledb/latest/getting-started
 2. API reference documentation: https://docs.timescale.com/api/latest
 3. How TimescaleDB is designed: https://docs.timescale.com/timescaledb/latest/overview/core-concepts

Note: Please enable telemetry to help us improve our product by running: ALTER DATABASE "timescaledb" SET timescaledb.telemetry_level = 'basic';
后记
如果本文章有何错误,请您评论中指出,或联系我,我会改正,如果您觉得这篇文章有用,请帮忙一键三连,让更多的人看见,谢谢
作者 yang_z_1 csdn博客地址: https://blog.csdn.net/yang_z_1?type=blog


 626
626


 被折叠的 条评论
为什么被折叠?
被折叠的 条评论
为什么被折叠?
 到【灌水乐园】发言


