


WebSocket通讯架构
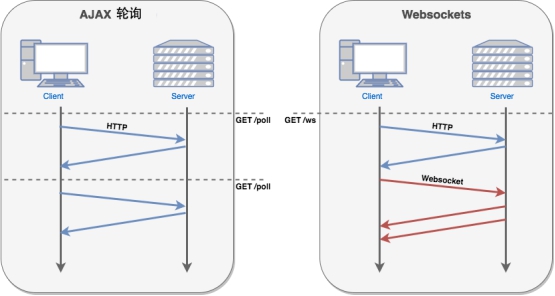
之前我们学过HTTP通讯协议,但是这个通讯协议特点:遵循请求-响应模式
一定需要前端发送请求,后端才给它返回结果
之前有没有技术可以做到客户端和服务端相互通讯?Socket
但是的Socket技术,只适合于后端和后端之间,它不能用于浏览器与服务器之间
WebSocket
WebSocket是由08年HTML5发布之后,才提供的。
WebSocket也是一种通讯协议,并且这种协议跟HTTP协议大家处于同一个等级上,底层都是:TCP/IP通讯协议
区别
HTTP通讯协议:只能前端发,后端响应
WebSocket通讯协议:它是一种双向通讯协议,前端既可以向后端发送,后端也可以主动将消息
发送给前端 ,这种协议跟TCP/IP协议一样,依赖连接
适用的场景
运维发送:维护信息
管理员发送:广告,公告等一些信息
后端主动需要向前端推送数据的时候,例如:摩拜单车地址,在地图上的变化
实现原理
WebSocket 是 HTML5 开始提供的一种在单个 TCP 连接上进行双向通讯的协议。WebSocket 使得客户端和服务器之间的数据交换变得更加简单,允许服务端主动向客户端推送数据。在 WebSocket API 中,浏览器和服务器只需要完成一次握手,两者之间就直接可以创建持久性的连接,并使用STOMP协议进行双向数据传输。
STOMP:全称:Simple (or Streaming) Text Orientated Messaging Protocol
面向简单文本的一种消息协议
在 WebSocket API 中,浏览器和服务器只需要做一个握手的动作,然后,浏览器和服务器之间就形成了一条快速通道。两者之间就直接可以数据互相传送。HTML5 定义的 WebSocket 协议,能更好的节省服务器资源和带宽,并且能够更实时地进行通讯。
前端向后端发送消息
后端如果要支持Websocket通讯协议,请选择SpringMVC框架,不要选择其他WEB框架
导入依赖
        <!--导入websocket的启动器-->
        <dependency>
            <groupId>org.springframework.boot</groupId>
            <artifactId>spring-boot-starter-websocket</artifactId>
        </dependency>
编写Websocket配置类
一定要写:
@EnableWebSocketMessageBroker
@Configuration
registry.addEndpoint(“/endpointWisely”).withSockJS(); 配置后端连接点
registry.enableSimpleBroker(“/topic”); 使用发布订阅模式
/**
 * WebSocket的配置类
 * @EnableWebSocketMessageBroker 开启后端的WebSocket支持
 */
@EnableWebSocketMessageBroker
@Configuration
public class WebSocketConfiguration implements WebSocketMessageBrokerConfigurer {

    /**
     * 配置连接位置
     * 相当于:ServerSocket ss = new ServerSocket(9999);
     * @param registry
     */
    @Override
    public void registerStompEndpoints(StompEndpointRegistry registry) {

        registry.addEndpoint("/endpointWisely").withSockJS();

    }

    /**
     * 配置消息的注册方式
     * @param registry
     */
    @Override
    public void configureMessageBroker(MessageBrokerRegistry registry) {
        //topic 消息主题模式(发布/订阅模式   广播模式)
        //queue 队列模式(点对点模式)
        registry.enableSimpleBroker("/topic");
    }
}
导入Thymeleaf模板依赖
        <!--导入Thymeleaf模板引擎-->
        <dependency>
            <groupId>org.springframework.boot</groupId>
            <artifactId>spring-boot-starter-thymeleaf</artifactId>
        </dependency>
在application.properties中配置Thymeleaf
#配置thymeleaf的视图解析器ThymeleafViewResolver
spring.thymeleaf.prefix=classpath:/templates/
spring.thymeleaf.suffix=.html
spring.thymeleaf.mode=HTML
spring.thymeleaf.cache=false
spring.thymeleaf.encoding=UTF-8
编写index.html首页
<!DOCTYPE html>
<html xmlns:th="http://www.thymeleaf.org">
<head>
    <meta charset="UTF-8">
    <title>Title</title>
</head>
<body>

<a th:href="@{/send}">进入到发送页面</a>
<br>
<a th:href="@{/receive}">进入到接收页面</a>

</body>
</html>
在SpringMVC配置类中,配置页面跳转路径
    /**
     * 配置跳转页面控制器
     * @param registry
     */
    @Override
    public void addViewControllers(ViewControllerRegistry registry) {

        registry.addViewController("/").setViewName("index");
        registry.addViewController("send").setViewName("websocket/send");
        registry.addViewController("receive").setViewName("websocket/receive");
        //将上述的映射关系,设置为级别最高
        registry.setOrder(Ordered.HIGHEST_PRECEDENCE);
    }
在static下导入WebSocket相关JS文件

配置application.properties文件,释放静态资源文件
#配置springmvc静态资源的释放
spring.mvc.static-path-pattern=/static/**
spring.resources.static-locations=classpath:/static/
编写send.html发送消息页面
<!DOCTYPE html>
<html xmlns:th="http://www.thymeleaf.org">
<head>
    <meta charset="UTF-8">
    <title>发送页面</title>
    <script th:src="@{static/js/jquery-3.2.0.min.js}"></script>
    <script th:src="@{static/js/sockjs.min.js}"></script>
    <script th:src="@{static/js/stomp.min.js}"></script>
    <script th:src="@{static/js/commons.js}"></script>

</head>
<body>

<noscript><h2 style="color:#ff0000">可能你的浏览器不支持websocket</h2></noscript>
<div>
    <div>
        <button id="connect">连接</button>
        <button id="disconnect">断开连接</button>
    </div>

    <div id="conversationDiv">
        <label>输入信息:</label>
        <input type="text" id="information"/>
        <button id="send">发送</button>
    </div>

    <hr>

    <!--显示的消息-->
    <p id="response"></p>

</div>

</body>
</html>
编写receive.html接收消息页面
<!DOCTYPE html>
<html xmlns:th="http://www.thymeleaf.org">
<head>
    <meta charset="UTF-8">
    <title>接收页面</title>
    <script th:src="@{static/js/jquery-3.2.0.min.js}"></script>
    <script th:src="@{static/js/sockjs.min.js}"></script>
    <script th:src="@{static/js/stomp.min.js}"></script>
    <script th:src="@{static/js/commons.js}"></script>
</head>
<body>

<noscript><h2 style="color:#ff0000">可能你的浏览器不支持websocket</h2></noscript>
<div>
    <div>
        <button id="connect">连接</button>
        <button id="disconnect">断开连接</button>
    </div>

    <!--显示的消息-->
    <p id="response"></p>
</div>

</body>
</html>
编写commons.js中的内容
getRootPath() 获得项目运行的绝对路径:http://192.168.6.11:8080/boots
connect () 与后端取得连接
disconnect() 与后端断开连接
send() 向后端发送消息
1、‘/endpointWisely’ 前端与后端建立连接的路径,对应是:WebSocketConfiguration中registry.addEndpoint(“/endpointWisely”).withSockJS();
2、“/accept” 用来向后端发送消息的路径,对应是:WebSocketController中@MessageMapping(“/accept”)
3、‘/topic/getResponse’ 消息发布与订阅 的共同主题(主题名称可以修改),对应是@SendTo(“/topic/getResponse”)
//获得项目的绝对路径,如:http://localhost:8083/uimcardprj
function getRootPath(){
    //获取当前网址,如: http://localhost:8083/uimcardprj/share/meun.jsp
    var curWwwPath=window.document.location.href;
    //获取主机地址之后的目录,如: uimcardprj/share/meun.jsp
    var pathName=window.document.location.pathname;
    var pos=curWwwPath.indexOf(pathName);
    //获取主机地址,如: http://localhost:8083
    var localhostPaht=curWwwPath.substring(0,pos);
    //获取带"/"的项目名,如:/uimcardprj
    var projectName=pathName.substring(0,pathName.substr(1).indexOf('/')+1);
    return(localhostPaht+projectName);
}

$(function() {
    var stompClient = null;
    disconnect();
    // 添加点击事件
    $('#connect').click(function() {
        connect();
    });

    // 添加点击事件
    $('#disconnect').click(function() {
        disconnect();
    });

    // 添加点击事件
    $('#send').click(function() {
        send();
    });

    function send() {
        var information = $('#information').val();
        console.info(getRootPath());
        stompClient.send("/accept", {}, JSON.stringify({
            'information' : information
        }));
        $('#information').prop('value','');
    }

    function disconnect() {

        if (stompClient != null) {
            stompClient.disconnect();
        }
        setConnected(false);
        console.info("Disconnected");
    }

    function connect() {
        var socket = new SockJS(getRootPath() + '/endpointWisely');// 相当于使用IP和端口,来创建一个连接
        stompClient = Stomp.over(socket);
        stompClient.connect({}, function(frame) {// 连接WebSocket服务端
            setConnected(true);
            console.info('Connected: ' + frame);
            //连接建立之后,从后端订阅返回消息
            stompClient.subscribe('/topic/getResponse', function(response){

                console.info("进入到回调中!!!")

                showResponse(JSON.parse(response.body).result.information);
            });
        });
    }

    /**
     * 建立连接成功之后,显示 发送输入框
     * @param state
     */
    function setConnected(state) {
        $('#connect').attr('disabled', state);
        $('#disconnect').attr('disabled', !state);
        var visibility = state ? 'visible' : 'hidden';
        $('#conversationDiv').css('visibility', visibility);
        $('#conversationDiv').html();
    }

    function showResponse(message) {
        $('#response').html(message);
    }

});
showResponse(JSON.parse(response.body).result.information); 一定要与后端发送过来的JSON结构进行对应(切记,不要错误)
编写后端消息接收类
/**
 * 消息的接收对象
 */
@Data
@NoArgsConstructor
@AllArgsConstructor
public class WiselyMessage implements Serializable {
    /**
     * 来自前端的消息
     */
    private String information;

}
编写后端WebSocketController
@RestController
public class WebSocketController {

    /**
     * @MessageMapping("/accept") 完成映射关系 可以理解为@RequestMapping
     * @SendTo 消息接收后,发送到/topic/getResponse这个主题上去
     * @param message
     * @return
     */
    @MessageMapping("/accept")
    @SendTo("/topic/getResponse")
    public ResultMsg receive(WiselyMessage message){

        System.out.println("后端接收的消息:" + message);

        return new ResultMsg(200,"接收成功",message);
    }

}
后端主动向前端推送消息
项目中,一般不可能只有前端可以向后端发送消息,实际上,后端也需要主动向前端推送某些消息
就需要使用WebSocket中的SimpMessagingTemplate 来实现
为了给大家体现效果,此处使用定时框架配合实现
开启定时任务框架
@EnableScheduling 开启定时任务框架
/**
 * @EnableScheduling 开启定时任务注解
 */
@EnableScheduling
@SpringBootApplication
public class SpringBootExtendApplication {

    public static void main(String[] args) {
        SpringApplication.run(SpringBootExtendApplication.class, args);
    }

}
定义定时任务,并主动向前端推送消息
@Component
public class SendMsgTask {

    /**
     * 导入消息推送对象
     */
    @Resource
    private SimpMessagingTemplate simpMessagingTemplate;

    /**
     * 间隔5秒钟,向前端推送消息
     * @throws Exception
     */
    @Scheduled(fixedRate=5000)
    public void reportCurrentTime() throws Exception {

        ResultMsg resultMsg = new ResultMsg(200,"接收成功"
                ,new WiselyMessage("广哥,起来读书了" + new Date()) );

        //我们使用这个方法进行消息的转发发送!
        simpMessagingTemplate.convertAndSend("/topic/getResponse", resultMsg);
    }
}
e SimpMessagingTemplate simpMessagingTemplate;
/**
 * 间隔5秒钟,向前端推送消息
 * @throws Exception
 */
@Scheduled(fixedRate=5000)
public void reportCurrentTime() throws Exception {

    ResultMsg resultMsg = new ResultMsg(200,"接收成功"
            ,new WiselyMessage("广哥,起来读书了" + new Date()) );

    //我们使用这个方法进行消息的转发发送!
    simpMessagingTemplate.convertAndSend("/topic/getResponse", resultMsg);
}
}
simpMessagingTemplate.convertAndSend("/topic/getResponse", resultMsg); 向"/topic/getResponse" 主题 推送消息!


 4万+
4万+


 被折叠的 条评论
为什么被折叠?
被折叠的 条评论
为什么被折叠?
 到【灌水乐园】发言


