


update 2015.1.21
写在前面的话:
其实写个自己的gem很简单,网上一搜好多教程。可是,可是一旦gem包含不止一个.rb文件时,问题就来了,往往是build的gem不可用!!!这时又没有解决方案,所以,学习制作自己的gem时最好的教程就是官方教程,其他地方转来转去就传的不知道哪里出问题了,所以在这先放个ruby gem制作的官方guide地址,http://guides.rubygems.org/make-your-own-gem/
当project有多个文件时,要注意命名规范,如果不符合rubygem的要求制作的gem是不可以使用的
gem命名规范官方文档要求 http://guides.rubygems.org/what-is-a-gem/
没事的,一遍不懂多操作几遍,一开始可以比着葫芦画瓢,多操作几遍就懂得其中缘由的。简单提几点
File names
The lib directory itself normally contains only one .rb file and a directory with the same name as the gem which contains the rest of the files.
Be consistent with how your gem files in lib and bin are named. Thehola gem from themake your own gem guide is a great example:
% tree
hola
├── Rakefile
├── bin
│   └── hola
├── hola.gemspec
├── lib
│   ├── hola
│   │   └── translator.rb
│   └── hola.rb
└── test
    └── test_hola.rb
The executable and the primary file in lib are named thesame. A developer can easily jump in and call require 'hola' with no problems.
也就是说lib根目录下的rb文件要跟gem包同名,如果lib下有根目录,目录名也要与gem包名相同。bin目录下方可执行文件也是同名的(暂时这样理解的)
Naming your gem
简单来讲就是 不要跟已有的gem重名,比如gem可以叫做 gem_yourname这样就大大避免重复的几率。Naming your gem is important. Before you pick a name for your gem, do a quick search on RubyGems.org and GitHub to see if someone else has taken it. Every published gem must have a unique name. Be sure to read our naming recommendations when you’ve found a name you like.
Respect the global load path 多个文件时如何组织工程结构
When packaging your gem files, you need to be careful of what is in your lib directory. Every gem you have installed gets its lib directory appended onto your $LOAD_PATH.This means any file on the top level of the lib directory could get required.
For example, let’s say we have a foo gem with the following structure:
.
└── lib
    ├── foo
    │   └── cgi.rb
    ├── erb.rb
    ├── foo.rb
    └── set.rb
This might seem harmless since your custom erb and set files are within your gem. However, this is not harmless, anyone who requires this gem will not be able to bring in the ERB or Set classes provided by Ruby’s standard library.
The best way to get around this is to keep files in a different directory under lib. The usual convention is to be consistent and put them in the same folder name as your gem’s name, for example lib/foo/cgi.rb.
.
└── lib
    ├── foo
    │   └── cgi.rb
    │   │── erb.rb
    │   └── set.rb
    └── foo.rb
样例
下面是一个简单的例子,也可以参照官网的demo
下面我们一起来写个gem,上传到http://rubygems.org 供别人调用,并把源码放到github上托管。
这里以创建一个名为gem_yangcs2009的gem为例。
1、注册rubygems和github账号
后面上传gem,托管代码使用
https://rubygems.org http://github.com
2、生成gem文件
$ bundle gem gem_yangcs2009
      create  gem_yangcs2009/Gemfile
      create  gem_yangcs2009/Rakefile
      create  gem_yangcs2009/LICENSE.txt
      create  gem_yangcs2009/README.md
      create  gem_yangcs2009/.gitignore
      create  gem_yangcs2009/gem_yangcs2009.gemspec
      create  gem_yangcs2009/lib/gem_yangcs2009.rb
      create  gem_yangcs2009/lib/gem_yangcs2009/version.rb
Initializing git repo in /Users/yangcs2009/gem_yangcs2009
project的目录结构如下
$ tree gem_yangcs2009/
gem_yangcs2009/
├── Gemfile
├── LICENSE.txt
├── README.md
├── Rakefile
├── gem_yangcs2009.gemspec
└── lib
      ├── gem_yangcs2009
      │    └── version.rb
      └── gem_yangcs2009.rb
3、编码
转到gem_yangcs2009目录下,打开gem_yangcs2009.gemspec,该文件是对这个gem的一些说明。
找到
s.summary     = %q{TODO: Write a gem summary}
s.description = %q{TODO: Write a gem description}
去掉其中的TODO,可先改为
s.summary     = %q{"sumamry for gem_yangcs2009"}
s.description = %q{"description for gem_yangcs2009"}4、生成自己的gem
$ gem build gem_yangcs2009.gemspec
WARNING:  no homepage specified
WARNING:  See http://guides.rubygems.org/specification-reference/ for help
  Successfully built RubyGem
  Name: gem_yangcs2009
  Version: 0.0.1
  File: gem_yangcs2009-0.0.1.gem
使用ls命令会发现在当前目录下生成了gem_yangcs2009-0.0.1.gem
5、发布gem到rubygems.org
$ gem push gem_yangcs2009-0.0.1.gem然后根据提示输入rubygems.org的用户信息就ok了。
PS:这里若遇到403权限问题很可能是gem包名已有同名文件存在,所以记得gem包名一开始要避免重复
6、github托管同步
在github上新建一个repository,名字尽量保持一致,所以我们取为gem_yangcs2009。
这一步一定要在网页上操作。创建完成后会有一个全是命令的页面。PS:不要选择创建README
其中应该包括:
…or create a new repository on the command line
touch README.md
git init
git add README.md
git commit -m "first commit"
git remote add origin git@github.com:yangcs2009/gem_yangcs2009.git
git push -u origin mastergit remote add origin git@github.com:yangcs2009/gem_yangcs2009.git
git push -u origin master7、git上传代码
git add .
git commit -m 'first commit'
#git remote add origin git@github.com:yangcs2009/gem_yangcs2009.git
git push -u origin master
8、当代码更新后
#gem_yangcs2009.rb
require "gem_yangcs2009/version"

module GemYangcs2009
  # Your code goes here...
  class Demo
  	def self.say (name)
  		puts name + ",welcome to China!!!"
  	end
  end
end9、安装、使用gem
$ sudo gem install gem_yangcs2009
Successfully installed gem_yangcs2009-0.0.2
Parsing documentation for gem_yangcs2009-0.0.2
Installing ri documentation for gem_yangcs2009-0.0.2
Done installing documentation for gem_yangcs2009 after 0 seconds
1 gem installed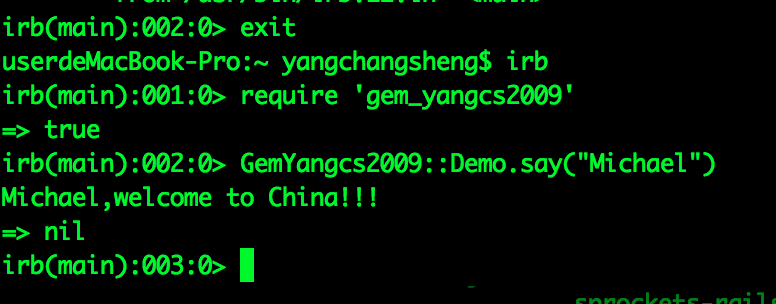
参考:https://ruby-china.org/topics/1178


 被折叠的 条评论
为什么被折叠?
被折叠的 条评论
为什么被折叠?
 到【灌水乐园】发言


