


如何启动
每当我们使用startActivity()的时候,系统就会为我们启动个Activity。虽然代码简单,但是Activity的启动是非常复杂的,我们一起去看看:
 public void startActivityForResult(Intent intent, int requestCode, @Nullable Bundle options) {
        if (mParent == null) {
            Instrumentation.ActivityResult ar =
                mInstrumentation.execStartActivity(
                    this, mMainThread.getApplicationThread(), mToken, this,
                    intent, requestCode, options);
            if (ar != null) {
                mMainThread.sendActivityResult(
                    mToken, mEmbeddedID, requestCode, ar.getResultCode(),
                    ar.getResultData());
            }
            if (requestCode >= 0) {
                // If this start is requesting a result, we can avoid making
                // the activity visible until the result is received.  Setting
                // this code during onCreate(Bundle savedInstanceState) or onResume() will keep the
                // activity hidden during this time, to avoid flickering.
                // This can only be done when a result is requested because
                // that guarantees we will get information back when the
                // activity is finished, no matter what happens to it.
                mStartedActivity = true;
            }

            cancelInputsAndStartExitTransition(options);
            // TODO Consider clearing/flushing other event sources and events for child windows.
        } else {
            if (options != null) {
                mParent.startActivityFromChild(this, intent, requestCode, options);
            } else {
                // Note we want to go through this method for compatibility with
                // existing applications that may have overridden it.
                mParent.startActivityFromChild(this, intent, requestCode);
            }
        }
    }
当我们调用startActivity()方法最终会执行到这个方法,那么启动Activity的代码就会转移到Instrumentation这个类
  public void execStartActivitiesAsUser(Context who, IBinder contextThread,
            IBinder token, Activity target, Intent[] intents, Bundle options,
            int userId) {
        IApplicationThread whoThread = (IApplicationThread) contextThread;
        if (mActivityMonitors != null) {
            synchronized (mSync) {
                final int N = mActivityMonitors.size();
                for (int i=0; i<N; i++) {
                    final ActivityMonitor am = mActivityMonitors.get(i);
                    if (am.match(who, null, intents[0])) {
                        am.mHits++;
                        if (am.isBlocking()) {
                            return;
                        }
                        break;
                    }
                }
            }
        }
        try {
            String[] resolvedTypes = new String[intents.length];
            for (int i=0; i<intents.length; i++) {
                intents[i].migrateExtraStreamToClipData();
                intents[i].prepareToLeaveProcess();
                resolvedTypes[i] = intents[i].resolveTypeIfNeeded(who.getContentResolver());
            }
            int result = ActivityManagerNative.getDefault()
                .startActivities(whoThread, who.getBasePackageName(), intents, resolvedTypes,
                        token, options, userId);
            checkStartActivityResult(result, intents[0]);
        } catch (RemoteException e) {
            throw new RuntimeException("Failure from system", e);
        }
    }
最主要的就是try catch里面最后的两端代码了,第一个通过ActivityManagerNative.getDefault()对象去启动Activity,第二个就是检查Activity的启动结果。而ActivityMangerNative.getDefault()是什么呢?
    private static final Singleton<IActivityManager> gDefault = new Singleton<IActivityManager>() {
        protected IActivityManager create() {
            IBinder b = ServiceManager.getService("activity");
            if (false) {
                Log.v("ActivityManager", "default service binder = " + b);
            }
            IActivityManager am = asInterface(b);
            if (false) {
                Log.v("ActivityManager", "default service = " + am);
            }
            return am;
        }
    };
他其实是ActivityManagerService的一个Proxy对象,而他们同样实现了IActivityManager接口,用于我们手机中每个app去调用系统ActivityManagerSevice中的方法,是一个跨进程的IPC操作。所以,我们不能够new Activity(),因为Activity的生成和生命周期都是由系统去控制的。那么,当我们调用Proxy中的startActivity()方法的时候
public int startActivities(IApplicationThread caller, String callingPackage,
            Intent[] intents, String[] resolvedTypes, IBinder resultTo,
            Bundle options, int userId) throws RemoteException {
        Parcel data = Parcel.obtain();
        Parcel reply = Parcel.obtain();
        data.writeInterfaceToken(IActivityManager.descriptor);
        data.writeStrongBinder(caller != null ? caller.asBinder() : null);
        data.writeString(callingPackage);
        data.writeTypedArray(intents, 0);
        data.writeStringArray(resolvedTypes);
        data.writeStrongBinder(resultTo);
        if (options != null) {
            data.writeInt(1);
            options.writeToParcel(data, 0);
        } else {
            data.writeInt(0);
        }
        data.writeInt(userId);
        mRemote.transact(START_ACTIVITIES_TRANSACTION, data, reply, 0);
        reply.readException();
        int result = reply.readInt();
        reply.recycle();
        data.recycle();
        return result;
    }
Proxy就会向Binder驱动中写入Parcel对象,并告诉服务端,我们要执行
START_ACTIVITIES_TRANSACTION标识所对应的操作,那么服务端就会从Binder池中读取我们Client端发来的数据,最终在onTransact()方法中执行:
    case START_ACTIVITY_TRANSACTION:
        {
            data.enforceInterface(IActivityManager.descriptor);
            IBinder b = data.readStrongBinder();
            IApplicationThread app = ApplicationThreadNative.asInterface(b);
            String callingPackage = data.readString();
            Intent intent = Intent.CREATOR.createFromParcel(data);
            String resolvedType = data.readString();
            IBinder resultTo = data.readStrongBinder();
            String resultWho = data.readString();
            int requestCode = data.readInt();
            int startFlags = data.readInt();
            ProfilerInfo profilerInfo = data.readInt() != 0
                    ? ProfilerInfo.CREATOR.createFromParcel(data) : null;
            Bundle options = data.readInt() != 0
                    ? Bundle.CREATOR.createFromParcel(data) : null;
            int result = startActivity(app, callingPackage, intent, resolvedType,
                    resultTo, resultWho, requestCode, startFlags, profilerInfo, options);
            reply.writeNoException();
            reply.writeInt(result);
            return true;
        }
所以,我们直接看ActivityManagerService中startActivity()方法即可。下面的代码很多,详细去读没有任何的意义,我直接用一个流程图代替
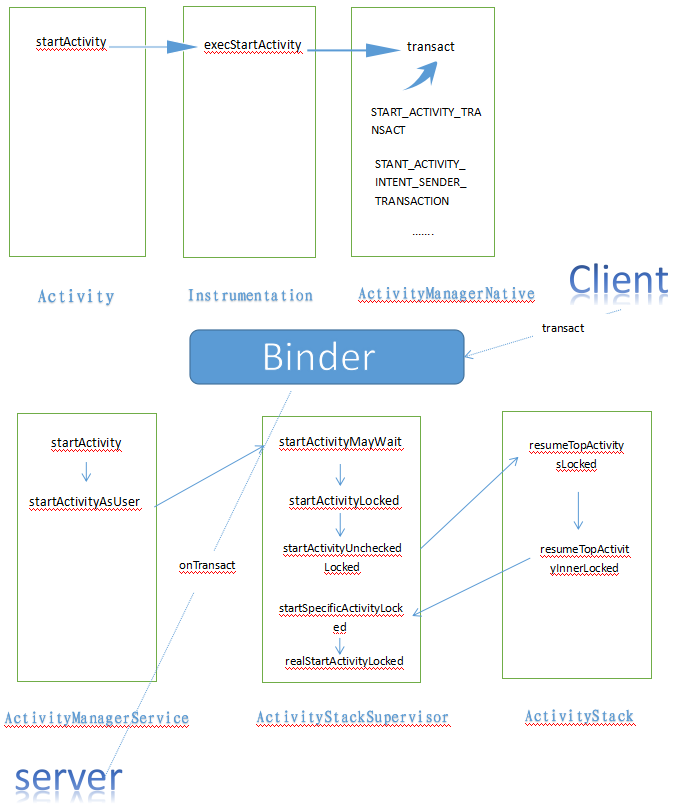
server端从ActivityManagerService执行到ActivityStackSupervisor再到ActivityStack,最终执行到ActivityStackSuperviso中的realStartActivityLocked方法:
  final boolean realStartActivityLocked(ActivityRecord r,
            ProcessRecord app, boolean andResume, boolean checkConfig)
            throws RemoteException {

             ......

            if (andResume) {
                app.hasShownUi = true;
                app.pendingUiClean = true;
            }
            app.forceProcessStateUpTo(mService.mTopProcessState);
            app.thread.scheduleLaunchActivity(new Intent(r.intent), r.appToken,
                    System.identityHashCode(r), r.info, new Configuration(mService.mConfiguration),
                    new Configuration(stack.mOverrideConfig), r.compat, r.launchedFromPackage,
                    task.voiceInteractor, app.repProcState, r.icicle, r.persistentState, results,
                    newIntents, !andResume, mService.isNextTransitionForward(), profilerInfo);

            ......

        return true;
    }
代码非常的长,但是最主要的是执行了 app.thread.scheduleLaunchActivity()这个方法,app.thread是什么呢?其实是ApplicationThreadNative对象的一个Proxy对象
    static public IApplicationThread asInterface(IBinder obj) {
        if (obj == null) {
            return null;
        }
        IApplicationThread in =
            (IApplicationThread)obj.queryLocalInterface(descriptor);
        if (in != null) {
            return in;
        }

        return new ApplicationThreadProxy(obj);
    }
从上面代码可以看出AMS中所持有的是它的Proxy对象,那么它的真实server实现对象是什么呢?在ActivityThread类中,ActivityThread是我们每个App的入口地址,在main方法中:
  public static void main(String[] args) {
        Trace.traceBegin(Trace.TRACE_TAG_ACTIVITY_MANAGER, "ActivityThreadMain");
        SamplingProfilerIntegration.start();

        // CloseGuard defaults to true and can be quite spammy.  We
        // disable it here, but selectively enable it later (via
        // StrictMode) on debug builds, but using DropBox, not logs.
        CloseGuard.setEnabled(false);

        Environment.initForCurrentUser();

        // Set the reporter for event logging in libcore
        EventLogger.setReporter(new EventLoggingReporter());

        AndroidKeyStoreProvider.install();

        // Make sure TrustedCertificateStore looks in the right place for CA certificates
        final File configDir = Environment.getUserConfigDirectory(UserHandle.myUserId());
        TrustedCertificateStore.setDefaultUserDirectory(configDir);

        Process.setArgV0("<pre-initialized>");

        Looper.prepareMainLooper();

        ActivityThread thread = new ActivityThread();
        thread.attach(false);

        if (sMainThreadHandler == null) {
            sMainThreadHandler = thread.getHandler();
        }

        if (false) {
            Looper.myLooper().setMessageLogging(new
                    LogPrinter(Log.DEBUG, "ActivityThread"));
        }

        // End of event ActivityThreadMain.
        Trace.traceEnd(Trace.TRACE_TAG_ACTIVITY_MANAGER);
        Looper.loop();

        throw new RuntimeException("Main thread loop unexpectedly exited");
    }
除了启动主Looper的循环之外,还有个很重要的操作:
   ActivityThread thread = new ActivityThread();
        thread.attach(false);
生成了ActivityThread这个对象,然后attach,去看看:
  private void attach(boolean system) {
        sCurrentActivityThread = this;
        mSystemThread = system;
        if (!system) {
            ViewRootImpl.addFirstDrawHandler(new Runnable() {
                @Override
                public void run() {
                    ensureJitEnabled();
                }
            });
            android.ddm.DdmHandleAppName.setAppName("<pre-initialized>",
                                                    UserHandle.myUserId());
            RuntimeInit.setApplicationObject(mAppThread.asBinder());
            final IActivityManager mgr = ActivityManagerNative.getDefault();
            try {
                mgr.attachApplication(mAppThread);
            } catch (RemoteException ex) {
                // Ignore
            }
         ......
    }
可以从上面看到,通过AMS的Proxy对象去告诉server去attachApplication,看到这里是不是晕了?其实这样子滴,AMS是我们系统的服务,我们的ActivityThread也就是我们的app持有了AMS对应的Proxy对象,通过调用它的接口去执行AMS端的代码,比如启动Activity,Service等,但是AMS如何和我们应用通信的呢?比如当我们的Activity生命周期到了pause,stop了,就是通过调用我们的ApplicationThreadNative对应的Proxy对象去操作我们ActivityThread中ApplicationThread中所实现接口的方法。此时,我们的ActivityThread就是server了。
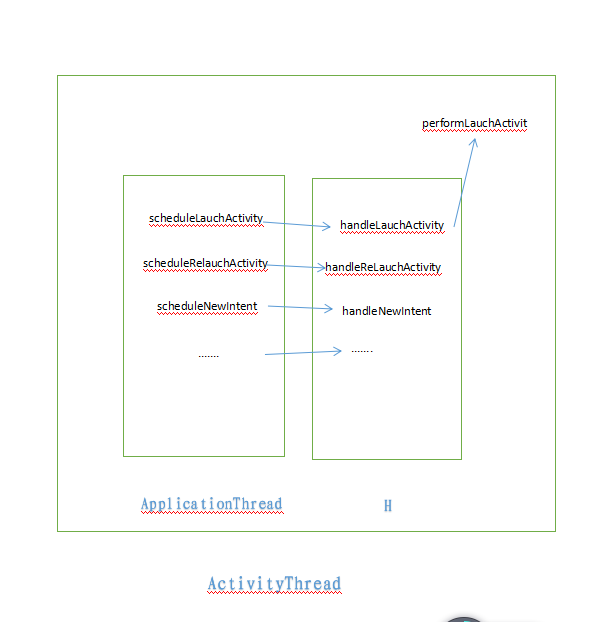
最终到我们的performLauchActivity()方法启动Activity
   private Activity performLaunchActivity(ActivityClientRecord r, Intent customIntent) {
        // System.out.println("##### [" + System.currentTimeMillis() + "] ActivityThread.performLaunchActivity(" + r + ")");

        ActivityInfo aInfo = r.activityInfo;
        if (r.packageInfo == null) {
            r.packageInfo = getPackageInfo(aInfo.applicationInfo, r.compatInfo,
                    Context.CONTEXT_INCLUDE_CODE);
        }

        ComponentName component = r.intent.getComponent();
        if (component == null) {
            component = r.intent.resolveActivity(
                mInitialApplication.getPackageManager());
            r.intent.setComponent(component);
        }

        if (r.activityInfo.targetActivity != null) {
            component = new ComponentName(r.activityInfo.packageName,
                    r.activityInfo.targetActivity);
        }

        Activity activity = null;
        try {
            java.lang.ClassLoader cl = r.packageInfo.getClassLoader();
            activity = mInstrumentation.newActivity(
                    cl, component.getClassName(), r.intent);
            StrictMode.incrementExpectedActivityCount(activity.getClass());
            r.intent.setExtrasClassLoader(cl);
            r.intent.prepareToEnterProcess();
            if (r.state != null) {
                r.state.setClassLoader(cl);
            }
        } catch (Exception e) {
            if (!mInstrumentation.onException(activity, e)) {
                throw new RuntimeException(
                    "Unable to instantiate activity " + component
                    + ": " + e.toString(), e);
            }
        }

        try {
            Application app = r.packageInfo.makeApplication(false, mInstrumentation);

            if (localLOGV) Slog.v(TAG, "Performing launch of " + r);
            if (localLOGV) Slog.v(
                    TAG, r + ": app=" + app
                    + ", appName=" + app.getPackageName()
                    + ", pkg=" + r.packageInfo.getPackageName()
                    + ", comp=" + r.intent.getComponent().toShortString()
                    + ", dir=" + r.packageInfo.getAppDir());

            if (activity != null) {
                Context appContext = createBaseContextForActivity(r, activity);
                CharSequence title = r.activityInfo.loadLabel(appContext.getPackageManager());
                Configuration config = new Configuration(mCompatConfiguration);
                if (DEBUG_CONFIGURATION) Slog.v(TAG, "Launching activity "
                        + r.activityInfo.name + " with config " + config);
                activity.attach(appContext, this, getInstrumentation(), r.token,
                        r.ident, app, r.intent, r.activityInfo, title, r.parent,
                        r.embeddedID, r.lastNonConfigurationInstances, config,
                        r.referrer, r.voiceInteractor);

                if (customIntent != null) {
                    activity.mIntent = customIntent;
                }
                r.lastNonConfigurationInstances = null;
                activity.mStartedActivity = false;
                int theme = r.activityInfo.getThemeResource();
                if (theme != 0) {
                    activity.setTheme(theme);
                }

                activity.mCalled = false;
                if (r.isPersistable()) {
                    mInstrumentation.callActivityOnCreate(activity, r.state, r.persistentState);
                } else {
                    mInstrumentation.callActivityOnCreate(activity, r.state);
                }
                if (!activity.mCalled) {
                    throw new SuperNotCalledException(
                        "Activity " + r.intent.getComponent().toShortString() +
                        " did not call through to super.onCreate()");
                }
                r.activity = activity;
                r.stopped = true;
                if (!r.activity.mFinished) {
                    activity.performStart();
                    r.stopped = false;
                }
                if (!r.activity.mFinished) {
                    if (r.isPersistable()) {
                        if (r.state != null || r.persistentState != null) {
                            mInstrumentation.callActivityOnRestoreInstanceState(activity, r.state,
                                    r.persistentState);
                        }
                    } else if (r.state != null) {
                        mInstrumentation.callActivityOnRestoreInstanceState(activity, r.state);
                    }
                }
                if (!r.activity.mFinished) {
                    activity.mCalled = false;
                    if (r.isPersistable()) {
                        mInstrumentation.callActivityOnPostCreate(activity, r.state,
                                r.persistentState);
                    } else {
                        mInstrumentation.callActivityOnPostCreate(activity, r.state);
                    }
                    if (!activity.mCalled) {
                        throw new SuperNotCalledException(
                            "Activity " + r.intent.getComponent().toShortString() +
                            " did not call through to super.onPostCreate()");
                    }
                }
            }
            r.paused = true;

            mActivities.put(r.token, r);

        } catch (SuperNotCalledException e) {
            throw e;

        } catch (Exception e) {
            if (!mInstrumentation.onException(activity, e)) {
                throw new RuntimeException(
                    "Unable to start activity " + component
                    + ": " + e.toString(), e);
            }
        }

        return activity;
    }
代码很长,但是我们很轻松的知道,先用类加载器生成Activity对象,然后生成Application,再然后调用Activity的onCreate()方法….
WMS的操作
获取视图
我们继续看performLauchActivity中的代码,当生成了Activity对象后,会调用它的attach方法,我们一起去Activity里面的attach方法:
 final void attach(Context context, ActivityThread aThread,
            Instrumentation instr, IBinder token, int ident,
            Application application, Intent intent, ActivityInfo info,
            CharSequence title, Activity parent, String id,
            NonConfigurationInstances lastNonConfigurationInstances,
            Configuration config, String referrer, IVoiceInteractor voiceInteractor) {
        attachBaseContext(context);

        mFragments.attachHost(null /*parent*/);

        mWindow = new PhoneWindow(this);
        mWindow.setCallback(this);
        mWindow.setOnWindowDismissedCallback(this);
        mWindow.getLayoutInflater().setPrivateFactory(this);
        if (info.softInputMode != WindowManager.LayoutParams.SOFT_INPUT_STATE_UNSPECIFIED) {
            mWindow.setSoftInputMode(info.softInputMode);
        }
        if (info.uiOptions != 0) {
            mWindow.setUiOptions(info.uiOptions);
        }
        mUiThread = Thread.currentThread();

        mMainThread = aThread;
        mInstrumentation = instr;
        mToken = token;
        mIdent = ident;
        mApplication = application;
        mIntent = intent;
        mReferrer = referrer;
        mComponent = intent.getComponent();
        mActivityInfo = info;
        mTitle = title;
        mParent = parent;
        mEmbeddedID = id;
        mLastNonConfigurationInstances = lastNonConfigurationInstances;
        if (voiceInteractor != null) {
            if (lastNonConfigurationInstances != null) {
                mVoiceInteractor = lastNonConfigurationInstances.voiceInteractor;
            } else {
                mVoiceInteractor = new VoiceInteractor(voiceInteractor, this, this,
                        Looper.myLooper());
            }
        }

        mWindow.setWindowManager(
                (WindowManager)context.getSystemService(Context.WINDOW_SERVICE),
                mToken, mComponent.flattenToString(),
                (info.flags & ActivityInfo.FLAG_HARDWARE_ACCELERATED) != 0);
        if (mParent != null) {
            mWindow.setContainer(mParent.getWindow());
        }
        mWindowManager = mWindow.getWindowManager();
        mCurrentConfig = config;
    }
已经上路的司机都知道Window在Android中是个抽象的对象,具体的视图应该是View对象,那么我们如何将Activity布局中的View对象放到Window中的呢?在Activity中的attach方法中生成了PhoneWindow对象,这也是它目前的唯一实现。并且注册它的Callback接口,这样,我们的Activity就能接收到对Window操作的回调了。attach方法的最后,将我们的windowManager传进去。好,接下来,我们分析PhoneWindow这个类,到底是如何分析起呢?去看看它的构造方法,也就是获取了布局解析器而已,我们只能继续看performLauchActivity,可以看到,后来,我们执行了Activity中的onCreate()方法,onCreate()方法又执行了什么呢?setContentView()方法,去看看Activity的setContentView方法:
  public void setContentView(@LayoutRes int layoutResID) {
        getWindow().setContentView(layoutResID);
        initWindowDecorActionBar();
    }
这里的getWindow()就是我们的PhoneWindow对象,所以,就继续分析PhoneWindow的setContentView()方法,其中将我们的布局ID传了进去:
   @Override
    public void setContentView(int layoutResID) {
        // Note: FEATURE_CONTENT_TRANSITIONS may be set in the process of installing the window
        // decor, when theme attributes and the like are crystalized. Do not check the feature
        // before this happens.
        if (mContentParent == null) {
            installDecor();
        } else if (!hasFeature(FEATURE_CONTENT_TRANSITIONS)) {
            mContentParent.removeAllViews();
        }

        if (hasFeature(FEATURE_CONTENT_TRANSITIONS)) {
            final Scene newScene = Scene.getSceneForLayout(mContentParent, layoutResID,
                    getContext());
            transitionTo(newScene);
        } else {
            mLayoutInflater.inflate(layoutResID, mContentParent);
        }
        mContentParent.requestApplyInsets();
        final Callback cb = getCallback();
        if (cb != null && !isDestroyed()) {
            cb.onContentChanged();
        }
    }
这里有个很重要的方法就是installDecor(),进去看看:
  private void installDecor() {
        if (mDecor == null) {
            mDecor = generateDecor();
            mDecor.setDescendantFocusability(ViewGroup.FOCUS_AFTER_DESCENDANTS);
            mDecor.setIsRootNamespace(true);
            if (!mInvalidatePanelMenuPosted && mInvalidatePanelMenuFeatures != 0) {
                mDecor.postOnAnimation(mInvalidatePanelMenuRunnable);
            }
        }
        if (mContentParent == null) {
            mContentParent = generateLayout(mDecor);

            ......
            }
            ......
       }
如果mDecor为空,就生成
 protected DecorView generateDecor() {
        return new DecorView(getContext(), -1);
    }
那么DecorView是什么呢?
    private final class DecorView extends FrameLayout implements RootViewSurfaceTaker {

        /* package */int mDefaultOpacity = PixelFormat.OPAQUE;

        /** The feature ID of the panel, or -1 if this is the application's DecorView */
        private final int mFeatureId;

        private final Rect mDrawingBounds = new Rect();

        private final Rect mBackgroundPadding = new Rect();

        private final Rect mFramePadding = new Rect();
其实就是一个FrameLayout,好在回去看installDecor,如果mContentParent为空,就去调用generateLayout(DecorView decor)这个方法,这个方法去生成什么呢?代码比较长,我们就分析最简单的一种情形,没有任何主题的:
    protected ViewGroup generateLayout(DecorView decor) {
    ....
      } else {
            // Embedded, so no decoration is needed.
            layoutResource = R.layout.screen_simple;
            // System.out.println("Simple!");
        }

        mDecor.startChanging();

        View in = mLayoutInflater.inflate(layoutResource, null);
        decor.addView(in, new ViewGroup.LayoutParams(MATCH_PARENT, MATCH_PARENT));
        mContentRoot = (ViewGroup) in;
            ViewGroup contentParent = (ViewGroup)findViewById(ID_ANDROID_CONTENT);
        if (contentParent == null) {
            throw new RuntimeException("Window couldn't find content container view");
        }
        .......
    return contentParent;
将我们的R.layout.screen.simple布局解析出来:
<LinearLayout xmlns:android="http://schemas.android.com/apk/res/android"
android:layout_width="match_parent"
android:layout_height="match_parent"
android:fitsSystemWindows="true"
android:orientation="vertical">
<ViewStub android:id="@+id/action_mode_bar_stub"
android:inflatedId="@+id/action_mode_bar"
android:layout="@layout/action_mode_bar"
android:layout_width="match_parent"
android:layout_height="wrap_content"
android:theme="?attr/actionBarTheme" />
<FrameLayout
android:id="@android:id/content"
android:layout_width="match_parent"
android:layout_height="match_parent"
android:foregroundInsidePadding="false"
android:foregroundGravity="fill_horizontal|top"
android:foreground="?android:attr/windowContentOverlay" />
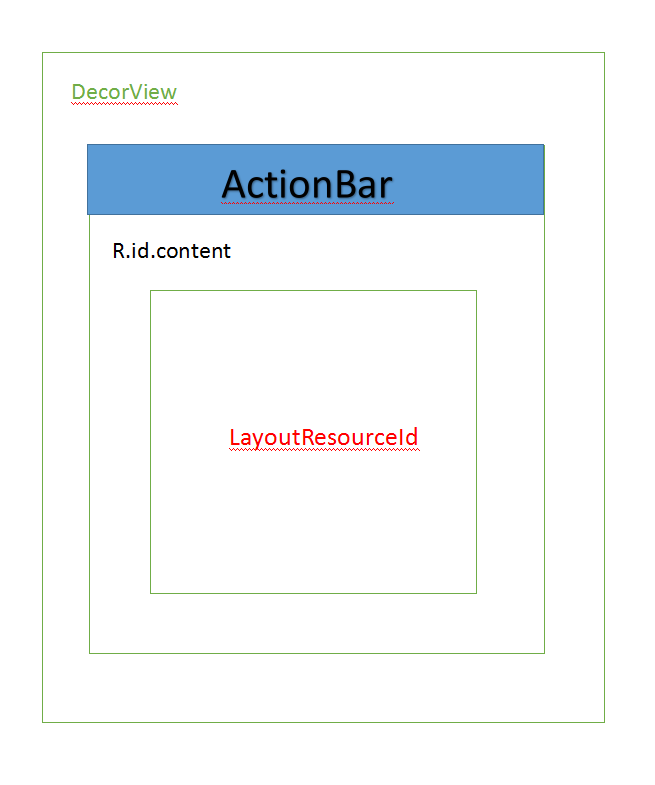
</LinearLayout>然后把这个布局放到我们的DecorView中,最后从我们的PhoneWindow中找出R.id.content这个ID,从上面的layout可以看出,还是一个FrameLayout。好,再回到我们的PhoneWindow中的setContentView方法来:
  public void setContentView(int layoutResID) {
        // Note: FEATURE_CONTENT_TRANSITIONS may be set in the process of installing the window
        // decor, when theme attributes and the like are crystalized. Do not check the feature
        // before this happens.
        if (mContentParent == null) {
            installDecor();
        } else if (!hasFeature(FEATURE_CONTENT_TRANSITIONS)) {
            mContentParent.removeAllViews();
        }

        if (hasFeature(FEATURE_CONTENT_TRANSITIONS)) {
            final Scene newScene = Scene.getSceneForLayout(mContentParent, layoutResID,
                    getContext());
            transitionTo(newScene);
        } else {
            mLayoutInflater.inflate(layoutResID, mContentParent);
        }
        mContentParent.requestApplyInsets();
        final Callback cb = getCallback();
        if (cb != null && !isDestroyed()) {
            cb.onContentChanged();
        }
    }
这样mContentParent就是我们的R.id.content的那个FrameLayout,然后把它当作我们的父容器,解析我们传入的Layout ID。
添加到WMS
通过上面的分析,我们知道当Activity启动时,到attach方法里面将我们的视图解析好后,放入DecorView中,那么系统何时将我们的DecorView放到到WMS中的呢?答案是在Activity的Resume()方法:
    final void handleResumeActivity(IBinder token,
            boolean clearHide, boolean isForward, boolean reallyResume) {
......
   if (r.window == null && !a.mFinished && willBeVisible) {
                r.window = r.activity.getWindow();
                View decor = r.window.getDecorView();
                decor.setVisibility(View.INVISIBLE);
                ViewManager wm = a.getWindowManager();
                WindowManager.LayoutParams l = r.window.getAttributes();
                a.mDecor = decor;
                l.type = WindowManager.LayoutParams.TYPE_BASE_APPLICATION;
                l.softInputMode |= forwardBit;
                if (a.mVisibleFromClient) {
                    a.mWindowAdded = true;
                    wm.addView(decor, l);
                }

            // If the window has already been added, but during resume
            // we started another activity, then don't yet make the
            // window visible.
            } else if (!willBeVisible) {
                if (localLOGV) Slog.v(
                    TAG, "Launch " + r + " mStartedActivity set");
                r.hideForNow = true;
            }
......
}
我们很清楚的看到wm.addView(decor,l),清楚WindowManagerService的司机们可能知道,这其实是一个IPC操作,当执行这段代码,其实又是一次IPC操作,和Android的内核进行了交互,远程的WMS将会将我们的DecorView添加进去。那么在添加的过程,又做了哪些事情呢?
  @Override
    public void addView(@NonNull View view, @NonNull ViewGroup.LayoutParams params) {
        applyDefaultToken(params);
        mGlobal.addView(view, params, mDisplay, mParentWindow);
    }
上面是WindowManager的唯一实现类WindowManagerImpl中的addView方法,所以,我们又要转移到WindowManagerGlobal中去看看了:
public void addView(View view, ViewGroup.LayoutParams params,
            Display display, Window parentWindow) {

     ......

      root = new ViewRootImpl(view.getContext(), display);

            view.setLayoutParams(wparams);

            mViews.add(view);
            mRoots.add(root);
            mParams.add(wparams);
        }

        // do this last because it fires off messages to start doing things
        try {
            root.setView(view, wparams, panelParentView);
        } catch (RuntimeException e) {
            // BadTokenException or InvalidDisplayException, clean up.
            synchronized (mLock) {
                final int index = findViewLocked(view, false);
                if (index >= 0) {
                    removeViewLocked(index, true);
                }
     ......

}
其中最主要的一段代码就是上面的了,当执行ViewRootImpl.setView()方法,我们就开始测量,绘制我们的控件了。由于View工作原理的代码篇幅太长了,就不贴出来了。
总结
ApplicationThread这个对象非常的重要,可以说它是AMS和ActivityThread沟通的桥梁,通过ApplicationThread,我们可以顺利的调用AMS去告诉系统启动android的四大组件,而AMS亦通过ApplicationThread去告诉我们activityThread四大组件的生命周期发生改变。
与之对应的是ViewRootImpl对象,通过ViewRootImpl,我们可以顺利的将我们的顶级View-DecorView添加到WMS中去,并且通过它去绘制我们的View,以及通过它去接收WMS那边的触摸事件。所以ViewRootImpl是打通WMS和DecorView的桥梁。


 3026
3026

 被折叠的 条评论
为什么被折叠?
被折叠的 条评论
为什么被折叠?
 到【灌水乐园】发言


