


1. QTextBrowser简介
QTextBrowser是Qt库中的一个富文本浏览控件类,它继承于QTextEdit,并添加了一些导航功能,以方便用户可以跟踪超文本文章中的链接。在缺省情况下,QTextBrowser设置为只读属性。
使用QTextBrowser时,可以通过setHtml()或setPlainText()方法设置内容,通过setSource()方法设置文本数据源。同时,可以通过连接到sourceChanged()信号来跟踪当前源文件名。
-
如何使用QTextBrowser:
头文件:#include <QTextBrowser>
CMake: find_package(Qt6 REQUIRED COMPONENTS Widgets)
target_link_libraries(mytarget PRIVATE Qt6::Widgets)
qmake:QT += widgets
继承于:QTextEdit
2. 示例说明
本文分享一个使用QTextBrowser自定义右键菜单的示例代码。
这个示例代码创建了一个I20YCTextBrowser类,继承于QTextBrowser,并重写覆盖了contextMenuEvent()函数。
在I20YCTextBrowser类的构造函数中,我们创建了一个自定义的右键菜单,并添加了“复制(&C)”和“全选(&A)”两个选项。然后,我们连接了这两个选项的触发信号到相应的槽函数,实现了复制和选择所有文本的功能。
在I20YCTextBrowser::contextMenuEvent()函数中,我们使用exec()函数在鼠标右键点击的位置显示自定义右键菜单。
最后,在main()函数中,我们创建了一个I20YCTextBrowser对象,并设置了一段HTML文本。运行程序后,当你在QTextBrowser控件中右键点击时,会显示出自定义的右键菜单。
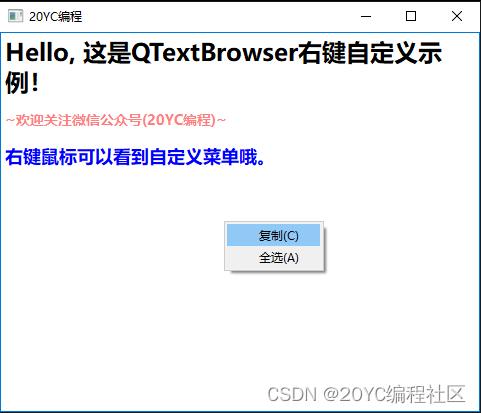
3. 示例执行效果
4. 示例源码
-
i20yctextbrowser.h
#ifndef I20YCTEXTBROWSER_H
#define I20YCTEXTBROWSER_H

#include <QTextBrowser>
#include <QMenu>
#include <QAction>
#include <QContextMenuEvent>

class I20YCTextBrowser : public QTextBrowser
{
    Q_OBJECT
public:
    I20YCTextBrowser(QWidget* parent = nullptr);

protected:
    void contextMenuEvent(QContextMenuEvent *event) override;

private:
    QMenu *m_pContextMenu{nullptr};
    QAction *m_pCopyAction{nullptr};
    QAction *m_pSelectAllAction{nullptr};
};

#endif // I20YCTEXTBROWSER_H
-
i20yctextbrowser.cpp
#include "i20yctextbrowser.h"

I20YCTextBrowser::I20YCTextBrowser(QWidget* parent)
    : QTextBrowser(parent)
{
    this->setWindowTitle("20YC编程");
    this->resize(480, 380);

    // 创建自定义右键菜单
    m_pContextMenu = new QMenu(this);
    m_pCopyAction = new QAction(tr("复制(&C)"), this);
    m_pSelectAllAction = new QAction(tr("全选(&A)"), this);
    m_pContextMenu->addSeparator();
    m_pContextMenu->addAction(m_pCopyAction);
    m_pContextMenu->addAction(m_pSelectAllAction);

    // 连接信号槽
    connect(m_pCopyAction, &QAction::triggered, this, &I20YCTextBrowser::copy);
    connect(m_pSelectAllAction, &QAction::triggered, this, &I20YCTextBrowser::selectAll);
}

void I20YCTextBrowser::contextMenuEvent(QContextMenuEvent *event)
{
    // 显示自定义右键菜单
    m_pContextMenu->exec(event->globalPos());
}
-
main.cpp
#include "i20yctextbrowser.h"
#include <QApplication>

int main(int argc, char *argv[]) {
    QApplication app(argc, argv);
    I20YCTextBrowser textBrowser;
    textBrowser.setHtml("<h1>Hello, 这是QTextBrowser右键自定义示例!</h1>\
<h3><p style=\"color:rgba(255,0,0,0.5);\">~欢迎关注微信公众号(20YC编程)~</p></h3>\
<h2><p style=\"color:blue;\">右键鼠标可以看到自定义菜单哦。</p></h2>\
");
    textBrowser.show();
    return app.exec();
}
![]()
-【End】-
#想了解更多精彩内容,关注下方公众号,还有示例源码、开发工具免费下载。

喜欢本文章,记得点赞、分享、关注哦~


 1万+
1万+


 被折叠的 条评论
为什么被折叠?
被折叠的 条评论
为什么被折叠?
 到【灌水乐园】发言


