activitymanagerservice服务源码分析
1、ActivityManagerService概述
ActivityManagerService(以下简称AMS)作为android中最核心的服务,主要负责系统的四大组件的启动、切换、调度以及应用进程的管理和调度等工作。它类似于操作系统中的进程管理和调度模块类似,所以要想掌握android,AMS至关重要。AMS属于service的一种,所以它也是由system_server进行启动以及管理。本文将以两条不同的主线来分析AMS:第一条与其他服务一样,分析system_server中AMS的调用轨迹;第二条将分析一个Activity的启动过程,而Activity的启动过程将在下一篇中进行分析。
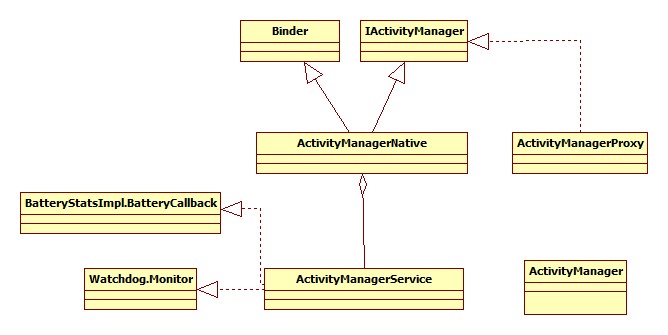
先来看AMS的家族图谱:

图中有一个ActivityManager类,由于ActivityManagerService是系统的核心服务,很多API不能开放给客户端使用,所以在家族图谱中增加了ActivityManager类,ActivityManager类通过调用ActivityManagerNative的getDefault函数来得到一个ActivityManagerProxy对象,通过它就可以实现ActivityManager与AMS的交互。
2、AMS的调用流程分析
AMS作为系统的核心服务,由system_server创建,system_server由Zygote进程的startsystemserver触发,此处以android6.0源码为基础,分析其run函数:
private void run(){
    ...
    //初始化native servers
    System.loadLibrary("android_servers");
    ...
    //初始化system context
    createSystemContext();
    //创建System service manager
    mSystemServiceManager = new SystemServiceManager(mSystemContext);
    LocalServices.addService(SystemServiceManager.class,mSystemServiceManager);

    //start services
    try{
        startBootstrapservices();
        startCoreServices();
        startOtherServices();
    }catch(Throwable ex){
        throw ex;
    }
    ...
    Looper.loop();
    ...
}
2.1 createSystemContext()方法分析
private void createSystemContext(){
    //创建一个ActivityThread对象,它代表应用进程的主线程
    ActivityThread activityThread = ActivityThread.systemMain();
    //获取一个和应用进程一样的android运行上下文环境
    mSystemContext = activityThread.getSystemContext();
    mSystemContext.setTheme(android.R.style.Theme_DeviceDefault_Light_DarkActionBar);
}
首先分析ActivityThread的systemMain()方法,其代码如下:
public static ActivityThread systemMain(){
    ...
    ActivityThread thread = new ActivityThread();
    thread.attach(true);
    return thread;
}由代码可知,其确实创建了一个ActivityThread对象,并调用其attach函数,记住,此处attach函数传入的参数为true,而在分析Activity启动的时候,它会为false,到时再对比分析。此处继续分析attach函数:
private void attach(boolean system) {
    ...
    if (!system) {//此处为true,所以不会执行此处代码
        ...
        android.ddm.DdmHandleAppName.setAppName("<pre-initialized>",
            UserHandle.myUserId());
        RuntimeInit.setApplicationObject(mAppThread.asBinder());
        final IActivityManager mgr = ActivityManagerNative.getDefault();
        try {
            mgr.attachApplication(mAppThread);
        } catch (RemoteException ex) {
            // Ignore
        }
        ...
    } else {//执行此分支
        android.ddm.DdmHandleAppName.setAppName("system_process",
            UserHandle.myUserId());
        try {
            mInstrumentation = new Instrumentation();
            //由ContextImol创建Context对象
            ContextImpl context = ContextImpl.createAppContext(
                this, getSystemContext().mPackageInfo);
            mInitialApplication = context.mPackageInfo.makeApplication(true, null);
            mInitialApplication.onCreate();
        } catch (Exception e) {

        }
   }
   //添加Dropbox logging 到libcore
   DropBox.setReporter(new DropBoxReporter());
   ViewRootImpl.addConfigCallback(new ComponentCallbacks2(){
        ...
   });
   ...
}
由于此处为系统服务,所以会执行else分支的代码,创建一个context对象,并且会根据Package信息来初始化一个Application对象。接着分析ActivityThread的getSystemContext()方法:
public ContextImpl getSystemContext(){
    Synchronized(this){
        if(mSystemContext == null){
            mSystemContext = ContextImpl.createSystemContext(this);
        }
        return mSystemContext;
    }
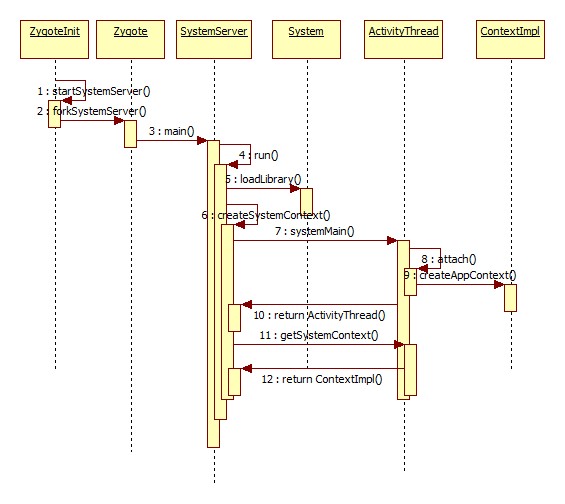
}显然,如果systemMain方法中创建Context成功,则返回,否则新建Context对象,综上,createSystemContext()方法主要功能就是,创建一个ActivityThread对象和一个ContextImpl对象,而这两个对象即组成了android运行环境。
时序图如下:
2.2 startBootstrapServices()方法分析
先看核心代码:
private void startBootStrapServices(){
    //启动Installer服务
    Installer installer = mSystemServiceManager.startService(Installer.class);
    //启动ActivityManagerService服务
    mActivityManagerService = mSystemServiceManager.
        startService(ActivityManagerService.Lifecycle.class).getService();
    //启动PowerManagerService服务
    mPowerManagerService = mSystemServiceManager.startService(PowerManagerService.class);
    ...
    //初始化属性缓存
    AttributeCache.init(mSystemContext);
    mActivityManagerService.setSystemProcess();

    startSensorService();
}
代码中,会将一系列的服务添加到servicemanager管理,主要包括Installer,AMS,PMS等系统服务,并初始化属性缓存,最后会调用AMS的setSystemProcess()方法将sytem_server进程并入AMS的管理范围,继续分析setSystemProcess()方法:
public void setSystemProcess(){
    try{
        //添加ActvityManagerService等服务到ServiceManager
        ServiceManager.addService(Context.ACTIVITY_SERVICE,this,true);
        ...
        ServiceManager.addService("meminfo",new MemBinder(this));
        ServiceManager.addService("gfxinfo",new GraohicsBinder(this));
        ServiceManager.addService("dbinfo"new DbBinder(this));
        ...
        //从packagemanagerservice中获取ApplicationInfo信息
        ApplicationInfo info = mContext.getPackageManager()
            .getApplicationInfo("android",STOCK_PM_FLAGS);
        //根据info初始化android运行环境,即ActivityThread以及ContextImpl对象
        mSystemThread.installSystemApplicationInfo(info,getClass().getClassLoader());
        synchronized(this){
            //创建新的进程
            ProcessRecord app = newProcessRecordLocked(info,info.processName,false,0);
            app.persistent = true;
            app.pid = MY_PID;
            app.maxAdj = ProcessList.SYSTEM_ADJ;
            //绑定主线程
            app.makeActive(mSystemThread.getApplicationThread(),mProcessStats);
            synchronized(mPidsSelfLocked){
                mPidsSelfLocked.put(app.pid,app);
            }
            //更新进程管理
            updateLruProcessLocked(app,false,null);
            updateOomAdjLocked();
        }catch(PackageManager.NameNotFoundException ex){
            throw new RuntimeException("unable to find android system package",ex);
        }
    }
}
首先分析installSystemApplicationInfo方法,它依次调用ActivityThread->ContextImpl->LoadedApk等的installSystemApplicationInfo方法,LoadedApk中的代码如下:
void installSystemApplicationInfo(ApplicationInfo info,ClassLoader classLoader){
    assert info.packageName.equals("android");
    mApplicationInfo = info;
    mClassLoader = classLoader;
}
显然,是根据先前从Package里面获取的ApplicationInfo对系统的应用信息进行初始化,主要包括ApplicationInfo以及ClassLoader对象。
接着,分析创建新进程的方法newProcessRecordLocked():
final ProcessRecord newProcessRecordLocked(ApplicationInfo info,String customProcess,
    boolean isolated,int isolatedUid){
    ...
    final ProcessRecord r = new ProcessRecord(stats,info,proc,uid);
    ...
    addProcessNameLocked(r);
    return r;
}
它首先创建一个进程对象ProcessRecord,并将其加入到自定义的ProcessMap类型的容器里,最后返回。
最后,分析更新进程管理updateLruProcessLocked()方法:
final updateLruProcessLocked(ProcessRecord app,boolean activityChange,ProcessRecord client){
    final boolean hasActivity = app.activities.size()>0||app.hasClientActivities
        ||app.treatLikeActivity;
    final boolean hasService = false;//android 6.0没实现
    //如果没有Activity切换,切当前进程有Activity存在,则进程调度直接返回
    if(!activityChange&&hasActivity){
        return;
    }
    ...
    //记录下一个进程的索引
    int nextIndex;
    if(hasActivity){
        //获取Lru进程表中进程的数量
        final int N = mLruProcesses.size();
        //该进程没有activity,而进程表中其他进程有activity
        if(app.activities.size() == 0&&mLruProcessActivityStart<(N-1)){
            //将进程加入进程表
            mLruProcesses.add(N-1,app);
            ...//将其调整到第二个进程位置
        }else{//如果该进程有activity
            //直接将其加入到Lru进程表顶端
            mLruProcesses.add(app);
        }
        nextIndex = mLruProcessesServiceStart;
    }else if(hasService){
        //如果有service存在,将它加入到service链表的顶端
        mLruProcesses.add(mLruProcessActivityStart,app);
        nextIndex = mLruProcessServiceStart;
        mLruProcessServiceStart++;
    }else{
        //如果是新建进程
        int index = mLruProcessServiceStart;
        if(client!=null){
            int clientIndex = mLruProcesses.lastIndexOf(client);
            if(clientIndex <= lrui){
                clientIndex = lrui;
            }
            if(clientIndex >= 0&&index > clientIndex){
                index = clientIndex;
            }
        }
        mLruProcesses.add(index,app);
        ...
    }
    ...
}
此段代码就是进程LRU进程调度,具体参考注释。
小结:startBootStrapServices()主要是进行一系列的服务的注册,并且初始化进程信息,并将其加入到Lru进程表进行调度,同时也将System_server进程纳入AMS的管理。
2.3 startOtherServices()方法分析
与ActivityManagerService有关的核心代码如下:
private void startOtherServices(){
    final Context context = mSystemContext;
    //启动一系列的服务,CameraService,Account Manager,Telephony registry等
    ...
    //启动settingProvider,它提供配置信息
    mActivityManagerService.installSystemProviders();
    ...
    //初始化窗口管理服务
    wm = WindowManagerService.main(content,inputManager,mFactoryTestMode !=
        FactoryTest.FACTORY_TEST_LOW_LEVEL,!mFirstBoot,mOnlyCore);
    ServiceManager.addService(Context.WINDOW_SERVICE,wm);
    ServiceManager.addService(Context.INPUT_SERVICE,inputManager);
    //在内部保存窗口管理服务WMS
    mActivityManagerService.setWindowManager(wm);
    ...
    //和WMS交互,弹出“启动进度”对话框
    mActivityManagerNative.getDefault().showBootMessage(context.getResources().getText(
        com.android.internal.R.String.android_upgrading_starting_apps));
    ...
    mActivityManagerService.systemReady(new Runnable(){
        @Override
        public void run(){
            ...
            //标记服务(services)准备完毕
            mSystemServiceManager.startBootPhase(SystemService.PHASE_ACTIVITY_MANAGER_READY);
            ...
            try{
                //启动桌面
                startSystemUi(context);
            }
            ...
        }
    });
}
首先,分析installSystemProviders()方法:
public final void installSystemProviders(){
    List<ProviderInfo> providers;
    synchronized(this){
        ProcessRecord app = mProcessNames.get("system",Process.SYSTEM_UID);
        //根据进程名以及进程uid向PKMS查询满足要求的ProviderInfo
        providers = generateApplicationProvidersLocked(app);
        ...
    }
    if(providers != null){
        mSystemThread.installSystemProviders(providers);
    }
    ...
}
从进程Map表里,根据进程名字system来获取进程,并根据进程app来获取其应用信息中的providers,接着调用ActivityThread的installSystemProviders()方法来进行配置信息解析。
//ActivityThread.java
public final void installSystemProviders(List<ProviderInfo> providers){
    if(providers != null){
        installContentProviders(mInitialApplication,providers);
    }
}
跟踪installContentProviders()方法:
private void installContentProviders(Context context,List<ProviderInfo> providers){
    final ArrayList<IActivityManager.ContentProviderHolder> results =
        new ArrayList<IActivityManager.ContentProviderHolder>();
    for(ProviderInfo cpi:providers){
        //通过调用istallProvider函数获得一个ContentProviderHolder对象
        IActivityManager.ContentProviderHolder cph = installProvider(context,null,cpi,false
            ,true,true);
        if(cph != null){
            cph.noReleaseNeeded = true;
            //保存获得的cph对象
            results.add(cph);
        }
    }
    try{
        //调用AMS的publishContentProvider注册此前的results里的cph。
        ActivityManagerNative.getDefault().publishContentProviders(getApplicationThread(),
            results);
    }catch(RemoteException ex){
    }
}
从代码可以看出,首先调用installProvider函数获得一个ContentProviderHolder对象,并将其保存在容器中,最后在调用AMS的publishContentProvider来注册容器中的所有ContentProviderHolder对象。至此,一个SettingProvider对象就正式的注册到了AMS.
继续分析startOtherServices()方法中mActivityManagerService.systemReady(final Runnable goingcallback)方法:
public void systemReady(final Runnable goingCallback){
    synchronized(this){
        if(mSystemReady){//系统已经准备好,直接调用goingCallback的run方法,而我们此处为false
            if(goingCallbak != null){
                goingCallback.run();
            }
            return;
        }
        ...
        if(!mDidUpdate){//检查是否有升级更新
            if(mWaitingUpdate){
                return;
            }
            final ArrayList<ComponentName> doneReceivers = new ArrayList<ComponentName>();
            //发送PRE_BOOT_COMPLETE广播
            mWaitingUpdate = deliverPreootCompleted(new Runnable(){
                public void run(){
                    synchronized(ActivityManagerService.this){
                        mDidUpdate = true;
                    }
                    showBootMessage(mContext.getText(R.string.android_upgrading_complete),false);
                    writeLastDonePreBootReceivers(doneReceivers);
                    //此处调用函数本身,再次执行
                    systemReady(goingCallback);
                }
            },doneReceivers,UserHandle.USER_OWNER);
            if(mWaitingUpdate){
                return;
            }
            mDidUpdate = true;
        }
        mAppOpsService.systemReady();
        //将mSystemReady标记为true,即表示系统准备好
        mSystemReady = true;
    }
    ...
    retrieveSettings();
    loadResourcesOnSystemReady();
    synchronized(this){
        readGrantedUriPermissionsLocked();
    }
    //此处执行函数传入的回调的run方法,主要是启动SystemUIService
    if(goingCallback != null){
        goingCallback.run();
    }
    ...
    synchronized(this){
        if(mFactoryTest != FactoryTest.FACTORY_TEST_LOW_LEVEL){
            try{
                //从PKMS中找出所有persistent属性为1的ApplicationInfo
                List apps = AppGlobals.getPackageManager().getPersistentApplications(
                    STOCK_PM_FLAGS);
                if(apps != null){
                    int N = apps.size();
                    int i;
                    for(i=0;i<N;i++){
                        ApplicationInfo info = (ApplicationInfo)apps.get(i);
                        if(info != null&&!info.packageName.equals("android")){
                            //逐个启动该Application所在的进程
                            addAppLocked(info,false,null);
                        }
                    }
                }
            }
        }
    }
    ...
    //启动初始化Activity
    mBooting = true;
    startHomeActivityLocked(mCurrentUserId,"systemReady");
    ...
    mStackSupervisor.resumeTopActivitiesLocked();
    sendUserSwitchBroadcastsLocked(-1,mCurrentUserId);
    }
}
首先,检查系统是否是更新,并发送PRE_BOOT_COMPLETE广播,并将mSystemReady置为true。接着调用函数传入的回调goingCallback的run方法,在run方法中主要功能是启动SystemUIService服务,其代码如下:
static final void startSystemUi(Context context){
    Intent intent = new Intent();
    intent.setComponent(new ComponentName("com.android.systemui",
        "com.android.systemui.SystemUIService"));
        context.startServiceAsUser(intent,UserHandle.OWNER);
}
它主要是启动了一个SystemUIService服务,此服务由SystemUi.apk提供,实现了状态栏。执行了回调之后,systemReady方法接着,从PKMS中找出所有persistent属性为1的ApplicationInfo,并将其所在的进程逐个启动,最后再调用startHomeActivityLocked来启动Home界面,
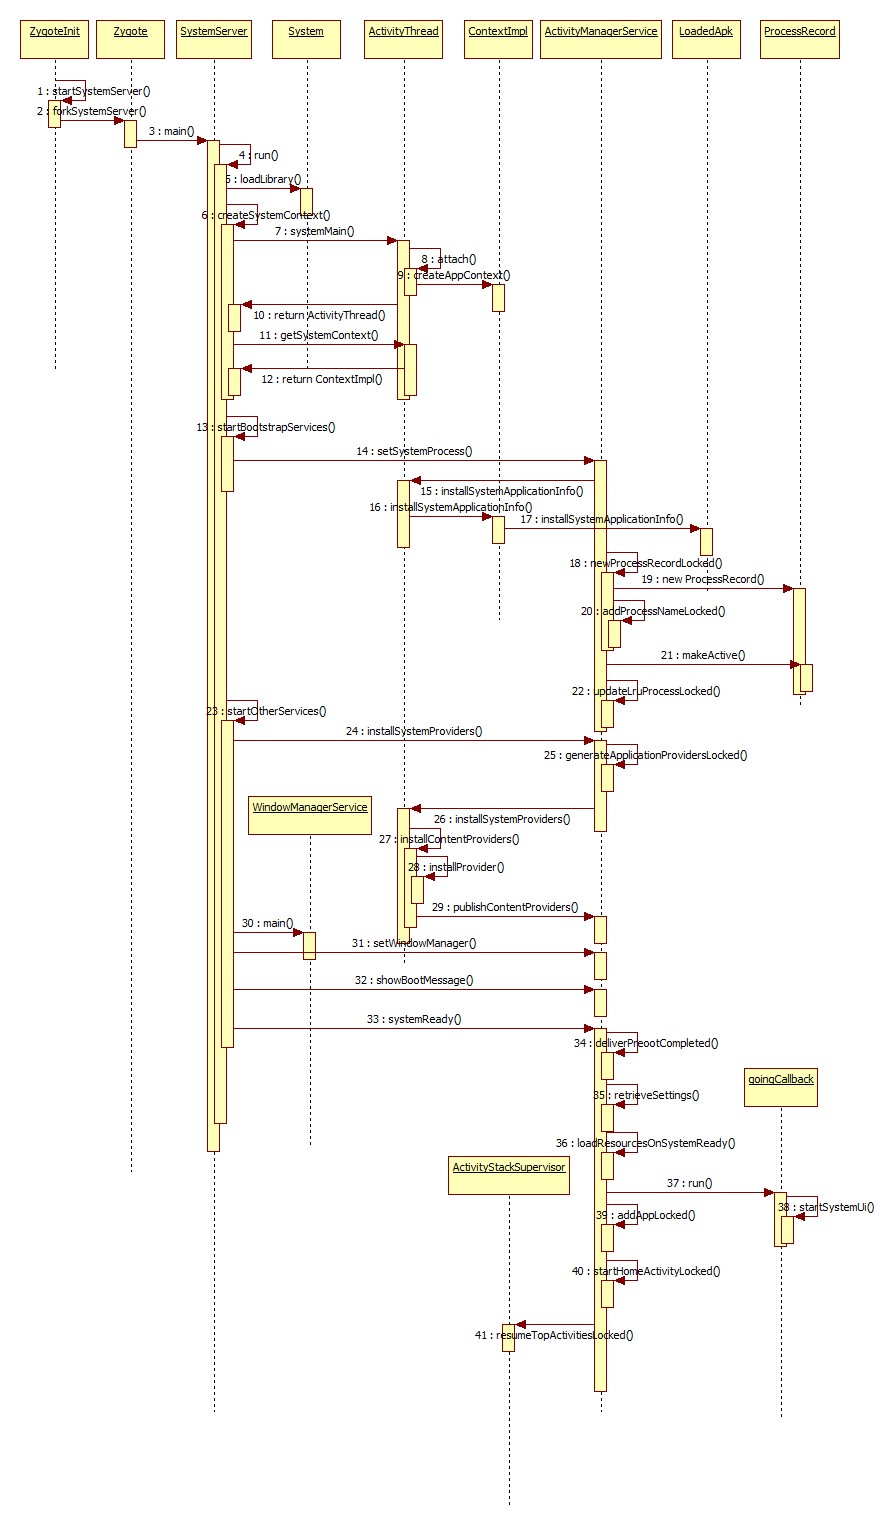
总结:到此时,从system_server进程开始,着重分析了ActivityManagerService服务的启动过程,至此,整个系统准备完毕,此处不详细分析Home的启动过程,它的启动将会在Activity的启动过程中进行详细的分析,而Home启动成功后,AMS会发送ACTION_BOOT_COMPLETED广播。AMS的启动流程很复杂,下面给出整体的时序图:


 1038
1038

 被折叠的 条评论
为什么被折叠?


