


vue知识点(四)
1、使用组件的细节点
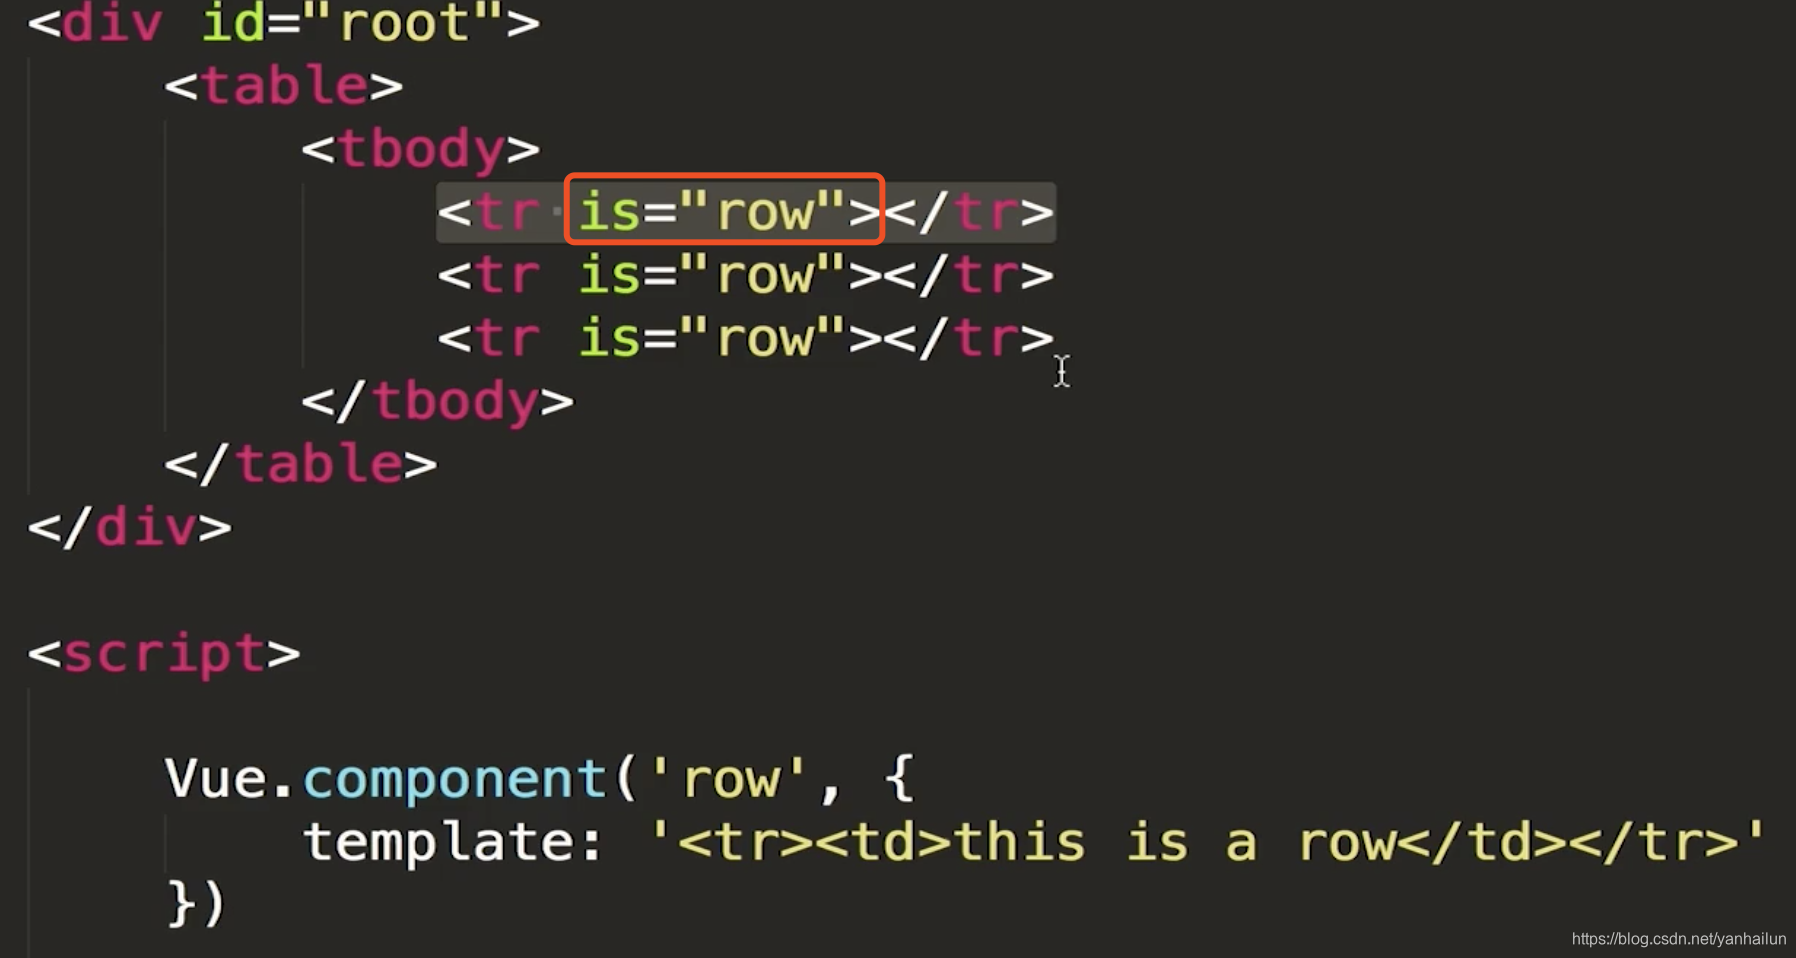
a、组件的is属性
某些特定的元素后面就要跟特定的标签,例如:tbody后面就要跟tr,如果将tr这个标签作为组件的一部分,渲染的时候就会有问题,这个时候在tr标签上加上is属性(还有ul标签后面要跟li标签、select后面必须写option)
b、组件中的data
根组件中的data可以是对象,但非根组件中的data必须是一个函数,并且这个函数必须返回一个对象,返回的这个对象中包含所需要的数据
c、ref获取dom对象
给某个dom元素一个ref="hello"的属性,通过this.$refs.hello就可以获取到这个dom元素
2、父子组件间的传值
a、父组件向子组件传值
通过绑定属性的方式,然后子组件通过props获取到父组件传过来的值(用:的形式绑定的属性=右边的双引号是表达式,没有用:绑定的属性=右边的双引号里面是字符串)
<div id="app">
	<counter :count="0"></counter>
	<counter :count="1"></counter>
</div>

<script>
	var counter = {
		template: '<counter>{{count}}<counter>',
		props: ['count']
	}

	var app = new Vue({
		el: '#app',
		components: {
			counter
		}
	})
</script>
⚠️:父组件可以随意的向子组件传递参数,但是子组件不能随便的修改父组件传递的参数,原因是如果传递过来的是引用类型的数据,而恰恰其他组件也用了这个父组件的数据,就会导致其他子组件的指向发生错误
但是可以将获取到的值赋值给data返回对象中的某一个属性:
data(){
	return {
		number: this.count
	}
}
b、子元素通过$emit触发父元素的自定义事件
<div id="root">
	<counter :count="3" @inc='handleIncrease'></counter>
	<counter :count="2" @inc='handleIncrease'></counter>
	<div>{{total}}</div>
</div>
var counter = {
	props: ['count'],
	data: function(){
		return {
			number: this.count
		}
	},
	template: '<div @click="handleClick">{{number}}</div>',
	methods: {
		handleClick: function(){
			this.number = this.number + 2;
			this.$emit('inc', 2);
		}
	}
}

var vm = new Vue({
	el: '#root',
	data: {
		total: 5
	},
	components: {
		counter: counter
	},
	methods: {
		handleIncrease: function(step){
			this.total += step;
		}
	}
})
3、非父子组件间的传值(4-5)
总线模式:非父子组件间的传值就是把一个空的vue实例作为中转站,通过 e m i t 触 发 事 件 , emit触发事件, emit触发事件,on监听事件
<div id="root">
	<child content="childOne"></child>
	<child1 content="childTwo"></child1>
	<child content="childTwo"></child>
</div>
Vue.prototype.bus = new Vue();
Vue.component('child',{
	props: ['content'],
	data: function(){
		return{
			myContent: this.content
		}
	},
	template: '<div @click="handleClick">{{myContent}}</div>',
	methods: {
		handleClick: function(){
			this.bus.$emit('change', this.content)
		}
	},
	//created: function(){
		//let this_ = this;
		//this.bus.$on('change', function(msg){
			//this_.myContent = msg
		//})
	//}
})

//child1组件
Vue.component('child1',{
	props: ['content'],
	data: function(){
		return{
			myContent: this.content
		}
	},
	template: '<div>{{myContent}}</div>',
	created: function(){
		let this_ = this;
		this.bus.$on('change', function(msg){
			this_.myContent = msg
		})
	}
})
4、插槽的使用(4-6)
单个插槽
组件中的带有html元素的字符串通过插槽展示在页面上
<div id="root">
	<child>
		<h1>hello</h1>
	<child>
</div>
Vue.component('child',{
	template: `<div>
					<slot></slot>
					<p>helen</p>
				</div>`,
})
具名插槽
<div id="root">
	<child>
		<h1 slot='header'>header</h1>
		<h2 slot='footer'>footer</h2>
	<child>
</div>
Vue.component('child',{
	template: `<div>
					<slot name="header"></slot>
					<p>helen</p>
					<slot name="footer"></slot>
				</div>`,
})
作用域插槽(4-7)
当父组件调用子组件,需要给子组件传dom元素时使用作用域插槽
<div id="root">
	<child>
		<template slot-scope="props">
			<li>{{props.item}}</li>
		</template>
	</child>
</div>
Vue.component('child',{
	data: function(){
		return {
			list: [1, 2, 3, 4]
		}
	},
	template: `<div>
					<ul>
						<slot v-for="item of list" :item=item></slot>
					</ul>
				</div>`
})
5、动态组件 (4-8)
<div id="root">
       <!-- <child-one v-if="type === 'child-one'"></child-one>
	<child-two v-if="type === 'child-two'"></child-two> -->
	<component :is="type"></component>
       <button @click="handleBtnClick">点击</button>
</div>
Vue.component('child-one', {
	template: '<div>child-one</div>'
})

Vue.component('child-two', {
	template: '<div>child-two</div>'
})

var vm = new Vue({
	el: '#root',
	data: {
		type: 'child-one'
	},
	methods: {
		handleBtnClick: function() {
			this.type = (this.type === 'child-one' ? 'child-two':'child-one');
		}
	}
})
v-once
只渲染元素和组件一次,随后的渲染,使用了此指令的元素/组件及其所有的子节点,都会当作静态内容并跳过,这可以用于优化更新性能。
<div id="app">
	<p v-once>{{msg}}</p>  //msg不会改变
	<p>{{msg}}</p>
	<p>
		<input type="text" v-model = "msg" name="">
	</p>
</div>
<script type="text/javascript">
	let vm = new Vue({
		el : '#app',
		data : {
			msg : "hello"
		}
	});
</script>


 409
409


 被折叠的 条评论
为什么被折叠?
被折叠的 条评论
为什么被折叠?
 到【灌水乐园】发言


