


<?php
思路:今天我们来学习一门新的技术,smarty模板技术/smarty引擎技术/smarty模板引擎技术
一、首先,利用前面学过的知识点完成一个用户列表页面:
userlist.php
如果这里面的处理逻辑比较复杂的话,那么整个页面看起来就比较臃肿,
大家想一想,我们有这么一种技术,能够将php代码和html代码进行分离,php代码主要用来负责业务逻辑的处理(如:从数据库中获取数据),而html代码主要用来数据的显示(将php代码获取到的数据显示到页面中),那么整个页面看起来就会舒服很多
将负责的业务逻辑放到php文件中,将php代码处理后的数据交给模板文件去显示
smarty模板引擎就是一门专门用来将php代码和html代码进行分离的这么一种技术
二、快速体验案例:
1、到官网去下载smarty类库包,并解压到项目的根目录下
2、引入smarty.class.php类库包,并建立两个文件夹:templates、templates_c
3、利用此类库的assign()方法,将php数据传递给模板文件
4、利用此类库的display()方法,将模板文件中的占位符替换为php数据,并将替换后的模板文件最终返还给浏览器显示
三、自动动手写一个min版本的smarty模板引擎,更有助于我们理解smarty模板引擎就是的底层原理
minsmarty.class.php
四、smarty类库包目录结构的分析:
libs
|-----smarty
|-----Smarty.class.php smarty核心类库
|-----Smarty_Compiler.class.php smarty核心编译类库
|-----Config_File.class.php smarty核心配置类库
|-----internals smarty内部函数目录
|-----plugins smarty插件目录
templates 模板目录
|-----index.html index.html模板文件
|-----index.tpl index.tpl模板文件
|-----index.php index.php模板文件
templates_c 编译目录
configs 配置文件目录
cache 缓存文件目录
五、smarty的配置:
include_once “smarty/Smarty.class.php”; //引入核心类文件
$smarty=new Smarty(); //创建一个smarty类实例对象
$smarty->template_dir=“./templates”; //设置模版目录
$smarty->compile_dir=“./templates_c”; //设置编译目录
$smarty->config_dir=“./configs”; //设置配置文件目录
//项目在调试期间,不建议启用缓存
$smarty->caching=false; //是否使用缓存
$smarty->cache_dir=“./cache”; //设置缓存目录
//左右边界符默认为{},但实际应用一般不使用默认的边界符,因为容易与javascript相冲突$smarty->left_delimiter=“{”; //设置左边界符
$smarty->right_delimiter=“}”; //设置右边界符
Smarty.class.php类库中的属性:可自行设置,以适应项目的需要
$template_dir [模板目录变量]
$compile_dir [编译目录变量]
$config_dir [配置目录变量]
$plugins_dir [插件目录变量]
$debugging [调试变量]
$debug_tpl调试模板变量
$debugging_ctrl [调试控制变量]
$global_assign [全局配置变量]
$undefined [未定义变量]
$autoload_filters [自动加载过滤器变量]
$compile_check [编译检查变量]
$force_compile [强迫编译变量]
$caching [缓存变量]
$cache_dir [缓存目录变量]
$cache_lifetime [缓存生存时间变量]
$cache_handler_func [缓存处理函数变量]
$cache_modified_check [缓存修正检查变量]
$config_overwrite [配置覆盖变量]
$config_booleanize [配置布尔化变量]
$config_read_hidden [配置读取隐藏变量]
$config_fix_newlines [配置固定换行符变量]
$default_template_handle r_func[默认模板处理函数变量]
$php_handling [PHP处理变量]
$security [安全变量]
$secure_dir [安全目录变量]
$security_settings [安全配置变量]
$trusted_dir [信任目录变量]
$left_delimiter [左结束符变量]
$right_delimiter [右结束符变量]
$compiler_class [编译类变量]
$request_vars_order [变量顺序变量]
$request_use_auto_globals [自动全局变量]
$compile_id [编译ID变量]
$use_sub_dirs [子目录变量]
$default_modifiers [默认修正器变量]
$default_resource_type [默认源类型变量]
Smarty.class.php类库中的方法:可根据需要来使用
append 添加
append_by_ref 引用添加
assign 赋值
assign_by_ref 引用赋值
clear_all_assign 清除所有赋值
clear_all_cache 清除所有缓存
clear_assign 清除赋值
clear_cache 清除缓存
clear_compiled_tpl 清除已编译模板
clear_config 清除配置
config_load 加载配置
display 显示
fetch 取得输出的内容
get_config_vars 取配置变量的值
get_registered_object 取得已注册的对象
get_template_vars 取得模板变量的值
is_cached 是否已被缓存
load_filter 加载过滤器
register_block 注册一个块
register_compiler_function 注册编译函数
register_function 注册函数
register_modifier 注册修饰器
register_object 注册对象
register_outputfilter 注册输出过滤器
register_postfilter 注册提交过滤器
register_prefilter 注册预过滤器
register_resource 注册资源
trigger_error 触发错误
template_exists 模板是否存在
unregister_block 注销一个块
unregister_compiler_function 注销编译函数
unregister_function 注销函数
unregister_modifier 注销修饰器
unregister_object 注销对象
unregister_outputfilter 注销输出过滤器
unregister_postfilter 注销提交过滤器
unregister_prefilter 注销预过滤器
unregister_resource 注销资源
常用的方法:
(1)append:添加指定的元素到数组中。如果是添加一个字符串,该字符串会被转换为数组格式后再进行添加。如果第三个可选参数被指定为TRUE,所添加的数据会和数组中现有数据进行合并,而不是直接添加。
例如:
$smarty->append(“数组名","Fred");
$smarty->append(“数组名",$address);
$smarty->append("数组名",array("city" => “bj","state" => “hd"));
案例:
****php文件
$smarty->append("aa","北京");
$smarty->append("aa","北京");
$smarty->append("aa","北京");
$smarty->append("aa","北京");
$smarty->append("bb",array('id'=>'001','name'=>'bbb'));
$smarty->append("bb",array('id'=>'001','name'=>'bbb'));
$smarty->append("bb",array('id'=>'001','name'=>'bbb'));
$smarty->append("bb",array('id'=>'003','name'=>'bbb'));
***tpl文件
<h1>append</h1>
<{foreach from=$aa item=temp}>
<{$temp}>
<{/foreach}>
<{foreach from=$bb item=temp2}>
<{$temp2.id}>||<{$temp2.name}>
<br/>
<{/foreach}>
(2)append_by_ref:采用引用的方式添加了一个变量,那么当这个变量的值改变时,被添加的值也随之改变。
例如:
$smarty->append_by_ref(“数组名”,$变量名);
提示:
*因为使用了引用添加,所有这里显示是 def
append方法增加数组和变量的时候,默认是值拷贝,不是引用传递.
为了节省内存开销,可以使用
append_by_ref来增加数组和变量,这样可以做到引用传递.
(3) assign_by_ref:采用引用的方式赋值到模板中,而不是在模板中创建一个数值的副本。
例如:
$smarty->assign_by_ref(“变量名”,值);
$smarty->assign_by_ref(“数组名”,数组);
提示:
为了节省内存开销,可以使用assign_by_ref来增加数组和变量,这样可以做到引用传递.
(4)clear_all_assign:清除所有已赋值到模板中的值
例如:
$smarty->clear_all_assign();
(5) clear_all_cache(int expire time):清除所有模板缓存。作为可选参数“expire time”,你可以指定一个以秒为单位的最小时间,超过这个时间的缓存都将被清除掉
例如:
$smarty->clear_all_cache();
(6)clear_assign:清除指定模板变量的值。可以指定单独的一个变量名称,或者是一个数组。
例如:
$smarty->clear_assign(“变量名”);
(7)clear_cache:清除指定模板的缓存。如果这个模板有多个缓存,你可以用第二个参数指定要清除缓存的缓存号。
例如:
// 清除某一模板的缓存
$smarty->clear_cache("index.tpl");
// 清除某一模板的多个缓存中指定缓存号的一个
$smarty->clear_cache(“index.tpl”,缓存号);
(8)is_cached:判断指定模板的是否缓存
例如:
$smarty->is_cached(“模板名称”);
(9)config_load:加载配置文件,并将其中的数据传送到模板中,它的功能和config_load函数是一样的。
例如:
// 加载配置变量
$smarty->config_load('my.conf');
// 加载其中一节
$smarty->config_load('my.conf','foobar');
(10)clear_config:清除所有配置变量,如果指定了变量名称,则只清除所指定的配置变量
例如:
// 清除所有配置变量
$smarty->clear_config();
// 清除一个配置变量
$smarty->clear_config('foobar');
(11)fetch:返回一个模板输出的内容(HTML代码),而不是直接显示出来,需要指定一个合法的模板资源的类型和路径。你还可以通过第二个可选参数指定一个缓存号。
例如:
$output=$smarty->fetch(“模板文件路径”,[缓存号]);
(12)templateExists:检查制定的模板是否存在,参数template既可以是模板的文件路径,也可以是指定的资源字符串
例如:
$smarty->templateExists(string template)
五、完成用户管理系统(增加、删除、修改、查询)
1、模板变量的来源分三种:
(1)从php中分配的变量:
(1)给模板分配简单变量:
$username="小强";
$smarty->assign("username",$username);//从php中给模板文件分配变量
$smarty->display("index.html");
从index.html模板文件中获取php中分配的变量:
<html>
<body>
用户名:<{$username}>
</body>
</html>
(2)给模板分配数组变量:
(3)给模板分配分配对象:
$object=new 类名();
$smarty->assign(“object”,$object);
模板文件中:
{$object->属性或者方法}
基本语法:
$smarty->register_object(“变量名”,$对象名)
$smarty->assign_by_ref(“变量名”,$对象名)
$smarty->assign(“变量名”,$对象名)
(2)smarty保留变量:
通过保留变量可以获取页面如下请求变量:get、post、server、session、cookie、request
比如:{$smarty.get.username}
通过保留变量可以获取php中的常量:const
比如:{$smarty.const.__FILE__}
通过保留变量可以获取配置文件中的变量:config
比如:{$smarty.config.title}
(3)配置文件中的变量:
自定义配置文件:
(1)配置文件放在由$smarty->config_dir=“./configs”属性指定的目录
(2)配置文件的后缀名为.conf
(4)配置文件中变量的声明:
#全局配置变量
title=“调用配置文件”
bgcolor=“red”
border=5
type=“计算机”
name=“php从入门到精通”
#局部变量
[login]
username=“用户名”
password=“密 码”
注意:一个配置变量占一行,并且配置变量后不以分号结尾
在模板文件中调用配置文件中的变量:
<!--默认情况下,只会将全局变量加载进来-->
{ config_load file="04.conf" }
<!--如果要加载局部变量,需要使用section属性指定特定的节-->
{ config_load file="04.conf" section="login" }
<title>{#title#}</title>
</head>
<body bgcolor="{#bgcolor#}">
<table border="{#border#}">
<tr>
<td>{$smarty.config.type}</td>
<td>{$smarty.config.name}</td>
</tr>
<tr>
<td>用户名:{#username#}</td>
<td>密 码:{#passord#}</td>
</tr>
</table>
</body>
</html>
2、smarty变量操作符:
(1)什么是smarty的变量操作符?
smarty模版引擎中有内置的一些函数,这些函数主要用来修饰或调节变量,我们称之为变量操作符或变量调节器,变量操作符主要用于操作变量,它可以帮助我们完成许多比较实用的功能,比如:首字母大写、拆分、替换、截取等等,这些功能通过smarty模版引擎可以很容易的在模版文件中实现,而不必再在php文件中通过php的内置函数去处理,这样的话就减少了php的代码量
(2)如何使用smarty变量操作符?
语法中使用 “|” 来应用变量操作符,多个参数用 ”:” 分隔开来
比如: 在模版文件中使用变量操作符截取前十个字符,{$name|truncate:10}
(3)常用的变量操作符:
capitalize [首字母大写]
count_characters [计算字符数]
cat [连接字符串]
count_paragraphs [计算段落数]
count_sentences [计算句数]
count_words [计算词数]
date_format [时间格式]
default [默认]
escape [转码]
indent[缩进]
lower[小写 ]
nl2br[换行符替换成<br />]
regex_replace[正则替换]
replace[替换]
spacify[插空]
string_format[字符串格式化]
strip[去除(多余空格)]
strip_tags[去除html标签]
truncate[截取]
upper[大写]
wordwrap[行宽约束]
如下所示:
日期:{$smarty.new|date_format:”%Y-%m-%d”}
变量中的字符数(包括空格):{$str|count_characters:true}
多个变量操作符修饰一个变量:{$str|nl2br|upper|cat:”张三”}
模版变量+“张三”:{$str1|cat:”张三”}
缩进四个空白字符,并使用*来代替:{$str2|indent:4:”*”}
把变量中的”hello”替换为“world”:{$str3|replace:”hello”,”world”}
3、smarty标签:smarty模板文件是以标签的方式来调用函数,
调用格式:{函数名 属性1=“属性值”属性2=“属性值”..}
内建函数:内建函数就是smarty模板引擎定义好的函数,程序员可以直接使用,用户不能创建同名的函数,也不能修改内建函数
内建函数:源代码位置 plugins目录
capture
config_load
foreach,foreachelse
include
include_php
insert
if,elseif,else
ldelim,rdelim
literal
php
section,sectionelse
strip
提示:标签的解析请参考Smarty类的如下方法:
function _compile_tag(){
//解析标签
}
(1)foreach标签:
在模版中必须使用成对的foreach标签遍历数组中的数据,而且必须设置from和item两个属性
格式:{foreach from=$users item=user key=key}
foreach标记的属性:
(1)from:待循环数组的名称
(2)item:当前元素的变量名称
(3)key:当前元素的键名
(4)name:该循环的名称
foreachelse子标记:
(1)当from属性指定的数组为空时,则输出foreachelse区域中的内容
(2)foreachelse必须与foreach一起使用
(3)foreachelse没有结束标记
案例:
1.循环一维数组:aaa为数组中当前元素的变量名称
{foreach from=$user item=aaa}
{$aaa}
{/foreach}
2.循环二维数组:如果users代表多个用户,那么user就代表当前用户
{foreach from=$users item=user}
姓名:{$user.username}
性别:{$user.sex}
{/foreach}
3.foreachelse子标记的用法:
{foreach from=$users item=user}
姓名:{$user.username}
性别:{$user.sex}
{foreachelse}
暂时没有数据
{/foreach}
(2)include标签:
include标记:在模版文件中包含子模版,格式:{include file=“模版文件路径”}
例如:
(1)包含公共头部文件: {include file=“header.html”}
(2)包含公共尾部文件: {include file=“footer.html”}
include标记中两个比较使用的特性:
(1)可在include标记中传入可选的assign属性,将导入的子模版内容不再当前模版中输出,而是赋值给assign属性指定的变量。
例如:{include file=“header.html” assign=“header”}
(2)可以在引入子模版的同时向其传递各种属性
例如:{include file=“header.html” title=“头部文件”}
(3)if标签:
模版文件中使用smarty模版引擎的if条件语句:
{if $name eq ‘admin’}
<font color=“red”>管理员登录</font>
{else}
<font color=“red”>你没有登录权限</font>
{/if}
模版文件中使用smarty模版引擎的if条件语句:
{if $quanxian eq ‘admin’}
<font color=“red”>管理员登录</font>
{elseif $name eq ‘xiaosan’}
<font color=“red”>普通会员登录</font>
{else}
<font color=“red”>你没有登录权限</font>
{/if}
if标记通常情况下会跟条件运算符一块儿使用:
(1) eq:相等 neq:不等
(2) mod:求模 gt:大于
(3) is even:是否是偶数 not:非
(4) ge:大于等于 lt:小于
(5) lte:小于等于
(6) ==:相等 !=:不相等
(7) >:大于 <:小于
(8)<=:小于等于 >=:大于等于
案例:if.html
<td height="30" bordercolor="#0000FF">
^if $user.username eq '张某'^
<font color="red">^$user.username^</font>
^else^
^$user.username^
^/if^
</td>
(4)literal:
literal文本的处理技巧:
literal中的数据将被当作文本处理,此时模版将忽略其内部的所有字符信息,该特性用于显示有可能包含大括号等字符信息的javascript脚本
案例:literal标记中的所以字符信息将被当作文本来处理
{literal}
<script>…</script>
{/literal}
(5)section标签:
在模版中必须使用成对的section标签遍历数组中的数据,而且必须设置name和loop两个属性
格式:{section name=i step=2 start=2 max=10 loop=$users}
section标记的属性:
(1)name:指定该循环的名称,当需要在section循环内输出变量时,必须在变量后加上中括号,中括号中必须包含name变量
(2)loop:循环变量的名称
(3)start:循环执行的初始索引位置
(4)step:该值决定循环的步长,例如:step=2将之遍历下标为0、2
、4等元素
(5)max:设定最大循环次数,比如:max=2,代表最多循环2次
(6)show:决定是否显示该循环,默认值为1-显示循环 0-禁止循环
section循环区域中可以调用的变量:
在section循环中有一些可供调用的变量名,用来访问该循环中一些特殊的值,而且在循环中必须通过smarty保留变量$smarty进行访问
格式:{$smarty.foreach.foreachname.varname}
(1)first:当前section循环在第一次执行时该变量的值为true
(2)last:当前section循环在最后一次执行时该变量的值为true
(3)rownum:循环的行数,与iteration变量差不多
(4)index:显示当前循环的索引
(5)iteration:显示循环的次数
sectionelse子标记:
(1)当loop属性指定的数组为空时,则输出sectionelse区域中的内容
(2)sectionelse必须与section一起使用
(3)sectionelse没有结束标记
使用格式:
{section name=i loop=$users}
{$users[i].username}
{sectionelse}
<div><font color=“red”>暂时没有数据</font></div>
{/section}
案例1:
1.start属性:循环执行的初始位置,如果该属性的值为负数,开始位置将从数组的尾部算起
比如:数组中有七个元素,指定start=-2,那么指向当前数组的索引为5,即:从索引为5的元素
开始循环
2.Step属性:如果step的值为负值的话,那么遍历数组的时候从后向前遍历
3.例如:section.html
<html>
<head>
<meta http-equiv="Content-Type" content="text/html; charset=gb2312" />
<title>无标题文档</title>
</head>
<body>
<table width="483" border="1" align="center" bordercolor="#0000FF">
<tr>
<th width="100" height="30" bordercolor="#0000FF" scope="col">索引</th>
<th width="100" height="30" bordercolor="#0000FF" scope="col">编号</th>
<th width="77" height="30" bordercolor="#0000FF" scope="col">用户名</th>
<th width="69" height="30" bordercolor="#0000FF" scope="col">性别</th>
<th width="92" height="30" bordercolor="#0000FF" scope="col">年龄</th>
<th width="103" height="30" bordercolor="#0000FF" scope="col">学历</th>
</tr>
^section name=i loop=$users^
<tr align="center">
<td height="30" bordercolor="#0000FF">^$users[i].index^</td>
<td height="30" bordercolor="#0000FF">^$users[i].id^</td>
<td height="30" bordercolor="#0000FF">^$users[i].username^</td>
<td height="30" bordercolor="#0000FF">^$users[i].sex^</td>
<td height="30" bordercolor="#0000FF">^$users[i].age^</td>
<td height="30" bordercolor="#0000FF">^$users[i].xueli^</td>
</tr>
^/section^
</table>
</body>
</html>
案例2:section1.html文件中
<html>
<head>
<meta http-equiv="Content-Type" content="text/html; charset=gb2312" />
<title>无标题文档</title>
</head>
<body>
^section name=i loop=$users^
^if $smarty.section.i.first^
<table width="483" border="1" align="center" bordercolor="#0000FF">
^/if^
<tr align="center">
<td height="30" bordercolor="#0000FF">索引:^$smarty.section.i.index^</td>
<td height="30" bordercolor="#0000FF">
循环次数:^$smarty.section.i.iteration^
</td>
<td height="30" bordercolor="#0000FF">^$users[i].id^</td>
<td height="30" bordercolor="#0000FF">^$users[i].username^</td>
<td height="30" bordercolor="#0000FF">^$users[i].sex^</td>
<td height="30" bordercolor="#0000FF">^$users[i].age^</td>
<td height="30" bordercolor="#0000FF">^$users[i].xueli^</td>
</tr>
^if $smarty.section.i.last^</table>^/if^
^/section^
</body>
</html>
案例3:section2.html
<html>
<head>
<meta http-equiv="Content-Type" content="text/html; charset=gb2312" />
<title>无标题文档</title>
</head>
<body>
<table width="483" border="1" align="center" bordercolor="#0000FF">
<tr>
<th width="100" height="30" bordercolor="#0000FF" scope="col">索引</th>
<th width="100" height="30" bordercolor="#0000FF" scope="col">编号</th>
<th width="77" height="30" bordercolor="#0000FF" scope="col">用户名</th>
<th width="69" height="30" bordercolor="#0000FF" scope="col">性别</th>
<th width="92" height="30" bordercolor="#0000FF" scope="col">年龄</th>
<th width="103" height="30" bordercolor="#0000FF" scope="col">学历</th>
</tr>
^section name=i loop=$users^
<tr align="center">
<td height="30" bordercolor="#0000FF">^$users[i].index^</td>
<td height="30" bordercolor="#0000FF">^$users[i].id^</td>
<td height="30" bordercolor="#0000FF">^$users[i].username^</td>
<td height="30" bordercolor="#0000FF">^$users[i].sex^</td>
<td height="30" bordercolor="#0000FF">^$users[i].age^</td>
<td height="30" bordercolor="#0000FF">^$users[i].xueli^</td>
</tr>
^sectionelse^
<tr align="center"><td colspan=6><font color="red" size=30px>暂时没有数据</font></td></tr>
^/section^
</table>
</body>
</html>
(6)php标签:
php 标签允许在模板中直接嵌入 php 脚本.是否处理这些语句取决于$php_handling的设置.
案例:
{php}
echo "hello world;";
{/php}
$smarty->php_handing= 值;//告诉smarty如何处理嵌入到模板中的php代码
SMARTY_PHP_PASSTHRU 原样输出标记.
SMARTY_PHP_QUOTE 作为html实体引用标记
SMARTY_PHP_REMOVE 从模板中移出标记.
SMARTY_PHP_ALLOW 将作为php代码执行标记
4、自定义函数:plugins目录
smarty自带一些自定义函数,可以直接在模板文件中使用:
常见自定义函数:
(1)assign:用于在模板被执行时为模板变量赋值
调用格式:
{assgin var=“变量名” value=“值”}
案例:
{assign var="name" value=“Tom"}
The value of $name is {$name}.
输出结果:
The value of $name is Tom.
(2)counter:用于保存了每次记数时的当前记数值
案例:
php文件:
$arr2=array(
array('id'=>'aa','name'=>'sp'),
array('id'=>'bb','name'=>'bbsp'),
array('id'=>'bb','name'=>'bbsp'),
array('id'=>'bb','name'=>'bbsp'),
array('id'=>'bb','name'=>'bbsp'),
array('id'=>'bb','name'=>'bbsp'),
array('id'=>'bb','name'=>'bbsp'),
array('id'=>'bb','name'=>'bbsp')
);
$smarty->assign("cc",$arr2);
tpl文件:
<table border="1" width='500px'>
<tr><td>id</td><td>name</td></tr>
<{counter start=0 skip=1 assign=my print=false}>
<{foreach from=$cc item=emp}>
<{counter}>
<{if $my is even}>
<tr bgcolor='red'><td><{$emp.id}></td><td><{$emp.name}></td></tr>
<{/if}>
<{if $my is odd}>
<tr bgcolor='blue'><td><{$emp.id}></td><td><{$emp.name}></td></tr>
<{/if}>
<{/foreach}>
</table>
(3)cycle:用于轮转使用一组值,隔行换色
案例:
各行换色
{section name=rows loop=$data}
<tr bgcolor="{cycle values="#eeeeee,#d0d0d0"}">
<td>{$data[rows]}</td>
</tr>
{/section}
输出结果:
<tr bgcolor="#eeeeee">
<td>1</td>
</tr>
<tr bgcolor="#d0d0d0">
<td>2</td>
</tr>
<tr bgcolor="#eeeeee">
<td>3</td>
</tr>
(4)debug
(5)eval
(6)fetch:主要用于获取文件并显示文件的内容
调用格式:
{fetch file=”本地文件/http/ftp” assign=“变量名” }
提示:如果设置了assign 属性,则文件的内容不会直接输出,而是被保存到assign 指定的变量中.
(7)html_checkboxes:自定义函数 html_checkboxes 根据给定的数据创建复选按钮组. 该函数可以指定哪些元素被选定. 要么必须指定 values 和ouput 属性,要么指定 options 替代。
调用格式:
{html_checkboxes name=“名字” values=$数组变量 checked=$选中的变量 output=$输出值的数组 separator=“分隔符号"}
{html_checkboxes options=$数组变量 checked=$选中的变量 separator=“分隔符号"}
(8)html_image
(9)html_options:根据给定的数据创建选项组. 该函数可以指定哪些元素被选定. 要么必须指定values 和 ouput 属性,要么指定 options 替代.
调用格式:
<select name=select控件名>
{html_options values=$数组变量 selected=$选中的变量 output=$输出值的数组}
</select>
<select name=select控件名>
{html_options options=$数组变量 selected=$选中的变量}
</select>
案例:
xx.php
$arr3=array('lq'=>'篮球','zq'=>'足球','wq'=>'网球');
$sel=array('lq','wq');
$smarty->assign('arr3',$arr3);
$smarty->assign('sel',$sel);
xx.tpl
<h1>请选择你喜欢的运动select</h1>
<select name='hobby' multiple> {* 这里增加multiple就可出现多选,否则只能下拉选择一项 *}
<{html_options options=$arr3 selected=$sel}>
</select>
(10)html_radios:html_radios 根据给定的数据创建单选按钮组. 该函数可以指定哪个元素被选定. 要么必须指定 values 和ouput 属性,要么指定 options 替代.
调用格式:
{html_radios values=$数组val变量 checked=$选中变量 output=$输出数组变量 separator=“分隔符"}
{html_radios name=“radio名称” options=$数组变量(key-val) checked=$选中变量 separator=“分隔符"}
(11)html_select_date:自定义函数 html_select_date 用于创建日期下拉菜单. 它可以显示任意年月日
调用格式:
{html_select_date prefix=“前缀名” start_year=“-年数” end_year=“+年数“}
(12)html_select_time:自定义函数 html_select_time 用于创建时间下拉菜单. 它可以显示任意时分秒.
调用格式:
{html_select_time use_24_hours=“true/flase”}
每个下拉框,都会默认生成一个名: 比如: Time_Hour 等
(13)html_table
(14)math
(15)mailto
(16)popup_init
(17)popup
(18)textformat
5、缓存机制:
(1)设置缓存:
(1)$smarty->caching=true; //开启缓存
(2)$smarty->cache_dir=“./cache”; //设置缓存目录
(3)$smarty->cache_lifetime=7*24*60*60; //设置缓存时间
(4)$smarty->display(“index.html”);
(2)每个页面多个缓存:
比如:发布文章的时候,使用同一模版时会生成不同的页面显示。如果开启缓存,则通过同一个模版生成的多篇文章(多个实例)都需要被缓存,smarty实现这个比较容易,只需要在调用display()方法时,通过在第二个可选参数中提供一个值,这个值是为每一篇文章(或实例)指定的一个唯一的标识符,有几个不同的标识符就有几个不同的缓存。
比如:$smarty->display(“news.html”,$_GET[‘newid’]);
(3)案例:
启用缓存后,在使用$smarty->display(“index.html”);不仅会把模版返回原来的状态(没缓存),也会把输出复制到$smarty->cache_dir=“./cache”指定的目录下并保存为缓存文件,当再次调用display()方法时,显示的将是保存在$cache_dir下的缓存文件
例如:cache.php
include_once “libs/smarty/Smarty.class.php”;
$smarty->caching=true;//开启缓存
$smarty->cache_dir=“./cache”;//设置缓存目录
$smarty->cache_lifetime=7*24*60*60;//以秒为单位设置缓存时间,默认的缓存时间为3600秒
$smarty->display(“cache.html”);//显示模版文件,并将输出保存到缓存文件
(4)怎样判断某个文件是否被缓存了?
(1) $smarty->is_cached(“index.html”);
(2) $smarty->is_cached(“news.html”,$_GET[‘newsid’]);
(5)smarty缓存的使用和清除:
(1) $smarty->clear_all_cache(); //清除所有缓存
(2) $smarty->clear_cache(‘index.tpl’); // 清除某一模版的缓存
(3) $smarty->clear_cache(‘index.tpl’,cache_id); // 清除指定缓存号的缓存
(6)案例:
怎样判断某个文件被缓存了?
比如:news.php
include_once “libs/smarty/Smarty.class.php”;
$smarty=new Smarty();
$smarty->caching=true;
if(!$smarty->is_cached(“news.html”)){
//如果没有被缓存,调用数据库,并对变量进行赋值
}
$smarty->display(“news.html”);
如果同一个模版有多个缓存实例的话,每个实例都要消除访问数据库和操作处理的开销,可以在is_cached()函数中指定第二个可选参数指定缓存号
比如:news.php
include_once “libs/smarty/Smarty.class.php”;
$smarty=new Smarty();
$smarty->caching=true;
if(!$smarty->is_cached(“news.html” ,$_GET[‘newsid’])){
//如果没有被缓存,调用数据库,并对变量进行赋值
}
$smarty->display(“news.html”,$_GET[‘newsid’]);
(7)smarty局部缓存:
Smarty局部缓存:insert函数默认是不缓存的,并且这个属性不能修改
模版文件index.html中:
<div>{insert name=“get_time”}</div>
程序文件index.php中:
function insert_get_time(){
return date(“Y-m-d H:i:s”);
}
注意:方法的前缀必须是insert
insert函数类似于include函数,不同之处是insert函数所包含的内容不会被缓存,每次调用该模板文件,都会重新执行该函数
(8)总结:
如果不使用缓存技术,当我们每次访问php文件的时候,都会建立新的数据库连接并从数据库中读取数据,再经过一系列的操作处理形成最终的html代码响应给用户显示,但是每次都要读取数据库和进行一系列操作处理很浪费资源和开销
如果不想每次都读取数据库和进行一系列操作处理(正则替换)的话,就可以在第一次访问该php文件的时候,将动态获取的html代码保存为静态页面,形成缓存文件,在以后每次访问该php文件时,直接去读取缓存的数据,而不是去读取数据库
六、smarty高级特性:
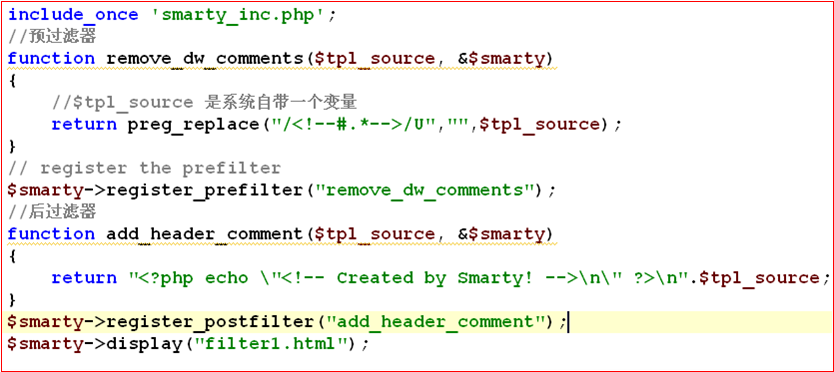
1、smarty的过滤器:
smarty 的过滤器分为:
Prefilter 预过滤器:在smarty模板编译成php代码之前调用
Postfilter 后过滤器:在smarty模板编译成php代码之后调用
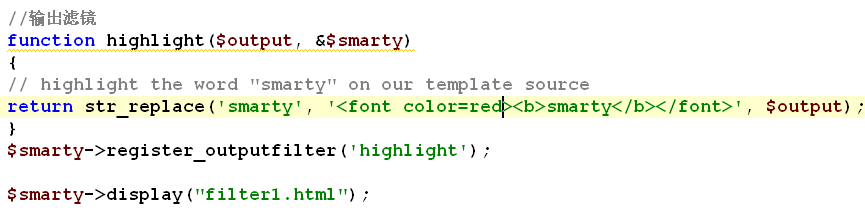
Output filter 输出滤镜:在smarty 准备显示编译过的代码时调用
这里的顺序应该是:
tpl源文件 =〉Prefilter =〉编译tpl文件 => Postfilter =>保存到磁盘=>编译过的php文件执行=〉Output Filters(=〉如果有smarty cache的话,Output Filters的内容会缓存)=>结果输出。
2、过滤器的创建方式:
执行时 注册一个 filter,此时可以用以下三种函数调用:
Prefilters void register_prefilter(mixed impl)
Postfilters void register_postfilter(mixed impl)
Output filters void register_outputfilter(mixed impl)
这里的impl 指 回调的函数名, 或者形如:
array($object, ‘method_name’)或
array('class_name', 'method_name')的数组
七、扩展smarty功能:
1、自定义变量调节器:plugins目录
plugins 插件目录
|-----modifier.xxx.php 自定义变量调节器文件
function smarty_modifier_xxx(){
//逻辑代码
}
2、自定义函数:plugins目录
plugins 插件目录
|-----function.xxx.php 自定义函数文件
function smarty_function_xxx($params, &$smarty){
//逻辑代码
}
?>


 243
243

 被折叠的 条评论
为什么被折叠?
被折叠的 条评论
为什么被折叠?
 到【灌水乐园】发言


