


转载请标明出处:http://blog.csdn.net/yansong_post ,本文出自【李岩松的博客】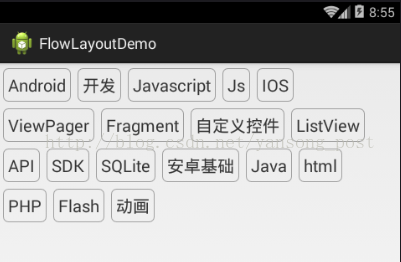
1.概述
本篇给大家带来一个实例,FlowLayout,什么是FlowLayout,我们常在App 的搜索界面看到热门搜索词,就是FlowLayout,
我们要实现的就是图中的效果,就是根据容器的宽,往容器里面添加元素,如果剩余的控件不足时候,自行添加到下一行,FlowLayout也叫流式布局,在开发中还是挺常用的.
2.对所有的子View进行测量
onMeasure方法的调用次数是不确定的,所以为了避免测量出错,需要把总的List集合,清空一下,一个View的绘制,需要经过onMeasure方法的测量,和onLayout方法的排版才能显示出来,在测量的方法中,我们把该ViewGroup中的所有子View遍历出来,添加到一行中的List集合中,再把一行中的所有的元素集合添加到总的集合中去,并对每个子View元素进行测量,测量的参数,我们给0,或者未指定,,如果不是一行中的第一元素,并且通过 getUsablewWidth()方法获取一行中可用的宽度,不够容纳下一元素,时就新创建一个集合,来装一行中所有元素,再把所有的子View元素全部测量完成后,我们还需要通过setMeasuredDemoetion()方法把测量出来的宽和高保存起来,保存之后可以调用getMeasureWidth获取测量之后的宽了.
protected void onMeasure(int widthMeasureSpec, int heightMeasureSpec) {
        allLines.clear();
        //测量容器的宽和高
        int containerMeasuredWidth = MeasureSpec.getSize(widthMeasureSpec);
        //这个集合用于保存单行
        ArrayList<View> oneLine = null;
        for (int i = 0; i < getChildCount(); i++) {
            //获取每一Chiledview
            View child = getChildAt(i);
             int UnspecifiedMeasureSpec = MeasureSpec.makeMeasureSpec(0, MeasureSpec.UNSPECIFIED);
            child.measure(UnspecifiedMeasureSpec, UnspecifiedMeasureSpec);//相当于传了一个0,0;
            //如果是第1个view就new一个新行出来,或者View大于了可用的宽度,
            if (i == 0 || child.getMeasuredWidth() > getUsablewWidth(containerMeasuredWidth, oneLine,oneLine.size())) {
                oneLine = new ArrayList<View>();
                allLines.add(oneLine);
            }
            oneLine.add(child);

        }

        int lineNumber = allLines.size();
        int allLinesHeight = getChildAt(0).getMeasuredHeight() * lineNumber;
        int verticalTotalpadding = getPaddingBottom() + getPaddingTop();
        //垂直总的spcing
        int verticalTotalSpcing = 8 * (lineNumber - 1);
        //容器的高 = 所有View的高 + 垂直方向的Padding + 垂直总的spcing
        int containerMeasureHeight = allLinesHeight + verticalTotalpadding + verticalTotalSpcing;
        setMeasuredDimension(containerMeasuredWidth, containerMeasureHeight);
    }
3.获取一行中可用的空间
protected void onMeasure(int widthMeasureSpec, int heightMeasureSpec) {
allLines.clear();
//测量容器的宽和高
int containerMeasuredWidth = MeasureSpec.getSize(widthMeasureSpec);
//这个集合用于保存单行
ArrayList<View> oneLine = null;
for (int i = 0; i < getChildCount(); i++) {
//获取每一Chiledview
View child = getChildAt(i);
int UnspecifiedMeasureSpec = MeasureSpec.makeMeasureSpec(0, MeasureSpec.UNSPECIFIED);
child.measure(UnspecifiedMeasureSpec, UnspecifiedMeasureSpec);//相当于传了一个0,0;
//如果是第1个view就new一个新行出来,或者View大于了可用的宽度,
if (i == 0 || child.getMeasuredWidth() > getUsablewWidth(containerMeasuredWidth, oneLine,oneLine.size())) {
oneLine = new ArrayList<View>();
allLines.add(oneLine);
}
oneLine.add(child);
}
int lineNumber = allLines.size();
int allLinesHeight = getChildAt(0).getMeasuredHeight() * lineNumber;
int verticalTotalpadding = getPaddingBottom() + getPaddingTop();
//垂直总的spcing
int verticalTotalSpcing = 8 * (lineNumber - 1);
//容器的高 = 所有View的高 + 垂直方向的Padding + 垂直总的spcing
int containerMeasureHeight = allLinesHeight + verticalTotalpadding + verticalTotalSpcing;
setMeasuredDimension(containerMeasuredWidth, containerMeasureHeight);
}获取一行中可用的宽度,需要我们传入容器的宽度,和一行元素的集合,和元素之间的间隔,,然后遍历所有的元素,通过一个变量来保存所有View测量出来宽度的总和,用容器的宽 减去,子View宽度的总和减去水平方向的间隔,以及左右两边的Padding,得到一行中可用的宽度
private int getUsablewWidth(int containerMeasuredWidth, ArrayList<View> oneLine,int needSpacingCount) {
        int oneLineWidth = 0;
        for (View view : oneLine) {
            oneLineWidth += view.getMeasuredWidth();
        }
        //水平方向两边的padding
        int horizotalPadding = getPaddingLeft() + getPaddingRight();
        int horizontalTotalSpcing = horizotalPadding * needSpacingCount;
        int usablewWidth = containerMeasuredWidth - oneLineWidth - horizotalPadding - horizontalTotalSpcing;
        return usablewWidth;
    }
3.对所有的子View进行排版
private int getUsablewWidth(int containerMeasuredWidth, ArrayList<View> oneLine,int needSpacingCount) {
int oneLineWidth = 0;
for (View view : oneLine) {
oneLineWidth += view.getMeasuredWidth();
}
//水平方向两边的padding
int horizotalPadding = getPaddingLeft() + getPaddingRight();
int horizontalTotalSpcing = horizotalPadding * needSpacingCount;
int usablewWidth = containerMeasuredWidth - oneLineWidth - horizotalPadding - horizontalTotalSpcing;
return usablewWidth;
}还是遍历每一行中的每一个元素,对该元素执行排版方法,通过child.getMeasuredWidth();和child.getMeasuredHeight();获取测量后的View的宽和高,通过child.layout(l,t,r,b),对View进行位置的摆放,left就是上个元素的Rigth,Top,就是上一行元素的Bootom,Rigth就是Left+View自身的宽度,Bottom是Top+View自身的高度,最后,因为我们手动把TextView的宽改变了,跟测量时的宽不一样了,重新调用测量即可
 protected void onLayout(boolean changed, int l, int t, int r, int b) {
        int tempRight = 0;//保存一行中上一个View的Right
        int tempBottom = 0;//保存上一行View的Bottom位置
        ///遍历第一排
        for (int row = 0; row < allLines.size(); row++) {
            ArrayList<View> oneLines = allLines.get(row);
            //计算一行中每个Veiw可以分到的平均宽度
            int  totalUsableWidth= getUsablewWidth(getMeasuredWidth(), oneLines,oneLines.size()-1);
            int averageUsablewWidth =  totalUsableWidth/oneLines.size();
            //遍历的是一行的内容
            for (int column = 0; column < oneLines.size(); column++) {
                View child = oneLines.get(column);
                //获取测量的宽高
                int measuredWidth = child.getMeasuredWidth();
                int measuredHeight = child.getMeasuredHeight();
                //如果是一行中的第一个View则排在第0个位置
                int left = column == 0 ? getPaddingLeft() : tempRight + 8;
                //如果是第1行Top坐标是PaddingTop的位置,否则就上一个View的bottom位置
                int top = row == 0 ? getPaddingTop() : tempBottom + 8;
                int right = left + measuredWidth ;//+ averageUsablewWidth;

                int bootom = top + measuredHeight;
                child.layout(left, top, right, bootom);
                tempRight = right;

                int WidthMeasureSpec = MeasureSpec.makeMeasureSpec(child.getWidth(), MeasureSpec.EXACTLY);
                int HeightMakeMeasureSpec = MeasureSpec.makeMeasureSpec(child.getHeight(), MeasureSpec.EXACTLY);
                child.measure(WidthMeasureSpec,HeightMakeMeasureSpec);
            }
            tempBottom = oneLines.get(0).getBottom();
        }
    }
protected void onLayout(boolean changed, int l, int t, int r, int b) {
int tempRight = 0;//保存一行中上一个View的Right
int tempBottom = 0;//保存上一行View的Bottom位置
///遍历第一排
for (int row = 0; row < allLines.size(); row++) {
ArrayList<View> oneLines = allLines.get(row);
//计算一行中每个Veiw可以分到的平均宽度
int totalUsableWidth= getUsablewWidth(getMeasuredWidth(), oneLines,oneLines.size()-1);
int averageUsablewWidth = totalUsableWidth/oneLines.size();
//遍历的是一行的内容
for (int column = 0; column < oneLines.size(); column++) {
View child = oneLines.get(column);
//获取测量的宽高
int measuredWidth = child.getMeasuredWidth();
int measuredHeight = child.getMeasuredHeight();
//如果是一行中的第一个View则排在第0个位置
int left = column == 0 ? getPaddingLeft() : tempRight + 8;
//如果是第1行Top坐标是PaddingTop的位置,否则就上一个View的bottom位置
int top = row == 0 ? getPaddingTop() : tempBottom + 8;
int right = left + measuredWidth ;//+ averageUsablewWidth;
int bootom = top + measuredHeight;
child.layout(left, top, right, bootom);
tempRight = right;
int WidthMeasureSpec = MeasureSpec.makeMeasureSpec(child.getWidth(), MeasureSpec.EXACTLY);
int HeightMakeMeasureSpec = MeasureSpec.makeMeasureSpec(child.getHeight(), MeasureSpec.EXACTLY);
child.measure(WidthMeasureSpec,HeightMakeMeasureSpec);
}
tempBottom = oneLines.get(0).getBottom();
}
}4.Activity
public class MainActivity extends Activity {

	@Override
	protected void onCreate(Bundle savedInstanceState) {
		super.onCreate(savedInstanceState);
		FlowLayout flowLayout = new FlowLayout(this);
		flowLayout.setPadding(6, 6, 6, 6);

		  for (String text : list) {
	            TextView textView = new TextView(this);
	            textView.setBackgroundResource(R.drawable.bg_text);
	            textView.setGravity(Gravity.CENTER);
	            textView.setPadding(6, 6, 6, 6);
	            textView.setText(text);
	            textView.setTextSize(20);
	            flowLayout.addView(textView);
	        }

		setContentView(flowLayout);
	}
	}
5.TextView 的背景
<shape xmlns:android="http://schemas.android.com/apk/res/android"
    android:shape="rectangle">
    <stroke android:width="1dp"
        android:color="#5000" />
	<corners android:radius="6dp"/>
</shape>
<shape xmlns:android="http://schemas.android.com/apk/res/android"
android:shape="rectangle">
<stroke android:width="1dp"
android:color="#5000" />
<corners android:radius="6dp"/>
</shape>


 1246
1246

 被折叠的 条评论
为什么被折叠?
被折叠的 条评论
为什么被折叠?
 到【灌水乐园】发言


