


一个简单的SOA实现
SOA ( Service Oriented Architecture ),是当前比较热门的话题,但是它的神秘面纱到底是什么呢,我想不应该把它看得那么神秘,不就是一种服务与技术分离的实现,从而达到服务可重用性的一种思想吗,我觉得没有必要这么鼓吹吗,^_^,我开玩笑的,不必当真。下面我大致介绍一个SOA的实现,虽然缺少了总线的概念在里面。
本例还是基于前两个例子的基础上的(一个简单 的Ejb 3.0实现、一个WebService+Ejb 3.0的简单实现),虽然不需要对第一个例子有多么了解,但请多少保证第二个例子能在你机子上完全跑得开。
一:WSDL2Java
从名字上可以看出,是把wsdl 转化为java的,是的,完全正确,记得第二个例子当中我们在服务器端生成了一个wsdl文件,对吗?那么现在要做的就是你把那个wsdl文件给别人或者别的公司,让他们根据wsdl中所描述的你所提供的服务,去开发一个应用,来访问你所提供的接口。那么他们拿到这个WSDL文件后要做什么呢,在这里是你拿到那个文件后做什么呢,to java。怎么to java呢?
这里,在原来的EmployeeManager工程下面建一个wsdl文件夹,将它放在下面,然后所要做的准备工作是,把包括axis在内的几个jar包找到,设置在你的classpath里面。然后在命令行下运行WSDL2Java。
哪几个jar包?
C:/axis-1_4/lib/axis.jar;C:/axis-1_4/lib/axis-ant.jar;C:/axis-1_4/lib/commons-discovery-0.2.jar;C:/axis-1_4/lib/commons-logging- 1.0.4 .jar;C:/axis-1_4/lib/jaxrpc.jar;C:/axis-1_4/lib/log4j-1.2.8.jar;C:/axis-1_4/lib/saaj.jar;C:/axis-1_4/lib/wsdl4j-1.5.1.jar;E:/jboss-4.0.5/server/default/lib/activation.jar;E:/jboss-4.0.5/server/default/lib/mail.jar
这是我classpath 里面所设置的几个jar包,后面两个可以不需要,第二个也可以不需要,后俩个只是保证呢运行的时候没有警告。我认为你能找到这几个jar包,我不多做怎么找到他们的介绍(网上搜,下载)。
1. 将LoginDaoBean.wsdl 放在wsdl文件夹下面。E:/workspace/EmployeeManager/wsdl
2. 在命令行下进入E:/workspace/EmployeeManager/wsdl
3. 执行 java org.apache.axis.wsdl.WSDL2Java LoginDaoBean.wsdl
这个时候,你会发现在wsdl文件夹下面生成了一个目录,它里面包含了几个java类。
LoginDao.java,LoginDaoBindingStub.java,LoginDaoService.java,LoginDaoServiceLocator.java
二:新建一个工程
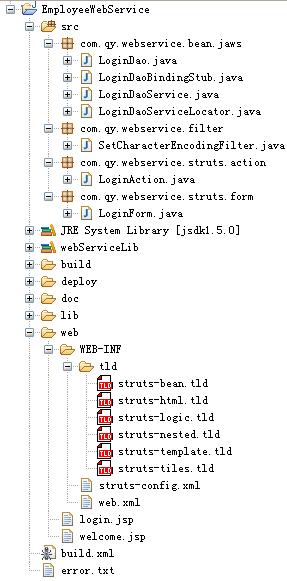
新建一个工程,EmployeeWebService,然后将上面生成的几个类放入你的src目录下面,记着是放整个目录,别只放几个类进去。
三:构建struts资源
这是你就可以这对你所有的几个类,去构建你自己的的应用了,本例中为了方便,直接把上一个工程中有些代码拿过来了,只不过换了目录,重构了一下。
1. LoginForm
2. LoginAction
3.SetCharacterEncodingFilter
这三个类,只有LoginAction需要改动,另外两个都不需要改动,只需要改变一下包结构。我下面就给出改动后的源代码。

 /**/
/*
/**/
/*  * * Copyright 2007-2008 neil *
  */
*/
 package
com.qy.webservice.struts.action;
import
javax.servlet.http.HttpServletRequest;
import
javax.servlet.http.HttpServletResponse;
import
javax.servlet.http.HttpSession;
import
org.apache.commons.logging.Log;
import
org.apache.commons.logging.LogFactory;
import
org.apache.struts.action.Action;
import
org.apache.struts.action.ActionForm;
import
org.apache.struts.action.ActionForward;
import
org.apache.struts.action.ActionMapping;
import
org.apache.struts.action.ActionMessage;
import
org.apache.struts.action.ActionMessages;
import
com.qy.webservice.bean.jaws.LoginDao;
import
com.qy.webservice.bean.jaws.LoginDaoServiceLocator;
import
com.qy.webservice.struts.form.LoginForm;
/** */
/** * * @author neil * @version 1.0 * */
public
class
LoginAction
extends
Action
...
{
package
com.qy.webservice.struts.action;
import
javax.servlet.http.HttpServletRequest;
import
javax.servlet.http.HttpServletResponse;
import
javax.servlet.http.HttpSession;
import
org.apache.commons.logging.Log;
import
org.apache.commons.logging.LogFactory;
import
org.apache.struts.action.Action;
import
org.apache.struts.action.ActionForm;
import
org.apache.struts.action.ActionForward;
import
org.apache.struts.action.ActionMapping;
import
org.apache.struts.action.ActionMessage;
import
org.apache.struts.action.ActionMessages;
import
com.qy.webservice.bean.jaws.LoginDao;
import
com.qy.webservice.bean.jaws.LoginDaoServiceLocator;
import
com.qy.webservice.struts.form.LoginForm;
/** */
/** * * @author neil * @version 1.0 * */
public
class
LoginAction
extends
Action
...
{
 /** *//** * Commons Logging instance.
 */ private Log log = LogFactory.getFactory().getInstance( this.getClass().getName()); public ActionForward execute(ActionMapping mapping, ActionForm form, HttpServletRequest request, HttpServletResponse response) throws Exception ...{ LoginForm loginForm = (LoginForm) form; String userName = loginForm.getLoginName(); String password = loginForm.getPassword(); LoginDaoServiceLocator loginDaoServiceLocator = new LoginDaoServiceLocator(); LoginDao loginDao = loginDaoServiceLocator.getLoginDaoPort(); ActionMessages messages = new ActionMessages(); try ...{ boolean isExistsUser = loginDao.isLogin(userName, password); if (!isExistsUser) ...{ messages.add("login", new ActionMessage( "error.login.jsp.loginName.exists")); } } catch (Exception ex) ...{ messages.add("login", new ActionMessage( "error.login.jsp.login.failuer")); } HttpSession session = request.getSession(); session.setAttribute("loginName", loginForm.getLoginName()); this.saveErrors(request, messages); if (messages.size() != 0) ...{ log.error("login failure!"); return mapping.getInputForward(); } log.info("login success!"); return mapping.findForward("success"); }}
下面是我机子上每个类所放的结构图
唯一要说明的就是jar包。
wsdl4j- 1.5.1 .jar
saaj.jar
axis-ant.jar
axis.jar
commons-discovery-0.2.jar
log4j- 1.2.8 .jar
commons-logging.jar
jaxrpc.jar
commons-digester.jar
struts.jar
servlet-api.jar
前5个是和axis相关的,第六个即和struts相关又和axis相关。这几个都不是太难找到,你在jboss 4.0.5 目录下搜,应该能搜出大多数。个别找不到的可以到网上去下载。
按照图片所给出的目录结构图,放置你的文件,下面我能给出的就是web.xml以及build.xml文件的源代码,因为只有这两个做了进一步的修改,其它都几乎没变,另外有一点忘了说明,就是你的eclipse的类放在了哪里呢,本例所有的实现是修改了eclipse的设置的。
Window->Preferences->Java->Build Path
选中Folders,修改output folder name的值为classes。然后建的工程,这样呢每新建或修改一个类,在classes目录下就会自动编译所生成的类文件。
四:web.xml
<?
xml version="1.0" encoding="iso-8859-1"
?>
<!
DOCTYPE web-app PUBLIC "-//Sun Microsystems, Inc.//DTD Web Application 2.2//EN" "http://java.sun.com/j2ee/dtds/web-app_2_2.dtd"
>
<
web-app
>
<
display-name
>
Struts Sample Application
</
display-name
>
<!--
Standard Action Servlet Configuration
-->
<
servlet
>
<
servlet-name
>
action
</
servlet-name
>
<
servlet-class
>
org.apache.struts.action.ActionServlet
</
servlet-class
>
<
init-param
>
<
param-name
>
config
</
param-name
>
<
param-value
>
/WEB-INF/struts-config.xml
</
param-value
>
</
init-param
>
<
load-on-startup
>
2
</
load-on-startup
>
</
servlet
>
<!--
Standard Action Servlet Mapping
-->
<
servlet-mapping
>
<
servlet-name
>
action
</
servlet-name
>
<
url-pattern
>
*.do
</
url-pattern
>
</
servlet-mapping
>
<
filter
>
<
filter-name
>
Set Character Encoding
</
filter-name
>
<
filter-class
>
com.qy.webservice.filter.SetCharacterEncodingFilter
</
filter-class
>
</
filter
>
<!--
Filter Mapping
-->
<
filter-mapping
>
<
filter-name
>
Set Character Encoding
</
filter-name
>
<
url-pattern
>
/*
</
url-pattern
>
</
filter-mapping
>
<!--
The Usual Welcome File List
-->
<
welcome-file-list
>
<
welcome-file
>
login.jsp
</
welcome-file
>
</
welcome-file-list
>
<!--
Struts Tag Library Descriptors
-->
<
taglib
>
<
taglib-uri
>
/tags/struts-bean
</
taglib-uri
>
<
taglib-location
>
/WEB-INF/tld/struts-bean.tld
</
taglib-location
>
</
taglib
>
<
taglib
>
<
taglib-uri
>
/tags/struts-html
</
taglib-uri
>
<
taglib-location
>
/WEB-INF/tld/struts-html.tld
</
taglib-location
>
</
taglib
>
<
taglib
>
<
taglib-uri
>
/tags/struts-logic
</
taglib-uri
>
<
taglib-location
>
/WEB-INF/tld/struts-logic.tld
</
taglib-location
>
</
taglib
>
<
taglib
>
<
taglib-uri
>
/tags/struts-nested
</
taglib-uri
>
<
taglib-location
>
/WEB-INF/tld/struts-nested.tld
</
taglib-location
>
</
taglib
>
</
web-app
>
五:build.xml
<
project
name
="employee"
default
="help"
basedir
="."
>
<
property
name
="app.home"
value
="."
/>
<
property
name
="app.name"
value
="employee"
/>
<
property
name
="javadoc.pkg.top"
value
="com"
/>
<
property
name
="src.home"
value
="${app.home}/src"
/>
<
property
name
="lib.home"
value
="${app.home}/lib"
/>
<
property
name
="classes.home"
value
="${app.home}/classes"
/>
<
property
name
="deploy.home"
value
="${app.home}/deploy"
/>
<
property
name
="doc.home"
value
="${app.home}/doc"
/>
<
property
name
="web.home"
value
="${app.home}/web"
/>
<
property
name
="build.home"
value
="${app.home}/build"
/>
<
property
name
="build.classes"
value
="${build.home}/WEB-INF/classes"
/>
<
property
name
="build.lib"
value
="${build.home}/WEB-INF/lib"
/>
<
property
name
="jboss.deploy.home"
value
="E:jboss-4.0.5serverdefaultdeploy"
/>
<!--
==================== Compilation Classpath ===========================
-->
<!--
This section creates the classpath for compilation.
-->
<
path
id
="compile.classpath"
>
<!--
The object files for this application
-->
<
pathelement
location
="${classes.home}"
/>
<!--
The lib files for this application
-->
<
fileset
dir
="${lib.home}"
>
<
include
name
="*.jar"
/>
<
include
name
="*.zip"
/>
</
fileset
>
</
path
>
<!--
==================== Build Targets below here=========================
-->
<!--
==================== "help" Target ===================================
-->
<!--
This is the default ant target executed if no target is specified. This helps avoid users just typing 'ant' and running a default target that may not do what they are anticipating...
-->
<
target
name
="help"
>
<
echo
message
="Please specify a target! [usage: ant <targetname>]"
/>
<
echo
message
="Here is a list of possible targets: "
/>
<
echo
message
=" clean-all.....Delete build dir, all .class and war files"
/>
<
echo
message
=" prepare.......Creates directories if required"
/>
<
echo
message
=" compile.......Compiles source files"
/>
<
echo
message
=" build.........Build war file from .class and jar file other files"
/>
<
echo
message
=" deploy........Copy war file to the webapps directory"
/>
<
echo
message
=" javadoc.......Generates javadoc for this application"
/>
</
target
>
<!--
==================== "clean-all" Target ==============================
-->
<!--
This target should clean up any traces of the application so that if you run a new build directly after cleaning, all files will be replaced with what's current in source control
-->
<
target
name
="clean-all"
>
<
delete
dir
="${build.home}"
/>
<
delete
dir
="${deploy.home}"
/>
<!--
delete the javadoc
-->
<
delete
dir
="${doc.home}"
/>
</
target
>
<!--
==================== "prepare" Target ================================
-->
<!--
This target is executed prior to any of the later targets to make sure the directories exist. It only creates them if they need to be created.... Other, similar, preparation steps can be placed here.
-->
<
target
name
="prepare"
>
<
mkdir
dir
="${deploy.home}"
/>
<
mkdir
dir
="${doc.home}"
/>
<
mkdir
dir
="${doc.home}/api"
/>
<
mkdir
dir
="${build.home}"
/>
<
mkdir
dir
="${build.home}/WEB-INF"
/>
<
mkdir
dir
="${build.home}/WEB-INF/classes"
/>
<
mkdir
dir
="${build.home}/WEB-INF/lib"
/>
</
target
>
<!--
==================== "compile" Target ================================
-->
<!--
This only compiles java files that are newer than their corresponding .class files.
-->
<
target
name
="compile"
depends
="prepare"
>
<
javac
srcdir
="${src.home}"
destdir
="${classes.home}"
debug
="yes"
>
<
classpath
refid
="compile.classpath"
/>
</
javac
>
</
target
>
<!--
==================== "build" Target ==================================
-->
<!--
This target builds the war file for the application by first building the directory structure of the application in ${build.home} and then creating the war file using the ant <war> task
-->
<
target
name
="build"
depends
="compile"
>
<!--
Copy all the webapp content (jsp's, html, tld's, xml, etc.
-->
<!--
Note that this also copies the META-INF directory
-->
<
copy
todir
="${build.home}"
>
<
fileset
dir
="${web.home}"
/>
</
copy
>
<!--
Now, copy all the Java class files
-->
<
copy
todir
="${build.home}/WEB-INF/classes"
>
<
fileset
dir
="${classes.home}"
/>
</
copy
>
<!--
Now, copy all the properties files, etc that go on the classpath
-->
<
copy
todir
="${build.home}/WEB-INF/classes"
>
<
fileset
dir
="${src.home}"
>
<
include
name
="**/*.properties"
/>
<
include
name
="**/*.prop"
/>
</
fileset
>
</
copy
>
<!--
Now, copy all the jar files we need
-->
<
copy
todir
="${build.home}/WEB-INF/lib"
>
<
fileset
dir
="${lib.home}"
/>
</
copy
>
<!--
Create the <war> file
-->
<
jar
jarfile
="${deploy.home}/${app.name}.war"
basedir
="${build.home}"
/>
</
target
>
<!--
==================== "deploy" Target =================================
-->
<!--
This target simply copies the war file from the deploy directory into the Tomcat webapp directory.
-->
<
target
name
="deploy"
depends
="build"
>
<!--
Copy the contents of the build directory
-->
<
copy
todir
="${jboss.deploy.home}"
file
="${deploy.home}/${app.name}.war"
/>
</
target
>
<!--
==================== "doc" Target ====================================
-->
<!--
This task creates javadoc. It is dependent upon only the 'compile' target so it is not executed in a normal build. As a result, the target needs to be run on its own.
-->
<
target
name
="javadoc"
depends
="compile"
>
<
javadoc
sourcepath
= "${src.home}"
destdir
= "${doc.home}/api"
packagenames
= "${javadoc.pkg.top}.*"
/>
</
target
>
</
project
>
六:运行
打包之后,运行它,如果你是先打包,再启动jboss的话,可能会有问题,也可能会没有,但是如果你是已经启动了jboss,然后又运行的build.xml的话,应该会有问题,具体错误大致如下(抽出了一小段给大家)
23:17:34,296 ERROR [STDERR] log4j:ERROR The class "org.apache.log4j.spi.ErrorHandler" was loaded by
23:17:34,296 ERROR [STDERR] log4j:ERROR [WebappClassLoader
delegate: false
repositories:
/WEB-INF/classes/
----------> Parent Classloader:
java.net.FactoryURLClassLoader@d 704f 0
] whereas object of type
解决问题的办法是:
修改E:/jboss- 4.0.5 /server/default/deploy/jbossweb-tomcat55.sar/META-INF 下的jboss-service.xml文件中的如下两行
<attribute name="Java2ClassLoadingCompliance">true</attribute>
<attribute name="UseJBossWebLoader">true</attribute>
这两行的属性值原来都是false,将其修改为true,重新启动jbsoo。这样问题解决了,但是还有一个问题,你会发现每当你热部署的时候还会有这样或那样的错误。我认为这个可能和jboss与tomact的兼容有关,所以这个时候热部署已经失去了功效,你每部署一次你的应用,你就要重新启动一次jboss,好在不是启动计算机,到这里有必要提醒一下,如果你这个时候修改了你计算机的密码,估计你要重启计算机了:)
至此,你便可以在浏览器中输入http://localhost:8080/employee,运行你这个SOA的应用了,你发现你没有配置数据库,没有管怎么去访问数据库,但是它已经得到了数据,你不觉得奇怪吗?不要奇怪,这就是SOA功能的体现。


 130
130

 被折叠的 条评论
为什么被折叠?
被折叠的 条评论
为什么被折叠?
 到【灌水乐园】发言


