


Linux Related Settings
Useful Linux Command
- ls | wc -l tell how many files in current directory
- ls -l | grep ^d list directory items in current directory
- pkg-config –static –libs glfw3 tell you how to link glfw3 lib by correct order
- locate -b ‘\qmake’ find qmake path using exact name
- objdump -t a.out display symbol table of elf file a.out
- objdump -h a.out display sections of elf file a.out
package install related problems
problem: X11/Xlib.h: No such file or directory
solution: yum install libX11-devel
problem: /usr/lib64/libX11.so
yum search keyword. 可以从yum 源中查询安装包。
Ubuntu: apt-get install xxx Could not get lock /var/lib/dpkg/lock
sudo rm /var/cache/apt/archives/lock
sudo rm /var/lib/dpkg/lock
E: Could not open lock file /var/lib/dpkg/lock - open (2: No such file or directory)
solution:
$ sudo cp /var/backups/dpkg.status.0 /var/lib/dpkg/status
$ sudo apt-get update
package info search Ubuntu
apt-cache search # (搜索包, 得到一个大概描述)
apt-cache show # (获取包的详细信息,如说明、大小、版本等)
apt-cache depends # (了解使用依赖)
dpkg -l (列出当前系统中所有的包)
例如: sudo dpkg -l | grep vim
详细介绍
动态库相关
查询动态库路径
ldd 查询可运行程序的动态库路径。
ldconfig -p 显示当前缓存的系统动态库路径。
添加动态库路径
/etc/ld.so.conf 文件中的条目可以指定系统动态库的查找路径。
LD_LIBRARY_PATH 环境变量可以临时进行指定,不建议使用。
Linux Kernel 启动参数相关
查看本次启动参数
# cat /proc/cmdline
BOOT_IMAGE=/vmlinuz-3.10.0-327.4.4.el7.x86_64 root=/dev/mapper/centos-root ro rd.lvm.lv=centos/root rd.lvm.lv=centos/swap crashkernel=auto rhgb quiet rdblacklist=nouveau
rdblacklist=nouveau 阻止模块nouveau加载。
通过grub2设置启动参数
启动参数详解
编辑grub 配置模板 /etc/default/grub
GRUB_TIMEOUT=5
GRUB_DEFAULT=saved
GRUB_DISABLE_SUBMENU=true
GRUB_TERMINAL_OUTPUT="console"
GRUB_CMDLINE_LINUX="rd.lvm.lv=centos/root rd.lvm.lv=centos/swap crashkernel=auto rhgb quiet rdblacklist=nouveau"
GRUB_DISABLE_RECOVERY="true"
新增命令行 rdblacklist=nouveau, 使用工具重新生成配置。
grub2-mkconfig -o /boot/grub2/grub.cfg
重新生成配置文件 /boot/grub2/grub.cfg, 下面为其中一个启动entry。
menuentry 'CentOS Linux (3.10.0-229.el7.x86_64) 7 (Core)' --class rhel fedora --class gnu-linux --class gnu --class os --unrestricted $menuentry_id_option 'gnulinux-3.10.0-229.el7.x86_64-advanced-ca9839b2-ce16-4d27-913d-8dda7d4ba8f4' {
        load_video
        set gfxpayload=keep
        insmod gzio
        insmod part_msdos
        insmod xfs
        set root='hd0,msdos1'
        if [ x$feature_platform_search_hint = xy ]; then
          search --no-floppy --fs-uuid --set=root --hint-bios=hd0,msdos1 --hint-efi=hd0,msdos1 --hint-baremetal=ahci0,msdos1 --hint='hd0,msdos1'  306e9c81-e781-41af-b348-8446fcf4d9b3
        else
          search --no-floppy --fs-uuid --set=root 306e9c81-e781-41af-b348-8446fcf4d9b3
        fi
        linux16 /vmlinuz-3.10.0-229.el7.x86_64 root=/dev/mapper/centos-root ro rd.lvm.lv=centos/root rd.lvm.lv=centos/swap crashkernel=auto rhgb quiet rdblacklist=nouveau
        initrd16 /initramfs-3.10.0-229.el7.x86_64.img
}
grub 用下面的命令:
sudo update-grub
Generating grub configuration file ...
Found linux image: /boot/vmlinuz-3.13.0-69-generic
Found initrd image: /boot/initrd.img-3.13.0-69-generic
Found linux image: /boot/vmlinuz-3.13.0-24-generic
Found initrd image: /boot/initrd.img-3.13.0-24-generic
Found linux image: /boot/vmlinuz-3.11.0-15-generic
Found initrd image: /boot/initrd.img-3.11.0-15-generic
Found linux image: /boot/vmlinuz-3.11.0-12-generic
Found initrd image: /boot/initrd.img-3.11.0-12-generic
Found memtest86+ image: /memtest86+.elf
Found memtest86+ image: /memtest86+.bin
Found Windows 8 (loader) on /dev/sda1
done
grep 相关
查找typedef 的定义:
grep '^typedef .* GLintptr;'/usr/include/GL/*.h
查找include的头文件:
grep -r '^#include' /usr/include/
-r 查找子目录
-n 显示匹配行号
-I 忽略二进制文件
查询显卡相关信息:
 lspci | grep -i 'vga'
0f:00.0 VGA compatible controller: NVIDIA Corporation GF110 [GeForce GTX 570] (rev a1)
查询详细信息 识别PCI设备
lspci -v -s 0f:00.0
0f:00.0 VGA compatible controller: NVIDIA Corporation GF110 [GeForce GTX 570] (rev a1) (prog-if 00 [VGA controller])
    Subsystem: NVIDIA Corporation Leadtek WinFast GTX 570
    Physical Slot: 2
    Flags: bus master, fast devsel, latency 0, IRQ 30
    Memory at ea000000 (32-bit, non-prefetchable) [size=16M]
    Memory at e0000000 (64-bit, prefetchable) [size=128M]
    Memory at e8000000 (64-bit, prefetchable) [size=32M]
    I/O ports at d000 [size=128]
    [virtual] Expansion ROM at eb080000 [disabled] [size=512K]
    Capabilities: [60] Power Management version 3
    Capabilities: [68] MSI: Enable+ Count=1/1 Maskable- 64bit+
    Capabilities: [78] Express Endpoint, MSI 00
    Capabilities: [b4] Vendor Specific Information: Len=14 <?>
    Capabilities: [100] Virtual Channel
    Capabilities: [128] Power Budgeting <?>
    Capabilities: [600] Vendor Specific Information: ID=0001 Rev=1 Len=024 <?>
    Kernel driver in use: nouveau
Nouveau是由第三方为NVIDIA显卡开发的一个开源3D驱动,也没能得到NVIDIA的认可与支持。虽然Nouveau Gallium3D在游戏速度上还远远无法和NVIDIA官方私有驱动相提并论,不过确让Linux更容易的应对各种复杂的NVIDIA显卡环境,让用户安装完系统即可进入桌面并且有不错的显示效果,所以,很多Linux发行版默认集成了Nouveau驱动,在遇到NVIDIA显卡时默认安装。企业版的Linux更是如此,几乎所有支持图形界面的企业Linux发行版都将Nouveau收入其中。
安装英伟达显卡驱动
- 禁用nouveau驱动,通过kernel 启动命令行的方式禁止。重启系统,用命令
lsmod | grep nouveau验证模块是否仍然加载在系统中。
lsmod | grep nouveau
nouveau              1403757  3
video                  24400  1 nouveau
mxm_wmi                13021  1 nouveau
i2c_algo_bit           13413  1 nouveau
drm_kms_helper        125008  1 nouveau
ttm                    93441  1 nouveau
drm                   349210  6 ttm,drm_kms_helper,nouveau
i2c_core               40582  4 drm,drm_kms_helper,i2c_algo_bit,nouveau
wmi                    19070  3 hp_wmi,mxm_wmi,nouveau
- 在文本模式下安装显卡驱动,因为安装时候不能使用X WINDOWS。
init 3重启系统进入文本模式。run level 的详细意义如下:
# Default runlevel. The runlevels used by RHS are:

#   0 - halt (Do NOT set initdefault to this)
#   1 - Single user mode
#   2 - Multiuser, without NFS (The same as 3, if you do not have networking)
#   3 - Full multiuser mode
#   4 - unused
#   5 - X11
#   6 - reboot (Do NOT set initdefault to this)
可以查看当前系统的run level。
# runlevel
N 5
# ps -ef | head
UID        PID  PPID  C STIME TTY          TIME CMD
root         1     0  0 Jan13 ?        00:00:24 /usr/lib/systemd/systemd --switched-root --system --deserialize 21
root         2     0  0 Jan13 ?        00:00:00 [kthreadd]
root         3     2  0 Jan13 ?        00:00:00 [ksoftirqd/0]
root         8     2  0 Jan13 ?        00:00:00 [migration/0]
root         9     2  0 Jan13 ?        00:00:00 [rcu_bh]
root        10     2  0 Jan13 ?        00:00:00 [rcuob/0]
root        11     2  0 Jan13 ?        00:00:00 [rcuob/1]
root        12     2  0 Jan13 ?        00:00:00 [rcuob/2]
root 13 2 0 Jan13 ? 00:00:00 [rcuob/3]- 安装Linux Kernel Interface.
- 到官网download driver Download ,进入文本模式安装。
install AMD/ATI graphics driver
It is similar to N-card driver install. The difference lies in that after install it also need to
configure x server in /etc/X11/xorg.conf. when driver package installed successfully, a tool called amdconfig will be installed automatically. with its help we can generate AMD
version x server configure file easily, just type amdconfig --initial. For details please amdconfig --help.
lspci | grep -i vga
0f:00.0 VGA compatible controller: Advanced Micro Devices, Inc. [AMD/ATI] Cypress XT [Radeon HD 5870]
lspci -v -s 0f:00.0
0f:00.0 VGA compatible controller: Advanced Micro Devices, Inc. [AMD/ATI] Cypress XT [Radeon HD 5870] (prog-if 00 [VGA controller])
    Subsystem: Advanced Micro Devices, Inc. [AMD/ATI] Radeon HD 5870 Eyefinity⁶ Edition
    Physical Slot: 2
    Flags: bus master, fast devsel, latency 0, IRQ 35
    Memory at e0000000 (64-bit, prefetchable) [size=256M]
    Memory at f8000000 (64-bit, non-prefetchable) [size=128K]
    I/O ports at d000 [size=256]
    [virtual] Expansion ROM at f8040000 [disabled] [size=128K]
    Capabilities: <access denied>
    Kernel driver in use: fglrx_pci
Now AMD driver fglrx_pci is in use.
vim 相关
高亮显示匹配项
- *向下查找光标所在单词并高亮显示
- #向上查找光标所在单词并高亮显示
光标移动
- ctrl + o 回到上一次光标所在位置
- j 向前(行号+)移动1行, 10j向前移动10行
- k 向后(行号-)移动1行, 10k向后移动10行
- h 向左移动1列, 10h 向左移动10列,0 移动到行首
- l 向右移动1列, 10l 向右移动10列,$ 移动到行首
参考资料
执行shell命令
- :!command 不退出vim 执行shell命令command,将命令输出显示在vim的命令区域,不会改变当前编辑的文件的内容。
例如: :!ls -l - :r !command 将shell命令command的结果插入到当前行的下一行
例如: :r !date 读取系统时间并插入到当前行的下一行。 - :起始行号,结束行号 !command 将起始行号和结束行号指定的范围中的内容输入到shell命令command处理,并将处理结果替换起始行号和结束行号指定的范围中的内容。
例如: :62,72 !sort 将62行到72行的内容进行排序。 :62 !tr [a-z] [A-Z] 将62行的小写字母转为大写字母。 - :起始行号,结束行号 w !command 将起始行号和结束行号所指定的范围的内容作为命令command的输入。不会改变当前编辑的文件的内容。
cscope plugin
tutorial
source code
vim script
nmap key map debug
using following command ctags only parse c source code to build reference index.
ctags `find . -name "*.[ch]" -print` what about cpp?
find . \( -name *.cpp -o -name *.h \) -printthe following expression is better, details please refer to manual of find command.
find . -regex '.*\.\(c\|h\)' -printUbuntu14.04 mount windows partitions
blkid query device info
run command:
blkid | grep ‘ntfs’. it can tell the uuid of the remote file system.
fdisk -l | grep ‘NTFS’. it can tell the name of windows partitions.
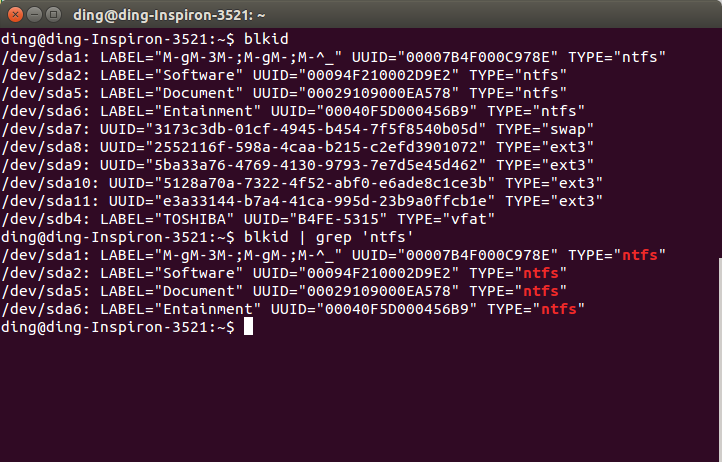
uuid will be referenced in /etc/fstab.
add entry to /etc/fstab
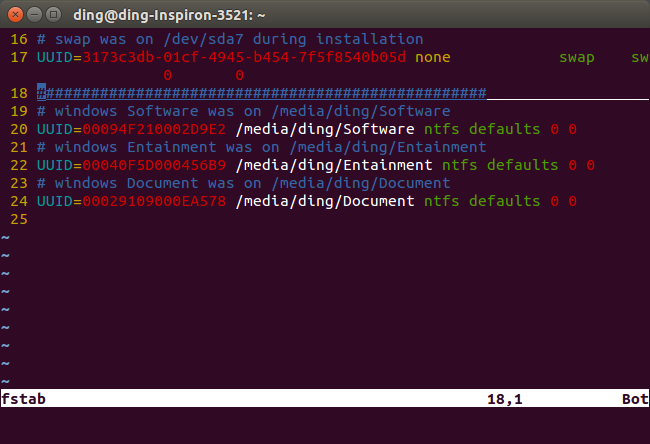
use command man fstab, more details will be found.
mount again
sudo mount -s


 132
132


 被折叠的 条评论
为什么被折叠?
被折叠的 条评论
为什么被折叠?
 到【灌水乐园】发言


