


配置nginx 使用service nginx start ,service nginx stop ,service nginx restart命令操作nginx和nginx随系统启动的方法遇到的问题总结:
环境:centos7.5 系统,nginx1.25.3
一、设置nginx的start 、stop、restart快捷操作
1、首先,在linux系统的/etc/init.d/目录下创建nginx文件,使用如下命令:
vim /etc/init.d/nginx新建一个nginx文件。
在文件中加入此代码:(此代码来源于nginx官网给出的:https://www.nginx.com/resources/wiki/start/topics/examples/redhatnginxinit/)
#!/bin/sh
#
# nginx - this script starts and stops the nginx daemon
#
# chkconfig: - 85 15
# description: NGINX is an HTTP(S) server, HTTP(S) reverse \
# proxy and IMAP/POP3 proxy server
# processname: nginx
# config: /etc/nginx/nginx.conf
# config: /etc/sysconfig/nginx
# pidfile: /var/run/nginx.pid
# Source function library.
. /etc/rc.d/init.d/functions
# Source networking configuration.
. /etc/sysconfig/network
# Check that networking is up.
[ "$NETWORKING" = "no" ] && exit 0
nginx="/usr/local/nginx-1.25.3/sbin/nginx" #修改为你的nginx安装目录
prog=$(basename $nginx)
NGINX_CONF_FILE="/usr/local/nginx-1.25.3/nginx.conf" #修改为你的nginx配置文件目录
[ -f /etc/sysconfig/nginx ] && . /etc/sysconfig/nginx
lockfile=/var/lock/subsys/nginx
make_dirs() {
# make required directories
user=`$nginx -V 2>&1 | grep "configure arguments:" | sed 's/[^*]*--user=\([^ ]*\).*/\1/g' -`
if [ -z "`grep $user /etc/passwd`" ]; then
useradd -M -s /bin/nologin $user
fi
options=`$nginx -V 2>&1 | grep 'configure arguments:'`
for opt in $options; do
if [ `echo $opt | grep '.*-temp-path'` ]; then
value=`echo $opt | cut -d "=" -f 2`
if [ ! -d "$value" ]; then
# echo "creating" $value
mkdir -p $value && chown -R $user $value
fi
fi
done
}
start() {
[ -x $nginx ] || exit 5
[ -f $NGINX_CONF_FILE ] || exit 6
make_dirs
echo -n $"Starting $prog: "
daemon $nginx -c $NGINX_CONF_FILE
retval=$?
echo
[ $retval -eq 0 ] && touch $lockfile
return $retval
}
stop() {
echo -n $"Stopping $prog: "
killproc $prog -QUIT
retval=$?
echo
[ $retval -eq 0 ] && rm -f $lockfile
return $retval
}
restart() {
configtest || return $?
stop
sleep 1
start
}
reload() {
configtest || return $?
echo -n $"Reloading $prog: "
killproc $nginx -HUP
RETVAL=$?
echo
}
force_reload() {
restart
}
configtest() {
$nginx -t -c $NGINX_CONF_FILE
}
rh_status() {
status $prog
}
rh_status_q() {
rh_status >/dev/null 2>&1
}
case "$1" in
start)
rh_status_q && exit 0
$1
;;
stop)
rh_status_q || exit 0
$1
;;
restart|configtest)
$1
;;
reload)
rh_status_q || exit 7
$1
;;
force-reload)
force_reload
;;
status)
rh_status
;;
condrestart|try-restart)
rh_status_q || exit 0
;;
*)
echo $"Usage: $0 {start|stop|status|restart|condrestart|try-restart|reload|force-reload|configtest}"
exit 2
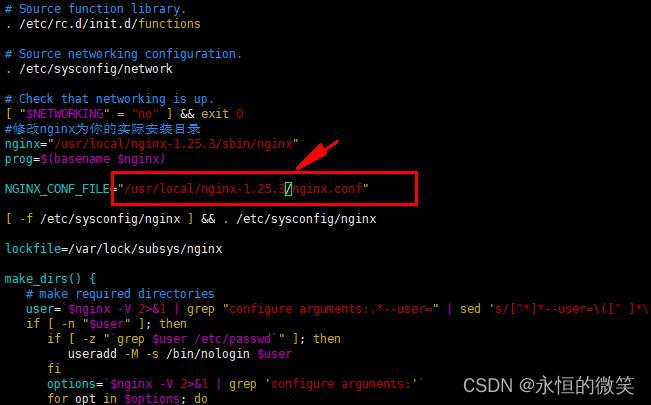
esac二、修改/etc/init.d/nginx的配置路径
如果你是自定义编译安装的nginx,需要根据您的安装路径修改下面这两项配置:
#修改成nginx执行程序的路径(我的nginx路径是“/usr/local/nginx-1.25.3/”所以代码里面是这个路径)。
nginx=”/usr/sbin/nginx”
# 修改成nginx配置文件的路径。
NGINX_CONF_FILE=”/etc/nginx/nginx.conf”
三、添加nginx启动的执行权限
1、添加权限文件的:
chmod 755 /etc/init.d/nginx
2、执行添加服务:
chkconfig --add /etc/init.d/nginx
chkconfig --add nginx
四、在 /usr/lib/systemd/system 目录中添加 nginx.service
1、新建nginx.service
#新建一个nginx.service文件
vim /usr/lib/systemd/system/nginx.service
2、并且添加如下代码
#nginx.service文件中添加以下代码
[Unit]
Description=nginx - high performance web server
Documentation=http://nginx.org/en/docs/
After=network.target remote-fs.target nss-lookup.target

[Service]
Type=forking
PIDFile=/usr/local/nginx-1.25.3/logs/nginx.pid
ExecStartPre=/usr/local/nginx-1.25.3/sbin/nginx -t -c /usr/local/nginx-1.25.3/conf/nginx.conf
ExecStart=/usr/local/nginx-1.25.3/sbin/nginx -c /usr/local/nginx-1.25.3/conf/nginx.conf
ExecReload=/bin/kill -s HUP $MAINPID
ExecStop=/bin/kill -s QUIT $MAINPID
PrivateTmp=true

[Install]
WantedBy=multi-user.target
修改nginx.service 的代码中的:(标红色的路径是您的nginx安装路径)
PIDFile=/usr/local/nginx-1.25.3/logs/nginx.pid
ExecStartPre=/usr/local/nginx-1.25.3/sbin/nginx -t -c /usr/local/nginx-1.25.3/conf/nginx.conf
ExecStart=/usr/local/nginx-1.25.3/sbin/nginx -c /usr/local/nginx-1.25.3/conf/nginx.conf
三个参数为你的nginx安装目录。
五、设置开机启动
systemctl enable nginx以上步骤是我总结的对nginx配置使用以下命令来快捷操作nginx的方法,并且设置开机自动启动nginx
service nginx start
service nginx stop
service nginx restart
做完后我以为就OK了,但是结果往往出人意料。
以下是错误分析
#执行service nginx start启动命令
service nginx start出现错误:如图

[root@localhost ~]# service nginx start
Starting nginx (via systemctl):  Warning: nginx.service changed on disk. Run 'systemctl daemon-reload' to reload units.

Job for nginx.service failed because a timeout was exceeded. See "systemctl status nginx.service" and "journalctl -xe" for details.
                                                           [FAILED]
查看nginx是否启动:
ps -ef | grep nginxnginx没有启动成功,使用“systemctl status nginx”命令查看错误内容:
systemctl status nginx如图:显示 Failed to start SYSV: NGINX is an HTTP(S) server, HTTP(S) reverse proxy and IMAP/POP3 proxy server.
[root@localhost ~]# systemctl status nginx
● nginx.service - SYSV: NGINX is an HTTP(S) server, HTTP(S) reverse proxy and IMAP/POP3 proxy server
   Loaded: loaded (/etc/rc.d/init.d/nginx; bad; vendor preset: disabled)
   Active: failed (Result: exit-code) since Wed 2024-01-10 17:44:37 PST; 5min ago
     Docs: man:systemd-sysv-generator(8)
  Process: 5670 ExecStart=/etc/rc.d/init.d/nginx start (code=exited, status=6)

Jan 10 17:44:37 localhost.localdomain systemd[1]: Starting SYSV: NGINX is an HTTP(S) server, HTTP(S) reverse proxy and IMAP/POP3 proxy server...
Jan 10 17:44:37 localhost.localdomain systemd[1]: nginx.service: control process exited, code=exited status=6
Jan 10 17:44:37 localhost.localdomain systemd[1]: Failed to start SYSV: NGINX is an HTTP(S) server, HTTP(S) reverse proxy and IMAP/POP3 proxy server.
Jan 10 17:44:37 localhost.localdomain systemd[1]: Unit nginx.service entered failed state.
Jan 10 17:44:37 localhost.localdomain systemd[1]: nginx.service failed.
之前自己一直没找到原因(自己有点粗心,不够仔细),通过一阵搜索后,找到类似的报错问题,好多都是说把所有的nginx全部kill,之后再重新启动,或者说的是对端口的占用导致的,先关掉这些占用的程序,再自动nginx就可以了。我尝试了都不行,说明我遇到的问题不是这些原因造成的。
最后静下心来,一步一步排查查看到/etc/init.d/nginx 文件中的代码中,我修改 NGINX_CONF_FILE= "/usr/local/nginx-1.25.3/nginx.conf"的配置文件路径出现了错误,把这个值修改为正确的"/usr/local/nginx-1.25.3/conf/nginx.conf".
执行service nginx start 启动成功
[root@localhost ~]# service nginx start
Starting nginx (via systemctl):                            [  OK  ]
查看nginx状态:systemctl status nginx
[root@localhost ~]# systemctl status nginx
● nginx.service - nginx - high performance web server
   Loaded: loaded (/usr/lib/systemd/system/nginx.service; disabled; vendor preset: disabled)
   Active: active (running) since Wed 2024-01-10 18:45:33 PST; 3min 40s ago
     Docs: http://nginx.org/en/docs/
  Process: 6685 ExecStart=/usr/local/nginx-1.25.3/sbin/nginx -c /usr/local/nginx-1.25.3/conf/nginx.conf (code=exited, status=0/SUCCESS)
  Process: 6682 ExecStartPre=/usr/local/nginx-1.25.3/sbin/nginx -t -c /usr/local/nginx-1.25.3/conf/nginx.conf (code=exited, status=0/SUCCESS)
 Main PID: 6687 (nginx)
   CGroup: /system.slice/nginx.service
           ├─6687 nginx: master process /usr/local/nginx-1.25.3/sbin/nginx -c /usr/local/nginx-1.25.3/conf/nginx.conf
           └─6688 nginx: worker process

Jan 10 18:45:32 localhost.localdomain systemd[1]: Starting nginx - high performance web server...
Jan 10 18:45:33 localhost.localdomain nginx[6682]: nginx: the configuration file /usr/local/nginx-1.25.3/conf/nginx.conf syntax is ok
Jan 10 18:45:33 localhost.localdomain nginx[6682]: nginx: configuration file /usr/local/nginx-1.25.3/conf/nginx.conf test is successful
Jan 10 18:45:33 localhost.localdomain systemd[1]: Started nginx - high performance web server.


 1万+
1万+


 被折叠的 条评论
为什么被折叠?
被折叠的 条评论
为什么被折叠?
 到【灌水乐园】发言


