


转载请注明出处:http://blog.csdn.net/yegongheng/article/details/17410835
1、什么是Service
Service的官网解释是:Service是一个在后台执行较长时间操作且不提供用户界面接口的应用程序组件。其它的应用程序组件能开启一个Service,Service将在后台运行甚至用户切换到其它应用时也有效。另外,一个组件可以绑定一个Service并与之相互通讯,同时也可以执行一些进程间的通讯操作。在 Service中主要执行一些比较耗时的操作,诸如网络下载,音乐播放、I/O文件操作和与Content Provider之间的联系等,当然所有的操作都是在后台进行。需要注意的是,Service即不是进程,也不是线程,它是运行在其所在宿主进程的主线程中。2、Service的生命周期
使用Service一般分为两种方法,Started Service和Bound Service:Started Service:
当一个应用程序组件调用startService()方法时便开启了一个Service,一般来讲,应用程序组件(比如Activity)一旦开启了一个Service,便和Service没有什么联系,甚至该应用程序组件销毁了,Service仍然正常运行直到组件调用stopService()方法或者是Service中的任务执行完成后自动停止。Service一般是运行在后台的操作,它不与前台进行交互或是返回任何值,比如网络的上传和下载,一旦任务完成Service变回自动停止销毁。
Bound Service:
当一个应用程序组件调用boundService()方法时便绑定了一个Service.Bound Service 实现了前台应用程序组件和后台Service的通讯,两者之间可以相互发送请求,获得结果甚至执行进程间的通讯(IPC)。Bound Service是依存于前台应用程序组件的,当前台组件销毁了,绑定的Service也会随之销毁,前台的多个组件可以绑定后台同一个Service,不过当所有的前台组件都解除绑定后,Service会被Destory掉。
两者Service的使用方法与Activity类似,都管理着各自的生命周期,下面是两者的生命周期图示:

Started Service经历创建-->运行-->销毁(onCreate()-->onStartCommand()-->onDestory())三个过程,Bound Service经历创建-->绑定-->解除绑定-->销毁(onCreate()-->onBind()-->onUnbind()-->onDestory)四个过程,下面将逐一分析每个方法:
onCreate():
该方法在Service首次创建的时候调用,位于onStartCommand()和onBind()之前,当Service实例已经存并运行,不会重复调用该方法。
onStartCommend():
当前台组件调用startService()用于开启一个服务的时候触发该方法,当Service执行完毕或调用stopService()方法时,Service将会销毁掉。
onBind():
当前台组件调用boundService()用于绑定一个服务时触发该方法。
onUnbind():
当前台所有绑定该Service的应用程序组件调用unBindService()时,该方法将调用。
onDestory():
Service停止或解除绑定时,该方法将调用,Service销毁。
3、Service实例讲解
以上基本了解了两种Service的原理和生命周期后,接下来讲通过实例来深入分析两种Service的使用方法:Started Service:
创建Started Service一般也分两种方法,分别为:
继承Service:
Service类是所有Services的基类,在继承Service创建自定义的Service时,最好在自定义的Service类中新建一个线程用于执行Service中所有的耗时工作,因为Service实例创建后默认情况下不会新建线程(依然在主线程中运行)。因此,为了避免在Service中执行较为繁重的工作而导致的前台Activity阻塞的情况发生,新创建线程用于执行耗时任务是较为明智的选择。下面我们使用一个实例来熟悉一下继承Service来Started Serivce的使用方法,主要源代码如下:MyServiceDemo.java:
import android.app.Service;
import android.content.Intent;
import android.os.Binder;
import android.os.IBinder;
import android.util.Log;
import android.widget.Toast;

public class MyServiceDemo extends Service {

	private static final String TAG = "ygh";

	@Override
	public IBinder onBind(Intent arg0) {
		// TODO Auto-generated method stub
		Log.i(TAG, "onBind()");
		return new MyBinder();
	}
	@Override
	public void onCreate() {
		// TODO Auto-generated method stub
		Log.i(TAG, "onCreate()");
		super.onCreate();
	}
	@Override
	public void onStart(Intent intent, int startId) {
		// TODO Auto-generated method stub
		Log.i(TAG, "onStart()");
		super.onStart(intent, startId);
	}
	@Override
	public int onStartCommand(Intent intent, int flags, int startId) {
		// TODO Auto-generated method stub
		Log.i(TAG, "onStartCommand()");
		return super.onStartCommand(intent, flags, startId);
	}
	@Override
	public void onRebind(Intent intent) {
		// TODO Auto-generated method stub
		Log.i(TAG, "onRebind()");
		super.onRebind(intent);
	}
	@Override
	public boolean onUnbind(Intent intent) {
		// TODO Auto-generated method stub
		Log.i(TAG, "onUnbind()");
		return super.onUnbind(intent);
	}
	@Override
	public void onDestroy() {
		// TODO Auto-generated method stub
		Log.i(TAG, "onDestroy()");
		super.onDestroy();
	}
	//自定义MyBinder类,继承Binder类
	public class MyBinder extends Binder
	{
		public void getString(String str)
		{
			Toast.makeText(getApplicationContext(), "Hello, "+ str, Toast.LENGTH_LONG).show();
		}
	}
}
//开启Service
	public void startServiceMethod()
	{
		Intent mIntent = new Intent(this,MyServiceDemo.class);

		this.startService(mIntent);
	}
	//停止Service
	public void stopServiceMethod()
	{
		Intent mIntent = new Intent(this,MyServiceDemo.class);
		this.stopService(mIntent);
	}
我们通过点击MainActivity的布局界面中这两个按钮来做试验:
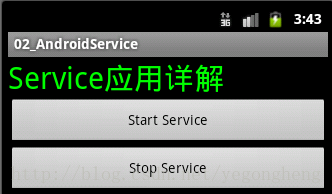
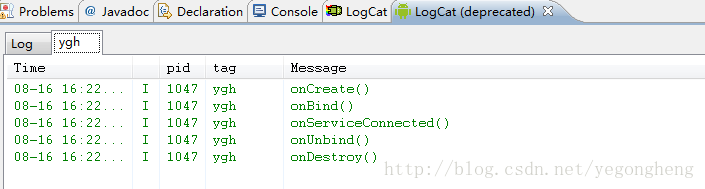
如上图示,我们点击“Start Service”按钮调用startServiceMethod()方法开启服务,点击“Stop Service”按钮调用stopServiceMethod()方法停止服务。首先,我们点击“Start Service”,打印的Log信息如下:
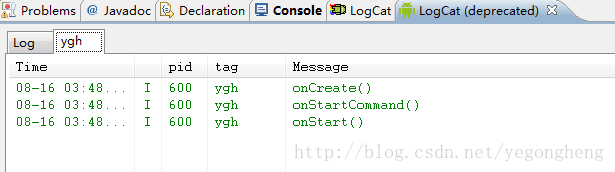
开启服务,首先调用onCreate()、onStartCommand()和onStart()方法,服务在后台中开始运行,然后再多次(三次)重复点击”Start Service“按钮,打印的Log信息如下:
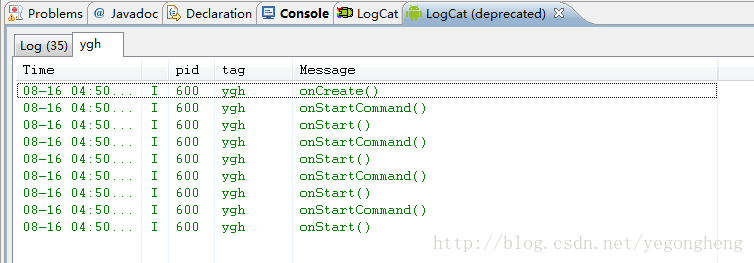
由上图可知,onCreate()方法只会在Service首次实例化的时候调用,当Service对象存在的情况下,调用startService()方法只会重复调用onStartCommand()和onStart()方法。接下来点击“Stop Service”,打印的Log信息如下:
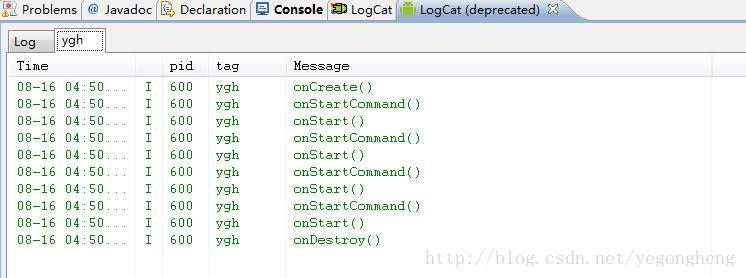
停止服务,调用onDestory()方法,服务停止并销毁。
在Service的生命周期中,有onStartCommand()方法,它在系统调用onCreate()之后调用,onStartCommand()方法返回一个int类型的值,返回值一般分为以下三种:
START_NOT_STICKY
Service在调用onStartCommand()后被Kill掉,系统不会自动重启服务,除非有其它等待的Intent启动服务。当不需要重启服务或者是有些应用可以非常容易重启未完成的工作时,使用该参数是最佳的选择。
START_STICKY
当Service在调用onStartCommand()后被Kill掉,系统会自动重启服务并调用onStartCommand()方法,但不传递最后的Intent对象,系统若调用onStartCommand()方法,返回的Intent对象的值为null。除非有其它等待的Intent启动服务,Intent才会被传递。该参数比较合适音频、视频等媒体播放情况,不执行命令,但无限运行并等待。
START_REDELIVER_INTENT
当Service在调用onStartCommand()后被Kill掉,系统会自动重启服务并调用onStartCommand()方法,同时也传递最后的Intent对象。该参数比较适合那些较为活跃的需立即重启服务和返回各种Intent的工作,如下载文件。
继承IntentService:
该类是Service的子类,继承IntentService与直接继承Service执行任务的区别是前者自动创建了一个工作线程用于处理所有的开启请求,若用户不需要执行多任务的请求时,使用IntentService方法是最佳的的选择。该类中有一个onHandleIntent()方法,使用时子类需重写这个方法,所有的后台工作都将在该方法中执行。由于大多数的Started Service操作都不需要使用多任务请求(实际上多任务请求比较危险),因此使用IntentService是最好的选择。那么相比Service,使用IntentService多做了哪些工作呢?如下罗列了几条:<1>在主线程之外,创建了一个默认的工作线程(work Thread)用于将所有的意图操作传递给onstartCommend()中。
<2>默认创建了一个工作队列(work queue)用于将意图一一传递到onHandleIntent()方法中,因此用户不需要担心多线程的问题。
<3>当所有的任务请求都结束后会自动停止服务(Stop Service),因此用户不需要调用stopSelf()方法。
<4>提供默认的onBind()实现方法,返回值为null。
<5>提供默认的onStartCommand()实现,将所有的意图请求传送到工作队列中然后再一一传递到onHandleIntent()方法实现中。
总的来讲,IntentService是在Service基础上的封装,使用IntentService时,它默认提供了一个工作线程和用于管理消息任务的工作队列,工作队列在Looper的管理下进行消息的接收和分发,然后再通过继承了Handler的ServiceHandler来传递消息给工作队列和接收工作队列分发出来的消息(其涉及到了多线程的异步任务方面的知识,具体的可以学习《Android多线程和异步任务之Handler》)。下面我们来分析一下IntentService的源码,具体了解IntentService的工作原理和机制,源码如下:
public abstract class IntentService extends Service {
    private volatile Looper mServiceLooper;
    private volatile ServiceHandler mServiceHandler ;
    private String mName;
    private boolean mRedelivery ;

    private final class ServiceHandler extends Handler {
        public ServiceHandler(Looper looper) {
            super(looper);
        }

        @Override
        public void handleMessage(Message msg) {
            onHandleIntent((Intent)msg.obj);
            stopSelf(msg.arg1);
        }
    }

    /**
     * Creates an IntentService.  Invoked by your subclass's constructor.
     *
     * @param name Used to name the worker thread, important only for debugging.
     */
    public IntentService(String name) {
        super();
        mName = name;
    }

    /**
     * Sets intent redelivery preferences.  Usually called from the constructor
     * with your preferred semantics.
     *
     * <p>If enabled is true,
     * {@link #onStartCommand(Intent, int, int)} will return
     * {@link Service#START_REDELIVER_INTENT} , so if this process dies before
     * {@link #onHandleIntent(Intent)} returns, the process will be restarted
     * and the intent redelivered.  If multiple Intents have been sent, only
     * the most recent one is guaranteed to be redelivered.
     *
     * <p>If enabled is false (the default),
     * {@link #onStartCommand(Intent, int, int)} will return
     * {@link Service#START_NOT_STICKY}, and if the process dies, the Intent
     * dies along with it.
     */
    public void setIntentRedelivery(boolean enabled) {
        mRedelivery = enabled;
    }

    @Override
    public void onCreate() {
        // TODO: It would be nice to have an option to hold a partial wakelock
        // during processing, and to have a static startService(Context, Intent)
        // method that would launch the service & hand off a wakelock.

        super.onCreate();
        HandlerThread thread = new HandlerThread("IntentService[" + mName + "]" );
        thread.start();

        mServiceLooper = thread.getLooper();
        mServiceHandler = new ServiceHandler(mServiceLooper );
    }

    @Override
    public void onStart(Intent intent, int startId) {
        Message msg = mServiceHandler.obtainMessage();
        msg.arg1 = startId;
        msg.obj = intent;
        mServiceHandler.sendMessage(msg);
    }

    @Override
    public int onStartCommand(Intent intent, int flags, int startId) {
        onStart(intent, startId);
        return mRedelivery ? START_REDELIVER_INTENT : START_NOT_STICKY ;
    }

    @Override
    public void onDestroy() {
        mServiceLooper.quit();
    }

    @Override
    public IBinder onBind(Intent intent) {
        return null ;
    }

    /**
     * This method is invoked on the worker thread with a request to process.
     * Only one Intent is processed at a time, but the processing happens on a
     * worker thread that runs independently from other application logic.
     * So, if this code takes a long time, it will hold up other requests to
     * the same IntentService, but it will not hold up anything else.
     *
     * @param intent The value passed to {@link
     *               android.content.Context#startService(Intent)}.
     */
    protected abstract void onHandleIntent(Intent intent);
}
public void onCreate() {
    // TODO: It would be nice to have an option to hold a partial wakelock
    // during processing, and to have a static startService(Context, Intent)
    // method that would launch the service & hand off a wakelock.

    super.onCreate();
    HandlerThread thread = new HandlerThread("IntentService[" + mName + "]" );
    thread.start();

    mServiceLooper = thread.getLooper();
    mServiceHandler = new ServiceHandler(mServiceLooper );
}private final class ServiceHandler extends Handler {
public ServiceHandler(Looper looper) {
super(looper);
}
@Override
public void handleMessage(Message msg) {
onHandleIntent((Intent)msg.obj);
stopSelf(msg.arg1);
}
}@Override
public void onStart(Intent intent, int startId) {
//得到Message对象
Message msg = mServiceHandler.obtainMessage();
//为Message设置标识
msg. arg1 = startId;
//将从前台传递过来的intent包装成消息对象
msg. obj = intent;
//将消息对象传递到子线程中,在子线程中处理相关操作
mServiceHandler.sendMessage(msg);
}
@Override
public int onStartCommand(Intent intent, int flags, int startId) {
onStart(intent, startId);
return mRedelivery ? START_REDELIVER_INTENT : START_NOT_STICKY ;
}再看ServiceHandler类中的handleMessage(Message msg)方法,该方法是接收传递过来的Message对象,并调用抽象方法onHandleIntent(Intent Service)方法,用户使用IntentService类时需继承IntentService并重写onHandleIntent(Intent service)方法,将主要耗时操作方法该方法中进行(注意,该操作是在新开的子线程中进行的)。操作执行完成自动调用stopSelf(msg.arg1)方法,根据标识将Service停止。
@Override
public void handleMessage(Message msg) {
 //调用onHandleIntent()抽象方法
 onHandleIntent((Intent)msg. obj);
 stopSelf(msg. arg1);
}@Override
public void onDestroy() {
//停止Looper循环并退出
mServiceLooper.quit();
}
import android.app.IntentService;
import android.content.Intent;
import android.util.Log;

public class MyIntentServiceExecuteDemo extends IntentService {

    private static final String TAG = "ygh";

    public MyIntentServiceExecuteDemo() {
          super("MyIntentServiceExecuteDemo" );
          // TODO Auto-generated constructor stub
    }
    @Override
    protected void onHandleIntent(Intent arg0) {
          // TODO Auto-generated method stub
          //利用线程睡眠来模拟耗时操作
          for(int   i = 0; i < 50;i++)
         {
             Log. i(TAG, "IntentService中子线程执行。。。。。。。" + (i + 1));
              try {
                 Thread. sleep(500);
             } catch (InterruptedException e) {
                  // TODO Auto-generated catch block
                 e.printStackTrace();
             }
         }
    }
}//使用Intentservice执行耗时任务
public void intentServiceExecute()
{
//创建Intent对象
Intent mIntent = new Intent(this,MyIntentServiceExecuteDemo. class);
//开启IntentService
this.startService(mIntent);
}
//开启主线程中的耗时操作(这里用线程睡眠来模拟)
public void startMainExecute()
{
waitForMinutes();
}
//耗时操作方法
public void waitForMinutes()
{
for(int i = 0; i < 50;i++)
{
Log. i(TAG, "主线程中执行。。。。。。。" + (i + 1));
try {
Thread. sleep(500);
} catch (InterruptedException e) {
// TODO Auto-generated catch block
e.printStackTrace();
}
}
} 我们通过点击MainActivity的布局界面中这两个按钮来做试验:

首先点击“Use IntentService Execute”按钮,调用了intentServiceExecute()方法开启MyIntentServiceExecuteDemo服务,然后再迅速点击"Start MainThread Execute"按钮,调用了startMainExecute()方法,模拟在主线程中执行一项任务。最后观察Log信息,如下图示:
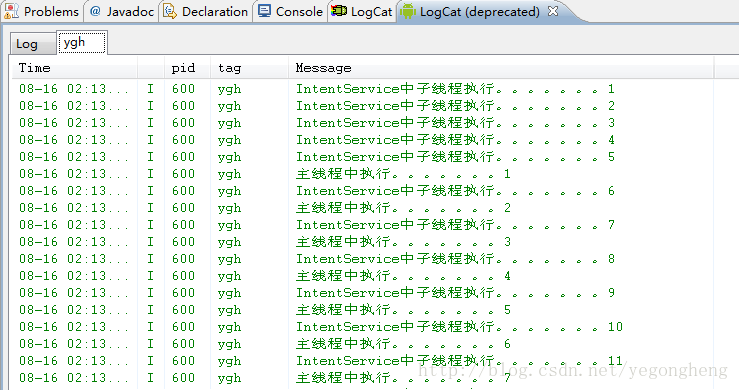
如上图我们可知,当开启IntentService服务后再运行主线程中的任务,IntentService中的任务和MainThread中的任务相互交替执行,由此我们可以断定IntentService新创建了一个线程用于执行后台任务。
前面我们讲了IntentService是在Service基础上的封装,那么我下面使用Service来完成上面同样的实验,看看有什么区别,主要代码如下:
MyServiceExecuteDemo.java:
import android.app.Service;
import android.content.Intent;
import android.os.Handler;
import android.os.HandlerThread;
import android.os.IBinder;
import android.os.Looper;
import android.os.Message;
import android.util.Log;
import android.widget.Toast;

public class MyServiceExecuteDemo extends Service {
     private Looper mServiceLooper;
      private ServiceHandler mServiceHandler;

      private static final String TAG = "ygh";
      // Handler that receives messages from the thread
      private final class ServiceHandler extends Handler {
          public ServiceHandler(Looper looper) {
              super(looper);
          }
          @Override
          public void handleMessage(Message msg) {
              // Normally we would do some work here, like download a file.
              // For our sample, we just sleep for 5 seconds.
          for(int   i = 0; i < 50;i++)
                 {
                      Log. i(TAG, "Service中子线程执行。。。。。。。" + (i + 1));
                       try {
                          Thread. sleep(500);
                      } catch (InterruptedException e) {
                           // TODO Auto-generated catch block
                          e.printStackTrace();
                      }
                 }
              // Stop the service using the startId, so that we don't stop
              // the service in the middle of handling another job
              stopSelf(msg. arg1);
          }
      }

      @Override
      public void onCreate() {
        // Start up the thread running the service.  Note that we create a
        // separate thread because the service normally runs in the process's
        // main thread, which we don't want to block.  We also make it
        // background priority so CPU-intensive work will not disrupt our UI.
        HandlerThread thread = new HandlerThread("ServiceStartArguments" );
        thread.start();
        // Get the HandlerThread's Looper and use it for our Handler
        mServiceLooper = thread.getLooper();
        mServiceHandler = new ServiceHandler(mServiceLooper );
      }

      @Override
      public int onStartCommand(Intent intent, int flags, int startId) {
          Toast. makeText(this, "service starting", Toast.LENGTH_SHORT ).show();

          // For each start request, send a message to start a job and deliver the
          // start ID so we know which request we're stopping when we finish the job
          Message msg = mServiceHandler.obtainMessage();
          msg. arg1 = startId;
          mServiceHandler.sendMessage(msg);

          // If we get killed, after returning from here, restart
          return START_STICKY ;
      }

      @Override
      public IBinder onBind(Intent intent) {
          // We don't provide binding, so return null
          return null;
      }

      @Override
      public void onDestroy() {
        Toast. makeText(this, "service done", Toast.LENGTH_SHORT ).show();
      }
}//使用IntentService执行耗时任务
public void serviceExecute()
{
//创建Intent对象
Intent mIntent = new Intent(this,MyServiceExecuteDemo.class);
//开启IntentService
this.startService(mIntent);
}
//开启主线程中的耗时操作(这里用线程睡眠来模拟)
public void startMainExecute()
{
waitForMinutes();
}
//耗时操作方法
public void waitForMinutes()
{
for(int i = 0; i < 50;i++)
{
Log. i(TAG, "主线程中执行。。。。。。。" + (i + 1));
try {
Thread. sleep(500);
} catch (InterruptedException e) {
// TODO Auto-generated catch block
e.printStackTrace();
}
}
} 我们通过点击MainActivity的布局界面中这两个按钮来做试验:


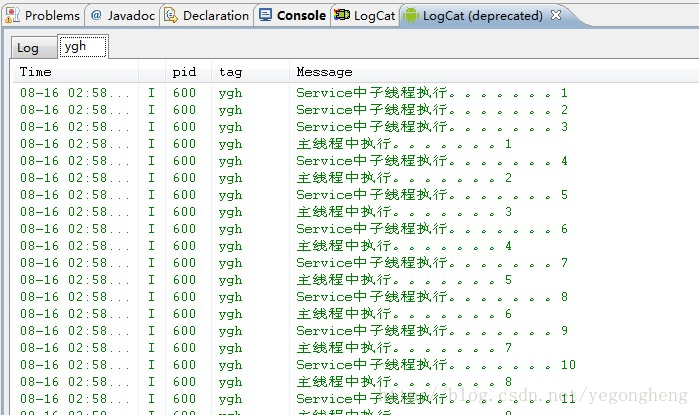
首先点击“Use Service Execute”按钮,调用了serviceExecute()方法开启MyServiceExecuteDemo服务,然后再迅速点击"Start MainThread Execute"按钮,调用了startMainExecute()方法,模拟在主线程中执行一项任务。最后观察Log信息,如下图示:
如上图我们发现执行的效果与使用IntentService执行的效果是一样的。
小结:通过以上的学习和实验,我们可知Service默认是依附在主线程中运行的,所以对于在Service中执行一些较为耗时的操作,我们建议手动新建线程,将耗时操作放在新建的线程中执行。而Google为了方便开发者,提供了IntentService类以便简化开发复杂度,IntentService其实是在Service基础上加入了Handler + Thread机制并进行了良好的封装。IntentService将前台发送过来的若干个Intent(意图)请求加入到MessageQueue中进行异步任务的管理,然后开启一个线程依次对每个耗时任务进行处理,这样避免了由于主线程阻塞导致ANR的情况发生。不过,当需要在后台开启多个线程执行多项任务的时候,使用IntentService就不适合了,因为IntentService默认只开启了一个线程,所以只有使用Service,在Service中手动开启多个线程用户执行多线程多任务的操作。
Bound Service:
Bound Service是连接客户端前台和后台的一个接口。Service允许其他的应用程序组件(如Activity)调用bindService()方法进行绑定、发送请求和接收返回值甚至执行一些进程间的通信。Bound Service是与其绑定它的组件是共存亡的,当绑定它的组件销毁时,Bound Service也随之销毁掉。要实现绑定操作并建立通信,首先得实例化一个IBinder,该对象主要作用实现客户端前台和后台的通信。一般创建IBinder对象有三种方法:继承Binder类
当Service只需在本应用程序中使用而无需进行跨进程的操纵时,继承Binder类是较好的选择。通过创建一个继承Binder的内部类,并将内部类的实例通过onBind()方法返回给前台客户端,前台客户端接收后台返回来的IBinder对象,通过该对象前台可以调用后台所有的公共方法。
使用Messenger
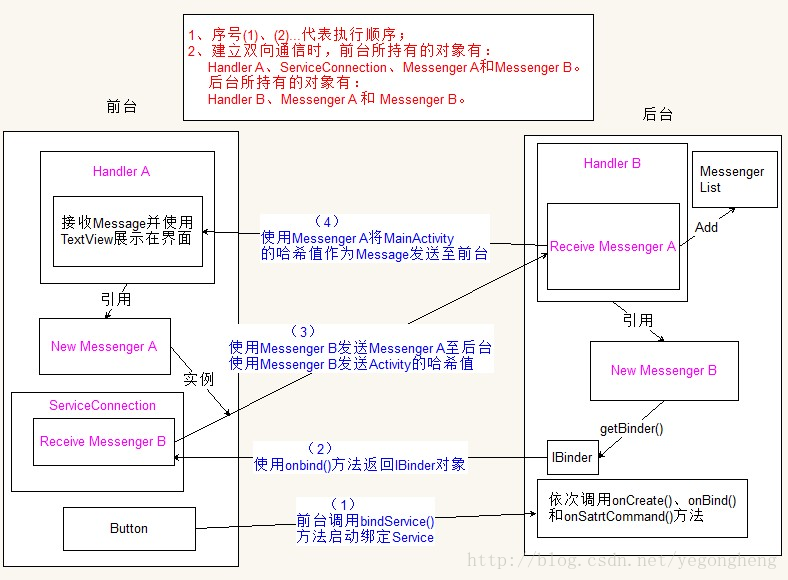
当需要在不同进程间工作时,可以考虑使用Messenger来实现不同进程之间的通信,Messenger作为进程间的信使来将信息体(Message)发送到另外的进程或后台。并且,我们可以借助Handler来接收Messenger发送过来的Message并进行相关处理,当然前提是Handler与与Messenger已经建立起关联的。举例来讲,首先我们在Service后台自定义Handler并重写handleMessage()方法,然后在Service后台实例化一个Messenger对象,在实例化Messenger的同时也实例化自定义的Handler并建立两者的关联关系。然后,通过onBinder()方法将Messenger包装成IBinder对象返回给客户端前台,客户端前台接收到Messenger后使用该对象发送相关Message给后台(或另外的进程),后台与Messenger关联的自定义的Handler接收到从前台发送过来的Message,然后进一步做相关的处理。
使用AIDL
AIDL(Android接口定义语言) 执行的所有工作都是将对象分解成操作系统 所能是别的额信息然后再执行进程间的通信。上面所将的Messenger实现原理其实就是将AIDL作为基础架构的。如上所述,Messenger在单个线程中创建了所有的客户端请求,所以Service一次只能接收一个请求。如果想要Service同时处理多个请求,可是使用AIDL来实现。在这种情况下,Service可以建立多个线程并保证线程安全的。由于篇幅关系,我们将在《使用AIDL实现进程间的通信》的博客中详细讲解AIDL的原理和使用方法。
粗略地分析了创建IBinder对象的三种方法,接下来我们将通过实例来了解前两种方法的实际使用:
继承Binder类实例:
Service类为MyServiceDemo.java,上面介绍Started Service时代码已经罗列出来了,
主界面MainActivity.java的主要源代码如下(布局文件和控件的声明代码省略):
//绑定Service
public void boundServiceMethod()
{
     Intent mIntent = new Intent(this,MyServiceDemo.class);
      this.bindService(mIntent, mServiceConnection, BIND_AUTO_CREATE );
      mIsBound = true ;
}
//解除Service绑定
public void unBoundServiceMethod()
{    if(mIsBound )
     {
          this.unbindService(mServiceConnection );
         Toast. makeText(getApplicationContext(), "unBound Service" , Toast.LENGTH_LONG).show();
     }
}
//使用MyServiceDemo,实例化ServiceConnection对象,建立Activity与后台Service的连接
ServiceConnection mServiceConnection = new ServiceConnection() {

      public void onServiceDisconnected(ComponentName name) {
          // TODO Auto-generated method stub
         Log. i(TAG, "onServiceDisconnected()");
     }
      public void onServiceConnected(ComponentName name, IBinder service) {
          // TODO Auto-generated method stub
         Log. i(TAG, "onServiceConnected()");
          myBinder = (MyServiceDemo.MyBinder)service;
          myBinder.getString("Mr Li" );
     }
};
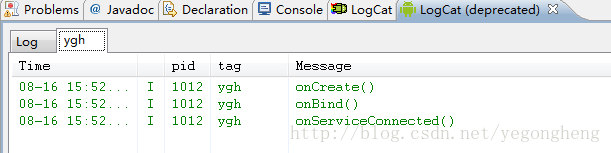
首先点击”Extending Binder Bound Service“按钮将会调用boundServiceMethod()方法绑定Service,后台打印的Log信息为:

//自定义MyBinder类,继承Binder类
    public class MyBinder extends Binder
    {
          public void getString(String str)
         {
             Toast. makeText(getApplicationContext(), "Hello, "+ str, Toast.LENGTH_LONG).show();
         }
    }
@Override
    public IBinder onBind(Intent arg0) {
          // TODO Auto-generated method stub
         Log. i(TAG, "onBind()");
          return new MyBinder();
    }
//使用MyServiceDemo,实例化ServiceConnection对象,建立Activity与后台Service的连接
    ServiceConnection mServiceConnection = new ServiceConnection() {

          public void onServiceDisconnected(ComponentName name) {
              // TODO Auto-generated method stub
             Log. i(TAG, "onServiceDisconnected()");
         }
          public void onServiceConnected(ComponentName name, IBinder service) {
              // TODO Auto-generated method stub
             Log. i(TAG, "onServiceConnected()");
              myBinder = (MyServiceDemo.MyBinder)service;
              myBinder.getString("Mr Li" );
         }
    };
4、使用Messenger实例:
/*
 * Copyright (C) 2010 The Android Open Source Project
 *
 * Licensed under the Apache License, Version 2.0 (the "License");
 * you may not use this file except in compliance with the License.
 * You may obtain a copy of the License at
 *
 *      http://www.apache.org/licenses/LICENSE-2.0
 *
 * Unless required by applicable law or agreed to in writing, software
 * distributed under the License is distributed on an "AS IS" BASIS,
 * WITHOUT WARRANTIES OR CONDITIONS OF ANY KIND, either express or implied.
 * See the License for the specific language governing permissions and
 * limitations under the License.
 */

package com.example.android.apis.app;

import android.app.Notification;
import android.app.NotificationManager;
import android.app.PendingIntent;
import android.app.Service;
import android.content.Intent;
import android.os.Binder;
import android.os.Handler;
import android.os.IBinder;
import android.os.Message;
import android.os.Messenger;
import android.os.RemoteException;
import android.util.Log;
import android.widget.Toast;

import java.util.ArrayList;

// Need the following import to get access to the app resources, since this
// class is in a sub-package.
import com.example.android.apis.R;
import com.example.android.apis.app.RemoteService.Controller;

/**
 * This is an example of implementing an application service that uses the
 * {@link Messenger} class for communicating with clients.  This allows for
 * remote interaction with a service, without needing to define an AIDL
 * interface.
 *
 * <p>Notice the use of the {@link NotificationManager} when interesting things
 * happen in the service.  This is generally how background services should
 * interact with the user, rather than doing something more disruptive such as
 * calling startActivity().
 */

public class MessengerService extends Service {
    /** For showing and hiding our notification. */
    NotificationManager mNM;
    /** Keeps track of all current registered clients. */
    ArrayList<Messenger> mClients = new ArrayList<Messenger>();
    /** Holds last value set by a client. */
    int mValue = 0;

    /**
     * Command to the service to register a client, receiving callbacks
     * from the service.  The Message's replyTo field must be a Messenger of
     * the client where callbacks should be sent.
     */
    static final int MSG_REGISTER_CLIENT = 1;

    /**
     * Command to the service to unregister a client, ot stop receiving callbacks
     * from the service.  The Message's replyTo field must be a Messenger of
     * the client as previously given with MSG_REGISTER_CLIENT.
     */
    static final int MSG_UNREGISTER_CLIENT = 2;

    /**
     * Command to service to set a new value.  This can be sent to the
     * service to supply a new value, and will be sent by the service to
     * any registered clients with the new value.
     */
    static final int MSG_SET_VALUE = 3;

    /**
     * Handler of incoming messages from clients.
     * <1>创建一个继承Handler的子类IncomingHandler,用于接收客户端前台发送过来的Message
     */
    class IncomingHandler extends Handler {

    //<5>后台Service的Handler接收从客户端前台发送过来的Message,并将在HandleMessage()方法中执行相关操作。
        @Override
        public void handleMessage(Message msg) {
            switch (msg.what ) {
                case MSG_REGISTER_CLIENT :
                    mClients.add(msg.replyTo );
                    break;
                case MSG_UNREGISTER_CLIENT :
                    mClients.remove(msg.replyTo );
                    break;
                case MSG_SET_VALUE :
                    mValue = msg.arg1 ;

                    for (int i=mClients.size()-1; i>=0; i--) {
                        try {
                          //将客户端前台发送过来的哈希值再发送到前台打印
                            mClients.get(i).send(Message.obtain( null,
                                    MSG_SET_VALUE, mValue, 0));
                        } catch (RemoteException e) {
                            // The client is dead.  Remove it from the list;
                            // we are going through the list from back to front
                            // so this is safe to do inside the loop.
                            mClients.remove(i);
                        }
                    }
                    break;
                default:
                    super.handleMessage(msg);
            }
        }
    }

    /**
     * Target we publish for clients to send messages to IncomingHandler.
     * <2>通过引用Handler来创建一个Messenger对象,这里可以理解为建立Handler与Messenger的关联。
     */
    final Messenger mMessenger = new Messenger(new IncomingHandler());

    @Override
    public void onCreate() {
        mNM = (NotificationManager)getSystemService(NOTIFICATION_SERVICE);

        // Display a notification about us starting.
        showNotification();
    }

    @Override
    public void onDestroy() {
        // Cancel the persistent notification.
        mNM.cancel(R.string.remote_service_started);
        // Tell the user we stopped.
        Toast. makeText(this, R.string.remote_service_stopped , Toast.LENGTH_SHORT ).show();
    }

    /**
     * When binding to the service, we return an interface to our messenger
     * for sending messages to the service.
     * <3>Messenger创建一个IBinder对象,并利用onBind()方法将该IBinder对象发给客户端前台
     */
    @Override
    public IBinder onBind(Intent intent) {
        return mMessenger .getBinder();
    }

    /**
     * Show a notification while this service is running.
     * 当Service运行的时候显示一个消息通知
     */
    private void showNotification() {
        // In this sample, we'll use the same text for the ticker and the expanded notification
        CharSequence text = getText(R.string.remote_service_started );

        // Set the icon, scrolling text and timestamp
        Notification notification = new Notification(R.drawable. stat_sample, text,
                System. currentTimeMillis());

        // The PendingIntent to launch our activity if the user selects this notification
        PendingIntent contentIntent = PendingIntent.getActivity(this, 0,
                new Intent(this, Controller.class), 0);

        // Set the info for the views that show in the notification panel.
        notification. setLatestEventInfo( this, getText(R.string.remote_service_label ),
                       text, contentIntent) ;

        // Send the notification.
        // We use a string id because it is a unique number.  We use it later to cancel.
        mNM.notify(R.string.remote_service_started, notification);
    }
}
//创建一个继承Handler的子类IncomingHandler,用于接收Service后台发送过来的Message(本对象的哈希值)
     class IncomingHandler extends Handler {
         @Override
         public void handleMessage(Message msg) {
             switch (msg.what ) {
                 case MessengerService.MSG_SET_VALUE :
                     mCallbackText.setText("Received from service: " + msg.arg1);
                     break;
                 default:
                     super.handleMessage(msg);
             }
         }
     }
     //实例化Messenger和IncomingHandler对象并建立两者之间的关联
     final Messenger mMessenger = new Messenger(new IncomingHandler());

     //绑定Service
    public void messengerBoundServiceMethod()
    {
          this.bindService(new Intent(MainActivity.this , MessengerService.class), mServiceConnection2, Context.BIND_AUTO_CREATE);
          mIsBound = true ;
          mCallbackText.setText("Binding." );
    }
    //解除Service绑定
    public void messengerUnBoundServiceMethod()
    {
          if (mIsBound ) {
             // If we have received the service, and hence registered with
             // it, then now is the time to unregister.
             if (mService != null) {
                 try {
                  //将客户端前台的Messenger发送至Service后台,后台将持有对应该Messenger的对象删除
                     Message msg = Message.obtain(null,
                             MessengerService.MSG_UNREGISTER_CLIENT );
                     msg. replyTo = mMessenger ;
                     mService.send(msg);
                 } catch (RemoteException e) {
                     // There is nothing special we need to do if the service
                     // has crashed.
                 }
             }

             // Detach our existing connection.
             unbindService( mServiceConnection2);
             mIsBound = false ;
            mCallbackText.setText("Unbinding." );
          }
    }
//使用MessengerService,实例化ServiceConnection对象,建立Activity和后台Service的连接
    ServiceConnection mServiceConnection2 = new ServiceConnection() {

          public void onServiceDisconnected(ComponentName name) {
              // TODO Auto-generated method stub
              // This is called when the connection with the service has been
            // unexpectedly disconnected -- that is, its process crashed.
            mService = null ;
            mCallbackText.setText("Disconnected." );

            // As part of the sample, tell the user what happened.
            Toast. makeText(MainActivity.this, "remote_service_disconnected" ,
                    Toast. LENGTH_SHORT).show();

         }

          public void onServiceConnected(ComponentName name, IBinder service) {
              // TODO Auto-generated method stub
              //得到从Service发送过来的IBinder对象并初始化Messenger
              mService = new Messenger(service);

              mCallbackText.setText("Attached." );
              // We want to monitor the service for as long as we are
            // connected to it.
            try {
              //将客户端前台的Messenger对象发送至Service,并通知后台的Messenger集合持有该对象
                Message msg = Message. obtain(null,
                        MessengerService.MSG_REGISTER_CLIENT );
                msg. replyTo = mMessenger ;
                //发送Message
                mService.send(msg);

                // Give it some value as an example.
                //将本对象的哈希值发送给Service后台
                msg = Message. obtain(null,
                        MessengerService.MSG_SET_VALUE , this.hashCode(), 0);
                mService.send(msg);
            } catch (RemoteException e) {
                // In this case the service has crashed before we could even
                // do anything with it; we can count on soon being
                // disconnected (and then reconnected if it can be restarted)
                // so there is no need to do anything here.
            }

            // As part of the sample, tell the user what happened.
            Toast.makeText(MainActivity.this, "remote_service_connected",
                    Toast. LENGTH_SHORT).show();
         }
    };
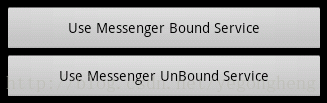
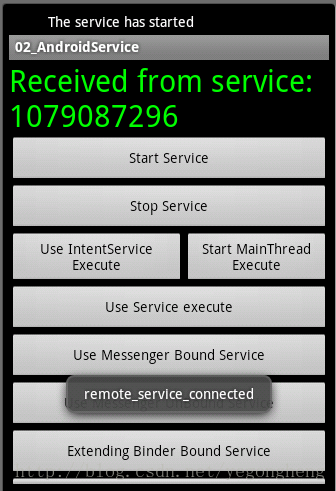
首先点击“Use Messenegr Bound Service ”按钮调用messengerBoundServiceMethod()方法绑定Service,前台显示的信息如图:
我们来追踪一下代码,点击开始绑定Service后,运行到后台MessengerService中,然后后台使用onBind()方法将后台的创建的Messenger对象所得到的IBinder对象发送到客户端前台:
 @Override
    public IBinder onBind(Intent intent) {
    //使用Messenger得到IBinder对象并返回给客户端前台
        return mMessenger .getBinder();
    }
public void onServiceConnected(ComponentName name, IBinder service) {
              // TODO Auto-generated method stub
              //得到从Service发送过来的IBinder对象并初始化成Messenger
              mService = new Messenger(service);

              mCallbackText .setText("Attached." );
              // We want to monitor the service for as long as we are
            // connected to it.
            try {
              //将客户端前台的Messenger对象发送至Service,并通知后台的Messenger集合持有该对象(目的是建立前台和后台的双向通信)
                Message msg = Message. obtain( null,
                        MessengerService.MSG_REGISTER_CLIENT );
                msg. replyTo = mMessenger ;
                //发送Message
                mService .send(msg);

                // Give it some value as an example.
                //将本对象的哈希值发送给Service后台
                msg = Message. obtain( null,
                        MessengerService.MSG_SET_VALUE , this.hashCode(), 0);
                mService .send(msg);
            } catch (RemoteException e) {
                // In this case the service has crashed before we could even
                // do anything with it; we can count on soon being
                // disconnected (and then reconnected if it can be restarted)
                // so there is no need to do anything here.
            }
            // As part of the sample, tell the user what happened.
            Toast.makeText(MainActivity. this, "remote_service_connected" ,
                    Toast. LENGTH_SHORT ).show();
         }
//创建一个继承Handler的子类IncomingHandler,用于接收Service后台发送过来的Message(本对象的哈希值)
     class IncomingHandler extends Handler {
         @Override
         public void handleMessage(Message msg) {
             switch (msg.what ) {
                 case MessengerService.MSG_SET_VALUE :
                     mCallbackText.setText("Received from service: " + msg.arg1);
                     break;
                 default:
                     super.handleMessage(msg);
             }
         }
     }
//实例化Messenger和IncomingHandler对象并建立两者之间的关联
     final Messenger mMessenger = new Messenger(new IncomingHandler());
//将客户端前台的Messenger对象发送至Service,并通知后台的Messenger集合持有该对象
     Message msg = Message.obtain(null,
     MessengerService.MSG_REGISTER_CLIENT);
     msg. replyTo = mMessenger ;
     //发送Message
     mService.send(msg);
switch (msg.what ) {
       case MSG_REGISTER_CLIENT :
       mClients.add(msg.replyTo );
       break;
       .....
//将本对象的哈希值发送给Service后台
    msg = Message. obtain(null,
    MessengerService.MSG_SET_VALUE , this.hashCode(), 0);
    mService.send(msg);
//创建一个继承Handler的子类IncomingHandler,用于接收Service后台发送过来的Message(本对象的哈希值)
     class IncomingHandler extends Handler {
         @Override
         public void handleMessage(Message msg) {
             switch (msg.what ) {
                 case MessengerService.MSG_SET_VALUE :
                     mCallbackText.setText("Received from service: " + msg.arg1);
                     break;
                 default:
                     super.handleMessage(msg);
             }
         }
     }
5、Bound Service的生命周期
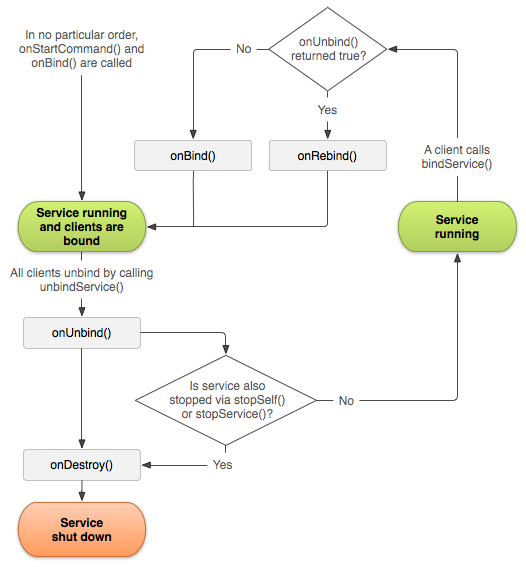
另外,如果service被开启并且接受绑定,那么当系统调用 onUnbind()方法时,如果想要在下次客户端绑定的时候接受一个onRebind()的调用(而不是调用 onBind()),可以选择在 onUnbind()中返回true。
onRebind()的返回值为void,但是客户端仍然在它的 onServiceConnected()回调方法中得到 IBinder 对象。
下图展示了这种service(被开启,还允许绑定)的生命周期:


 3035
3035


 被折叠的 条评论
为什么被折叠?
被折叠的 条评论
为什么被折叠?
 到【灌水乐园】发言


