


在SpringCloud的这个微服务系统中,所有的请求经过nginx做了负载均衡后,然后又到了zuul,来做一次负载均衡的分流处理操作。在springboot中,zuul主要实现了两个功能:1、用户分流处理,2、过滤 用户的请求。对于搭建动态路由(zuul),主要 有一下几个步骤:1、配置pom.xml,添加
spring-cloud-starter-zuul的依赖,2、配置application.yml,设置分流操作,3、配置启动类,添加@EnableZuulProxy注解,开启动态路由,4、配置过滤器,实现ZuulFilter抽象类,5、配置过滤器到启动类。第4和第5步,不是非必须的,而是自定义过滤器的操作
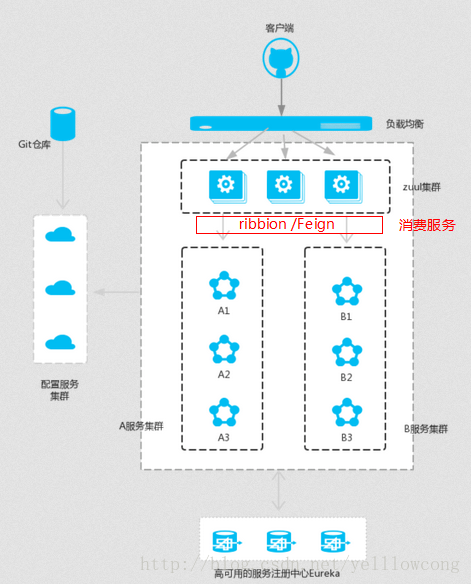
架构图
这个架构图是我从方志朋那儿偷过来的,zuul 这一层,可以用来做分流处理,对不同的业务,分流到指定的系统集群里面,然后通过ribbion和feign来调用服务。
代码地址
https://gitee.com/yellowcong/springcloud/tree/master/chapter5目录结构
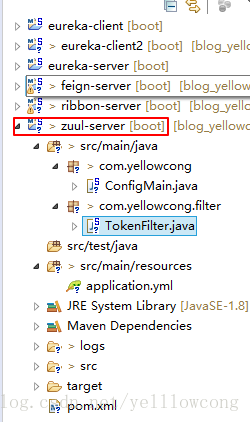
项目架构
| 节点 | 服务 | 项目名 |
|---|---|---|
| yellowcong.com:8761 | eureka注册服务 | eureka-server |
| yellowcong.com:8762 | 提供服务1 | eureka-client |
| yellowcong.com:8763 | 提供服务2 | eureka-client2 |
| yellowcong.com:8764 | ribbon服务 | ribbon-server |
| yellowcong.com:8765 | feign服务 | feign-server |
| yellowcong.com:8766 | zuul服务 | zuul-server |
项目的架构图
动态路由搭建(Zuul)
对于搭建动态路由(zuul),主要 有一下几个步骤:1、配置pom.xml,添加
spring-cloud-starter-zuul的依赖,2、配置application.yml,设置分流操作,3、配置启动类,添加@EnableZuulProxy注解,开启动态路由
1、配置pom.xml
想要zuul的动态路由,就必须得导入spring-cloud-starter-zuul的依赖,但是这个地方,有个问题,由于 jar包的冲突问题,我们要排除掉spring-cloud-starter-eureka-server中的servlet-api依赖包,
<!--eureka server -->
<dependency>
    <groupId>org.springframework.cloud</groupId>
    <artifactId>spring-cloud-starter-eureka-server</artifactId>
    <version>1.3.0.RELEASE</version><!--$NO-MVN-MAN-VER$-->
    <exclusions>
       <exclusion>
           <groupId>javax.servlet</groupId>
           <artifactId>servlet-api</artifactId>
       </exclusion>
   </exclusions>
</dependency>

<dependency>
         <groupId>org.springframework.cloud</groupId>
         <artifactId>spring-cloud-starter-zuul</artifactId>
         <version>1.3.0.RELEASE</version><!--$NO-MVN-MAN-VER$-->
     </dependency>
下面是完整的pom.xml配置
<project xmlns="http://maven.apache.org/POM/4.0.0" xmlns:xsi="http://www.w3.org/2001/XMLSchema-instance"
    xsi:schemaLocation="http://maven.apache.org/POM/4.0.0 http://maven.apache.org/xsd/maven-4.0.0.xsd">
    <modelVersion>4.0.0</modelVersion>

    <groupId>yellowcong.com</groupId>
    <artifactId>cas-client-springboot</artifactId>
    <version>0.0.1-SNAPSHOT</version>
    <packaging>jar</packaging>

    <name>cas-client-springboot</name>
    <url>http://maven.apache.org</url>

    <repositories>
        <repository>
            <id>spring-milestones</id>
            <name>Spring Milestones</name>
            <url>https://repo.spring.io/milestone</url>
            <snapshots>
                <enabled>false</enabled>
            </snapshots>
        </repository>
    </repositories>

    <!-- 引用父类依赖 -->
    <parent>
        <groupId>org.springframework.boot</groupId>
        <artifactId>spring-boot-starter-parent</artifactId>
        <version>1.5.10.RELEASE</version>
    </parent>

    <properties>
        <project.build.sourceEncoding>UTF-8</project.build.sourceEncoding>
        <project.reporting.outputEncoding>UTF-8</project.reporting.outputEncoding>
        <java.version>1.8</java.version>
    </properties>

    <dependencies>

        <!--eureka server -->
        <dependency>
            <groupId>org.springframework.cloud</groupId>
            <artifactId>spring-cloud-starter-eureka-server</artifactId>
            <version>1.3.0.RELEASE</version><!--$NO-MVN-MAN-VER$-->
            <exclusions>
                <exclusion>
                    <groupId>javax.servlet</groupId>
                    <artifactId>servlet-api</artifactId>
                </exclusion>
            </exclusions>
        </dependency>

        <dependency>
            <groupId>org.springframework.cloud</groupId>
            <artifactId>spring-cloud-starter-zuul</artifactId>
            <version>1.3.0.RELEASE</version><!--$NO-MVN-MAN-VER$-->
        </dependency>

        <dependency>
            <groupId>org.springframework.boot</groupId>
            <artifactId>spring-boot-starter-test</artifactId>
            <scope>test</scope>
        </dependency>

    </dependencies>
    <build>
        <plugins>
            <!-- 添加spring的插件, 就可以直接通过 mvn spring-boot:run 运行了 -->
            <plugin>
                <groupId>org.springframework.boot</groupId>
                <artifactId>spring-boot-maven-plugin</artifactId>
                <dependencies>
                    <dependency>
                        <groupId>org.springframework</groupId>
                        <artifactId>springloaded</artifactId>
                        <version>1.2.4.RELEASE</version>
                    </dependency>
                </dependencies>
            </plugin>
        </plugins>
    </build>
</project>
2、配置application.yml
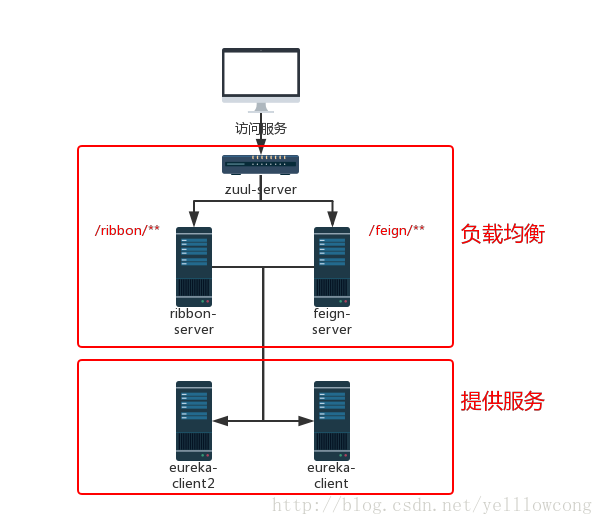
通过配置application.yml 来实现分流的操作,通过配置zuul.routes.<自定义名称>.path ,来配置不同请求,对应着不同的服务,实现了根据服务来分流。
下面的这段配置中,我将以/ribbon开头的请求,都发送到service-ribbon处理;以/feign开头的请求,都发送到service-feign处理
#配置eureka 的注册中心
eureka:
  client:
    serviceUrl:
      defaultZone: http://yellowcong.com:8761/eureka/

# 注册服务的端口
server:
  port: 8766

#配置当前服务的名称
spring:
  application:
    name: service-zuul

#配置路由规则
zuul:
  routes:
    app-a:
      path: /ribbon/**
      serviceId: service-ribbon
    app-b:
      path: /feign/**
      serviceId: service-feign
3、配置启动器
通过添加@EnableZuulProxy注解,让动态路由生效
package com.yellowcong;

import org.springframework.boot.SpringApplication;
import org.springframework.boot.autoconfigure.SpringBootApplication;
import org.springframework.cloud.client.discovery.EnableDiscoveryClient;
import org.springframework.cloud.netflix.zuul.EnableZuulProxy;

@SpringBootApplication
@EnableDiscoveryClient
//配置@EnableZuulProxy 注解 ,让动态路由生效
@EnableZuulProxy
public class ConfigMain {

    public static void main(String[] args) {
        SpringApplication.run(ConfigMain.class, args);
    }

}
添加自定义过滤器
1、配置过滤器,实现
ZuulFilter抽象类,2、配置过滤器到启动类。第4和第5步,不是非必须的,而是自定义过滤器的操作
1、创建自定义过滤器
自定义过滤器,需要实现ZuulFilter,然后复写里面的方法,主要是在run这个函数里面,添加过滤的逻辑处理操作,我这个逻辑处理操作是,只要带有token的参数,就处理这个请求,如果不带,就直接返回401状态码,并返回错误信息。
package com.yellowcong.filter;

import javax.servlet.http.HttpServletRequest;

import org.springframework.stereotype.Component;

import com.netflix.zuul.ZuulFilter;
import com.netflix.zuul.context.RequestContext;

/**
 * 创建日期:2018年3月16日 <br/>
 * 创建用户:yellowcong <br/>
 * 功能描述:自定义过滤器,需要实现ZuulFilter
 */
@Component
public class TokenFilter extends ZuulFilter {

    /**
     * 过滤器的具体逻辑 ctx.setSendZuulResponse(false)令zuul不允许请求,
     * ctx.setResponseStatusCode(401)设置了其返回的错误码
     * ctx.setResponseBody(body)编辑返回body内容
     *
     * @return
     */
    @Override
    public Object run() {
        RequestContext ctx = RequestContext.getCurrentContext();
        HttpServletRequest request = ctx.getRequest();

        //获取token 的参数
        String token = request.getParameter("token");
        if(token == null) {
            //zuul不处理这条请求
            ctx.setSendZuulResponse(false);
            //设定返回的错误代码
            ctx.setResponseStatusCode(401);

            //写数据到浏览器
            ctx.setResponseBody("token is null");
            return null;
        }
        return null;
    }

    /**
     * 判断过滤器是否执行
     * 本文true,永远过滤
     */
    @Override
    public boolean shouldFilter() {
        return true;
    }

    /**
     * 通过int值来定义过滤器的执行顺序
     */
    @Override
    public int filterOrder() {
        return 0;
    }

    /**
     * 返回过滤器类型
     *
     * @return pre:可以在请求被路由之前调用
     *         routing:在路由请求时候被调用
     *         post:在routing和error过滤器之后被调用
     *         error:处理请求时发生错误时被调用
     */
    @Override
    public String filterType() {
        return "pre";
    }

}
2、注册过滤器到启动类
package com.yellowcong;

import org.springframework.boot.SpringApplication;
import org.springframework.boot.autoconfigure.SpringBootApplication;
import org.springframework.cloud.client.discovery.EnableDiscoveryClient;
import org.springframework.cloud.netflix.zuul.EnableZuulProxy;
import org.springframework.context.annotation.Bean;

import com.yellowcong.filter.TokenFilter;

@SpringBootApplication
@EnableDiscoveryClient
//配置@EnableZuulProxy 注解 ,让动态路由生效
@EnableZuulProxy
public class ConfigMain {

    public static void main(String[] args) {
        SpringApplication.run(ConfigMain.class, args);
    }

    /**
     * 创建日期:2018年3月16日<br/>
     * 创建用户:yellowcong<br/>
     * 功能描述:注册过滤器
     * @return
     */
    @Bean
    public TokenFilter getZuulFilter(){
        return new TokenFilter();
    }
}
启动测试
这个地方,我就简单测试了, 我将提供服务的两个都给关掉了,但是启动了 feign和ribbon,这样处于熔断的状态,就可以测试zuul是否有分流的效果了。
| 项目名 | 启动顺序 |
|---|---|
| eureka-server | 1 |
| eureka-client | 2(不启动) |
| eureka-client2 | 3(不启动) |
| feign-server | 4 |
| ribbon-server | 5 |
| zuul-server | 6 |
访问节点 http://yellowcong.com:8761 ,查看到提供服务的两个节点已经挂掉了。

测试访问
| 地址 | 结果 |
|---|---|
| http://yellowcong.com:8766/feign/hi/xx?token=12 | feign 系统 |
| http://yellowcong.com:8766/ribbon/hi/xx?token=12 | ribbon系统 |
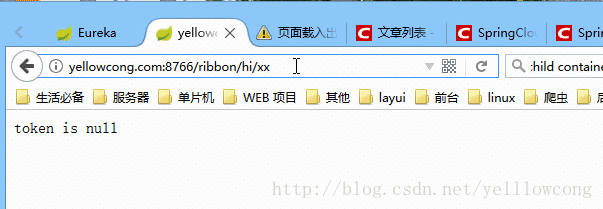
| http://yellowcong.com:8766/ribbon/hi/xx | 报异常 |
具体可以看下图的结果。
常见问题
Unable to start embedded Tomcat
出现了不能启动tomcat的错误,这个错误的原因,多半是由于maven的依赖出了问题。
org.springframework.context.ApplicationContextException: Unable to start embedded container; nested exception is org.springframework.boot.context.embedded.EmbeddedServletContainerException: Unable to start embedded Tomcat
    at org.springframework.boot.context.embedded.EmbeddedWebApplicationContext.onRefresh(EmbeddedWebApplicationContext.java:137) ~[spring-boot-1.5.10.RELEASE.jar:1.5.10.RELEASE]
    at org.springframework.context.support.AbstractApplicationContext.refresh(AbstractApplicationContext.java:537) ~[spring-context-4.3.14.RELEASE.jar:4.3.14.RELEASE]
    at org.springframework.boot.context.embedded.EmbeddedWebApplicationContext.refresh(EmbeddedWebApplicationContext.java:122) ~[spring-boot-1.5.10.RELEASE.jar:1.5.10.RELEASE]
    at org.springframework.boot.SpringApplication.refresh(SpringApplication.java:693) [spring-boot-1.5.10.RELEASE.jar:1.5.10.RELEASE]
    at org.springframework.boot.SpringApplication.refreshContext(SpringApplication.java:360) [spring-boot-1.5.10.RELEASE.jar:1.5.10.RELEASE]
    at org.springframework.boot.SpringApplication.run(SpringApplication.java:303) [spring-boot-1.5.10.RELEASE.jar:1.5.10.RELEASE]
    at org.springframework.boot.SpringApplication.run(SpringApplication.java:1118) [spring-boot-1.5.10.RELEASE.jar:1.5.10.RELEASE]
    at org.springframework.boot.SpringApplication.run(SpringApplication.java:1107) [spring-boot-1.5.10.RELEASE.jar:1.5.10.RELEASE]
    at com.yellowcong.ConfigMain.main(ConfigMain.java:17) [classes/:na]
后来排查发现,是由于spring-cloud-starter-eureka-server中的servlet-api 包捣鬼,我们把他排除掉,不到入,即可解决问题了。
<!--eureka server -->
<dependency>
    <groupId>org.springframework.cloud</groupId>
    <artifactId>spring-cloud-starter-eureka-server</artifactId>
    <version>1.3.0.RELEASE</version><!--$NO-MVN-MAN-VER$-->
    <exclusions>
       <exclusion>
           <groupId>javax.servlet</groupId>
           <artifactId>servlet-api</artifactId>
       </exclusion>
   </exclusions>
</dependency>


 5569
5569


 被折叠的 条评论
为什么被折叠?
被折叠的 条评论
为什么被折叠?
 到【灌水乐园】发言


