


JGraph学习
都说JGraph是mvc的。
下面就写一个图形编辑器展开学习。
图形编辑器首先要能够画图(包括图形的拖放,属性设置),
其次将图形保存,
然后考虑高级特性:undo/redo,open已存在,缩放,布局,输入输出格式等。
第一部分
1. JGraph程序或应用的基本结构
JGraph中用
类JGraph来表示一个图,
类
GraphLayoutCache
来表示视图
(
以前叫
GraphView)
,
类
GraphModel
表示视图对应的模型。
之后,用类
Cell
在
GraphLayoutCache
,即视图来具体画图。即
Cell
是图的基本
单元,
JGraph
里面图是由
Cell
组成的。
所以,通常可以这样理解整体结构:
//
创建模型
GraphModel model = new DefaultGraphModel();
//
创建视图
GraphLayoutCache view = new GraphLayoutCache(model,
new DefaultCellViewFactory());
//
创建
JGraph
对象
JGraph graph = new JGraph(model, view);
//
下面的代码创建很多
Cell
,并设置
...
//
将所有
Cell
加入
JGraph
对象
graph.getGraphLayoutCache().insert(cells);
2.
类
Cell
作为
JGraph
中图的基本组成部分,
Cell
分为三类:
Vertex
,
Edge
,
Port
。
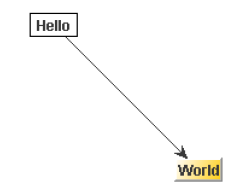
如
3
中的图,
Hello
和
World
是
Vertex
,它们之间的连接线是
Edge
,而
Edge
与
Hello
的连接处,以及与
World
的连接处称为
Port
(图中没有显示的表示)。
Port
是
Edge
与
Vertex
的连接点,每一个连接就一定有一个连接点。
当然
JGraph
提供了很多方法来设置
Cell
的属性,包括外观。
还可以创建用户自己的外观。
3.
JGraph
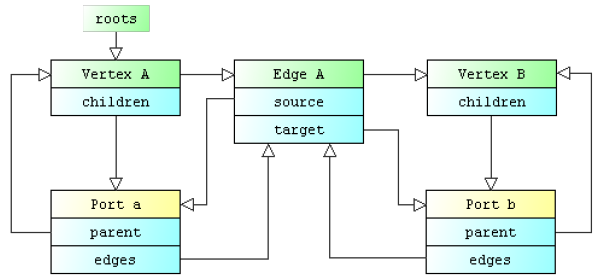
中视图与模型的关系
上面这个视图有两个Vertex,一个Edge,两个Port。
在模型中这
样来表示上图的结构:
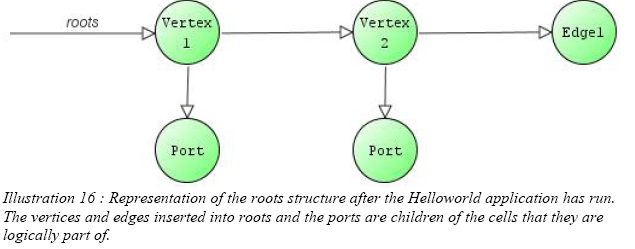
这个结构从技术上来说一个森林,树相连接的森林,所以用roots这个词来表示。
在JGraph中将所有的Vertex和Edge作为roots级的,将Port作为其子节点加到相应的节点下。
模型提供一系列处理各节点的操作。
4. 创建更有意义的视图
如果要编写一个流程图,那么像3,就可以处理了。因为每个节点上的文字就可以表达了。
现在要创建一个工作流建模的图形编辑器,那么只有文字是不能完全表达的。比如用一个Vertex来表示一个活动节点,活动除了名字可以用Vertex上的文本来表达外,活动还具有时间,条件,类型等属性。这个时候用一个活动对象来表达需要的所有信息,然后将该对象赋给Vertex,用
javax.swing.tree.DefaultMutableTreeNode.setUserObject(活动对象)。这种使用方法与JTree.setUserObject()的意义是相同的。
总结一下,当你要在Vertex上表达的意义只有一个属性的时候,可以直接在Vertex上以文本的方法显示,当你要表达的意义超过一个属性的时候,就需要使用user object,就像JTree一样。
第二部分
1. JGraph
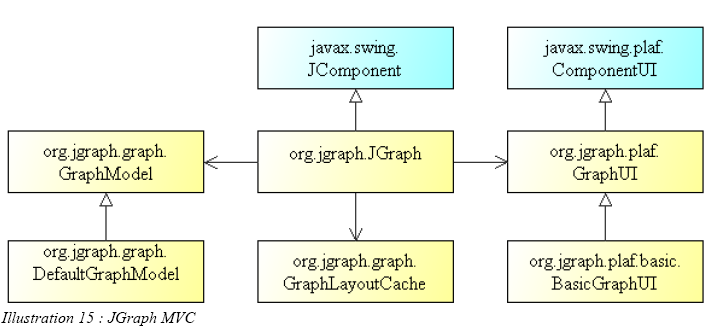
一个不完整的简单描述:
JGraph extends JComponent {
...
org.jgraph.graph.GraphModel model;
org.jgraph.plaf.GraphUI ui;
org.jgraph.graph.GraphLayoutCache cache;
...
org.jgraph.graph.GraphModel model;
org.jgraph.plaf.GraphUI ui;
org.jgraph.graph.GraphLayoutCache cache;
...
}
出于分解复杂性的考虑,JGraph2将一些可视化属性从view分解给model。
有一个建议:
尽量避免使用GraphLayoutCache,GraphModel提供了足够的方法来操作graph。只在GraphModel无法处理时使用GraphLayoutCache。如果对一个不可见的Cell使用GraphLayoutCache处理的话,该Cell就变成可见的了。这时应该使用GraphModel处理。
2. Cell
创建Cell之后,很重要的工作就是赋予其属性。
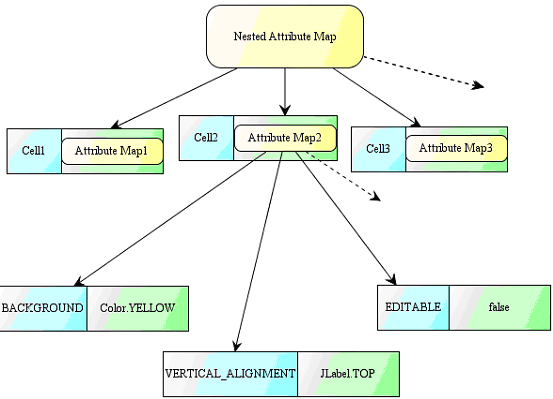
一个Cell的属性是一个Map:CellAttributeMap(Attribute/value),如下:
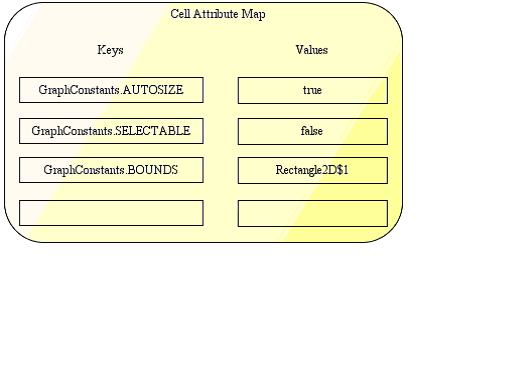
多个Cell的属性,即多个Map进一步又构成一个
AllCellsMap(Cell/CellAttributeMap)。
属性的设置通过类GraphConstants来实现,通常形式:
GraphConstants.setXxxx(cell的属性Map,Xxx属性的值)。
编辑Cell的属性,像上面设置Cell的属性那样,遵循了
所有Cell的属性AllCellsMap (Cell/
CellAttributeMap),
CellAttributeMap(Attribute/value)
Map nested = new Hashtable();
Map attributeMap1 = new Hashtable();
GraphConstants.setLineColor(attributeMap1 , Color.orange);
nested.put(cell1, attributeMap1 );
Map attributeMap2 = new Hashtable();
GraphConstants.setLabelAlongEdge(attributeMap2 , true);
nested.put(cell2, attributeMap2 );
graph.getgraphLayoutCache().edit(nested, null, null, null);
graph.getGraphLayoutCache().insert(nested, null, null, null);(?)
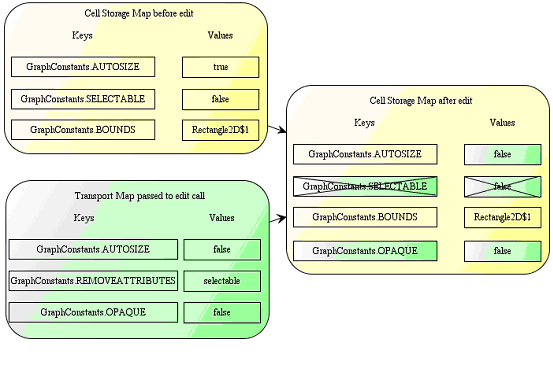
还有一种改变Cell属性的方法:
给edit()传递一个Cell,以及该Cell新的属性Map,如果旧属性中的属性:
例如:
1. GraphModel
2. GraphLayoutCache
[1] 在新Map上,根据新Map修改原来的值;
[2] 不在新Map上,继续保持;
[3] 在新Map的REMOVEATTRIBUTES列出的属性中,则删除原属性;
[4] 新Map中出现了原属性中没有的属性,则保持该新属性。
删除Cell属性
Object[] keys = new Object[] { GraphConstants.ICON };
GraphConstants.setRemoveAttributes(map, keys);
删除Cell
Cell
接口
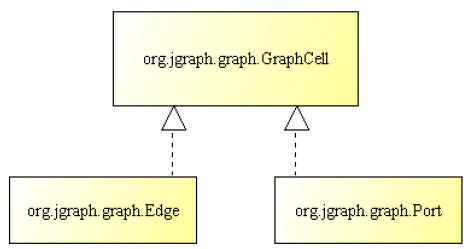
如上是Cell的接口图,
Cell有三类,Edge和Port都有对应的接口。
GraphCell既代表Cell,同时Cell的默认实现被认为就是Vertex,所以GraphCell也就是Vertex的接口。
Cell接口中提供setAttriubtes()和getAttributes()
似乎setAttriubtes()要少用或不用,因为下面讲到的GraphModel的insert,edite和remove方法是改变属性的默认方式(GraphLayoutCache也有这三个方法),并且setAttriubtes()的方式似乎不会把改变记录到undo的记录中。
getAttributes()倒是常用。
Edge接口中提供getSource(), getTarget(), setSource() ,setTarget(),
这几个跟与Edge连接的Port有关。
Port接口提供edges(), addEdge() , removeEdge():与Edge有关,
getAnchor() and setAnchor():与Vertex有关。
Cell
实现
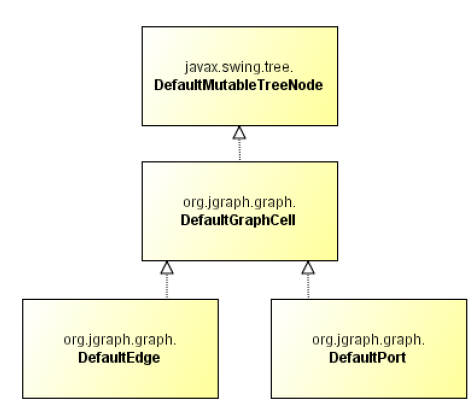
如上图:
这里只画了类层次的继承,没有画接口上的继承关系。
除了其他接口外
DefaultGraphCell继承了GraphCell接口,
DefaultEdge继承了GraphCell接口,Edge接口
DefaultPort继承了GraphCell接口,Port接口
DefaultCell的实现的几个问题
构造函数
clone()
user object
Cell
的
View
到目前为止,Cell都还只有数据结构,没有视图。每个Cell至少有一个CellView来显示。CellView处理Cell在可视化方面的功能。
CellView需要renderer,editor,handle。
|
为什么要使用CellView,而不是直接用Cell来处理视图表现,JTree之类是没有JTreeView的,JTree和一个renderor就完成所有事情(JGraph是swing的继承,所以经常比较两者)。
因为:
JGraph中component比swing中复杂,显示任务也就比swing的component重。
GraphModel和GraphLayoutCache已经完整表达了图的概念,对于那些只想做基于图的分析的人来说,这已经足够了。但是对于需要复杂显示的人来说还不够。
有了CellView似乎对同一个Cell采用不同的显示时,更方便实现。
|
renderer将component的绘制功能分解出来。(flyweigth)
editor用来编辑Cell的内容。
handle在swing中可以理解为用editor编辑,在JGraph中意为对Cell的拖动,大小调整,以及其他对Cell和多个Cell的交互操作。(基于composite模式)
下面是View,editor,renderer,handle的关系:
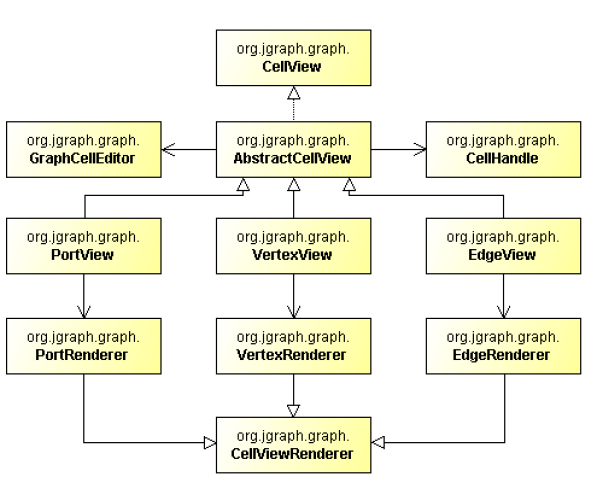
一个问题:
类
AbstractCellView
中并没有
CellHandle
的变量。
CellView
接口
:
getRendererComponent(), getHandle(), getEditor ()
refresh()
:
当
CellView
关联的
Cell
改变时被调用。
但是
refresh()
只更新
CellView
的内在属性,而不会
repaint CellView
外观。
update()
refresh()
用它同步
CellView
和
Cell
的数据。
getParentView(), getChildViews(), removeFromParent() ,isLeaf(),
在
Vertex
边框上的什么位置做
Edge
的连接:
getPerimeterPoint()
创建新的
CellView
和
renderer
:
记得使用
flyweight
模式,为每种类型的
CellView
保持一个静态的
render
实例,这样可以减小内存使用。
|
public class MyView extends AbstractCellView {
protected static MyRenderer renderer = new MyRenderer();
public MyView() {
super();
}
public MyView(Object arg0) {
super(arg0);
}
public CellViewRenderer getRenderer() {
return renderer;
}
public Point2D getPerimeterPoint(EdgeView edge, Point2D source,
Point2D p) {
if (getRenderer() instanceof MyRenderer)
return ((MyRenderer)
getRenderer()).getPerimeterPoint(this,
source, p);
return super.getPerimeterPoint(edge, source, p);
}
public static class MyRenderer extends JLabel implements
CellViewRenderer, Serializable {
public void paint(Graphics g) {
}
public Component getRendererComponent(JGraph graph, CellView
view, boolean sel, boolean focus, boolean preview) {
}
public Point2D getPerimeterPoint(VertexView view, Point2D
source, Point2D p) {
}
}
}
|
利用
CellViewFactory
来创建新的
CellView
:
为每个
Cell
创建一个
View
,然后将它们关联,是件麻烦的事情,所以使用
CellViewFactory
来简化这种创建过程。
CellViewFactory
利用
createView()
来创建
view
。
GraphLayoutCache
关联了
CellViewFactory
,并有
setter
和
getter
。
如果创建
GraphLayoutCache
的时候没有指定
CellViewFactory
的话,默认使用
DefaultCellViewFactory
。
下面是一个新的
CellViewFactory
的片断:
|
public CellView createView(GraphModel model, Object cell) {
CellView view = null;
if (model.isPort(cell))
view = createPortView(cell);
else if (model.isEdge(cell))
view = createEdgeView(cell);
else
view = createVertexView(cell);
return view;
}
protected VertexView createVertexView(Object cell) {
if (cell instanceof MyVertex) {
return new MyVertexView(cell);
}
return new VertexView(cell);
}
protected EdgeView createEdgeView(Object cell) {
return new EdgeView(cell);
}
protected PortView createPortView(Object cell) {
return new PortView(cell);
}
|
CellView
的默认实现:
VertexView
PortView
EdgeView
Renderer
的默认实现:
PortRenderer
VertexRender
EdgeRender
对每类
CellView
只有一个
renderer
实例,因此在绘制每个
CellView
前要根据这个
CellView
的需要设置
renderer
的属性。
Renderer
中保存了
Cell
的当前状态
(selected
,
preview
,
focus)
,因为绘制
Cell
的时候是需要状态的。
1. GraphModel
三个重要方法:
insert()
edit()
remove()
GraphLayoutCache中有类似的三个方法。
访问GraphModel的数据:
在root级访问
getRootCount(),
getRootAt(),
getIndexOfRoot() ,
contains()
更灵活的访问:
Object getSource(Object edge),//Edge的源Port
Object getTarget(Object edge)//Edge的目标Port
boolean isEdge(Object edge),
boolean isPort(Object port)
根据关系的访问:
Object getParent(Object child)
int getIndexOfChild(Object parent, Object child)
Object getChild(Object parent, int index)
int getChildCount(Object parent)
示意图:
根据以上方法得到一些有用的程序片断:
连接到一个Vertex的所有Edge
|
List listEdges = new ArrayList();
int numChildren = model.getChildCount(cell);
for (int i = 0; i < numChildren; i++) {
Object port = model.getChild(cell, i);
if (model.isPort(port)) {
Iterator iter = model.edges(port);
while (iter.hasNext()) {
listEdges.add(iter.next());
}
}
}
|
获取Edge的源和目标Vertex
|
Object sourceVertex = model.getParent(model.getSource(edge));
Object targetVertex = model.getParent(model.getTarget(edge));
|
2. GraphLayoutCache


 6056
6056

 被折叠的 条评论
为什么被折叠?
被折叠的 条评论
为什么被折叠?
 到【灌水乐园】发言


