


Spring Boot2.X整合Dubbo3入门
微服务
最近在学习使用微服务相关的框架,而Spring Cloud和Dubbo无疑是当前国内微服务使用最频繁的,虽然平时工作基本用不到微服务,但是,虽然有点晚,还是得学。
作为常年依靠菜鸟教程开发的一个老菜鸟,遇到微服务自然又做了一次菜鸟。关于微服务、Spring Cloud、Dubbo的介绍,度娘一搜一大把,不需要再来赘述,回去收藏几篇文章背一背,绝对不是因为我懒。
作为入门,需要了解,Dubbo是一个RPC框架,RPC是什么?Remote Procedure Call,即远程过程调用,剩下的。。。有时间做个笔记,没时间就度娘吧。。。绝对不是因为我懒。
言归正传,我想要搭建一个Spring Boot + Dubbo的简单程序,2.7.8搭建完成后,想再试试3.0,官网说升级全透明的。
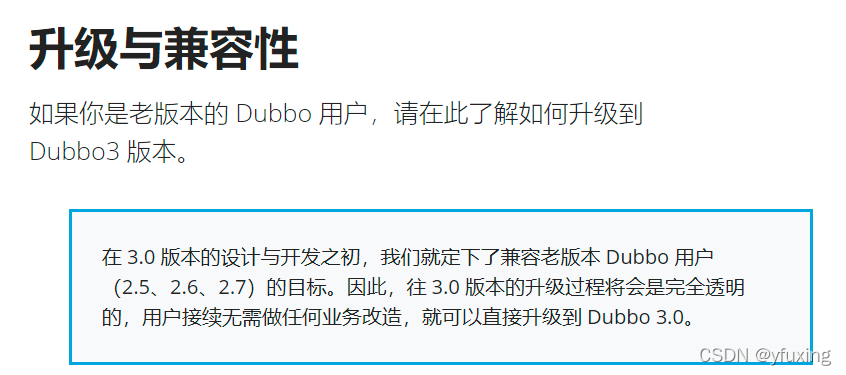
话说3.0和2.x的官方文档简直没法比,还是自力更生吧,还按原来的方式,zookeeper注册中心。
ZOOKEEPER注册中心
dubbo默认推荐使用zookeeper作为分布式服务的注册中心,我在当前项目中使用的也是zookeeper。
zookeeper安装就不说了,可以使用本地windows启动一个zookeeper server,也可以找一个linux服务器搭建服务。完成后可以通过修改hosts文件,添加一行描述,将zookeeper地址映射到指定名称上,当然也可以不用。

最后不要忘了启动zookeeper服务端。
项目结构
实现一个简单的dubbo工程,分几个部分,api、provider、consumer
下面是项目目录结构,没有目录看起来就很难受。
父工程dubbotest
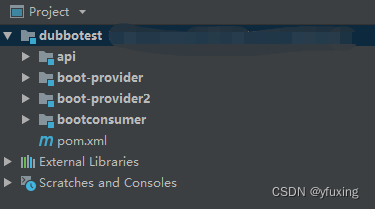
api模块
提供者provider模块
provider2可以尝试给项目做分发、降级、负载均衡等,这里先不看,现在除了端口不同,其他配置和provider基本相同
消费者consumer模块
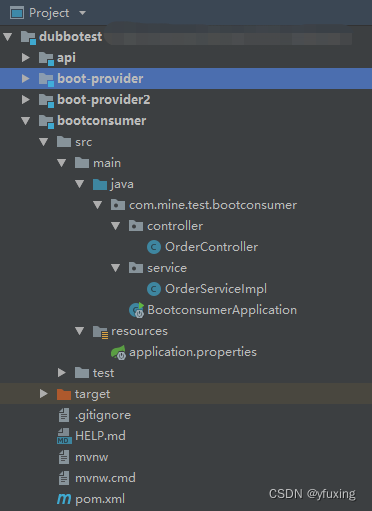
都是普通的springboot工程
父工程
用maven创建一个新的工程,留下pom文件,其他一律删除
pom文件填写如下配置:
首先是标签,项目继承spring-boot-starter-parent。
	<parent>
        <groupId>org.springframework.boot</groupId>
        <artifactId>spring-boot-starter-parent</artifactId>
        <version>2.3.5.RELEASE</version>
        <relativePath/>
    </parent>
这里spring boot版本我使用了2.3.5.RELEASE。而继承spring-boot-starter-parent的原因是,它继承了spring-boot-dependencies,可以控制子模块可能会引用到的各种spring或者第三方相关依赖的版本,如:mysql、log4j等等,感兴趣可以点进去看一看,预设的依赖很多。当然,这里的依赖版本并不是真正引用,而是指定版本,子模块引用的时候可以省略相关的标签,当然也可以指定其他版本(如果不怕包冲突的话)。
	<groupId>com.mine.test</groupId>
    <artifactId>dubbo-test</artifactId>
    <packaging>pom</packaging>
    <version>1.0-SNAPSHOT</version>
接下来是父工程的一些基本设置,包名、工程名、版本等等。
	<modules>
		<module>api</module>
        <module>boot-provider</module>
        <module>boot-provider2</module>
        <module>bootconsumer</module>
    </modules>
modules,就是模块,记录了父工程中引用的所有模块,使用idea创建maven模块时会自动生成,start.spring.io创建模块时需要手动增加
	<properties>
        <project.build.sourceEncoding>UTF-8</project.build.sourceEncoding>
        <java.version>1.8</java.version>
        <maven.compiler.source>1.8</maven.compiler.source>
        <maven.compiler.target>1.8</maven.compiler.target>
        <dubbo.version>3.0.5</dubbo.version>
        <dubbo.boot.version>3.0.5</dubbo.boot.version>
        <spring-boot.version>2.3.5.RELEASE</spring-boot.version>
        <apache-curator.version>5.2.0</apache-curator.version>
        <junit.version>3.8.1</junit.version>
    </properties>
properties,自定义依赖版本,不多说了
<dependencyManagement>
        <dependencies>
            <dependency>
                <groupId>org.springframework.boot</groupId>
                <artifactId>spring-boot-dependencies</artifactId>
                <version>${spring-boot.version}</version>
                <type>pom</type>
                <scope>import</scope>
            </dependency>

            <!-- https://mvnrepository.com/artifact/org.apache.zookeeper/zookeeper -->
            <dependency>
                <groupId>org.apache.zookeeper</groupId>
                <artifactId>zookeeper</artifactId>
                <version>3.7.0</version>
            </dependency>

            <!-- Apache Dubbo  -->
            <dependency>
                <groupId>org.apache.dubbo</groupId>
                <artifactId>dubbo-dependencies-bom</artifactId>
                <version>${dubbo.boot.version}</version>
                <type>pom</type>
                <scope>import</scope>
            </dependency>
            <!-- Dubbo Spring Boot Starter -->
            <dependency>
                <groupId>org.apache.dubbo</groupId>
                <artifactId>dubbo-spring-boot-starter</artifactId>
                <version>${dubbo.boot.version}</version>
            </dependency>

            <!-- for dubbo3 -->
            <dependency>
                <groupId>org.apache.curator</groupId>
                <artifactId>curator-x-discovery</artifactId>
                <version>${apache-curator.version}</version>
            </dependency>
        </dependencies>
    </dependencyManagement>
depandencyManagement在单体java程序中用得比较少,模块化应用里,指定公共依赖的版本,在spring-boot-starter-parent中继承的spring-boot-dependencies也是这样使用的。
在这里我们指定了几个依赖:zookeeper-3.7.0、curator-x-discovery-5.2.0、dubbo-spring-boot-starter-3.0.5。另外,指定了dubbo-dependencies-bom的版本,它的作用和spring-boot-dependencies类似。
pom完整配置如下所示
<?xml version="1.0" encoding="UTF-8"?>
<project xmlns="http://maven.apache.org/POM/4.0.0"
         xmlns:xsi="http://www.w3.org/2001/XMLSchema-instance" xsi:schemaLocation="http://maven.apache.org/POM/4.0.0 http://maven.apache.org/xsd/maven-4.0.0.xsd">
    <modelVersion>4.0.0</modelVersion>

    <parent>
        <groupId>org.springframework.boot</groupId>
        <artifactId>spring-boot-starter-parent</artifactId>
        <version>2.3.5.RELEASE</version>
        <relativePath/> <!-- lookup parent from repository -->
    </parent>

    <groupId>com.mine.test</groupId>
    <artifactId>dubbo-test</artifactId>
    <packaging>pom</packaging>
    <version>1.0-SNAPSHOT</version>
    <modules>
    	<module>api</module>
        <module>boot-provider</module>
        <module>boot-provider2</module>
        <module>bootconsumer</module>
    </modules>

    <properties>
        <project.build.sourceEncoding>UTF-8</project.build.sourceEncoding>
        <java.version>1.8</java.version>
        <maven.compiler.source>1.8</maven.compiler.source>
        <maven.compiler.target>1.8</maven.compiler.target>
        <dubbo-boot.version>3.0.5</dubbo-boot.version>
        <spring-boot.version>2.3.5.RELEASE</spring-boot.version>
        <apache-curator.version>5.2.0</apache-curator.version>
        <junit.version>3.8.1</junit.version>
    </properties>

    <dependencyManagement>
        <dependencies>
            <dependency>
                <groupId>org.springframework.boot</groupId>
                <artifactId>spring-boot-dependencies</artifactId>
                <version>${spring-boot.version}</version>
                <type>pom</type>
                <scope>import</scope>
            </dependency>

            <!-- https://mvnrepository.com/artifact/org.apache.zookeeper/zookeeper -->
            <dependency>
                <groupId>org.apache.zookeeper</groupId>
                <artifactId>zookeeper</artifactId>
                <version>3.7.0</version>
            </dependency>

            <!-- Apache Dubbo  -->
            <dependency>
                <groupId>org.apache.dubbo</groupId>
                <artifactId>dubbo-dependencies-bom</artifactId>
                <version>${dubbo-boot.version}</version>
                <type>pom</type>
                <scope>import</scope>
            </dependency>
            <!-- Dubbo Spring Boot Starter -->
            <dependency>
                <groupId>org.apache.dubbo</groupId>
                <artifactId>dubbo-spring-boot-starter</artifactId>
                <version>${dubbo-boot.version}</version>
            </dependency>

            <!-- for dubbo3 -->
            <dependency>
                <groupId>org.apache.curator</groupId>
                <artifactId>curator-x-discovery</artifactId>
                <version>${apache-curator.version}</version>
            </dependency>
        </dependencies>
    </dependencyManagement>
</project>
父工程搭建完成后,开始搭建各个子模块。
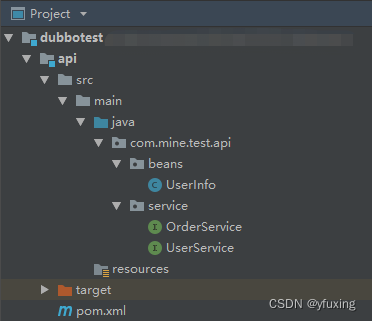
API
API模块时Dubbo服务调用的中继点,提供者和消费者通过实现和引用api中的接口,完成服务内容的编写和调用。API模块中一版包含各种服务接口和实体Bean。
pom文件
<?xml version="1.0" encoding="UTF-8"?>
<project xmlns="http://maven.apache.org/POM/4.0.0"
         xmlns:xsi="http://www.w3.org/2001/XMLSchema-instance"
         xsi:schemaLocation="http://maven.apache.org/POM/4.0.0 http://maven.apache.org/xsd/maven-4.0.0.xsd">
    <parent>
        <artifactId>dubbo-test</artifactId>
        <groupId>com.mine.test</groupId>
        <version>1.0-SNAPSHOT</version>
    </parent>
    <modelVersion>4.0.0</modelVersion>

    <groupId>com.mine.test</groupId>
    <artifactId>api</artifactId>
    <version>1.0-SNAPSHOT</version>
</project>
这里有些文章建议引用zookeeper、dubbo、netty、curator等相关依赖,实际上只要继承父工程dubbo-test就足够了,因为这里主要是接口和实体Bean,并不需要实际使用这些jar包的功能和接口。当然,如果实际项目中需要继承使用第三方依赖的某些接口,还是要引用的。
接下来,需要编写bean和interface
创建UserInfo.java,并定义几个属性
package com.mine.test.api.beans;

import java.io.Serializable;

public class UserInfo implements Serializable {
    private String userId;
    private String userName;
    private String userAge;

    public UserInfo(String userId, String userName, String userAge) {
        this.userId = userId;
        this.userName = userName;
        this.userAge = userAge;
    }

    public String getUserId() {
        return userId;
    }

    public void setUserId(String userId) {
        this.userId = userId;
    }

    public String getUserName() {
        return userName;
    }

    public void setUserName(String userName) {
        this.userName = userName;
    }

    public String getUserAge() {
        return userAge;
    }

    public void setUserAge(String userAge) {
        this.userAge = userAge;
    }
}
记住,一定要实现Serializable接口!
编写UserService接口,并提供一个方法,获取UserInfo的列表。该接口是dubbo交互的重点,提供者实现UserService并将服务暴露到注册中心,消费者通过Spring注入调用接口方法。
package com.mine.test.api.service;

import com.mine.test.api.beans.UserInfo;

import java.util.List;

public interface UserService {
    public List<UserInfo> getUserList();
}
接下来编写OrderService接口,消费者实现该接口的方法,并调用UserService提供的方法完成与提供者的交互。OrderService并不需要在api里定义,在消费者内部定义也完全可以,这里仅保持接口统一来源。
package com.mine.test.api.service;

import com.mine.test.api.beans.UserInfo;

import java.util.List;

public interface OrderService {
    public List<UserInfo> initOrder();
}
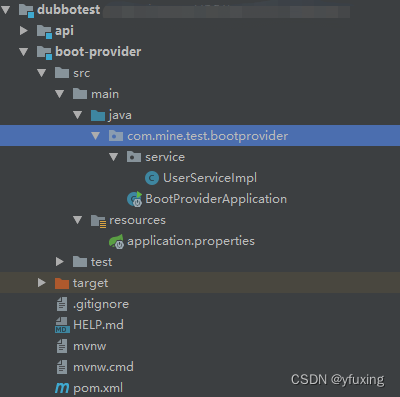
提供者
提供者提供服务,供消费者远程调用
pom文件
<?xml version="1.0" encoding="UTF-8"?>
<project xmlns="http://maven.apache.org/POM/4.0.0" xmlns:xsi="http://www.w3.org/2001/XMLSchema-instance"
         xsi:schemaLocation="http://maven.apache.org/POM/4.0.0 https://maven.apache.org/xsd/maven-4.0.0.xsd">
    <modelVersion>4.0.0</modelVersion>
    <parent>
        <groupId>com.mine.test</groupId>
        <artifactId>dubbo-test</artifactId>
        <version>1.0-SNAPSHOT</version>
    </parent>
    <groupId>com.mine.test</groupId>
    <artifactId>boot-provider</artifactId>
    <version>0.0.1-SNAPSHOT</version>
    <name>boot-provider</name>
    <description>Demo project for Spring Boot</description>
    <properties>
        <java.version>1.8</java.version>
    </properties>
    <dependencies>
        <dependency>
            <groupId>org.springframework.boot</groupId>
            <artifactId>spring-boot-starter</artifactId>
        </dependency>

        <dependency>
            <groupId>org.springframework.boot</groupId>
            <artifactId>spring-boot-starter-test</artifactId>
            <scope>test</scope>
        </dependency>

        <dependency>
            <groupId>org.apache.dubbo</groupId>
            <artifactId>dubbo-spring-boot-starter</artifactId>
        </dependency>

        <dependency>
            <groupId>org.apache.curator</groupId>
            <artifactId>curator-x-discovery</artifactId>
        </dependency>

        <dependency>
            <groupId>org.apache.zookeeper</groupId>
            <artifactId>zookeeper</artifactId>
        </dependency>

        <dependency>
            <groupId>com.mine.test</groupId>
            <artifactId>api</artifactId>
            <version>1.0-SNAPSHOT</version>
        </dependency>
    </dependencies>

    <build>
        <plugins>
            <plugin>
                <groupId>org.springframework.boot</groupId>
                <artifactId>spring-boot-maven-plugin</artifactId>
            </plugin>
        </plugins>
    </build>

</project>
pom文件继承父工程-主要是引用父工程jar包的版本,这样在dependency里相关依赖都不用填写标签了,当然,父工程和spring-boot-starter-parent都没有的依赖还是需要填写的。
dependencies中还引用了几项依赖:
		<dependency>
            <groupId>org.springframework.boot</groupId>
            <artifactId>spring-boot-starter</artifactId>
        </dependency>
spring-boot-starter:spring boot的依赖包,因为本次测试提供者并不向外提供web服务,所以引用它就可以,如果提供者本身也要向外提供一系列服务,需要引用spring-boot-starter-web依赖。
		<dependency>
            <groupId>org.springframework.boot</groupId>
            <artifactId>spring-boot-starter-test</artifactId>
            <scope>test</scope>
        </dependency>
spring-boot-starter-test:这个不说了
		<dependency>
            <groupId>org.apache.dubbo</groupId>
            <artifactId>dubbo-spring-boot-starter</artifactId>
        </dependency>
dubbo-spring-boot-starter:顾名思义,dubbo服务为使用spring boot编写的starter,我们主要的功能都是通过它来实现的。顺便一提,我们现在使用的dubbo服务的groupid是org.apache.dubbo,在2.6以前项目由阿里维护,groupid使用的是com.alibaba,后来阿里把dubbo交给apache开源基金会管理,在2.7之后就有了apache dubbo。
		<dependency>
            <groupId>org.apache.curator</groupId>
            <artifactId>curator-x-discovery</artifactId>
        </dependency>
curator-x-discovery:curator是现今java程序员实现zookeeper客户端最常用的依赖包之一,其他还有zkclient等。
zookeeper:这个包有些 dubbo3.0的文章并没有提及,连接zookeeper必须的,可能有些资深开发者觉得不需要提,但是,dubbo-starter核心包中默认并没有引用zookeeper,如果不添加此依赖,程序启动时就会报java.lang.NoClassDefFoundError: org/apache/zookeeper/Watcher的错误。
com.mine.test.api:我们自己编写的API接口模块,一定不能忘,因为我们还要实现它的接口。
接下来是代码
启动类:BootProviderApplicationTests.java
package com.mine.test.bootprovider;

import org.apache.dubbo.config.spring.context.annotation.EnableDubbo;
import org.springframework.boot.SpringApplication;
import org.springframework.boot.autoconfigure.SpringBootApplication;


@SpringBootApplication
public class BootProviderApplication {

    public static void main(String[] args) throws Exception {
        SpringApplication.run(BootProviderApplication.class, args);
    }

}
spring boot的启动类应该都了解,这里要说的是在@SpringBootApplication注解以外,还要添加一个@EnableDubbo注解,开启dubbo服务。
服务实现类:UserServiceImpl.java
package com.mine.test.bootprovider.service;

import com.mine.test.api.beans.UserInfo;
import com.mine.test.api.service.UserService;
import org.apache.dubbo.config.annotation.DubboService;

import java.util.Arrays;
import java.util.List;

@DubboService(version = "1.0.0")
public class UserServiceImpl implements UserService {
    @Override
    public List<UserInfo> getUserList() {
        System.out.println("provider receive...");
        UserInfo userInfo1 = new UserInfo("1", "user1", "11");
        UserInfo userInfo2 = new UserInfo("2", "user2", "22");
        UserInfo userInfo3 = new UserInfo("3", "user2", "33");
        return Arrays.asList(userInfo1, userInfo2, userInfo3);
    }
}
提供者实现了UserService接口,并返回一个UserInfo列表。这里通过添加@DubboService注解,指定向注册中心暴露该类,消费者可以调用其下的方法。原本在2.6以前的dubbo中提供的事@Service注解,但可能是这样同Spring的@Service注解相同,容易出错,后来有了@DubboService注解。
这样就完成了服务提供者注册。。。并没有。
还要填写application.properties文件,当然用xml、yml也都是可以的。
dubbo.application.name=dubbo-provider
dubbo.registry.address=zookeeper_txy:2181
dubbo.registry.protocol=zookeeper
dubbo.protocol.name=dubbo
dubbo.protocol.port=20881
springboot的相关配置暂时不需要填写。只增加dubbo相关的配置即可,一些基本配置项如下:
dubbo.application.name:应用名,向注册中心注册服务的名称。
dubbo.registry.protocol和dubbo.registry.address:注册中心类型和地址,这里是zookeeper,也可以统一写成:
dubbo.registry.address=zookeeper://zookeeper_txy:2181
zookeeper_txy是本地hosts文件映射的zookeeper地址,实际是云服务器IP
dubbo.protocol.name:提供者和消费者交互的协议类型,这里用dubbo协议,也可以使用rmi、hessian、webservice等。
dubbo.protocol.port:提供者向外暴露的监听端口,与消费者建立连接。
提供者配置完成,运行BootProviderApplication
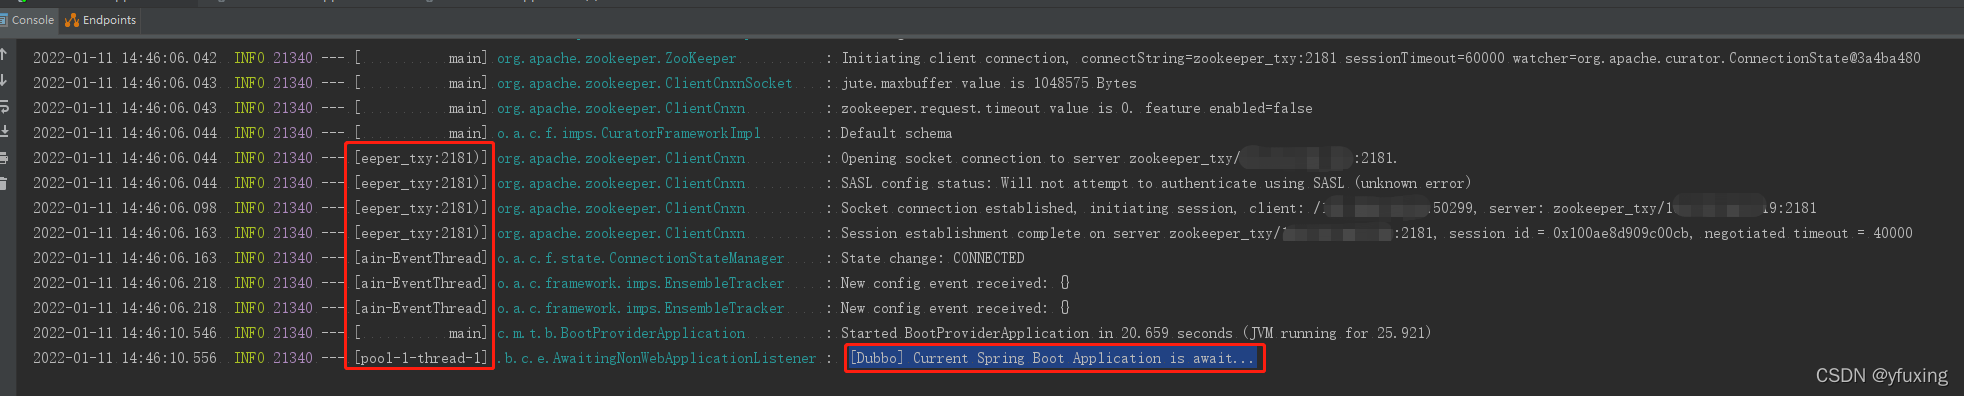
好的,控制台输出**[Dubbo] Current Spring Boot Application is await…**的字样,并且有zookeeper相关的地址信息,启动成功。
消费者
消费者调用提供者暴露的远程服务,并向外提供web http服务。
pom文件
<?xml version="1.0" encoding="UTF-8"?>
<project xmlns="http://maven.apache.org/POM/4.0.0" xmlns:xsi="http://www.w3.org/2001/XMLSchema-instance"
         xsi:schemaLocation="http://maven.apache.org/POM/4.0.0 https://maven.apache.org/xsd/maven-4.0.0.xsd">
    <modelVersion>4.0.0</modelVersion>
    <parent>
        <groupId>com.mine.test</groupId>
        <artifactId>dubbo-test</artifactId>
        <version>1.0-SNAPSHOT</version>
    </parent>
    <groupId>com.mine.test</groupId>
    <artifactId>bootconsumer</artifactId>
    <version>0.0.1-SNAPSHOT</version>
    <name>bootconsumer</name>
    <description>Demo project for Spring Boot</description>
    <properties>
        <java.version>1.8</java.version>
    </properties>
    <dependencies>

        <dependency>
            <groupId>org.springframework.boot</groupId>
            <artifactId>spring-boot-starter-web</artifactId>
        </dependency>

        <dependency>
            <groupId>org.springframework.boot</groupId>
            <artifactId>spring-boot-starter-test</artifactId>
            <scope>test</scope>
        </dependency>

        <dependency>
            <groupId>org.apache.dubbo</groupId>
            <artifactId>dubbo-spring-boot-starter</artifactId>
        </dependency>


        <dependency>
            <groupId>org.apache.curator</groupId>
            <artifactId>curator-x-discovery</artifactId>
        </dependency>

        <dependency>
            <groupId>org.apache.zookeeper</groupId>
            <artifactId>zookeeper</artifactId>
        </dependency>

        <dependency>
            <groupId>com.mine.test</groupId>
            <artifactId>api</artifactId>
            <version>1.0-SNAPSHOT</version>
        </dependency>
    </dependencies>

    <build>
        <plugins>
            <plugin>
                <groupId>org.springframework.boot</groupId>
                <artifactId>spring-boot-maven-plugin</artifactId>
            </plugin>
        </plugins>
    </build>

</project>
pom文件内容和提供者几乎没有区别,当然,不代表依赖没有区别。要注意的是:
		<dependency>
            <groupId>org.springframework.boot</groupId>
            <artifactId>spring-boot-starter-web</artifactId>
        </dependency>
原来的spring-boot-starter包变成了spring-boot-starter-web,之前提过,如果需要提供web服务,就需要改用这个依赖,而我们的消费者正是需要提供http服务的。
同样,接下来是代码
启动类:BootconsumerApplication.java
package com.mine.test.bootconsumer;

import org.springframework.boot.SpringApplication;
import org.springframework.boot.autoconfigure.SpringBootApplication;

@SpringBootApplication
public class BootconsumerApplication {

    public static void main(String[] args) {
        SpringApplication.run(BootconsumerApplication.class, args);
    }

}
作为服务调用方,并不需要@EnableDubbo注解,使用正常的spring boot启动类方式。
订阅Service实现OrderServiceImpl.java
package com.mine.test.bootconsumer.service;

import com.mine.test.api.beans.UserInfo;
import com.mine.test.api.service.OrderService;
import com.mine.test.api.service.UserService;
import org.apache.dubbo.config.annotation.DubboReference;
import org.springframework.stereotype.Service;

import java.util.List;

@Service
public class OrderServiceImpl implements OrderService {

    @DubboReference
    private UserService userService;

    @Override
    public List<UserInfo> initOrder() {
        System.out.println(Thread.currentThread().getId() + ": consumer initOrder...");
        return userService.getUserList();
    }
}
这是一个SpringBoot常用的Service层代码,可以看到,UserService的注入并未使用平时的@Autowared注入,而是使用的一个新的注解@DubboReference注入api模块的UserService接口,这是dubbo为我们提供的消费者注解,我们通过它远程调用提供者UserServiceImpl对象中的方法,并获取返回值。
下面我们编写一个Controller
package com.mine.test.bootconsumer.controller;

import com.mine.test.api.beans.UserInfo;
import com.mine.test.api.service.OrderService;
import org.springframework.beans.factory.annotation.Autowired;
import org.springframework.web.bind.annotation.GetMapping;
import org.springframework.web.bind.annotation.RestController;

import java.util.List;

@RestController
public class OrderController {

    @Autowired
    OrderService orderService;

    @GetMapping("order")
    public List<UserInfo> initOrder() {
        return orderService.initOrder();
    }
}
Controller注入OrderService,并调用initOrder()方法,返回UserInfo列表,这里向外提供了一个叫order的http接口。
当然配置文件application.pproperties是不能忘的:
dubbo.application.name=boot-consumer
dubbo.registry.address=zookeeper://zookeeper_txy:2181
dubbo.protocol.port=20890
dubbo.protocol.name=dubbo
内容和提供者差不多,通信接口变成20890,用来与提供者通信。
当然,提供者和消费者都有各自的特殊配置,这里暂不介绍。
好了,程序写完了,启动一下BootconsumerApplication。

同样,看到走哦keeper信息和Started BootconsumerApplication in 21.011 seconds (JVM running for 26.544),且没有报错,消费者启动成功,而且看到,我们没有设置server.port和spring.application.name,所以默认地址就是http://localhost:8080。
调用
程序写完了试试效果。
打开浏览器,输入http://localhost:8080/order

返回一个json字符串,内容就是之前UserServiceImpl里返回的列表
		UserInfo userInfo1 = new UserInfo("1", "user1", "11");
        UserInfo userInfo2 = new UserInfo("2", "user2", "22");
        UserInfo userInfo3 = new UserInfo("3", "user2", "33");
        return Arrays.asList(userInfo1, userInfo2, userInfo3);
可喜可贺。
诶,好像3.0和2.7没啥区别,要不要试试其他协议


 401
401


 被折叠的 条评论
为什么被折叠?
被折叠的 条评论
为什么被折叠?
 到【灌水乐园】发言


