


配置构建
Android构建系统编译app资源和源代码,并将它们打包进你能够测试、部署、签名和分发的APKs文件里。Android Studio使用一个高级构建工具包--Gradle,Gradle能自动化管理构建过程,同时允许你灵活的自定义构建配置。每一个构建配置都定义他自己的代码和资源,同时能够复用你的app所有版本的公共部分。用于Gradle的Android插件与构建工具包提供了特定于构建和测试Android应用程序的过程和配置设置。
Gradle和Android插件独立于Android Studio运行,这意味着你能从Android Studio中或者命令行来构建你的Android应用程序。如果你不使用Android Studio,你可以学习怎样从命令行构建和运行app。构建的输出也同样关乎你是在命令行、远程计算机上还是Android Studio中构建。
注意:由于Gradle和Android插件独立于Android Studio运行,因此,你需要分别升级构建工具。查看发布笔记来学习 怎样升级Gradle和Android 插件。Android构建系统的灵活性使得你无需修改app的代码源文件就能够执行自定义构建配置。这一段帮助你明白Android构建系统是如何工作的,它又是怎样帮助你自定义和自动化多构建配置的。如果你只是想学习更多的关于部署你的app,请看 Building and Running from Android Studio.要正确地使用Android Studio来创建自定义的构建配置,请看 Configuring Build Variants。
构建过程
构建过程调用许多工具和过程来转换你的项目到APK文件中。构建过程是非常灵活的,因此,明白在hood下发生了一些什么事情是非常有用的。
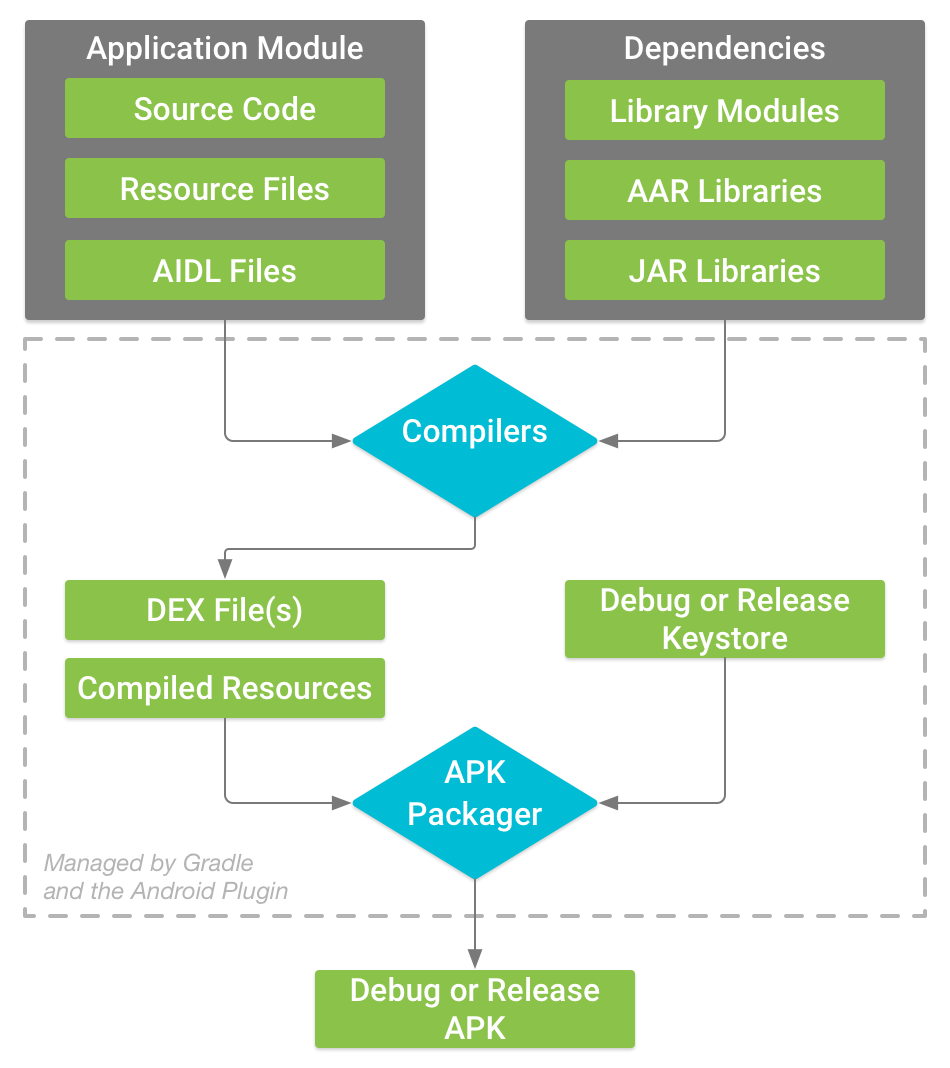
图1.典型的android app模块构建过程
在图1中显示了一个典型的Android app模块中的构建过程,它遵循下面的常规步骤:1.编译器转换你的源代码到DEX文件中,这DEX文件包括运行在Android设备中的字节码和编译过的资源文件。
2.APK打包器将DEX文件和编译过的资源组合到一个单独的APK文件里。然而,在Android设备上安装和部署你的app之前,APK文件必须先签名。
3.APK打包器使用调试版或者发布版的密钥文件来给你的APK文件签名。
4.在生成最终的APK文件之前,打包器使用zipalign工具来优化你的app,使得app在设备上运行时使用更少的内存。
在构建过程的最后,你获得了一个调试版的APK文件或者一个发布版的APK文件,这个APK文件你能够部署、测试或者发布给其他人。
自定义构建配置
Gradle和Android插件帮助你配置构建时的一些方面:
构建类型当你正在构建和打包你的app时,构建类型定义Gradle使用的某些属性以及你开发周期的不同阶段的一些通常的配置。例如,debug构建类型能使用debug选项和使用debug密钥来签名APK文件,同时,release构建类型可以缩小、混淆和使用release密钥来签名APK文件。你必须至少使用一个构建类型来构建你的app--Android Studio默认创建一个debug和release的构建类型。要开始为你的app自定义打包设置,请看 Configure Build Types。
产品渠道
产品渠道代表你可以发布给用户的app的不同的版本,例如免费版和收费版。你可以使用不同的代码和资源自定义产品渠道,同时缩小和复用app所有版本的公共部分。产品渠道是可选的并且必须手动才能创建。要创建不同的app版本,请看 Configure Product Flavors。
构建变种
一个构建变种是横跨构建类型和产品渠道的一个产品,是Gradle用来构建你的app的一个配置。使用构建变种,你能在开发阶段构建产品渠道的debug版,或者用于发布的产品渠道的已签名的release版。尽管你不需要直接配置构建变种,但是你配置了形成它们的构建类型和产品渠道。创建额外的构建类型或者产品渠道也能创建出额外的构建变种。要学习怎样创建和管理构建变种,请看 Configure Build Variants。
清单条目
你能为构建变种的配置清单文件中的某些属性指定值,这些构建值会覆盖掉清单文件中已经存在值,这是非常有用的,如果你想为你的模块生成多个APK文件,且这些模块有不同的应用程序名、不同的SDK版本要求。当存在多个清单文件的时候, Gradle会融合清单中的设置。
依赖
构建系统从你的本地文件系统和远程仓库来管理项目的依赖,这个会阻止你手动搜索、下载和复制你的app所依赖的二进制包到你的项目目录中。要找到更多信息,请看 Declare Dependencies。
签名
构建系统使你能够在构建配置中指定签名设置,并且构建系统能够在构建期间自动签名你的APK文件。构建系统使用一个默认的密钥和证书来签名debug版本,以避免在构建时出现输入密码的提示。构建系统不会签名release版本,除非你明确地为这个建构定义一个签名配置,如果你没有一个release版的密钥,你可以在 Sign Your App里面生成一个。
产品安全
构建系统允许你为每一个构建变种指定一个不同的ProGuard规则文件。在构建过程中,构建系统会运行ProGuard文件来缩小和混淆类文件。
APK 拆分
构建系统允许你自动化构建不同的APK文件,且每个APK文件只包含指定的屏幕密度或ABI所需的代码和资源。要获取更多信息,请看 Configure APK Splits。
构建配置文件
创建自定义构建配置要求你改变一个或多个构建配置文件或者build.gradle文件。这些纯文本文件使用Groovy DSL来描述和操作构建逻辑,Groovy是一门适用JVM的动态语言。你不需要知道Groovy就可以开始配置你的构建了,因为Android插件为你介绍了大量的DSL元素。要学习更多关于Android插件的DSL,请看 DSL reference documentation。
当你开始一个新项目时,Android Studio为你自动创建了一些像图2中显示的文件,这些文件以一些合理的默认的内容来填充。

图2.一个Android app 模块的默认项目结构
图2中有少数几个Gradle构建配置文件,这些文件属于一个Android app的标准项目结构中的一部分。在你开始配置你的构建之前,明白这些文件的使用范围和目的以及它们应该定义哪些基本的DSL元素是非常重要的。Settings.gradle文件
Setting.gradle文件位于根目录下,它主要是告诉Gradle在构建app时应该包含哪些模块。对大多数项目而言,这个文件是简单的且只包含下面的内容:
include ':app'
然而,多模块项目必须指定每一个需要包含进构建的模块。
顶级build.gradle文件
顶级build.gradle文件,位于根目录下,定义一些配置,这些配置能够应用到项目中所有模块。默认情况,这个顶级build.gradle文件使用buildscript{}脚本块来定义在项目中所有模块都共用的Gradle仓库和依赖。下面的代码简单描述了在创建一个新的项目之后,顶级build.gradle文件中能找到的默认的设置和DSL元素。
/**
 * The buildscript {} block is where you configure the repositories and
 * dependencies for Gradle itself--meaning, you should not include dependencies
 * for your modules here. For example, this block includes the Android plugin for
 * Gradle as a dependency because it provides the additional instructions Gradle
 * needs to build Android app modules.
 */
buildscript {
    /**
     * The repositories {} block configures the repositories Gradle uses to
     * search or download the dependencies. Gradle pre-configures support for remote
     * repositories such as JCenter, Maven Central, and Ivy. You can also use local
     * repositories or define your own remote repositories. The code below defines
     * JCenter as the repository Gradle should use to look for its dependencies.
     */
    repositories {
        jcenter()
    }
    /**
     * The dependencies {} block configures the dependencies Gradle needs to use
     * to build your project. The following line adds Android Plugin for Gradle
     * version 2.0.0 as a classpath dependency.
     */
    dependencies {
        classpath 'com.android.tools.build:gradle:2.0.0'
    }
}
/**
 * The allprojects {} block is where you configure the repositories and
 * dependencies used by all modules in your project, such as third-party plugins
 * or libraries. Dependencies that are not required by all the modules in the
 * project should be configured in module-level build.gradle files. For new
 * projects, Android Studio configures JCenter as the default repository, but it
 * does not configure any dependencies.
 */
allprojects {
   repositories {
       jcenter()
   }
}
模块级别的build.gradle文件
模块级别的build.gradle文件,位于每一个 <project>/<module>/ 目录下,这个build.gradle文件允许你为指定的模块配置构建设置。配置这些构建设置允许你自定义打包选项,例如额外的构建类型和产品渠道,以及重写main/app目录下的清单文件或者顶级build.gradle文件中的设置。
下面这个模块build.gradle文件描述了一些你应该知道的DSL元素和设置。
/**
 * The first line in the build configuration applies the Android plugin for
 * Gradle to this build and makes the android {} block available to specify
 * Android-specific build options.
 */
apply plugin: 'com.android.application'
/**
 * The android {} block is where you configure all your Android-specific
 * build options.
 */
android {
  /**
   * compileSdkVersion specifies the Android API level Gradle should use to
   * compile your app. This means your app can use the API features included in
   * this API level and lower.
   *
   * buildToolsVersion specifies the version of the SDK build tools, command-line
   * utilities, and compiler that Gradle should use to build your app. You need to
   * download the build tools using the SDK Manager.
   */
  compileSdkVersion 23
  buildToolsVersion "23.0.3"
  /**
   * The defaultConfig {} block encapsulates default settings and entries for all
   * build variants, and can override some attributes in main/AndroidManifest.xml
   * dynamically from the build system. You can configure product flavors to override
   * these values for different versions of your app.
   */
  defaultConfig {
    /**
     * applicationId uniquely identifies the package for publishing.
     * However, your source code should still reference the package name
     * defined by the package attribute in the main/AndroidManifest.xml file.
     */
    applicationId 'com.example.myapp'
    // Defines the minimum API level required to run the app.
    minSdkVersion 14
    // Specifies the API level used to test the app.
    targetSdkVersion 23
    // Defines the version number of your app.
    versionCode 1
    // Defines a user-friendly version name for your app.
    versionName "1.0"
  }
  /**
   * The buildTypes {} block is where you can configure multiple build types.
   * By default, the build system defines two build types: debug and release. The
   * debug build type is not explicitly shown in the default build configuration,
   * but it includes debugging tools and is signed with the debug key. The release
   * build type applies Proguard settings and is not signed by default.
   */
  buildTypes {
    /**
     * By default, Android Studio configures the release build type to enable code
     * shrinking, using minifyEnabled, and specifies the Proguard settings file.
     */
    release {
        minifyEnabled true // Enables code shrinking for the release build type.
        proguardFiles getDefaultProguardFile('proguard-android.txt'), 'proguard-rules.pro'
    }
  }
  /**
   * The productFlavors {} block is where you can configure multiple product
   * flavors. This allows you to create different versions of your app that can
   * override defaultConfig {} with their own settings. Product flavors are
   * optional, and the build system does not create them by default. This example
   * creates a free and paid product flavor. Each product flavor then specifies
   * its own application ID, so that they can exist on the Google Play Store, or
   * an Android device, simultaneously.
   */
  productFlavors {
    free {
      applicationId 'com.example.myapp.free'
    }

    paid {
      applicationId 'com.example.myapp.paid'
    }
  }
  /**
   * The splits {} block is where you can configure different APK builds that
   * each contain only code and resources for a supported screen density or
   * ABI. You'll also need to configure your build so that each APK has a
   * different versionCode.
   */
  splits {
    // Screen density split settings
    density {
      // Enable or disable the density split mechanism
      enable false
      // Exclude these densities from splits
      exclude "ldpi", "tvdpi", "xxxhdpi", "400dpi", "560dpi"
    }
  }
}
/**
 * The dependencies {} block in the module-level build configuration file
 * only specifies dependencies required to build the module itself.
 */
dependencies {
    compile project(":lib")
    compile 'com.android.support:appcompat-v7:22.0.1'
    compile fileTree(dir: 'libs', include: ['*.jar'])
}
Gradle属性文件
Gradle包括两个属性文件,它们位于根目录中,这些文件能够为Gradle构建工具本身提供指定的设置。
gradle.properties
在这里,你能配置工程范围的Gradle设置,例如Gradle守护进程的最大堆栈大小。要获取更多信息,请看 The Build Environment。
local.properties
为构建系统配置本地环境属性,例如SDK安装的路径。因为这个文件的内容是通过Android Studio自动生成的并且是特定于本地开发者环境的,你不要手动修改这个文件或者把它提交到VCS中。
同步项目与Gradle文件
当你在项目中改变了构建配置,Android Studio会要求你同步项目文件使得Android Stuido 能够导入改变的构建配置并运行一些检查以确定这些配置不会创建构建错误。
当你改变了配置文件时,点击出现在通知栏中的Sync Now(像图3显示的那样),或者点击菜单栏中的Sync Project,来同步你的项目文件。如果Android Sutido通知你的配置有错误,例如,你的源代码使用比你的compileSdkVersion更高级别的API,那么,消息窗口会出现这个问题的描述。

图3.在Android Studio中同步项目与构建配置文件
源集Android Studio为每个模块逻辑地组织源代码和资源到源集中。一个模块的 main/source 包括其所有构建变种使用的代码和资源,额外的源集目录是可选的,并且当你配置一个新的构建变种时Android Studio不会自动创建它们。然而,当你创建app的某些版本时,创建源集合如 main/,可以帮助组织Gradle应该会使用的文件和资源。
src/main/
这个源集包括所有的构建变种公共的代码和资源。
src/<buildType>/
创建这个源集来包括一个指定的构建类型的代码和资源。
src/<productFlavor>/
创建这个源集来包括一个指定的产品渠道的代码和资源。
src/<productFlavorBuildType>/
创建这个源集来包括一个指定的构建变种的代码和资源。
例如,要生成fullDebug的版本,构建系统会从下面的源集中融合代码、设置和资源。
src/fullDebug/ (the build variant source set)
src/debug/ (the build type source set)
src/full/ (the product flavor source set)
src/main/ (the main source set)
注意:在Android Studio中,你可以使用 File>New菜单选项给指定的源集创建一个新的文件或目录。
如果不同的源集包含相同文件的不同版本,Gradle会按下面的优先顺序来决定使用哪一个文件:
build Variants > build Type > product flavor > main source set > library dependencies
原文地址: https://developer.android.com/studio/build/index.html?hl=zh-cn#build-process


 1万+
1万+

 被折叠的 条评论
为什么被折叠?
被折叠的 条评论
为什么被折叠?
 到【灌水乐园】发言


