


路由
前端路由
根据对于的url地址来渲染不同的内容
前端路由的分类
- 页面路由 (通过页面的跳转来完成对应的切换(刷新页面))
- hash路由 (通过对应hash值变化来控制内容的渲染(onhashchange)(页面不刷新 只有一个页面))
- history路由 (通过对应的地址的变化来控制内容的渲染 (onpopstate) (页面不刷新 只有一个页面))
SPA
单页应用程序 (single page application),顾名思义只有一个页面,通过控制渲染内容来完成对应的页面内容的切换。一个页面的设计的好处在于对应的页面切换的操作不再依赖于刷新(减少了页面的重绘和回流操作),单独只有一个页面那么打出来的包的大小也相对较小。单页应用的坏处在于不利于seo(电商网站不可能使用spa)。react和vue都是为了减少对应的重绘和回流提高对应的性能,所以它一般都是采用对应的单页页面应用。所以主要采用的路由的模式为hash路由、history路由。默认情况下为hash模式。
后端路由
根据对应的访问地址返回不同数据 或渲染不同的内容
SSR
服务器渲染,服务器渲染的话它也有对应的好处 利于seo,速度快。坏处在于代码量大维护起来较为困难,对于服务器压力大。
一般的大型电商网站都是采用ssr配合对于的spa来共同作用。(前端采用的是vue的技术栈 配合ssr的框架 nuxt.js 前端采用的是react那么配合的是next.js)
hash路由
vue中hash路由实现
<!DOCTYPE html>
<html lang="en">
<head>
    <meta charset="UTF-8">
    <meta http-equiv="X-UA-Compatible" content="IE=edge">
    <meta name="viewport" content="width=device-width, initial-scale=1.0">
    <title>Document</title>
    <script src="./lib/vue.min.js"></script>
    <script src="./lib/vue-router.js"></script>
    <style>
        /* 激活的链接 */
        .router-link-exact-active{
            color:red
        }
    </style>
</head>
<body>
    <!-- 容器 -->
    <div id="app">
        <!-- 路由链接 to指定的地址  router-link会解析成a标签-->
        <router-link to="/">去首页</router-link>
        <router-link to="/user">去用户页</router-link>
        <!-- 路由视图 显示的视图  router-view会解析你对应需要渲染的内容-->
        <router-view></router-view>
    </div>
    <script>
        //组件 渲染的内容
        let home = Vue.component('home',{
            template:'<div>首页</div>'
        } )
        //渲染的内容
        let user = Vue.component('user',{
            template:'<div>用户页</div>'
        } )
        //路由对象
        let router = new VueRouter({
            // mode:'hash', 模式默认为hash
            //路由配置 router 名词(路由对象)  route 动词(路由配置) routes 多个(路由配置)
            routes:[
                //route规则
                {
                    name:'home',//名字
                    path:'/', //路由地址
                    component:home //组件 渲染什么
                },
                {
                    name:'user',
                    path:'/user',
                    component:user
                }
            ]
        });
        new Vue({
            el:'#app',
            //传入路由配置 router
            // router:router
            router
        })
    </script>
</body>
</html>
自定义模拟实现
- 利用onhashchange事件监听hash值的变化
- 通过对应的routes规则里面对应的compoent内容来渲染
class Vue{
    constructor(options){
        //解构获取里面的el和对应的router
        let {el,router} = options
        this.el = document.querySelector(el) //元素
        this.router = router
        //调用解析a的方法 将这个this.el当作this
        this.router.analysisLink.call(this.el)
        //监听对应的变化
        this.router.listener(this.el)
    }
    //返回一个新的组件
    static component(name,{template}){
        return new Component(name,template)
    }
}
//组件的构造
function Component(name,template){
    this.name = name,
        this.template = template
}
//创建VueRouter的类
class VueRouter{
    constructor(options){
        //解构获取对应的mode routes
        let {mode,routes} = options
        //如果mode没有默认为hash模式 如果mode有就是设置模式
        this.mode =  mode?mode:'hash'
        this.routes = routes
    }
    //解析对应的router-link
    analysisLink(){
        //获取所有的router-link标签
        let links = this.querySelectorAll('router-link')
        //拿到它的to属性  变成对应的a to属性就是a的href
        //遍历
        Array.prototype.forEach.call(links,(v)=>{
            //获取to属性的值
            let toValue = v.getAttribute('to')
            //先创建对应的a标签 用a标签替换对应的links
            let target = document.createElement('a')
            target.href = `#${toValue}`
            target.innerHTML = v.innerHTML
            //替换
            this.replaceChild(target,v)
        })
    }
    //解析router-view
    // 监听hash值得变化
    listener(el){
        //进入就开始渲染
        window.onload = ()=>{
            location.hash = '/'
        }
        //变化的时候进行渲染
        window.onhashchange = ()=>{
            this.handler(el)
        }
    }
    handler(el){
        //得到对应的hash值
        let hash = location.hash.substring(1)
        //根据hash匹配对应的routes里面的path路径 找到对应的route配置
        let route = this.routes.find(({path})=>{
            return path == hash
        })
        //根据route里面component属性 找到对应渲染内容 template
        // route.component.template
        // 找到router-view标签进行innerHTML赋值
        let views = el.querySelectorAll('router-view')
        Array.from(views).forEach(v=>{
            v.innerHTML = route.component.template
        })
        //样式激活
        this.active(el)
    }
    //匹配当前的hash地址和对应的a标签的链接地址 添加对应的class
    active(el){
        //得到hash值
        let hash = location.hash.substring(1)
        //得到所有的a标签
        let links = el.querySelectorAll('a')
        // 进行匹配
        //排他
        Array.prototype.forEach.call(links,v=>{
            v.className = ''
        })
        Array.prototype.find.call(links,(v)=>{
            return v.href.split('#')[1] == hash
        }).className = 'router-link-exact-active'
    }
}
history路由
- onpopstate进行监听
- 将a的内容全部重写 (通过pushState来完成路径变化)
class Vue{
  constructor(options){
    //解构获取里面的el和对应的router
    let {el,router} = options
    this.el = document.querySelector(el) //元素
    this.router = router
    //调用解析a的方法 将这个this.el当作this
    this.router.analysisLink.call(this.el)
    this.router.listener(this.el)
  }
  //返回一个新的组件
  static component(name,{template}){
     return new Component(name,template)
  }
}
//组件的构造
function Component(name,template){
  this.name = name,
  this.template = template
}
//创建VueRouter的类
class VueRouter{
  constructor(options){
    //解构获取对应的mode routes
    let {mode,routes} = options
    //如果mode没有默认为hash模式 如果mode有就是设置模式
    this.mode =  mode?mode:'hash'
    this.routes = routes
  }
  //解析对应的router-link
  analysisLink(){
    //获取所有的router-link标签
    let links = this.querySelectorAll('router-link')
    //拿到它的to属性  变成对应的a to属性就是a的href
    //遍历
    Array.prototype.forEach.call(links,(v)=>{
      //获取to属性的值
      let toValue = v.getAttribute('to')
      //先创建对应的a标签 用a标签替换对应的links
      let target = document.createElement('a')
      target.href = `${toValue}`
      target.innerHTML = v.innerHTML
      //替换
      this.replaceChild(target,v)
    })
  }
  //处理对应的a标签
  handlerA(el){
    //获取所有的a标签
    let links = el.querySelectorAll('a')
    let that = this
    //给a标签添加点击事件
    Array.prototype.forEach.call(links,(link)=>{
      link.onclick = function(e){
        e = e || window.event
        //禁止刷新
        e.preventDefault();
        //点击对应的值 通过对应的pushState 来修改对应的页面
        history.pushState('','',this.href)
        //渲染
        that.handler(el)
      }
    })
  }
  //解析router-view
  // 监听对应的state的变化
  listener(el){
    //监听a的点击事件
    this.handlerA(el)
    //变化的时候进行渲染
    window.onpopstate = ()=>{
      this.handler(el)
    }
  }
  handler(el){
    //得到对应的地址
    let localPath = location.pathname
    //根据hash匹配对应的routes里面的path路径 找到对应的route配置
    let route = this.routes.find(({path})=>{
        return path == localPath
    })
    //根据route里面component属性 找到对应渲染内容 template
    // route.component.template
    // 找到router-view标签进行innerHTML赋值
    let views = el.querySelectorAll('router-view')
    Array.from(views).forEach(v=>{
        v.innerHTML = route.component.template
    })
    //样式激活
    this.active(el)
  }
  //匹配当前的地址和对应的a标签的链接地址 添加对应的class
  active(el){
    //得到地址
    let localPath = location.pathname
    //得到所有的a标签
    let links = el.querySelectorAll('a')
    // 进行匹配
    //排他
    Array.prototype.forEach.call(links,v=>{
      v.className = ''
    })
    Array.prototype.find.call(links,(v)=>{
      let url = new URL(v.href)
      return url.pathname == localPath
    }).className = 'router-link-exact-active'
  }
}
history路由和hash路由的区别 *
Sass
sass概述
sass是一个预编译css,和**less(底层实现是js)**属于一样的东西,它底层采用的是python环境 Ruby语言书写,支持基本的css语法,最终还是会编译成对应的css,它在node环境中不需要你手动编译它会自动编译(sass-load的包)。
sass的编译环境
借助node来进行编译
按照对应的sass及sass-load
npm i sass,sass-load
借助第三方插件来进行编译
vscode插件
live Sass Compiler
easy sass
easy sass使用
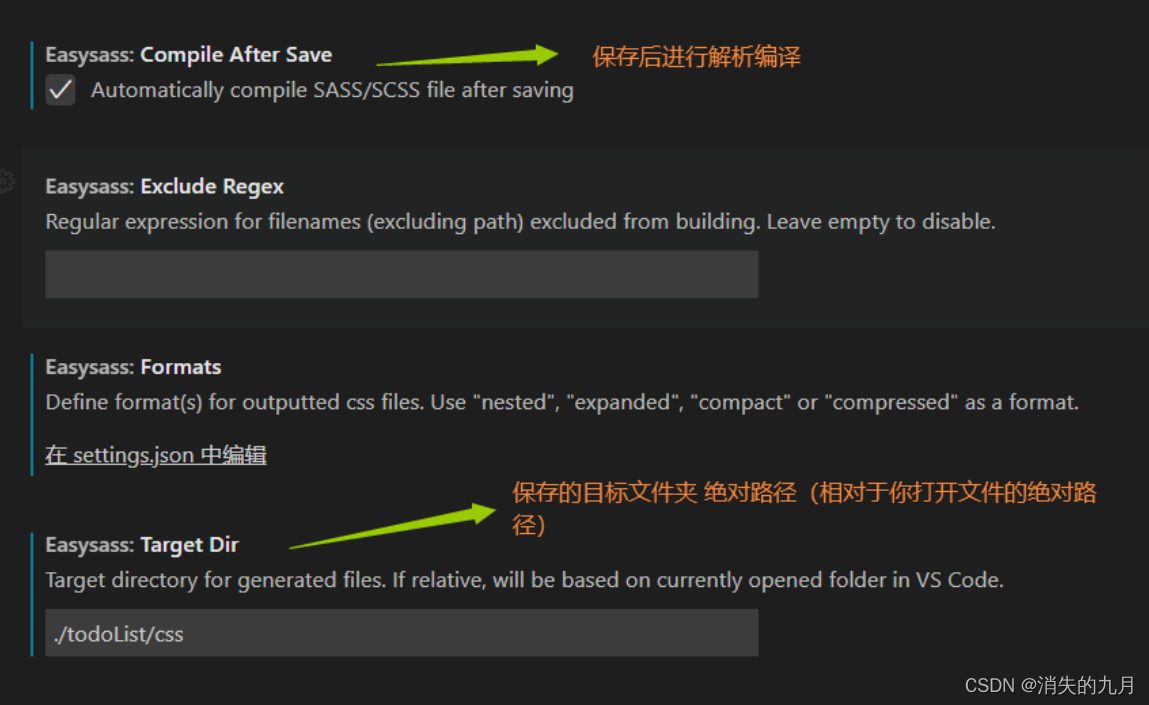
- 安装对应的easy sass插件
- 配置对应的easy sass(你需要将sass保存到什么地方 什么时候进行编译)
sass的书写
-
sass后缀 (以缩进作为区分 跟stylus一样)
div
  color:#fff
  a
    color:#ccc
编译后的内容
div { color: #fff; } div a { color: #ccc; } -
scss后缀 (跟css的语法一致)
div{
  color:#000;
  // div里面包含a
  a{
    color:#333;
  }
}
编译后的内容
div {
  color: #000;
}

div a {
  color: #333;
}
sass相关应用内容
https://www.sass.hk/docs/
支持变量定义 使用$
$color:#ccc;
.box{
	color:$color;
}
编译后
.box {
  color: #ccc;
}
支持运算符 ±*/%
//支持运算符
$size:10px;
.content{
	font-size:$size * 10;
	width:$size + 10;
  // -号会被识别为一个连接符号 需要空格隔开
	height:$size - 10;
	left:$size % 10;
	top:$size / 10;
}
编译后
.content {
  font-size: 100px;
  width: 20px;
  height: 0px;
  left: 0px;
  top: 1px;
}
注释支持
- // 单行注释
- /**/ 文档注释
//我是单行注释 不会被编译
/*文档注释 会被编译*/
条件判断 @if @else
$width:100px;
.context{
  @if $width>100 {
    width:$width - 10
  }
  @else {
    width:$width + 10
  }
}
编译后
.context {
  width: 110px;
}
循环
@for 从某个值到某个值
//循环 不包含最后一个
@for $i from 1 to 5 {
  //变量占位符#{}
  item_#{$i}{
    font-size: $i+px;
  }
}
编译后
item_1 {
  font-size: 1px;
}

item_2 {
  font-size: 2px;
}

item_3 {
  font-size: 3px;
}

item_4 {
  font-size: 4px;
}
@while
$i: 6;
@while $i > 0 {
  .item-#{$i} { width: 2em * $i; }
  $i: $i - 2;//迭代
}
编译后
.item-6 {
    width: 12em; }

.item-4 {
    width: 8em; }

.item-2 {
    width: 4em; }
@each 相当于forEach
//定义数组
$arr:1,2,3,4;
@each $item in $arr{
     .li_#{$item}{
       font-size:$item+px
     }
}
编译后
.li_1 {
  font-size: 1px;
}

.li_2 {
  font-size: 2px;
}

.li_3 {
  font-size: 3px;
}

.li_4 {
  font-size: 4px;
}
关系
//关系
body{
	//div里面的a
	a{
		color:#ccc;
        &:hover{
            color:#fff;
        }
	}
}
body{
    color:#00f;
    //&表示自身
    &:hover{
        color:#fff;
    }
}
编译后
body a {
  color: #ccc;
}

body a:hover {
  color: #fff;
}

body {
  color: #00f;
}
函数 (为了获取返回值)
- @function 定义函数
- @return 返回对应的内容
//函数 返回值 (sass中是为了拿返回值)
@function sum($b,$c){
  @return $b + $c+'px'
}
#index{
  width:sum(1,2)
}
编译后
#index {
  width: "3px";
}
混入器 (为了设置对应的内容) *
- @mixin 定义混入器
- @include 引入混入器
//混入器 不带参数的
@mixin setSize {
  font-size: 10px;
  color: #00f;
  padding: 10px;
}
tr{
  //调用混入器
  @include setSize
}
td{
  @include setSize
}
//带参数的混入器
@mixin color($bg,$border,$font) {
    background-color: $bg;
    border-color: $border;
    color: $font;
}
thead{
  @include color(#ccc,#aaa,#bbb)
}
tfoot{
  @include color(#111,#222,#333)
}
//默认参数的混入器
@mixin size($w:500px,$h:300px,$font:12px) {
  width:$w;
  height: $h;
  font-size: $font;
}
table{
  //不传参调用默认参数
  @include size
}
a{
  //传参覆盖默认参数
  @include size(100px,200px)
}
编译后
tr {
  font-size: 10px;
  color: #00f;
  padding: 10px;
}

td {
  font-size: 10px;
  color: #00f;
  padding: 10px;
}

thead {
  background-color: #ccc;
  border-color: #aaa;
  color: #bbb;
}

tfoot {
  background-color: #111;
  border-color: #222;
  color: #333;
}

table {
  width: 500px;
  height: 300px;
  font-size: 12px;
}

a {
  width: 100px;
  height: 200px;
  font-size: 12px;
}
模块化
@import 省略后缀名 (css文件还是sass文件还是scss都能省略后缀名)
@import "foo.css";
@import "foo" screen;
@import "http://foo.com/bar";
@import url(foo);
编译
@import "foo.css";
@import "foo" screen;
@import "http://foo.com/bar";
@import url(foo);
继承
@extend 实现继承
//继承
.inner{
  color:yellow;
  font-size:18px;
}
#box{
  @extend .inner;
  width:100px;
}
编译后
.inner, #box {
  color: yellow;
  font-size: 18px;
}

#box {
  width: 100px;
}


 8435
8435


 被折叠的 条评论
为什么被折叠?
被折叠的 条评论
为什么被折叠?
 到【灌水乐园】发言


