


一、Android UI组件类图
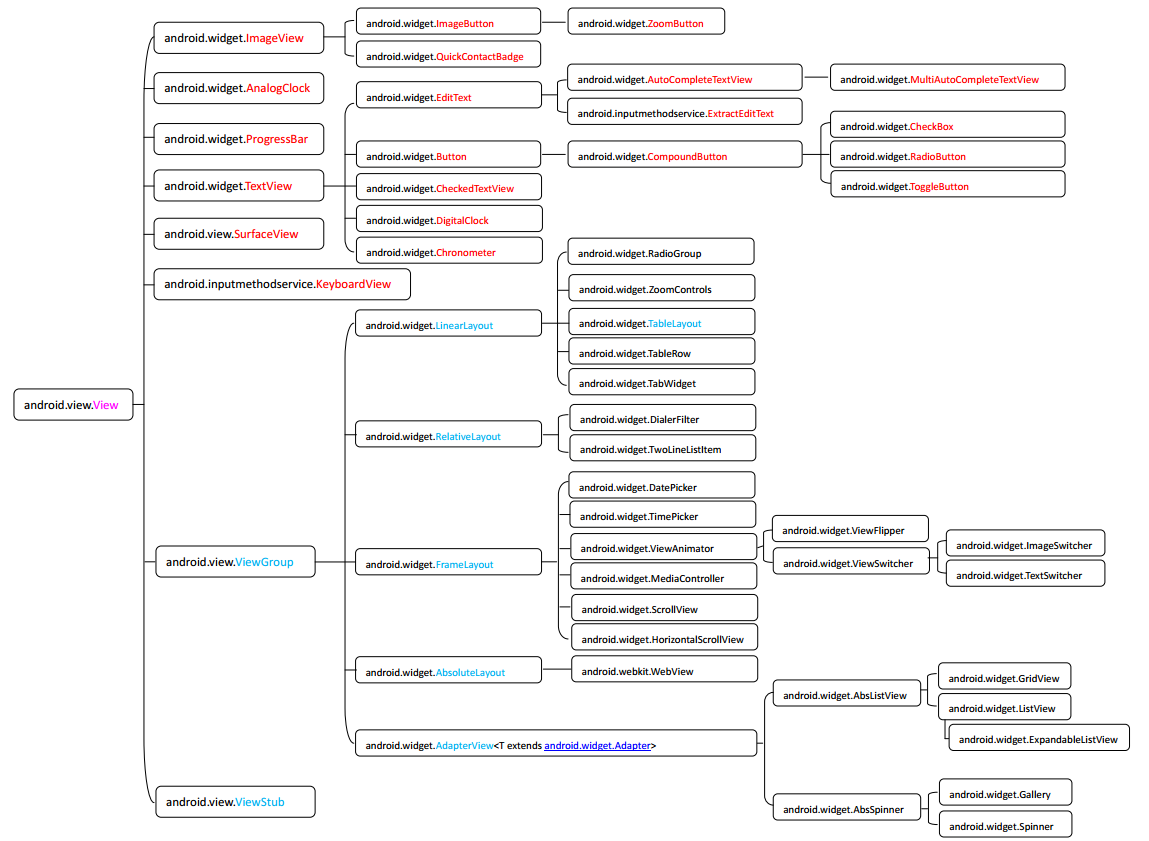
1、Android中的所有UI组件都继承自android.view.View类,所有的UI组件都位于android.view包 和 android.widget包中
2、主要分为两大部分,View(视图:普通控件)和ViewGroup(容器:布局管理器)
二、Android中的6大布局管理器
1、为什么要使用布局管理器?
根据屏幕大小,管理容器内的控件,自动适配组件在手机屏幕中的位置
2、6大布局管理器详解(LinearLayout、TableLayout、RelativeLayout、FrameLayout、AbsoluteLayout、GridLayout)
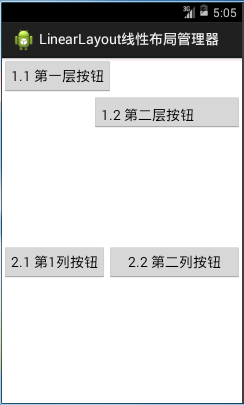
1). LinearLayout 线性布局管理器
Ⅰ. 线性布局内的控件不换行or换列,组件依次排列,超出容器的控件则不会被显示
Ⅱ. 重要属性说明
android:orientation,当设置成 vertical 时表示布局容器内的控件纵向排列成1列,当设置成 horizontal 时表示布局容器内的所有控件横向排列成1行
android:layout_weight,为容器内的组件设置权重,表示当所有控件全部排列完毕后,该被设置的组件占父容器剩余空白部分的多少比重
android:layout_gravity,为容器内的控件设置该控件在父容器中的对齐方式
当父容器线性设置为 vertical 纵向时,则只有设置与左右相关的值才起作用,ex:left、right
当父容器线性设置为 horizontal 横向时,则只有设置与上下相关的值才起作用,ex:top、bottom
android:gravity,设置控件上面的文字 在 该组件里面的对齐方式
android:visibility,visibility显示;invisibility不显示,但是还是占据那个位置留一个空白区域;gone真正的完全隐藏
线性布局管理器demo:
<?xml version="1.0" encoding="utf-8"?>
<LinearLayout xmlns:android="http://schemas.android.com/apk/res/android"
    android:layout_width="match_parent"
    android:layout_height="match_parent"
    android:orientation="vertical" >
    <!-- 线性布局中嵌套布局, LinearLayout vertical 纵向排列-->
    <LinearLayout
        android:layout_width="match_parent"
    	android:layout_height="wrap_content"
    	android:layout_weight="1"
    	android:orientation="vertical">
    		<Button
	    		android:layout_width="wrap_content"
	    		android:layout_height="wrap_content"
	    		android:text="1.1 第一层按钮"
	    	/>
			<Button
	    		android:layout_width="200dp"
	    		android:layout_height="wrap_content"
	    		android:layout_gravity="right"
	    		android:gravity="left|bottom"
	    		android:text="1.2 第二层按钮"
	    	/>
    </LinearLayout>
    <!-- 线性布局中嵌套布局, LinearLayout horizontal 横向排列-->
    <LinearLayout
        android:layout_width="match_parent"
    	android:layout_height="wrap_content"
    	android:orientation="horizontal">
    		<Button
	    		android:layout_width="wrap_content"
	    		android:layout_height="wrap_content"
	    		android:text="2.1 第1列按钮"
	    	/>
			<Button
	    		android:layout_width="match_parent"
	    		android:layout_height="wrap_content"
	    		android:text="2.2 第二列按钮"
	    	/>
			<Button
	    		android:layout_width="wrap_content"
	    		android:layout_height="wrap_content"
	    		android:text="2.3 第三列按钮"
	    	/>
    </LinearLayout>
</LinearLayout>
demo效果: 可以看到xml布局文件中的 "2.3 第三列按钮" 因为超出容器,所以不显示;"1.2 第二层按钮" 在容器中右对齐,按钮自身文字靠左靠下
2). TableLayout 表格布局管理器
Ⅰ. 表格布局继承自LinearLayout线性布局
Ⅱ. 表格布局用行、列方式来管理容器内的控件
Ⅲ. 表格布局不需要制定多少行列,布局内每添加一行TableRow表示添加一行,然后再在TableRow添加子控件,容器的列数由包含列数最多的行决定
Ⅳ. 重要属性说明
android:stretchColumns,为TableLayout容器里面设置属性,表示 被设置的这些列 可拉伸 (注意:TableLayout中列的索引从0开始)
android:shrinkColumns, 为TableLayout容器里面设置属性,表示 被设置的这些列 可收缩
android:layout_column, 在容器里面的控件设置属性,指定该控件在TableRow中的指定列(注:该属性在eclipse中不会自动提醒)
android:layout_span, 在容器里面的控件设置属性,指定该控件在TableRow中的指定列(注:该属性在eclipse中不会自动提醒)
表格布局管理器demo:
<?xml version="1.0" encoding="utf-8"?>
<TableLayout xmlns:android="http://schemas.android.com/apk/res/android"
    android:layout_width="match_parent"
    android:layout_height="match_parent"

    android:stretchColumns="0,2"
    android:shrinkColumns="1"

 	android:collapseColumns="2">

    <!-- 注意:第3列超出了屏幕大小,所以不显示 -->
    <TableRow>
        <Button android:text="第1行  第1列"/>
        <Button android:text="第1行  第2列"/>
        <Button android:text="第1行  第3列"/>
    </TableRow>

    <!-- 不用TableRow,直接使用控件占据一行 -->
	<Button android:text="第2行 第1列:单独的Button,非TableRow"/>

	<!-- android:layout_column 属性指定该组件到该行的指定列-->
	<TableRow>
	    <Button android:text="第3行  指定到第2列"            android:layout_column="1"/>
	</TableRow>

	<!-- layout_span 属性指定该组件占据多少列-->
	<TableRow>
	    <Button android:text="第4行 第1列   指定占据2列空间...."  android:layout_span="2"/>
	</TableRow>

</TableLayout>
demo效果: 可以看到xml布局文件中的 "第1行第3列超出屏幕大小没有显示;3行2列被指定到第2列;4行1列占据了2列的空间"

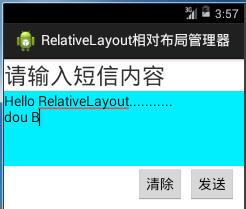
3). RelativeLayout 相对布局管理器
容器内的控件布局总是相对于父容器或兄弟组件的位置
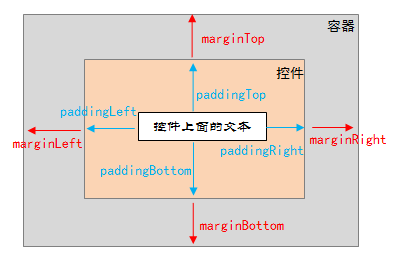
相对布局是实际中应用最多,也是最灵活的布局管理器,这里不一一介绍它的属性,注意说明一下易混淆的margin和padding的区别
相对布局管理器demo:
<?xml version="1.0" encoding="utf-8"?>
<RelativeLayout xmlns:android="http://schemas.android.com/apk/res/android"
    android:layout_width="match_parent"
    android:layout_height="match_parent" >

    <TextView
        android:id="@+id/txtInfor"
        android:layout_width="match_parent"
        android:layout_height="wrap_content"
        android:textSize="30sp"
        android:text="请输入短信内容"/>
    <EditText
        android:id="@+id/txtSMS"
        android:layout_width="match_parent"
        android:layout_height="wrap_content"
        android:minHeight="100dp"
        android:background="#00eeff"
        android:gravity="left|top"
        android:layout_below="@id/txtInfor"
        android:layout_alignLeft="@id/txtInfor"
        />
    <Button
        android:id="@+id/btnClearSMS"
        android:layout_width="wrap_content"
		android:layout_height="wrap_content"
		android:layout_below="@id/txtSMS"
		android:layout_alignParentRight="true"
		android:layout_marginRight="80dp"

		android:text="清除"
        />
    <Button
        android:id="@+id/btnSendSMS"
        android:layout_width="wrap_content"
		android:layout_height="wrap_content"
		android:layout_alignBaseline="@id/btnClearSMS"
		android:layout_alignParentRight="true"
		android:layout_marginRight="10dp"
		android:text="发送"
        />
</RelativeLayout>
</TableLayout>
demo效果:
4). FrameLayout 帧布局管理器
为容器内的控件创建一块空白区域(帧),一帧一个控件,后面添加的控件的覆盖在前面的控件上面。类似于Java中的AWT中的CardLayout布局
ex:播放器APP,播放器上面的按钮就浮动在播放器上面
帧布局管理器demo:
<?xml version="1.0" encoding="utf-8"?>
<FrameLayout xmlns:android="http://schemas.android.com/apk/res/android"
    android:layout_width="match_parent"
    android:layout_height="match_parent" >

	<TextView
	    android:layout_width="wrap_content"
	    android:layout_height="wrap_content"
	    android:layout_gravity="center"
	    android:height="280dp"
	    android:width="280dp"
	    android:background="#eeff00"/>
	<TextView
	    android:layout_width="wrap_content"
	    android:layout_height="wrap_content"
	    android:layout_gravity="center"
	    android:height="180dp"
	    android:width="180dp"
	    android:background="#3322ff"/>
	<TextView
	    android:layout_width="wrap_content"
	    android:layout_height="wrap_content"
	    android:layout_gravity="center"
	    android:height="80dp"
	    android:width="80dp"
	    android:background="#ff2233"/>
</FrameLayout>
demo效果:

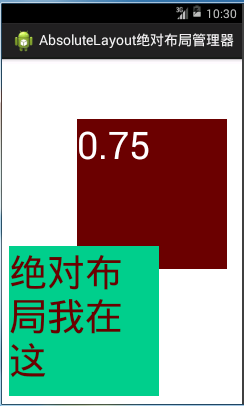
5). AbsoulteLayout 绝对布局管理器
容器管理容器内控件的位置大小,开发人员通过指定X、Y坐标指定组件的位置
android:layout_x,指定控件在容器中的 x 坐标值
android:layout_y,指定控件在容器中的 y 坐标值
实际应用中一般不适用AbsoulteLayout,因为应用该APP的手机屏幕大小,分辨率肯定会不同
绝对布局管理器demo:
<?xml version="1.0" encoding="utf-8"?>
<AbsoluteLayout xmlns:android="http://schemas.android.com/apk/res/android"
    android:layout_width="match_parent"
    android:layout_height="match_parent" >

    <TextView
        android:id="@+id/tv1"
        android:layout_width="wrap_content"
        android:layout_height="wrap_content"
        android:height="200dp"
        android:width="200dp"
        android:layout_x="100dp"
        android:layout_y="80dp"
        android:textSize="50sp"
        android:textColor="#ffffff"
        android:background="#680000"/>
    <TextView
        android:layout_width="wrap_content"
        android:layout_height="wrap_content"
        android:height="200dp"
        android:width="200dp"
        android:layout_x="10dp"
        android:layout_y="250dp"
        android:textSize="50sp"
        android:textColor="#680000"
        android:background="#00cc88"
        android:text="绝对布局我在这"/>
</AbsoluteLayout>
demo效果:
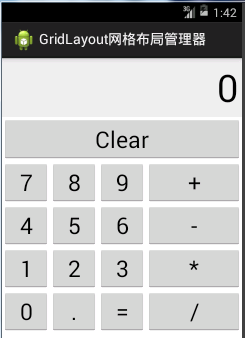
6). GridLayout 网格布局管理器
Ⅰ. GridLayout网格布局管理器是android 4.0 以后才增加的布局管理器
Ⅱ. 网格布局管理器将容器划分为行×列的网格,每个控件置于网格中,当然也可以通过设置相关属性使一个控件占据多行或多列
网格布局管理器 计算器布局demo :布局文件test_gridlayout.xml
<?xml version="1.0" encoding="utf-8"?>
<GridLayout xmlns:android="http://schemas.android.com/apk/res/android"
    android:layout_width="match_parent"
    android:layout_height="match_parent"
    android:rowCount="6"
    android:columnCount="4"
    android:id="@+id/grid_cal">

    <TextView
        android:id="@+id/tv_result"
        android:layout_width="match_parent"
        android:layout_height="wrap_content"
        android:textSize="50sp"
        android:textColor="#000000"
        android:background="#eeeeee"
        android:text="0"
        android:gravity="right"
        android:padding="5dp"
        android:layout_columnSpan="4"/>
    <Button
        android:id="@+id/btn_clear"
        android:layout_width="match_parent"
        android:layout_height="wrap_content"
        android:layout_columnSpan="4"
        android:text="Clear"
        android:textSize="30dp"/>
</GridLayout>
代码:
package com.example.testgrid;

import android.app.Activity;
import android.os.Bundle;
import android.view.Gravity;
import android.widget.Button;
import android.widget.GridLayout;

public class MainActivity extends Activity {

	String[] btnLable = new String[]{
		"7","8","9","+",
		"4","5","6","-",
		"1","2","3","*",
		"0",".","=","/"
		};

    @Override
    protected void onCreate(Bundle savedInstanceState) {
        super.onCreate(savedInstanceState);
        //setContentView(R.layout.activity_main);
        setContentView(R.layout.test_gridlayout);

        GridLayout gridCal = (GridLayout) findViewById(R.id.grid_cal);

        for(int i=0; i<btnLable.length; i++){	//添加16个网格,每个网格1个按钮
        	Button button = new Button(this);
        	button.setText(btnLable[i]);
        	button.setTextSize(30);

        	GridLayout.Spec rowSpec = GridLayout.spec(i / 4 + 2);	//行位置
        	GridLayout.Spec colSpec = GridLayout.spec(i % 4);		//列位置

        	GridLayout.LayoutParams gridLayoutParams = new GridLayout.LayoutParams(rowSpec, colSpec);	//属性
        	gridLayoutParams.setGravity(Gravity.FILL_HORIZONTAL);	//横向排满容器

        	gridCal.addView(button, gridLayoutParams);				//将按钮添加到网格容器内
        }
    }
}
demo运行效果:
注意代码里面的GridLayout.LayoutParams,其实所有的布局管理器都提供了自己相对应的LayoutParams封装属性信息的类,便于用代码去控制容器自身里面的控件
ex: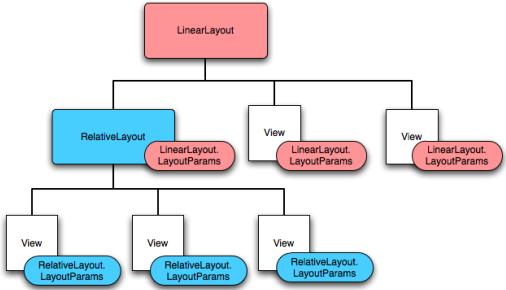
同样FrameLayout.LayoutParams、 LinearLayout.LayoutParams、RadioGroup.LayoutParams,、RelativeLayout.LayoutParams ..............
三、Android中的显示单位
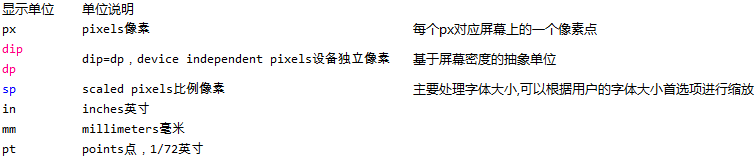
其中 px 和 dp是存在换算关系的,每英寸160像素的屏幕时,1px = 1dp;屏幕密度改变,dip与px的换算也会改变

从上面可以看到,虽然屏幕分辨率不同,但是当使用dp作为显示单位时,程序能自适配UI控件在屏幕上面的显示,显示效果一样
其中当前app所运行的屏幕的密码比值可以通过Context的以下方法得到:
float density = getResources().getDisplayMetrics().density; /* 获得手机屏幕密度值 */
所以:为了适应不同手机,不同分辨率屏幕大小时,view的大小一般采用dp或者dip作为显示单位,字体的大小一般采用sp作为显示单位
http://blog.csdn.net/yihuiworld


 被折叠的 条评论
为什么被折叠?
被折叠的 条评论
为什么被折叠?
 到【灌水乐园】发言


