


文章目录
SpringMVC_Thymeleaf综合示例1
1. Thymeleaf简介
Thymeleaf是一个现代化的服务器端基于Java的页面模板引擎。它通过将数据模型和页面分离,能帮我们重新构建更优雅的动态页面。
开源模板引擎主要有:
- Velocity 过时,不再更新和维护了
- Freemarker 早几年占市场主流
- Thymeleaf Spring官方推荐
模板引擎工作原理:

编码的时候,具体表现形式为:
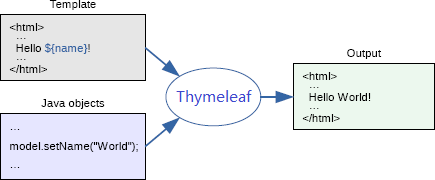
模板引擎工作原理大都比较类似,都是通过一个基于模板引擎语法的模板文件,把需要显示的模型数据和前端页面进行分离,使其更容易分开维护,体现了“前后分离”的思想。
使用模板引擎相对于JSP这样的动态页面的好处就是,JSP不通过服务器是生成不了Html文件的,直接用浏览器打开可读性差,而模板文件本身就是Html页面,程序员开发的时候修改调试非常方便。
2. SpringMVC整合Thymeleaf
2.1 引入类库
<dependency>
    <groupId>org.thymeleaf</groupId>
    <artifactId>thymeleaf</artifactId>
    <version>3.0.9.RELEASE</version>
</dependency>
<dependency>
    <groupId>org.thymeleaf</groupId>
    <artifactId>thymeleaf-spring4</artifactId>
    <version>3.0.9.RELEASE</version>
</dependency>
thymeleaf为核心包,thymeleaf-spring为整合spring的依赖包,使用不同版本的spring,需要引入相应版本的Thymeleaf整合包。
2.2 基本配置
回顾一下之前使用JSP的时候,我们WebConfig中的关于视图解析器的配置:
@Bean
public ViewResolver viewResolver() {
    InternalResourceViewResolver resolver = new InternalResourceViewResolver();
    // 设置视图前缀
    resolver.setPrefix("/");
    // 设置视图后缀
    resolver.setSuffix(".jsp");
    // 让上下文的bean在请求的属性中也可以访问
    resolver.setExposeContextBeansAsAttributes(true);
    return resolver;
}
通过这段配置,在controller返回视图逻辑名称的时候,spring会在这个逻辑名称的前后进行拼串,最终找到页面路径。
使用Thymeleaf,我们需要使用Thymeleaf提供的视图解析器来替换上面这段配置,我们将依次配置如下组件:
- SpringResourceTemplateResolver(模板解析器):加载Thymeleaf模板
- SpringTemplateEngine(Spring模板引擎):处理模板并渲染结果页面
- ThymeleafViewResolver(视图解析器):将逻辑视图名称解析为Thymeleaf模板视图
@Bean
public ITemplateResolver templateResolver(ApplicationContext applicationContext) {
    // 模板解析器
    SpringResourceTemplateResolver templateResolver = new SpringResourceTemplateResolver();
    templateResolver.setApplicationContext(applicationContext);
    templateResolver.setPrefix("/");
    templateResolver.setSuffix(".html");
    templateResolver.setTemplateMode(TemplateMode.HTML);
    templateResolver.setCacheable(false);// 开发时为了调试方便,禁用页面缓存
    return templateResolver;
}

@Bean
public TemplateEngine templateEngine(ITemplateResolver templateResolver) {
    // 模板引擎
    SpringTemplateEngine templateEngine = new SpringTemplateEngine();
    // 支持SpEL(Spring的EL表达式)
    templateEngine.setEnableSpringELCompiler(true);
    templateEngine.setTemplateResolver(templateResolver);
    return templateEngine;
}

@Bean
public ViewResolver viewResolver(ITemplateEngine templateEngine) {
    // 视图解析器
    ThymeleafViewResolver viewResolver = new ThymeleafViewResolver();
    viewResolver.setTemplateEngine(templateEngine);
    viewResolver.setCharacterEncoding("utf-8");
    return viewResolver;
}
2.3 Thymeleaf命名空间
在编制模板文件的时候,我们只需要在Html页面上的html节点中增加Thymeleaf命名空间就可以使用Thymeleaf了。
<html xmlns:th="http://www.thymeleaf.org">
2.4 Thymeleaf的eclipse插件安装
为了在eclipse中编写thymeleaf有语法提示,我们需要安装thymeleaf的eclipse插件。
- 首先下载离线的插件安装包:thymeleaf-extras-eclipse-plugin-2.1.2.zip(勿解压)
- eclipse->Help->Install New Software…->Add->Archive…,然后在文件系统中,指向插件文件。
- 勾选要安装的插件,一路next至安装完毕,安装完毕需要重启eclipse
3. Helloworld
编写controller代码:
@RequestMapping("/hello")
public String hello(Model model) {
    model.addAttribute("msg", "你好!");
    return "success";
}
编写模板文件:
<!DOCTYPE html>
<html xmlns:th="http://www.thymeleaf.org">
<head>
<meta charset="UTF-8">
<title>Insert title here</title>
</head>
<body>
	<div th:text="${msg}"></div>
</body>
</html>
th:text属性将会设置div中的文本值为msg指定的消息。上述代码最终会生成html为:
<div>你好!</div>
注意:thymeleaf的语法都是基于th:属性名来为传统的html标签添加属性体现的,并不会有类似于<c:forEach这种单独的标签体,所以即使编写错误,由于html语法本身的松散性,并不会影响开发时直接使用浏览器打开模板文件进行浏览。
4. 使用fragment构建高可用的网站框架
在编写网页代码时,我们可以通过fragment来定义一些html的代码片段,方便其它页面进行重用。
4.1 fragment语法
声明fragment:
<span th:fragment="片段变量名">
    html代码
</span>
引用fragment:
<div th:replace="~{模板文件名::selector}"></div>
selector可以是片段变量名、标签甚至是样式(具体请参看usingthymeleaf.pdf的20章节)。
在引用fragment的时候我们可以使用th:replace、th:insert、th:include(具体区别请参看usingthymeleaf.pdf的8.1章节)。
4.2 提取公共片段
common.html
<!DOCTYPE html>
<html xmlns:th="http://www.thymeleaf.org">
<head th:fragment="head(titleName)">
<meta charset="UTF-8">
<title th:text="${titleName}"></title>
<style type="text/css">
@import url("style.css");
</style>
</head>
<body>
<div th:fragment="top" align="center">
<h1>欢迎进入用户管理系统</h1>
<hr>
</div>
<div th:fragment="bottom" align="center">
<hr>
© 2018 Turing IT Education Group.
</div>
</body>
</html>
代码中定义了3个片段:head、top和bottom。
其中head为带参数的代码片段,它将使用形参titleName来设置动态title标签的内容。
为了使用刚才在模板文件中定义好的片段,我们可以在新建的用户列表页面list.html做出如下编码:
<!DOCTYPE html>
<html xmlns:th="http://www.thymeleaf.org">
<head th:replace="~{common::head('用户列表')}">
</head>
<body>
	<div th:replace="~{common::top}"></div>
	<div align="center">
		<!--展示用户列表信息-->
	</div>
	<div th:replace="~{common::bottom}"></div>
</body>
</html>
5. 查询用户列表
查询所有用户的controller代码:
@RequestMapping("/findAllUser")
public String findAll(Model model) {
    List<User> userList = userService.findAll();
    model.addAttribute(userList);
    return "list";
}
list.html
<table id="hor-minimalist-b">
    <thead>
        <tr>
            <th scope="col">编号</th>
            <th scope="col">姓名</th>
            <th scope="col">性别</th>
            <th scope="col">生日</th>
            <th scope="col">爱好</th>
            <th scope="col">操作</th>
        </tr>
    </thead>
    <tbody>
        <tr th:each="user:${userList}">
            <td th:text="${user.id}"></td>
            <td th:text="${user.name}"></td>
            <td th:text="${user.gender}?'男':'女'"></td>
            <td th:text="${#dates.format(user.birthday, 'yyyy-MM-dd')}"></td>
            <td th:text="${user.hobby}"></td>
            <td></td>
        </tr>
    </tbody>
</table>
其中,“#”用来引用Thymeleaf的内置对象,我们调用了#dates对象的format(date,pattern)方法,来进行日期格式化。(请参看usingthymeleaf.pdf的18、19章节了解内置对象的使用案例)
6. 进一步优化重用
由于一个网站的页面布局一般都是比较固定的,我们可以使用fragment进一步的定义某一个网页的固定布局(layout)。
新建layout.html:
<html th:fragment="standard(titleName,content)"
	xmlns:th="http://www.thymeleaf.org">
<head th:replace="~{common::head(${titleName})}"></head>
<body>
	<div th:replace="~{common::top}"></div>
	<div th:replace="${content}"></div>
	<div th:replace="~{common::bottom}"></div>
</body>
</html>
在这个layout模板文件中,我们定义了一个名为standard的片段(注意,该片段是定义在html节点中的),需要传入两个参数:titleName用来设置页面标题,content用来设置中间的主体内容。而网页的头部和尾部分别引用了common模板文件中定义的2个片段。
我们可以把list.html进一步修改为listplus.html:
<html th:replace="~{layout::standard('用户列表',~{::div})}"
	xmlns:th="http://www.thymeleaf.org">
<head></head>
<body>
	<div align="center">
		<table id="hor-minimalist-b">
			<thead>
				<tr>
					<th scope="col">编号</th>
					<th scope="col">姓名</th>
					<th scope="col">性别</th>
					<th scope="col">生日</th>
					<th scope="col">爱好</th>
					<th scope="col">操作</th>
				</tr>
			</thead>
			<tbody>
				<tr th:each="user:${userList}">
					<td th:text="${user.id}"></td>
					<td th:text="${user.name}"></td>
					<td th:text="${user.password}"></td>
					<td th:text="${user.gender}?'男':'女'"></td>
					<td th:text="${#dates.format(user.birthday, 'yyyy-MM-dd')}"></td>
					<td th:text="${user.hobby}"></td>
				</tr>
			</tbody>
		</table>
	</div>
</body>
</html>
在引用layout的standard片段时,我们传入的第2个参数为~{::div},首先这是一个片段的引用,其次,省略了模板名意为在当前文件中进行查找,div为选择器,联合起来理解为在当前文件中查找名为div的标签,然后把整个div标签的内容作为变量,传递给layout模板文件的standard这个片段。
rmat(user.birthday, ‘yyyy-MM-dd’)}">
在引用layout的standard片段时,我们传入的第2个参数为~{::div},首先这是一个片段的引用,其次,省略了模板名意为在当前文件中进行查找,div为选择器,联合起来理解为在当前文件中查找名为div的标签,然后把整个div标签的内容作为变量,传递给layout模板文件的standard这个片段。
以上用法,就是片段在布局中的使用:我们在layout.html中定义页面的基本布局,在common.html中定义各种可以被重用的小片段,然后使用其它页面引用layout.html来最终生成所需的页面。


 401
401


 被折叠的 条评论
为什么被折叠?
被折叠的 条评论
为什么被折叠?
 到【灌水乐园】发言


