


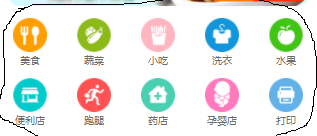
今天我们来讲一下首页快捷入口的布局编写,看下图

我们看一下代码
<view class="title-view">
<view class="title-button" wx:for="{{nav}}" wx:for-item="item" bindtap="searchShop" data-index="{{item.bind}}">
<image class="image-btn" src="{{item.src}}"></image>
<text class="text-btn">{{item.title}}</text>
</view>
</view>
下面我把用的css样式贴出
.title-view{
float: left;
}
.title-button {
display: flex;
flex-direction: column;
justify-content: center;
align-items: center;
width: 20%;
margin-top: 30rpx;
float: left;
}
.image-btn{
width: 80rpx;
height: 80rpx;
}
.text-btn{
margin-top: 8rpx;
font-size: 25rpx;
color: #6e6d6b;
}
这里最关键用了左浮动效果
float: left;
我们在最外层包裹一个左浮动
然后内部再用一个纵向排列的view
把图片和文字包括成上下排列,
然后加载js数据,
data: {
address: '',
nav: [{
title: "美食",
src: "/images/food.png",
bind: "food"
}, {
title: "蔬菜",
src: "/images/vegetables.png",
bind: "vegetables"
}, {
title: "小吃",
src: "/images/snack.png",
bind: "snack"
}, {
title: "洗衣",
src: "/images/clothes.png",
bind: "clothes"
},{
title: "水果",
src: "/images/fruit.png",
bind: "fruit"
},{
title: "便利店",
src: "/images/shop.png",
bind: "shop"
},{
title: "跑腿",
src: "/images/run.png",
bind: "run"
},{
title: "药店",
src: "/images/drugstore.png",
bind: "drugstore"
},{
title: "孕婴店",
src: "/images/baby.png",
bind: "baby"
},{
title: "打印",
src: "/images/duplicate.png",
bind: "duplicate"
}]
}
这里重点说一下,每一行显示数量的控制,
我们可以通过百分比来控制, 这里我们看
一下这段代码:
<view class="title-button" wx:for="{{nav}}" wx:for-item="item" bindtap="searchShop" data-index="{{item.bind}}">
<image class="image-btn" src="{{item.src}}"></image>
<text class="text-btn">{{item.title}}</text>
</view>
这个view包着的就是一个快捷按钮,我们可以把屏幕的宽度看作是100%
这里我把每一个view的宽度设置成了20%,100除以20等于5,也就是一行
显示5个,它会根据你js中的数组数据来动态显示,每到5个就会自动换行,
这样一个漂亮的首页快捷按钮布局就写好了。


 296
296


 被折叠的 条评论
为什么被折叠?
被折叠的 条评论
为什么被折叠?
 到【灌水乐园】发言


