


This chapter is from the book

Image Embellishments
When you include embellishments in your pictures such as shadows, sparkles, badges, and other items that extend beyond the image’s core content, an image’s natural size may no longer reflect the way you want Auto Layout to handle layout. In Auto Layout, constraints determine view size and placement, using a geometric element called an alignment rectangle. The UIKit API calls help you control that placement.
Alignment Rectangles
As developers create complex views, they may introduce visual ornamentation such as shadows, exterior highlights, reflections, and engraving lines. As they do, these features are often drawn onto image art rather than being added through layers or subviews. Unlike frames, a view’s alignment rectangle should be limited to a core visual element. Its size should remain unaffected as new items are drawn onto the view. Consider the left side of Figure 1-11. It shows a view drawn with a shadow and a badge. When laying out this view, you want Auto Layout to focus on aligning just the core element—the blue rectangle—and not the ornamentation.
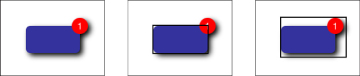
Figure 1-11 A view’s alignment rectangle (center) refers strictly to the core visual element to be aligned, without embellishments.
The center image in Figure 1-11 highlights the view’s alignment rectangle. This rectangle excludes all ornamentation, such as the drop shadow and badge. It’s the part of the view you want Auto Layout to consider when it does its work. Contrast this with the rectangle shown in the right image. This version includes all the visual ornamentation, extending the view’s frame beyond the area that should be considered for alignment.
The right-hand rectangle in Figure 1-11 encompasses all the view’s visual elements. It encompasses the shadow and badge. These ornaments could potentially throw off a view’s alignment features (for example, its center, bottom, and right) if they were considered during layout.
By working with alignment rectangles instead of frames, Auto Layout ensures that key information like a view’s edges and center are properly considered during layout. In Figure 1-12, the adorned view is perfectly aligned on the background grid. Its badge and shadow are not considered during placement.
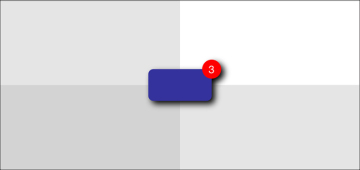
Figure 1-12 Auto Layout only considers this view’s alignment rectangle when laying it out as centered in its superview. The shadow and badge don’t affect its placement.
Visualizing Alignment Rectangles
Both iOS and OS X enable you to overlay views with their alignment rectangles in your running application. You set a simple launch argument from your app’s scheme:UIViewShowAlignmentRects for iOS and NSViewShowAlignmentRects for OS X. Set the argument value to YES and make sure to prefix it with a dash, as shown in Figure 1-13.
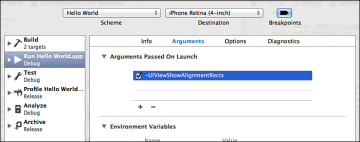
Figure 1-13 Set launch arguments in the scheme editor.
When the app runs, rectangles show over each view. The resulting rectangles are light and can be difficult to see. You will need to look closely at times.
Alignment Insets
Drawn art often contains hard-coded embellishments such as highlights, shadows, and so forth. These items take up little memory and run efficiently. Because of the low overhead, many developers predraw effects to art assets. Figure 1-14 demonstrates a typical problem encountered when using image-based ornamentation with Auto Layout. The left image shows a basic image view, whose art I created in Photoshop. I used a standard drop shadow effect. When added to the image view, the 20-point by 20-point area I left for the shadow throws off the view’s alignment rectangle, causing it to appear slightly too high and left.
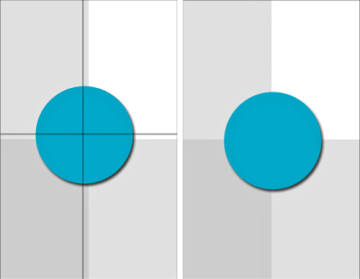
Figure 1-14 Adjust your images to account for alignment when using Auto Layout. At the left, the image view was created with an unadjusted image. It displays slightly too far left and up, which you can see by looking at the points where the circle crosses the background grid. I added lines over the image on the left to emphasize where the centering should have occurred. The image on the right shows the adjusted image view. It centers exactly onto its parent view.
In its default implementation, the image view has no idea that the image contains ornamental elements. You have to tell it how to adjust its intrinsic content so that the alignment rectangle considers just that core material.
To accommodate the shadow, you load and then rebuild the image. This is a two-step process. First, you load the image as you normally would (for example, withimageNamed:). Then you call imageWithAlignmentRectInsets: on that image to produce a new version that supports the specified insets. The following snippet accommodates a 20-point shadow by insetting the alignment rect on the bottom and right:
UIImage *image = [[UIImage imageNamed:@"Shadowed.png"]
    imageWithAlignmentRectInsets:UIEdgeInsetsMake(0, 0, 20, 20)];
UIImageView *imageView = [[UIImageView alloc] initWithImage:image];
Insets define offsets from the top, left, bottom, and right of some rectangles. You use them to describe how far to move in (using positive values) or out (using negative values) from rectangle edges. These insets ensure that the alignment rectangle is correct, even when there are drawn embellishments placed within the image. The fields are defined as follows:
typedef struct {
   CGFloat top, left, bottom, right;
} UIEdgeInsets;
After specifying the alignment rect insets, the updated version now properly aligns, as you see on the right in Figure 1-14. I logged the pertinent details so that you can compare the view details. Here’s what the view frame looks like (it shows the full 200×200 image size), the intrinsic content size built from the image’s alignment insets (180×180), and the resulting alignment rectangle used to center the image view’s frame:
HelloWorld[53122:c07] Frame: {{70, 162}, {200, 200}}
HelloWorld[53122:c07] Intrinsic Content Size: {180, 180}
HelloWorld[53122:c07] Alignment Rect: {{70, 162}, {180, 180}}
It’s a bit of a pain to construct these insets by hand, especially if you may later update your graphics. When you know the alignment rect and the overall image bounds, you can, instead, automatically calculate the edge insets you need to pass to this method. Listing 1-1 defines a simple inset builder. It determines how far the alignment rectangle lies from each edge of the parent rectangle, and it returns a UIEdgeInset structure that represents those values. Use this function to build insets from the intrinsic geometry of your core visuals.
Listing 1-1 Building Edge Insets from Alignment Rectangles
UIEdgeInsets BuildInsets(
    CGRect alignmentRect, CGRect imageBounds)
{
    // Ensure alignment rect is fully within source
    CGRect targetRect =
        CGRectIntersection(alignmentRect, imageBounds);

    // Calculate insets
    UIEdgeInsets insets;
    insets.left = CGRectGetMinX(targetRect) –
        CGRectGetMinX(imageBounds);
    insets.right = CGRectGetMaxX(imageBounds) –
        CGRectGetMaxX(targetRect);
    insets.top = CGRectGetMinY(targetRect) –
        CGRectGetMinY(imageBounds);
    insets.bottom = CGRectGetMaxY(imageBounds) –
        CGRectGetMaxY(targetRect);

    return insets;
}
Declaring Alignment Rectangles
Cocoa and Cocoa Touch offer several additional ways to report alignment geometry. You may implement alignmentRectForFrame:, frameForAlignmentRect:,baselineOffsetFromBottom, and alignmentRectInsets. These methods allow your views to declare and translate alignment rectangles from code.
For the most part, thankfully, you can ignore alignment rectangles and insets. Things just, for the most part, work. The edge cases you encounter usually happen when Auto Layout comes into conflict with transforms (and other circumstances when the actual frame doesn’t match the visual frame, as with buttons).
A few notes on these items:
- alignmentRectForFrame: and frameForAlignmentRect: must always be mathematical inverses of each other.
- Most custom views only need to override alignmentRectInsets to report content location within their frame.
- baselineOffsetFromBottom is available only for NSView and refers to the distance between the bottom of a view’s alignment rectangle and the view’s content baseline, such as that used for laying out text. This is important when you want to align views to text baselines and not to the lowest point reached by typographic descenders, like j and q.
Here’s some information about alignmentRectForFrame: andframeForAlignmentRect: from the UIView.h documentation:
- These two methods should be inverses of each other. UIKit will call both as part of layout computation. They may be overridden to provide arbitrary transforms between frame and alignment rect, though the two methods must be inverses of each other. However, the default implementation uses alignmentRectInsets, so just override that if it’s applicable. It’s easier to get right.
- A view that displayed an image with some ornament would typically override these, because the ornamental part of an image would scale up with the size of the frame. Set the NSUserDefault UIViewShowAlignmentRects to YES to see alignment rects drawn.
NSLayoutConstraint.h on OS X adds the following comment:
- If you do override these, be sure to account for the top of your frame being eitherminY or maxY depending on the superview’s flippedness.
You can see this flippedness adjustment made in Listing 1-2, in the next section.
Layout Operates on Alignment Rectangles, Not on Frames
When considering layout, keep in mind that the frame of a control is less important than its visual extent. As a result, ornaments such as shadows and engraving lines should typically be ignored for the purposes of layout. Interface Builder ignores them when positioning views on the canvas—in the following example, the Aqua guide (the dashed blue line) aligns with the visual extent of the button, not with the button’s frame (the solid blue rectangle).
To allow layout based on the presentation of the content rather than the frame, views provide an alignment rectangle, which is what the layout actually operates on. To determine whether your override is correct on OS X, you can set the NSViewShowAlignmentRects default to YES to draw the alignment rects.

Implementing Alignment Rectangles
Listing 1-2 provides a trivial example of code-based alignment geometry. This OS X app builds a fixed-size view and draws a shadowed rounded rectangle into it. WhenUSE_ALIGNMENT_RECTS is set to 1, its alignmentRectForFrame: andframeForAlignmentRect: methods convert to and from frames and alignment rects. As Figure 1-15 shows, these reporting methods allow the view to display with proper alignment.
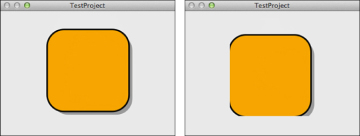
Figure 1-15 Implementing intrinsic content size and frame/alignment rectconversion methods ensures that your view will align and display correctly (as shown on the left) rather than be misaligned and possibly clipped (as shown on the right).
Listing 1-2 Using Code-Based Alignment Frames
@interface CustomView : NSView
@end

@implementation CustomView
- (void) drawRect:(NSRect)dirtyRect
{
    NSBezierPath *path;

    // Calculate offset from frame for 170x170 art
    CGFloat dx = (self.frame.size.width - 170) / 2.0f;
    CGFloat dy = (self.frame.size.height - 170);

    // Draw a shadow
    NSRect rect = NSMakeRect(8 + dx, -8 + dy, 160, 160);
    path = [NSBezierPath
        bezierPathWithRoundedRect:rect xRadius:32 yRadius:32];
    [[[NSColor blackColor] colorWithAlphaComponent:0.3f] set];
    [path fill];

    // Draw fixed-size shape with outline
    rect.origin = CGPointMake(dx, dy);
    path = [NSBezierPath
        bezierPathWithRoundedRect:rect xRadius:32 yRadius:32];
    [[NSColor blackColor] set];
    path.lineWidth = 6;
    [path stroke];
    [ORANGE_COLOR set];
    [path fill];
}

- (NSSize)intrinsicContentSize
{
    // Fixed content size - base + frame
    return NSMakeSize(170, 170);
}

#define USE_ALIGNMENT_RECTS 1
#if USE_ALIGNMENT_RECTS
- (NSRect)frameForAlignmentRect:(NSRect)alignmentRect
{
    // 1 + 10 / 160 = 1.0625
    NSRect rect = (NSRect){.origin = alignmentRect.origin};
    rect.size.width = alignmentRect.size.width * 1.06250;
    rect.size.height = alignmentRect.size.height * 1.06250;
    return rect;
}

- (NSRect)alignmentRectForFrame:(NSRect)frame
{
    // Account for vertical flippage
    CGFloat dy = (frame.size.height – 170.0) / 2.0;
    rect.origin = CGPointMake(frame.origin.x, frame.origin.y + dy);

    rect.size.width = frame.size.width * (160.0 / 170.0);
    rect.size.height = frame.size.height * (160.0 / 170.0);
    return rect;
}
#endif
@end


 1409
1409

 被折叠的 条评论
为什么被折叠?
被折叠的 条评论
为什么被折叠?
 到【灌水乐园】发言


