


调研起因:
准备搞AI Agent海外项目,有相当一部分用户群体是程序员,所以当然要接入Github这个全球最大的同性交友网站了,让用户使用Github账号一键完成注册或登录。
本教程基于Web H5界面进行对接,同时也提供了spring-boot版本的对接Demo在:
https://github.com/youbl/study/tree/master/study-codes/github-oauth-login-demo
废话不多说,直接开始步骤说明吧:
注意:要注册和对接,国内访问github不那么稳定,自己想办法保证稳定性吧。
1、Github OAuth功能申请
1.1、账号注册
首先肯定是要有一个有效的Github账号,去这里注册去吧:https://github.com/signup
这个过程比较简单,输入一个邮箱和密码,接收验证码邮件确认即可,过程中会进行机器人验证。
如果已经有账号了,可以忽略。
1.2、创建Github App
按Github要求,要在App内配置和使用OAuth身份验证能力,所以要先创建Github App。
注:Github支持2种App:
两种Apps的区别参考官方说明:https://docs.github.com/zh/apps/oauth-apps/building-oauth-apps/differences-between-github-apps-and-oauth-apps
我自己实际配置对比了一下:
- Github Apps:推荐,支持配置最多10个回调地址,支持细粒度的权限配置;
- OAuth Apps:Github也不推荐,只支持配置1个回调地址(不方便测试),不支持权限配置。
Github Apps创建说明参考:https://docs.github.com/zh/apps/creating-github-apps/registering-a-github-app/registering-a-github-app
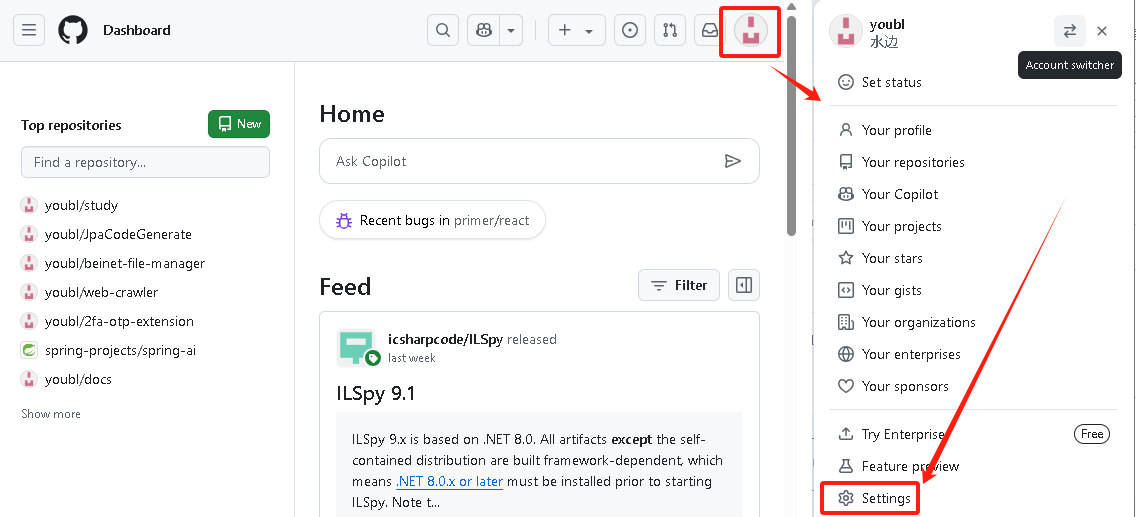
- 先登录并进入Github首页:https://github.com/
点击右上角的头像,再点弹出菜单下面的“Settings”:
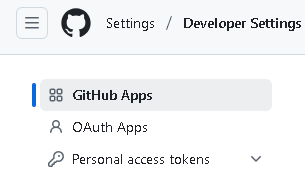
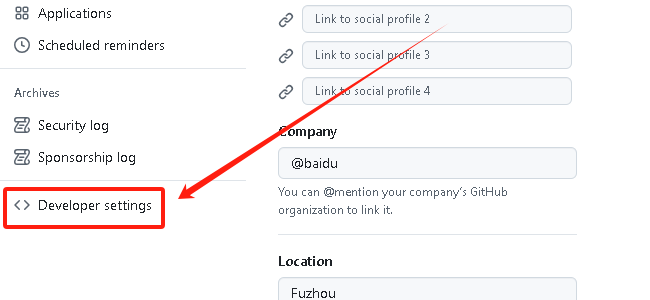
- 再点左边菜单列表最下面的“Developer settings”:
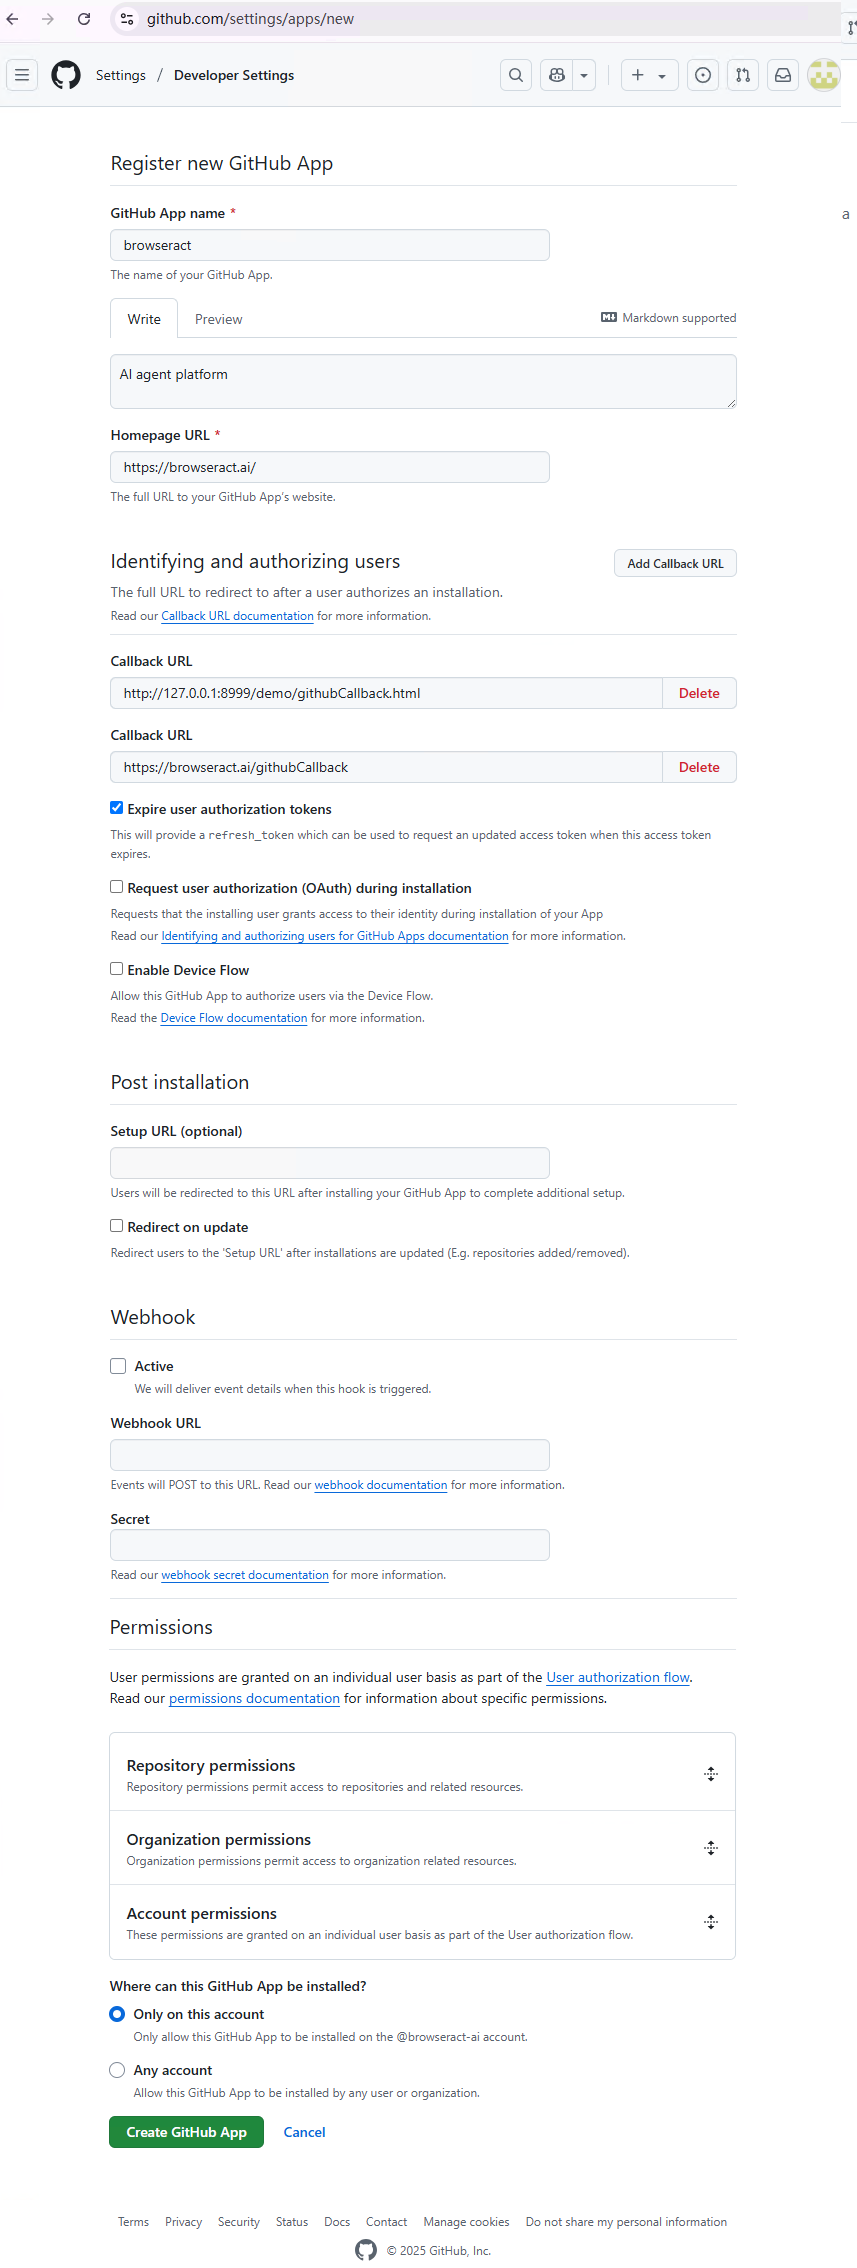
- 点击右侧的“New GitHub App”

- 在新建窗口,输入必要信息,必填项:
- GitHub App name:应用名,自己写,必须在GitHub唯一才行;
- Homepage URL:你的网站地址,没有可以使用Github项目地址,不过Github没有校验是否存在;
- Callback URL:Github登录成功的回调地址,最多可以配置10个,建议把开发、测试、预上、生产都配置进去;
- Webhook:取消勾选Active,不接收Github的活动事件;
- 最后点击最下方的“Create GitHub App”即可。
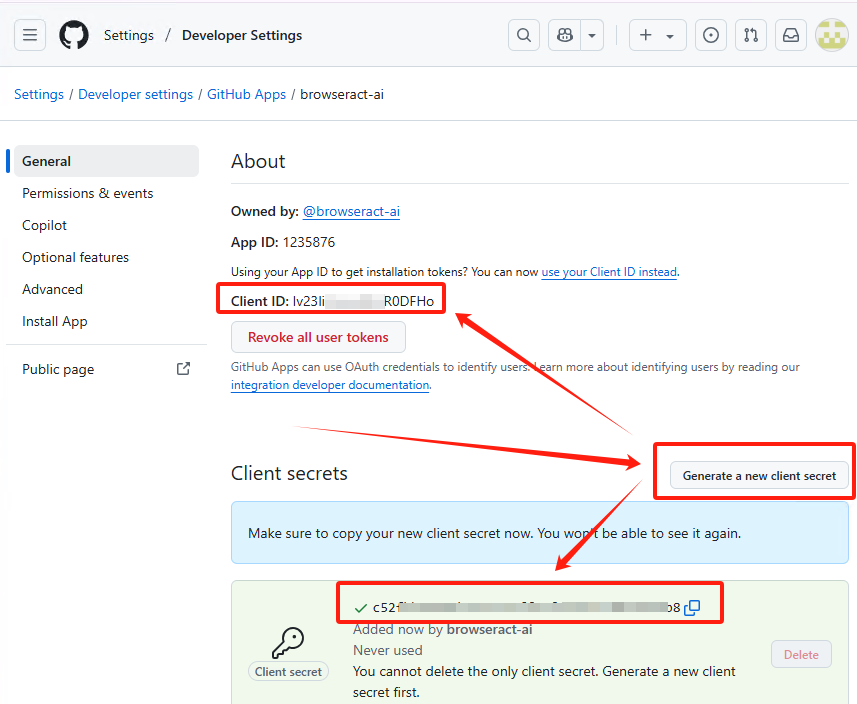
- 此时会进入创建成功的App页面,点击页面右边的“Generate a new client secret”, 生成一个OAuth使用的密钥,请务必把这个Client ID和Client secret复制并保存下来,后面程序要用:
- OK,到这里,GitHub App已经创建完成了,下面是代码对接过程。
注:一开始还以为要配置权限,添加“Email addresses”的只读权限,后面发现并不需要。
2、代码对接
上面的步骤操作完成后,有了客户端ID和Secret,把它复制下来,开始用于我们的代码对接。
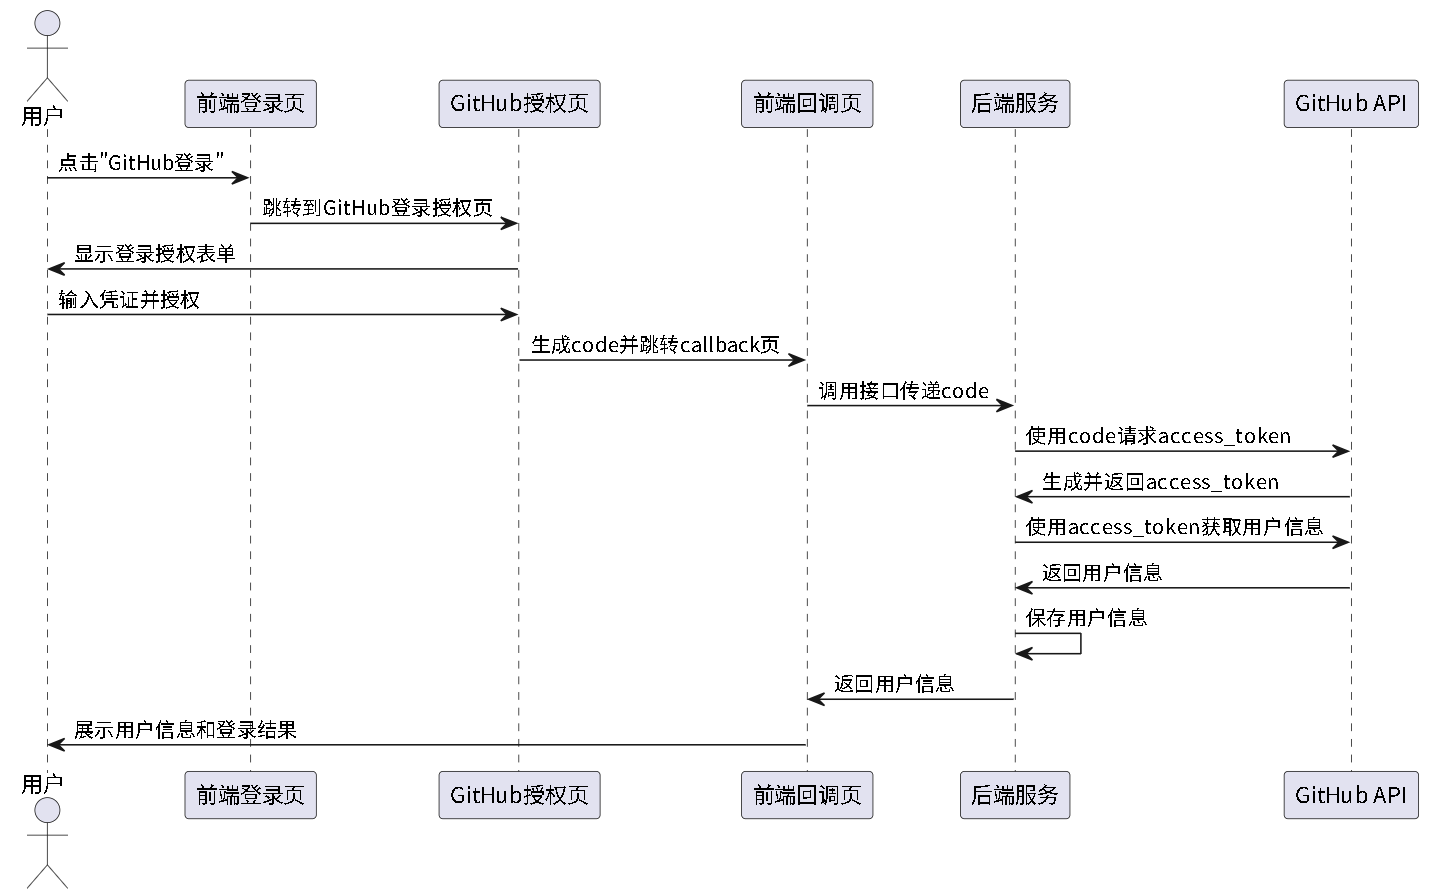
2.1、技术方案和时序图
考虑前端灵活性,以及code无法单独生成access_token,不存在安全问题,下面演示的方案使用前端接收GitHub回调,再通过后端生成access_token及获取用户信息,时序图如下:
2.2、前端页面对接代码生成
2.2.1、登录页面的按钮逻辑
这一步就是生成一个按钮,点击跳转去GitHub登录授权页,参考代码:
<input type="button" onclick="doLogin" value="Github登录">
<script type="text/javascript">
    const githubUrl = 'https://github.com/login/oauth/authorize?scope=user:email&client_id=';
    const githubClientId = '上面App里的 Client ID';
    const redirectUri = 'http://127.0.0.1:8999/demo/githubCallback.html';
    function doLogin() {
        location.href = githubUrl + encodeURIComponent(githubClientId)
            + '&redirect_uri=' + encodeURIComponent(redirectUri);
    }
</script>
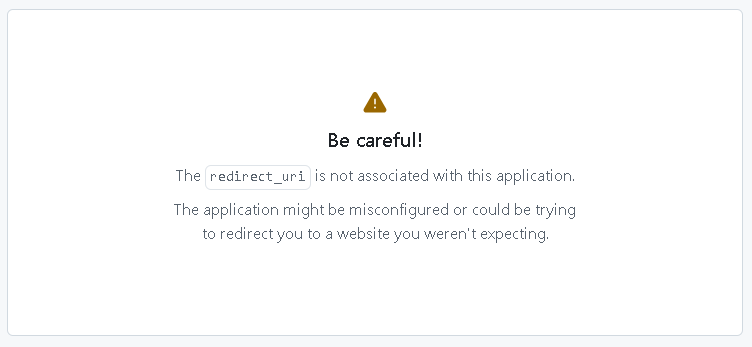
注:上面代码里的回调地址 http://127.0.0.1:8999/demo/githubCallback.html 要记得在GitHub Apps那边的Callback URL里配置,否则点登录时会报错:
2.2.2、上面提到的回调地址逻辑
http://127.0.0.1:8999/demo/githubCallback.html 这个回调页面,要从url里提取出授权码code,并转发给服务端,
回调页面代码参考:
<script>
   start();
   function start() {
       let code = getFromSearch('code');
       if (!code) {
           return alert('未找到code授权码:' + url);
       }
       // 后端获取github用户信息
       getUserInfoByServer(code);
   }
   /**
    * 从url的参数里获取变量值
    * @param name 变量名
    * @returns {string} 变量值
    */
   function getFromSearch(name) {
       if (!name || !location.search || location.search.length <= 1) {
           return ''; // 没有search
       }
       let array = location.search.substring(1).split('&'); // 去除第一个 ?
       for (let i = 0, j = array.length; i < j; i++) {
           let item = array[i];
           let idx = item.indexOf('=');
           if (idx <= 0) continue;

           if (name === item.substring(0, idx))
               return item.substring(idx + 1);
       }
       return '';

   }
   function getUserInfoByServer(code) {
       let userInfoUrl = '../callback?code=' + encodeURIComponent(code);

       var xhr = new XMLHttpRequest();
       xhr.open('GET', userInfoUrl);
       xhr.onreadystatechange = function (e) {
           if (xhr.response) {
               const data = JSON.parse(xhr.response);
               document.getElementById('txtUserInfoServer').value = '后端返回得到的github用户信息:\r\n' +
                   JSON.stringify(data, null, 4);
           }
       };
       xhr.send(null);
   }
</script>
2.3、后端根据code获取用户信息的逻辑
2.3.1、根据code生成access_token
要使用code + Client ID + Client secret,才能生成access_token,
对应的API文档:https://docs.github.com/zh/apps/creating-github-apps/authenticating-with-a-github-app/generating-a-user-access-token-for-a-github-app#using-the-web-application-flow-to-generate-a-user-access-token
参考代码:
@FeignClient(name = "github-token", url = "https://github.com")
public interface GithubTokenFeign {
    /**
     * 根据登录成功回调的code,交换access_token
     * @param dto code信息
     * @return token信息
     */
    @PostMapping(value = "login/oauth/access_token", headers = {"Accept=application/json", "Content-Type=application/json"})
    GithubTokenOutputDto getAccessToken(GithubTokenInputDto dto);
    /*
// 异常场景:
// 不加 Accept=application/json ,返回值如下:
// error=bad_verification_code&error_description=The+code+passed+is+incorrect+or+expired.&error_uri=https%3A%2F%2Fdocs.github.com%2Fapps%2Fmanaging-oauth-apps%2Ftroubleshooting-oauth-app-access-token-request-errors%2F%23bad-verification-code
// 加了返回值如下:
// {"error":"bad_verification_code","error_description":"The code passed is incorrect or expired.","error_uri":"https://docs.github.com/apps/managing-oauth-apps/troubleshooting-oauth-app-access-token-request-errors/#bad-verification-code"}
// 正常场景,返回的json如下:
// {access_token=aaa, expires_in=28800, refresh_token=bbb, refresh_token_expires_in=15811200, token_type=bearer, scope=}
    * */
}
2.3.2、根据access_token获取用户信息
对应的API文档:https://docs.github.com/zh/rest/users/users?apiVersion=2022-11-28#get-the-authenticated-user
参考代码:
@FeignClient(name = "github-api", url = "https://api.github.com")
public interface GithubApiFeign {
    /**
     * 获取用户信息
     * @param authorization access_token
     * @return 用户信息
     */
    @GetMapping(value = "user", headers = {"Accept=application/json", "Content-Type=application/json"})
    GithubUserDto getUserInfo(@RequestHeader String authorization);

    /*
    成功响应参考:
cost time(ms): 916 status:200 from GET https://api.github.com/user
Headers:
  access-control-allow-origin: *
  access-control-expose-headers: ETag, Link, Location, Retry-After, X-GitHub-OTP, X-RateLimit-Limit, X-RateLimit-Remaining, X-RateLimit-Used, X-RateLimit-Resource, X-RateLimit-Reset, X-OAuth-Scopes, X-Accepted-OAuth-Scopes, X-Poll-Interval, X-GitHub-Media-Type, X-GitHub-SSO, X-GitHub-Request-Id, Deprecation, Sunset
  cache-control: private, max-age=60, s-maxage=60
  content-length: 1250
  content-security-policy: default-src 'none'
  content-type: application/json; charset=utf-8
  date: Tue, 29 Apr 2025 10:00:16 GMT
  etag: "abc"
  github-authentication-token-expiration: 2025-04-29 18:00:09 UTC
  last-modified: Mon, 28 Apr 2025 09:48:55 GMT
  referrer-policy: origin-when-cross-origin, strict-origin-when-cross-origin
  server: github.com
  strict-transport-security: max-age=31536000; includeSubdomains; preload
  vary: Accept, Authorization, Cookie, X-GitHub-OTP,Accept-Encoding, Accept, X-Requested-With
  x-accepted-github-permissions: allows_permissionless_access=true
  x-accepted-oauth-scopes:
  x-content-type-options: nosniff
  x-frame-options: deny
  x-github-api-version-selected: 2022-11-28
  x-github-media-type: github.v3
  x-github-request-id: abc
  x-oauth-client-id: abc
  x-oauth-scopes:
  x-ratelimit-limit: 5000
  x-ratelimit-remaining: 4999
  x-ratelimit-reset: 1745924416
  x-ratelimit-resource: core
  x-ratelimit-used: 1
  x-xss-protection: 0

Body:
{"login":"youbl","id":1,"node_id":"abc","avatar_url":"https://avatars.githubusercontent.com/u/2508702?v=4","gravatar_id":"","url":"https://api.github.com/users/youbl","html_url":"https://github.com/youbl","followers_url":"https://api.github.com/users/youbl/followers","following_url":"https://api.github.com/users/youbl/following{/other_user}","gists_url":"https://api.github.com/users/youbl/gists{/gist_id}","starred_url":"https://api.github.com/users/youbl/starred{/owner}{/repo}","subscriptions_url":"https://api.github.com/users/youbl/subscriptions","organizations_url":"https://api.github.com/users/youbl/orgs","repos_url":"https://api.github.com/users/youbl/repos","events_url":"https://api.github.com/users/youbl/events{/privacy}","received_events_url":"https://api.github.com/users/youbl/received_events","type":"User","user_view_type":"public","site_admin":false,"name":"水边","company":"@baidu","blog":"http://beinet.cn","location":"Fuzhou","email":"youbl@126.com","hireable":true,"bio":"https://youbl.blog.csdn.net/","twitter_username":null,"notification_email":"youbl@126.com","public_repos":17,"public_gists":0,"followers":12,"following":0,"created_at":"2012-10-08T03:37:21Z","updated_at":"2025-04-28T09:48:55Z"}
     */
}
2.3.3、封装API给前端调用
参考代码:
@RestController
@RequiredArgsConstructor
public class GithubCallbackController {
    private final String githubClientId = "Iv23liwz6AxRv7VXcHvf";
    private final String githubClientSecret = "github app里的Client secret";

    private final GithubTokenFeign githubTokenFeign;
    private final GithubApiFeign githubApiFeign;

    // 会带code回调,如 http://localhost:8080/callback?code=abc
    @GetMapping("callback")
    public GithubUserDto callback(@RequestParam String code) {
        GithubTokenInputDto dto = new GithubTokenInputDto()
                .setClient_id(githubClientId)
                .setClient_secret(githubClientSecret)
                .setCode(code);
        // 根据授权码,获取access_token
        GithubTokenOutputDto ret = githubTokenFeign.getAccessToken(dto);
        if (!ret.success()) {
            throw new RuntimeException("failed: " + ret.getError_description() + " " + ret.getError_uri());
        }

        String auth = ret.getToken_type() + " " + ret.getAccess_token();
        // 根据access_token, 获取用户信息
        return githubApiFeign.getUserInfo(auth);
    }
}
2.4、运行和测试
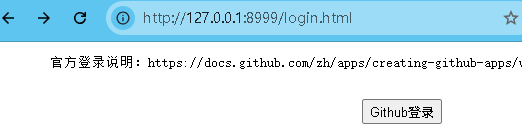
把项目跑起来,在浏览器里访问:http://127.0.0.1:8999/login.html
-
打开的登录测试页如下:
-
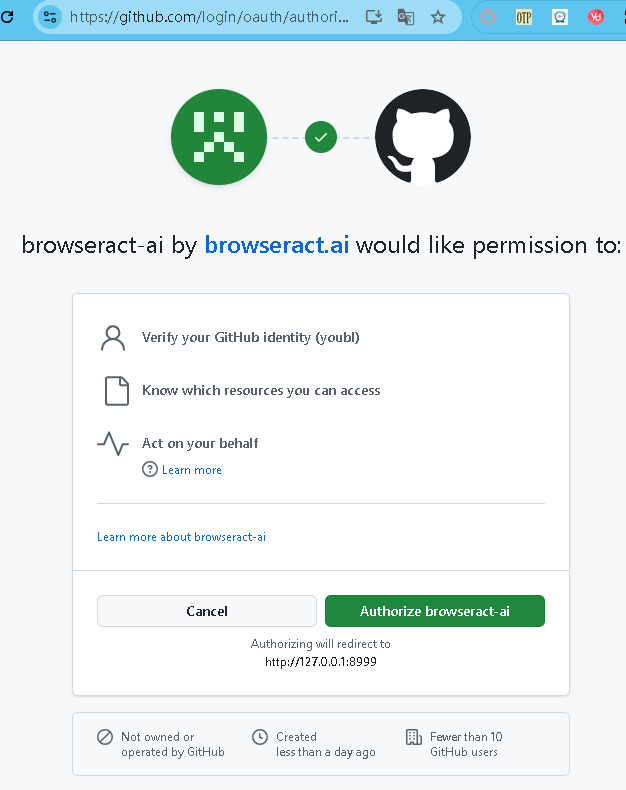
点击上面的登录按钮,会进入GitHub的授权页面:
注:每个用户只会显示一次,授权通过后,第二次再登录,就没有这个界面了,会直接进入回调页;
除非该用户去GitHub的设置页面,删除授权,删除授权的地址:https://github.com/settings/apps/authorizations
-
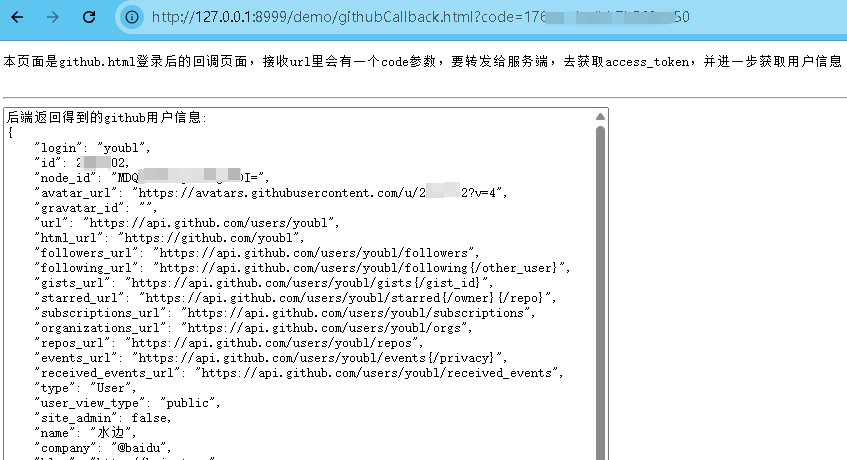
点击上面授权页的“Authorize xxx”后,就会调用后端去获取GitHub的用户信息了,测试页面的结果如下:
3、常见问题
3.1、不支持iframe嵌入
测试中发现,想在登录页面弹出一个浮层,使用iframe嵌入GitHub的授权页面是不支持的,必须是跳转过去完成授权,再通过Callback URL接收回调的方式。
因此,我项目里的其它登录,比如Google OAuth登录也要修改风格,从弹小窗变成跳转方式了。


 4922
4922

 被折叠的 条评论
为什么被折叠?
被折叠的 条评论
为什么被折叠?
 到【灌水乐园】发言


