$onInit
作用
- 他一般用于component中对于数据做初始化,即当我们在使用bindings传递数据的时候就会用上它
- 如果不用$onInit初始化数据,那么在相应的controller中是拿不到传递的数据
例子
<!DOCTYPE html>
<html>
<head>
<meta charset="utf-8" />
<script src="https://cdn.bootcdn.net/ajax/libs/angular.js/1.6.8/angular.min.js"></script>
</head>
<body>
<div ng-app="myApp" ng-controller="myCtrl">
<h1>{{indexName}}</h1>
<hello-world my-name="childName"></hello-world>
</div>
<script>
var app = angular.module("myApp", []);
app.controller("myCtrl", function ($scope) {
$scope.indexName = "主页";
$scope.childName = "我是传到组件中的信息";
});
app.component("helloWorld",{
restrict: "E",
template:`
<div>
<h3>自定义组件</h3>
<div>{{$ctrl.myName}}</div>
<div>{{scopeName}}</div>
<div>{{$ctrl.thisName}}</div>
</div>
`,
bindings:{
myName:"<"
},
controller:function($scope){
console.log(this.myName);
this.$onInit = function(){
console.log('$onInit',this.myName);
}
$scope.scopeName = "controller的$scope中绑定的属性";
this.thisName = "controller的this中绑定的属性";
}
})
</script>
</body>
</html>
对于代码的解释
- 在例子中我们使用了
$scope和this来分别绑定属性,在例子中可以查看他在模板和controller的用法 - 我们传通过标签传递了
myName并在onInit内外分别打印了他,可以看到不在$onInit中是无法拿到传递的数据的 - 所以在component中通过标签传递的数据,想要在
controller中使用的话必须通过$onInit初始化
$onChanges
$onInit只会初始化一次,但是对于父组件改变的值, $onInit 就不会再调用,这个时候就用到了$onChanges
作用
- 当父组件传入子组件的值变化的时候,就会调用
$onChanges函数 - 他有一个参数为
changes,保存了变化前的值和变化后的值,如图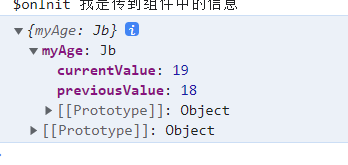
例子
<!DOCTYPE html>
<html>
<head>
<meta charset="utf-8" />
<script src="https://cdn.bootcdn.net/ajax/libs/angular.js/1.6.8/angular.min.js"></script>
</head>
<body>
<div ng-app="myApp" ng-controller="myCtrl">
<h1>{{indexName}}</h1>
<h2>年龄:{{age}}岁</h2>
<button ng-click="addAge()">年龄增加</button>
<hello-world my-name="childName" my-age="age"></hello-world>
</div>
<script>
var app = angular.module("myApp", []);
app.controller("myCtrl", function ($scope) {
$scope.indexName = "主页";
$scope.childName = "我是传到组件中的信息";
$scope.age = 18;
$scope.addAge = function(){
$scope.age++;
}
});
app.component("helloWorld",{
restrict: "E",
template:`
<div>
<h3>自定义组件</h3>
<div>{{$ctrl.myName}}</div>
<div>{{scopeName}}</div>
<div>{{$ctrl.thisName}}</div>
<h2>子组件的年龄:{{myAge}}岁</h2>
</div>
`,
bindings:{
myName:"<",
myAge:"<"
},
controller:function($scope){
console.log(this.myName);
this.$onInit = function(){
console.log('$onInit',this.myName);
$scope.myAge = this.myAge;
}
this.$onChanges = function(changes){
console.log(changes);
$scope.myAge = changes.myAge.currentValue;
}
$scope.scopeName = "controller的$scope中绑定的属性";
this.thisName = "controller的this中绑定的属性";
}
})
</script>
</body>
</html>
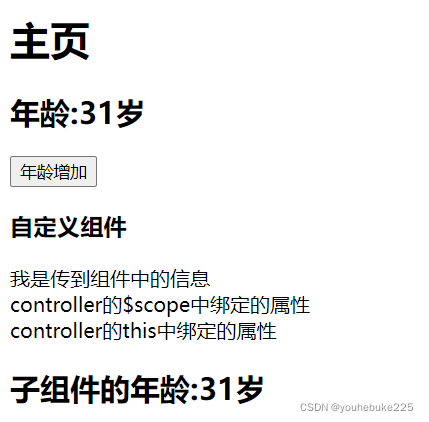
- 效果
对于代码的解释
- 当我们点击相关按钮的时候就会发现子组件同父组件一样同时改变年龄
- 这时因为,当父组件传递到子组件的标签上面的数据改变的时候就会调用
$onChanges函数,传递相应的变化的值
$onDistory
作用
- 一般当组件销毁的时候会调用这个函数,比如关闭弹窗的时候
- 一般在这里做一些收尾,如消除一些定时器等
例子
<!DOCTYPE html>
<html>
<head>
<meta charset="utf-8" />
<script src="https://cdn.bootcdn.net/ajax/libs/angular.js/1.6.8/angular.min.js"></script>
</head>
<body>
<div ng-app="myApp" ng-controller="myCtrl">
<h1>{{indexName}}</h1>
<button ng-click="isShowDialog()">是否显示</button>
<div >
<hello-world ng-if="showDialog"></hello-world>
</div>
</div>
<script>
var app = angular.module("myApp", []);
app.controller("myCtrl", function ($scope) {
$scope.indexName = "主页";
$scope.showDialog = false;
$scope.isShowDialog = function(){
$scope.showDialog = !$scope.showDialog;
}
});
app.component("helloWorld",{
restrict: "E",
template:`
<div>
<h2>我是子组件</h2>
</div>
`,
controller:function($scope){
this.$onDestroy = function(){
console.log("调用了distory");
}
}
})
</script>
</body>
</html>
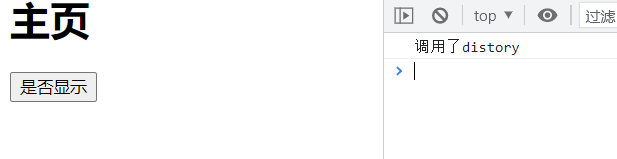
对于代码的解释
- 当我们对于组件隐藏的时候,我们就会发现这里调用了
$onDestroy
$postLink
作用
- 这个相当于vue2的
mounted,react的componentWillMount的阶段,在这个时候,组件模板已经编译完成,可以进行操作DOM
例子
<!DOCTYPE html>
<html>
<head>
<meta charset="utf-8" />
<script src="https://cdn.bootcdn.net/ajax/libs/angular.js/1.6.8/angular.min.js"></script>
</head>
<body>
<div ng-app="myApp" ng-controller="myCtrl">
<h1>{{indexName}}</h1>
<hello>
<world></world>
</hello>
</div>
<script>
var app = angular.module("myApp", []);
app.controller("myCtrl", function ($scope) {
$scope.indexName = "主页";
});
app.component("hello", {
template: `
<div>
<h2>我是hello</h2>
<div ng-transclude><div>
</div>
`,
controller: function ($scope) {
const world = document.getElementById("world");
console.log(world);
this.$postLink = function () {
console.log("$postLink");
const world = document.getElementById("world");
console.log(world);
};
},
transclude:true
});
app.component("world", {
template: `
<div>
<h2 id="world">我是world</h2>
</div>
`
});
</script>
</body>
</html>
对于代码的解释
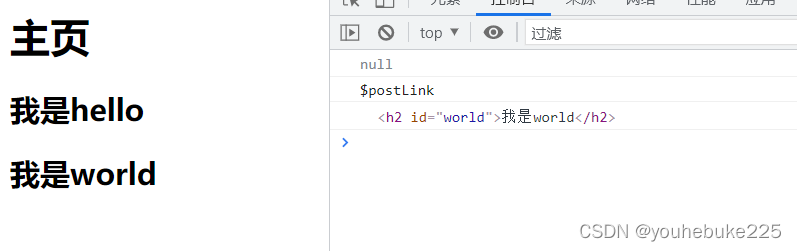
- 适用于嵌套的组件中父组件拿到子组件
- 我们在外部和内部分别打印了相关的内容,打印的效果如下
博客参考


 6608
6608

 被折叠的 条评论
为什么被折叠?
被折叠的 条评论
为什么被折叠?
 到【灌水乐园】发言


