


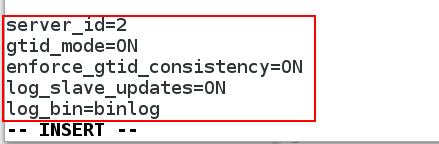
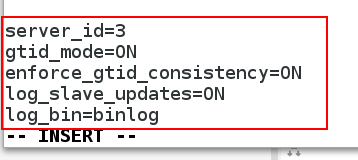
1.配置基于gtid的主从复制
[root@server1 MYSQL]# vim /etc/my.cnf

[root@server1 MYSQL]# systemctl start mysqld
[root@server1 MYSQL]# cat /var/log/mysqld.log |grep password
2020-03-08T06:45:33.282665Z 1 [Note] A temporary password is generated for root@localhost: 4(OoP3Y&3!yE
[root@server1 MYSQL]# mysql_secure_installation

Securing the MySQL server deployment.

Enter password for user root:

The existing password for the user account root has expired. Please set a new password.

New password:

Re-enter new password:


[root@server2 MYSQL]# vim /etc/my.cnf
[root@server2 MYSQL]# systemctl start mysqld
[root@server2 MYSQL]# cat /var/log/mysqld.log |grep password
2020-03-08T06:53:32.565415Z 1 [Note] A temporary password is generated for root@localhost: (ugscGoJ78a1
[root@server2 MYSQL]# mysql_secure_installation

Securing the MySQL server deployment.

Enter password for user root:

The existing password for the user account root has expired. Please set a new password.

New password:

Re-enter new password:
The 'validate_password' plugin is installed on the server.
The subsequent steps will run with the existing configuration
of the plugin.
Using existing password for root.

Estimated strength of the password: 100
Change the password for root ? ((Press y|Y for Yes, any other key for No) :


[root@server3 MYSQL]# vim /etc/my.cnf
[root@server3 MYSQL]# systemctl start mysqld
[root@server3 MYSQL]# cat /var/log/mysqld.log |grep password
2020-03-08T07:01:04.059684Z 1 [Note] A temporary password is generated for root@localhost: l8!Q95srK8,/
[root@server3 MYSQL]# mysql_secure_installation

Securing the MySQL server deployment.

Enter password for user root:

The existing password for the user account root has expired. Please set a new password.

New password:

Re-enter new password:
The 'validate_password' plugin is installed on the server.
The subsequent steps will run with the existing configuration
of the plugin.
Using existing password for root.

Estimated strength of the password: 100
Change the password for root ? ((Press y|Y for Yes, any other key for No) :


2. 安装MHA管理软件
[root@server4 ~]# ls
MHA-7
[root@server4 ~]# cd MHA-7/
[root@server4 MHA-7]# ls
master_ip_failover
master_ip_online_change
mha4mysql-manager-0.58-0.el7.centos.noarch.rpm
mha4mysql-node-0.58-0.el7.centos.noarch.rpm
perl-Config-Tiny-2.14-7.el7.noarch.rpm
perl-Email-Date-Format-1.002-15.el7.noarch.rpm
perl-Log-Dispatch-2.41-1.el7.1.noarch.rpm
perl-Mail-Sender-0.8.23-1.el7.noarch.rpm
perl-Mail-Sendmail-0.79-21.el7.noarch.rpm
perl-MIME-Lite-3.030-1.el7.noarch.rpm
perl-MIME-Types-1.38-2.el7.noarch.rpm
perl-Parallel-ForkManager-1.18-2.el7.noarch(1).rpm
perl-Parallel-ForkManager-1.18-2.el7.noarch.rpm
[root@server4 MHA-7]#
[root@server4 MHA-7]# yum install mha4mysql-manager-0.58-0.el7.centos.noarch.rpm perl-* mha4mysql-node-0.58-0.el7.centos.noarch.rpm -y
生成密钥,并发给server1 2 3 ,使server4可以免密登陆
[root@server4 MHA-7]# ssh-keygen
Generating public/private rsa key pair.
Enter file in which to save the key (/root/.ssh/id_rsa):
Enter passphrase (empty for no passphrase):

ssh-copy-id root@172.25.254.1
ssh-copy-id root@172.25.254.2
ssh-copy-id root@172.25.254.3
[root@server4 MHA-7]# ssh server1
[root@server1 ~]# logout
Connection to server1 closed.
[root@server4 MHA-7]# ssh server2
Last login: Sun Mar  8 14:22:58 2020 from foundation8.ilt.example.com
[root@server2 ~]# logout
Connection to server2 closed.
[root@server4 MHA-7]# ssh server3
Last login: Sun Mar  8 14:23:41 2020 from foundation8.ilt.example.com
[root@server3 ~]# logout
Connection to server3 closed.
[root@server4 MHA-7]#

将MHA软件同发送给server1 2 3
[root@server4 MHA-7]# scp mha4mysql-node-0.58-0.el7.centos.noarch.rpm server1:/root/
The authenticity of host 'server1 (172.25.254.1)' can't be established.
ECDSA key fingerprint is 00:d6:7c:cd:b0:27:4d:d3:1c:cb:1e:12:43:1a:5a:e0.
Are you sure you want to continue connecting (yes/no)? yes
Warning: Permanently added 'server1,172.25.254.1' (ECDSA) to the list of known hosts.
root@server1's password:
mha4mysql-node-0.58-0.el7.centos.noarch.rpm            100%   35KB  35.5KB/s   00:00
[root@server4 MHA-7]# scp mha4mysql-node-0.58-0.el7.centos.noarch.rpm server2:/root/
The authenticity of host 'server2 (172.25.254.2)' can't be established.
ECDSA key fingerprint is d4:42:84:ef:fe:b7:ad:e2:06:f7:37:9a:f5:b0:c9:8f.
Are you sure you want to continue connecting (yes/no)? yes
Warning: Permanently added 'server2,172.25.254.2' (ECDSA) to the list of known hosts.
root@server2's password:
mha4mysql-node-0.58-0.el7.centos.noarch.rpm            100%   35KB  35.5KB/s   00:00
[root@server4 MHA-7]# scp mha4mysql-node-0.58-0.el7.centos.noarch.rpm server3:/root/
The authenticity of host 'server3 (172.25.254.3)' can't be established.
ECDSA key fingerprint is a7:44:fc:4a:52:58:80:45:e5:9e:f5:87:81:fe:c7:fb.
Are you sure you want to continue connecting (yes/no)? yes
Warning: Permanently added 'server3,172.25.254.3' (ECDSA) to the list of known hosts.
root@server3's password:
mha4mysql-node-0.58-0.el7.centos.noarch.rpm            100%   35KB  35.5KB/s   00:00
[root@server4 MHA-7]#
将server4发送的软件在server1、server2和server3中安装
[root@server1 ~]# yum install -y mha4mysql-node-0.58-0.el7.centos.noarch.rpm
[root@server2 ~]# yum install -y mha4mysql-node-0.58-0.el7.centos.noarch.rpm
[root@server3 ~]# yum install -y mha4mysql-node-0.58-0.el7.centos.noarch.rpm
server4配置MHA:
<1> 创建mha工作目录及编写配置文件
[root@server4 MHA-7]# mkdir /etc/masterha
[root@server4 MHA-7]# cd /etc/masterha/
[root@server4 masterha]# l
-bash: l: command not found
[root@server4 masterha]# ls
[root@server4 masterha]# vim master.cnf
[root@server4 masterha]# vim master.cnf
[root@server4 masterha]#


<2> 检测ssh连接
通过masterha_check_ssh检查ssh连接,由于之前我们设置的是server4与server1,2,3建立免密连接,但server1,2,3之间却不是免密连接的,因此我们需要使各结点均可免密登录即可。
[root@server4 masterha]# scp -r ~/.ssh server1:
id_rsa                                             100% 1675     1.3MB/s   00:00
id_rsa.pub                                         100%  394   368.6KB/s   00:00
known_hosts                                        100%  543   475.0KB/s   00:00
[root@server4 masterha]# scp -r ~/.ssh server2:
id_rsa                                             100% 1675     1.1MB/s   00:00
id_rsa.pub                                         100%  394   342.7KB/s   00:00
known_hosts                                        100%  543   511.8KB/s   00:00
[root@server4 masterha]# scp -r ~/.ssh server3:
id_rsa                                             100% 1675     1.1MB/s   00:00
id_rsa.pub                                         100%  394   365.1KB/s   00:00
known_hosts

masterha_check_ssh --conf=/etc/masterha/master.cnf     ##可以看到ssh连接成功


<3> 检查复制功能
由于之前我们对数据库进行了安全初始化,数据库不允许root用户远程登录,因此我们需要在主库中给root用户授权,然后才能通过复制功能检测(在server1中授权即可)


<4> 测试手动切换master
(当前server1是主,server2和server3为备)
进行死切
当server1节点服务停止后,server2能否接替成为主节点
在server1中关闭mysql服务
##在server1中关闭服务
[root@server1 ~]# systemctl stop mysqld

##在server4中手动切换
[root@server4 ~]# masterha_master_switch --master_state=dead --conf=/etc/masterha/master.cnf --dead_master_host=172.25.254.1 --dead_master_ip=172.25.254.1 --dead_master_port=3306 --new_master_host=172.25.254.2 --new_master_port=3306

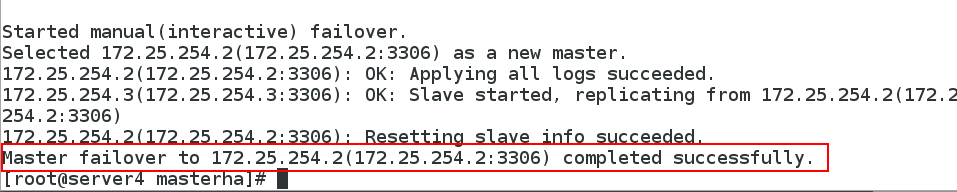
在其他结点测试,查看主数据库是否切换,server3中,查看从结点的状态,可以看到master的主机地址已经切换,在server2中从节点状态为空


恢复server1数据库,将server1作为slave加到高可用集群中
systemctl start mysqld
mysql -uroot -pWestos+001
change master to master_host='172.25.254.2',
master_user='repl',
master_password='Westos+001',
master_auto_position=1;
start slave;
show slave status\G


MHA只负责节点之间的切换,底层的主从复制需要自己提前保证正确
(5)手动在线切换master( 活切 )
<1> 在/etc/masterha目录下生成一个master.failover.complete文件,是来记录failover情况的,再进行failover时必须先把这个文件删除,不然不会failover
cd /etc/masterha
rm -fr master.failover.complete

<2> 手动在线切换
masterha_master_switch --master_state=alive --conf=/etc/masterha/master.cnf --new_master_host=172.25.254.1 --new_master_port=3306 --orig_master_is_new_slave --running_updates_limit=10000


<3> server1中查看之前从结点的设置,变为空,则证明现在server1是master,server2和server3中查看从结点状态,会发现master的ip变为server1的 ip


(6)半自动切换节点
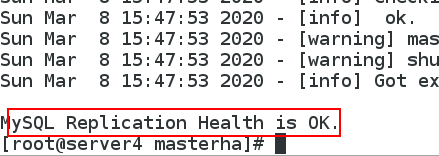
MHA自带的manager守护进程后台自动检测
[root@server4 masterha]# nohup masterha_manager --conf=/etc/masterha/master.cnf &>/dev/null &
[1] 12868
[root@server4 masterha]#
 server1上
 现在手动关闭server1上的mysqld服务
[root@server1 ~]# systemctl stop mysqld
[root@server1 ~]#

 现在让server1重新上线,成为slave
 关闭MHA的manager的守护进程
[root@server4 masterha]# masterha_stop --conf=/etc/masterha/master.cnf
MHA Manager is not running on master(2:NOT_RUNNING).
[root@server4 masterha]#
(7) 测试全自动切换master(谁是主---->谁得到VIP)
实际上就是编写了两个脚本,把它们加入到配置文件中,在出问题时,通过使用这两个脚本,实现了master的一个专门的ip的漂移,以此来实现master的切换
首先清理master.failover.complete
然后修改两个脚本
[root@server4 bin]# vim master_ip_failover
[root@server4 bin]# vim master_ip_online_change

 将脚本加到配置文件中
vim /etc/masterha/master.cnf

添加脚本的执行权限
[root@server4 masterha]# cd /usr/local/bin/
[root@server4 bin]# ls
master_ip_failover  master_ip_online_change
[root@server4 bin]# chmod +x *
[root@server4 bin]# ls
master_ip_failover  master_ip_online_change
[root@server4 bin]#
目前server2是主节点,为server2配置VIP
[root@server2 ~]# ip addr add 172.25.254.100/24 dev eth0
[root@server2 ~]#

测试VIP的漂移(手动)
[root@server4 bin]# masterha_stop --conf=/etc/masterha/master.cnf
MHA Manager is not running on master(2:NOT_RUNNING).
[root@server4 bin]#

将server2往server1上面进行迁移
(在server2在线的情况下将server1提升为新的master)


 发现此时VIP已经漂移到了server1上面

测试VIP的全自动漂移
 将主节点挂掉
[root@server1 ~]# systemctl stop mysqld


至此,就实现了自动切换主节点以及VIP的自动漂移。


 7126
7126


 被折叠的 条评论
为什么被折叠?
被折叠的 条评论
为什么被折叠?
 到【灌水乐园】发言


