如何通过MQTT连接阿里云进行通讯

首先我们要做一些前期的准备工作:

1.我们需要创建一个阿里云账号,开题公共基础或企业服务。

2.安装mqttfx客户端

接下来需要我们在公共实例内创建产品和设备。

创建好后需要发布。

[外链图片转存失败,源站可能有防盗链机制,建议将图片保存下来直接上传(img-PpenT9xj-1672141903988)(C:\Users\Zsuns\AppData\Roaming\Typora\typora-user-images\image-20221104103247770.png)]

这里的参数特别重要。连接mqttfx需要将mqtt连接参数添加到mqttfx设置当中:

img

img

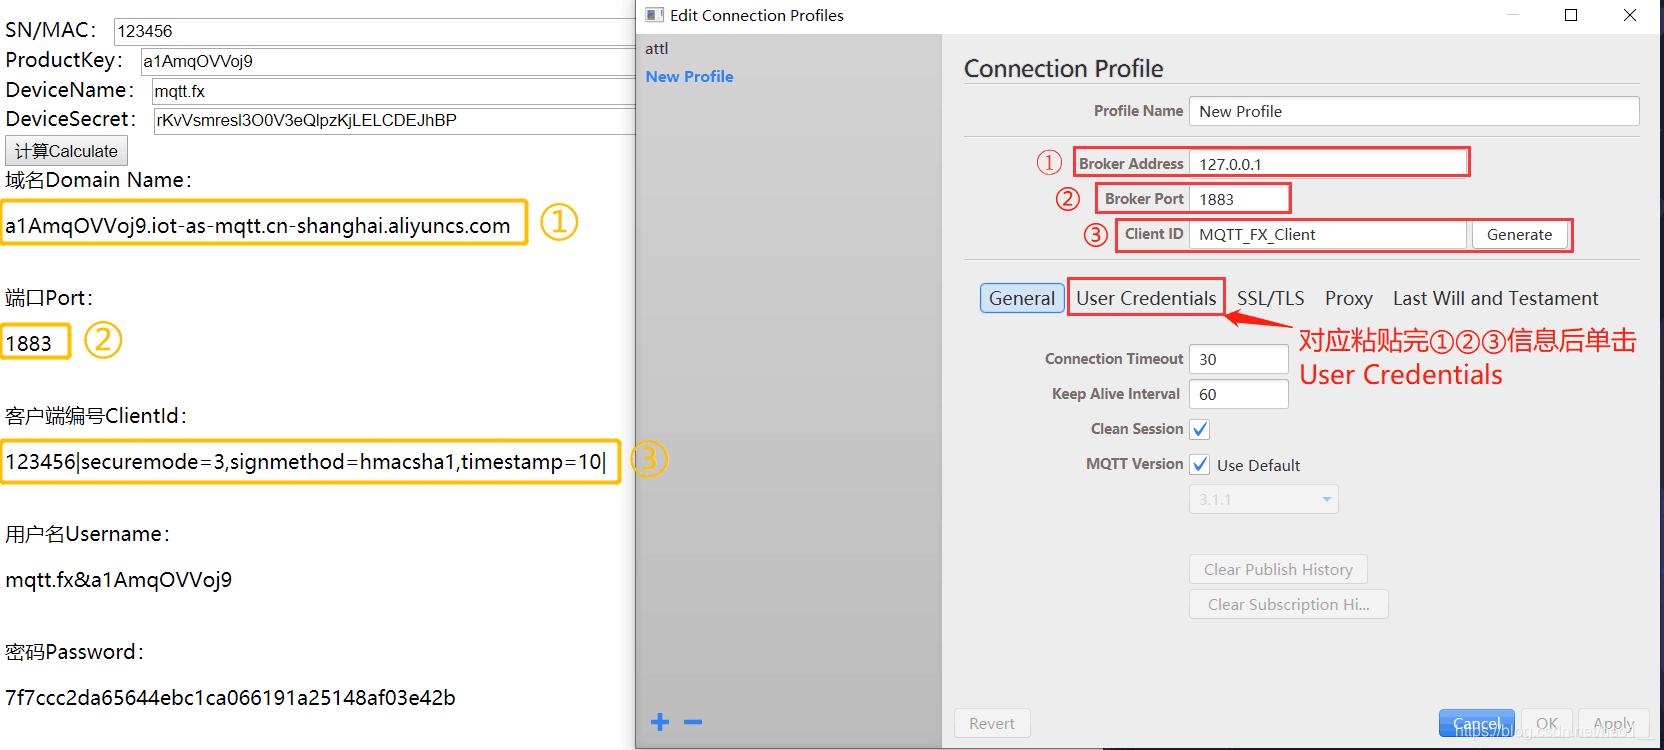
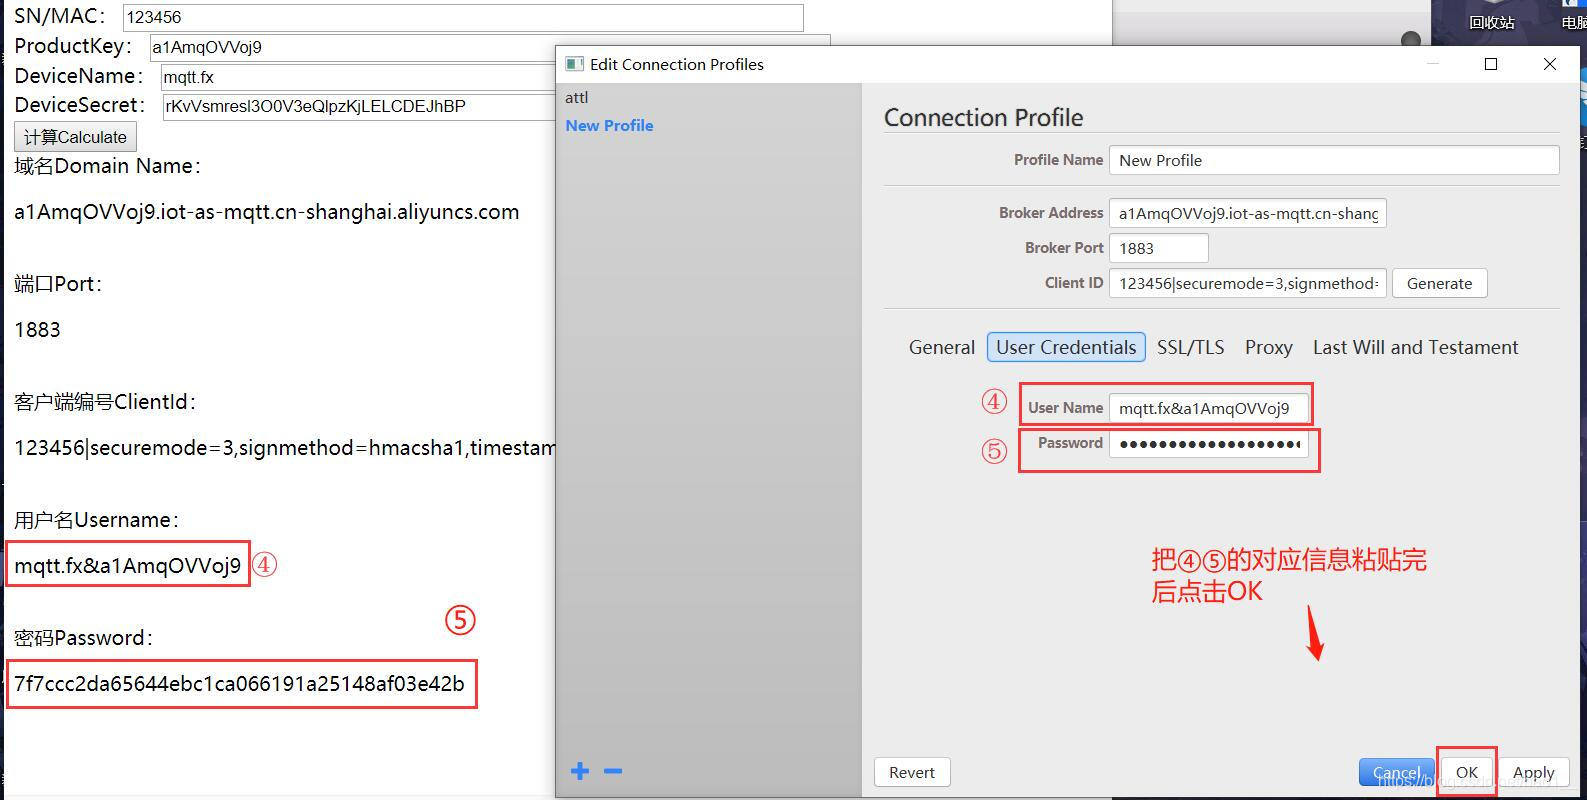
[外链图片转存失败,源站可能有防盗链机制,建议将图片保存下来直接上传(img-y51sn96G-1672141903991)(C:\Users\Zsuns\AppData\Roaming\Typora\typora-user-images\image-20221104103445264.png)]

这几步下来后,即可进行上行和下行通讯的验证:

[外链图片转存失败,源站可能有防盗链机制,建议将图片保存下来直接上传(img-Fsz5N3MO-1672141903991)(C:\Users\Zsuns\AppData\Roaming\Typora\typora-user-images\image-20221104103619308.png)]

sz5N3MO-1672141903991)]

分别复制到mqttfx当中,替换当中的设备名称为自己创建的名称即可。

  • 0
    点赞
  • 0
    收藏
    觉得还不错? 一键收藏
  • 0
    评论
要使用SIM7000C通过MQTT连接阿里云,你需要遵循以下步骤: 1.注册阿里云账号并创建一个IoT实例。 2.在IoT实例中创建一个设备,并获取设备的三元组(ProductKey、DeviceName和DeviceSecret)。 3.在阿里云控制台中创建一个Topic,以便在设备和应用程序之间传输消息。 4.获取SIM7000C的MQTT库,例如PubSubClient,并将其添加到你的Arduino IDE中。 5.在Arduino IDE中编写代码,以便SIM7000C可以将数据发布到阿里云,并且可以从阿里云接收数据。 下面是一些示例代码,可以将其用作参考: ```C++ #include <Wire.h> #include <SoftwareSerial.h> #include <PubSubClient.h> //引入mqtt库 //SIM7000C连接的RX TX引脚 #define SIM_TX 8 #define SIM_RX 9 SoftwareSerial SerialSIM7000(SIM_TX, SIM_RX); //阿里云iot的三元组 #define PRODUCTKEY "xxxxxxxxxxxxxxxx" #define DEVICENAME "xxxxxxxxxxxxx" #define DEVICESECRET "xxxxxxxxxxxxxxxxxxxxxxxxxxxxxxx" //WiFi的SSID和密码 #define WIFI_SSID "your_wifi_ssid" #define WIFI_PWD "your_wifi_password" //MQTT服务器的地址和端口号 #define MQTT_SERVER "xxxxxxxxx.iot-as-mqtt.cn-shanghai.aliyuncs.com" #define MQTT_PORT 1883 //MQTT的Topic #define MQTT_TOPIC "/sys/" PRODUCTKEY "/" DEVICENAME "/thing/event/property/post" //MQTT的客户端ID #define MQTT_CLIENTID "mqtt_clientid" //MQTT的用户名和密码 #define MQTT_USERNAME PRODUCTKEY "&" DEVICENAME #define MQTT_PASSWORD DEVICESECRET //创建一个PubSubClient的实例 WiFiClient espClient; PubSubClient mqttClient(espClient); void setup() { Serial.begin(9600); SerialSIM7000.begin(115200); delay(1000); //连接SIM7000C SerialSIM7000.println("AT"); delay(1000); SerialSIM7000.println("AT+CGATT=1"); delay(5000); SerialSIM7000.println("AT+CGDCONT=1,\"IP\",\"your_apn\""); delay(1000); SerialSIM7000.println("AT+CSTT=\"your_apn\",\"your_username\",\"your_password\""); delay(5000); SerialSIM7000.println("AT+CIICR"); delay(5000); SerialSIM7000.println("AT+CIFSR"); delay(1000); //连接WiFi WiFi.begin(WIFI_SSID, WIFI_PWD); while (WiFi.status() != WL_CONNECTED) { delay(1000); } //连接MQTT服务器 mqttClient.setServer(MQTT_SERVER, MQTT_PORT); mqttClient.setCallback(callback); while (!mqttClient.connected()) { if (mqttClient.connect(MQTT_CLIENTID, MQTT_USERNAME, MQTT_PASSWORD)) { Serial.println("MQTT connected"); } else { Serial.println("MQTT failed"); delay(5000); } } } void loop() { mqttClient.loop(); //从阿里云接收消息 if (mqttClient.connected()) { mqttClient.subscribe(MQTT_TOPIC); } //向阿里云发布数据 String payload = "{\"id\":123,\"temperature\":25,\"humidity\":50}"; mqttClient.publish(MQTT_TOPIC, payload.c_str()); delay(5000); } //MQTT的回调函数 void callback(char* topic, byte* payload, unsigned int length) { Serial.print("Message arrived ["); Serial.print(topic); Serial.print("] "); for (int i = 0; i < length; i++) { Serial.print((char)payload[i]); } Serial.println(); } ``` 请注意,你需要将代码中的“your_apn”、“your_username”和“your_password”替换为SIM7000C所连接的运营商的APN、用户名和密码。此外,你还需要将代码中的“your_wifi_ssid”和“your_wifi_password”替换为你的WiFi网络的SSID和密码。 希望这可以帮助你开始使用SIM7000C通过MQTT连接阿里云。

“相关推荐”对你有帮助么?

  • 非常没帮助
  • 没帮助
  • 一般
  • 有帮助
  • 非常有帮助
提交
评论
添加红包

请填写红包祝福语或标题

红包个数最小为10个

红包金额最低5元

当前余额3.43前往充值 >
需支付:10.00
成就一亿技术人!
领取后你会自动成为博主和红包主的粉丝 规则
hope_wisdom
发出的红包
实付
使用余额支付
点击重新获取
扫码支付
钱包余额 0

抵扣说明:

1.余额是钱包充值的虚拟货币,按照1:1的比例进行支付金额的抵扣。
2.余额无法直接购买下载,可以购买VIP、付费专栏及课程。

余额充值