


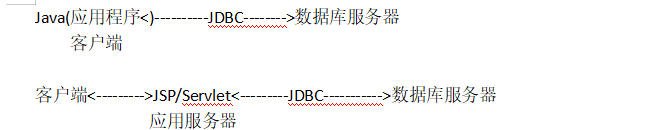
一、JDBC概述
JDBC(Java DataBase Connectivity)是一种执行SQL语句的Java API,可以为多种数据库提供统一访问,它由一组用java语言编写的类和接口组成,JDBC提供了一组基准,据此可以构建更高级的工具和接口,使数据库开发人员能够编写数据库应用程序,同时,JDBC也是商标名.
1.JDBC API
JDBC API可做三件事:与数据库建立连接、执行SQL语句、处理结果.

二、创建数据库与表

三、实例演示————用户登录
1、创建Web项目LoginDemo01

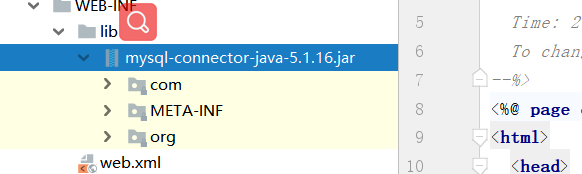
2.添加数据驱动包
3.在web目录创建首页文件index.jsp

4.在web目录里创建登录页面login.jsp
<%@ page language="java" import="java.util.*" pageEncoding="UTF-8" %>
<html>
<head>
<title>用户登录</title>
</head>
<body>
<h3 style="text-align: center">用户登录</h3>
<form action="do_login.jsp" method="post">
<table border="1" cellpadding="10" style="margin: 0px auto">
<tr>
<td align="center">用户名</td>
<td><input type="text" name="username"/></td>
</tr>
<tr>
<td align="center">密 码</td>
<td><input type="password" name="password"/></td>
</tr>
<tr align="center">
<td colspan="2">
<input type="submit" value="登录"/>
<input type="reset" value="重置"/>
</td>
</tr>
</table>
</form>
<%
String errMsg = (String) session.getAttribute("errMsg");
if (errMsg != null) {
out.println("<p style='text-align: center; color: red'>" + new String(errMsg.getBytes("ISO-8859-1"), "utf-8") + "</p>");
}
%>
</body>
</html>
5.在web目录创建登录处理页面do_login.jsp
<%@ page import="java.net.URLEncoder" %>
<%@ page import="java.sql.*" %><%--
  Created by IntelliJ IDEA.
  User: lenovo
  Date: 2020/4/5
  Time: 10:04
  To change this template use File | Settings | File Templates.
--%>
<%@ page contentType="text/html;charset=UTF-8" language="java" %>
<html>
<head>
    <title>登录处理页面</title>
</head>
<body>
<%
    //设置请求对象字符编码
    request.setCharacterEncoding("utf-8");
    //获取表单提交数据
    String username=request.getParameter("username");
    String password=request.getParameter("password");

    //设置连接数据库的参数值
    final String DRIVER ="com.mysql.jdbc.Driver";
    final String URL="jdbc:mysql://localhost:3306/ysy";
    final String USER="root";
    final String PASSWORD="password";


    try{
        //安装数据库驱动程序
        Class.forName(DRIVER);
        //获取数据库连接
        Connection connection= DriverManager.getConnection(URL+"?useUnicode=true&characterEncoding=utf-8",USER,PASSWORD);
        //定义SQL字符串
        String strSQL="select * from t_user where username=? and password =?";
        //创建预备语句对象
        PreparedStatement pstmt=connection.prepareStatement(strSQL);
        //设置占位符
        pstmt.setString(1,username);
        pstmt.setString(2,password);
        //执行SQL查询,返回结果集
        ResultSet rs=pstmt.executeQuery();
        //判断结果集是否有记录
        if (rs.next()){
            //清除session里可能存在的属性值
            if (session.getAttribute("errMsg")!=null){
                session.removeAttribute("errMsg");
            }
            //采用重定向,跳转到登录成功页面
            response.sendRedirect("success.jsp?username="+ URLEncoder.encode(username,"utf-8"));
        }else {
            //设置session属性值
            session.setAttribute("errMsg","用户名或密码错误,请重新登录!!");
            //采用重定向,跳转到登录成功界面
            response.sendRedirect("login.jsp");
        }
    } catch (ClassNotFoundException e) {
        e.printStackTrace();
    } catch (SQLException e) {
        e.printStackTrace();
    }
%>
</body>
</html>
6.启动服务器查看效果

登录失败情况

改进版1:创建一个数据库连接管理类ConnectionManager,效果是一样的
1.src里创建net.ysy.dbutil包,在里面创建ConnectionManager类

package net.ysy.dbutil;

import java.sql.Connection;
import java.sql.DriverManager;
import java.sql.SQLException;

public class ConnectionManager {
    //设置连接数据库的参数值
    private static final String DRIVER ="com.mysql.jdbc.Driver";
    private static final String URL="jdbc:mysql://localhost:3306/ysy";
    private static final String USER="root";
    private static final String PASSWORD="password";

    //私有构造方法,拒绝实例化
    private  ConnectionManager(){

    }

    /*
    获取数据库连接静态方法
     */
    public static Connection getConnection(){
        //声明数据库连接
        Connection connection=null;
        try {
            //安装数据库驱动程序
            Class.forName(DRIVER);
            //获取数据库连接
            connection= DriverManager.getConnection(URL,USER, PASSWORD);
        } catch (Exception e) {
            e.printStackTrace();
        }
        //返回数据库连接
        return connection;
    }
    /*
    关闭数据库连接静态方法
    @param connection 数据库连接

     */
     public static void closeConn(Connection connection){
         if (connection !=null){
             try {
                 if (!connection.isClosed()){
                          connection.close();
                 }
             } catch (SQLException e) {
                 e.printStackTrace();
             }
         }

     }

}
2.修改do_login里面的内容

<%@ page import="java.net.URLEncoder" %>
<%@ page import="java.sql.*" %>
<%@ page import="net.ysy.dbutil.ConnectionManager" %><%--
  Created by IntelliJ IDEA.
  User: lenovo
  Date: 2020/4/5
  Time: 10:04
  To change this template use File | Settings | File Templates.
--%>
<%@ page contentType="text/html;charset=UTF-8" language="java" %>
<html>
<head>
    <title>登录处理页面</title>
</head>
<body>
<%
    //设置请求对象字符编码
    request.setCharacterEncoding("utf-8");
    //获取表单提交数据
    String username=request.getParameter("username");
    String password=request.getParameter("password");

    //获取数据库连接
    Connection connection= ConnectionManager.getConnection();

    //定义SQL字符串
    String strSQL="select * from t_user where username= ? and password = ? ";
    //创建预备语句对象
    PreparedStatement pstmt=connection.prepareStatement(strSQL);
    //设置占位符的值
    pstmt.setString(1,username);
    pstmt.setString(2,password);
    //执行SQL查询,返回结果集
    ResultSet rs=pstmt.executeQuery();
    //判断结果集是否有记录
    if (rs.next()) {
        //清除session里可能存在的errMsg属性
        if (session.getAttribute("errMsg") != null) {
            session.removeAttribute("errMsg");
        }
        //采用重定向,跳转到登录成功页面
        response.sendRedirect("success.jsp?username=" + URLEncoder.encode(username, "utf-8"));

    }else {
            //设置session属性值
            session.setAttribute("errMsg","用户名或密码错误,请重新登录!!");
            //采用重定向,跳转到登录成功界面
            response.sendRedirect("login.jsp");
        }


%>


</body>
</html>
改进版2:引入模型层,创建UserDao 效果一样
1.在src里创建net.ysy.bean包,在里面创建User实体类

2.在src.ysy.dao包,在里面创建UserDao接口

3.在net.ysy.dao下创建impl子包,在里面创建UserDaoImpl实现类

package net.ysy.dao.impl;

import net.ysy.bean.User;
import net.ysy.dao.UserDao;
import net.ysy.dbutil.ConnectionManager;

import java.sql.Connection;
import java.sql.PreparedStatement;
import java.sql.ResultSet;
import java.sql.SQLException;

/**
 * 功能:用户数据访问接口实现类
 *
 */

public class UserDaoImpl implements UserDao {
    @Override

    /**
     * 登录方法
     * @param username
     * @param password
     * @return true -登录成功   false-登录失败
     */
    public boolean login(String username, String password) {
        //声明标志变量
        boolean flag=false;
        //声明数据库连接
        Connection connection=null;
        try{
            //获取数据库的连接
            connection =ConnectionManager.getConnection();
            //定义SQL字符串
            String strSQL="select * from t_user where username= ? and password = ? ";
            //创建预备语句对象
            PreparedStatement pstmt=connection.prepareStatement(strSQL);
            //设置占位符的值
            pstmt.setString(1,username);
            pstmt.setString(2,password);
            //执行SQL查询,返回结果集
            ResultSet rs=pstmt.executeQuery();
            //判断结果集是否有记录
            if (rs.next()) {
                flag=true;
            }else {
                flag=false;
            }

        } catch (SQLException ex) {
            ex.printStackTrace();
        }finally {
            //关闭数据库连接
            ConnectionManager.closeConn(connection);
        }
        //返回标志变量
        return flag;
    }

    /**
     * 插入方法
     * @param user
     * @return 插入记录数
     */
    @Override
    public int insert(User user) {
        //声明插入记录变量数
        int count =0;
        //声明数据库连接
        Connection connection=null;
        try{
            //获取数据库连接
            connection =ConnectionManager.getConnection();
            //定义SQL字符串
            String strSQL="insert into t_user (username,password) value(?,?)";
            //创建预备语句对象
            PreparedStatement pstm=connection.prepareStatement(strSQL);
            //设置占位符的值
            pstm.setString(1,user.getUsername());
            pstm.setString(2,user.getPassword());
            //执行SQL更新,返回更新记录数
            count =pstm.executeUpdate();
        } catch (SQLException e) {
            e.printStackTrace();
        }finally {
            //关闭数据库连接
            ConnectionManager.closeConn(connection);
        }
         //返回插入记录数
        return count;
    }
}
4.修改登录处理页面do_login.jsp(控制层)

<%@ page import="java.net.URLEncoder" %>
<%@ page import="java.sql.*" %>
<%@ page import="net.ysy.dbutil.ConnectionManager" %>
<%@ page import="net.ysy.dao.UserDao" %>
<%@ page import="net.ysy.dao.impl.UserDaoImpl" %><%--
  Created by IntelliJ IDEA.
  User: lenovo
  Date: 2020/4/5
  Time: 10:04
  To change this template use File | Settings | File Templates.
--%>
<%@ page contentType="text/html;charset=UTF-8" language="java" %>
<html>
<head>
    <title>登录处理页面</title>
</head>
<body>
<%
    //设置请求对象字符编码
    request.setCharacterEncoding("utf-8");
    //获取表单提交数据
    String username=request.getParameter("username");
    String password=request.getParameter("password");
    //创建用户数据访问对象
    UserDao userDao=new UserDaoImpl();
    //判断是否登录成功
    if (userDao.login(username,password)){
        //清除session里可能存在的errMsg
        if (session.getAttribute("errMsg")!=null){
            session.removeAttribute("errMsg");
        }
    //采用重定向,跳转到登录成功页面
        response.sendRedirect("success.jsp?username=" + URLEncoder.encode(username, "utf-8"));
    }else {
            //设置session属性值
            session.setAttribute("errMsg","用户名或密码错误,请重新登录!!");
            //采用重定向,跳转到登录成功界面
            response.sendRedirect("login.jsp");
        }


%>


</body>
</html>
改进版3:用Servlet取代登录处理页面do_login.jsp
1.在src里创建net.ysy.servlet包,在里面创建登录LoginServlet类


2.在LoginServelt注解里添加url映射

3.编写doGet()方法,调试doPost()方法.

4.编写doPost()方法,进行业务逻辑处理,实现页面跳转.

package net.ysy.Servlet;

import net.ysy.dao.UserDao;
import net.ysy.dao.impl.UserDaoImpl;

import javax.servlet.ServletException;
import javax.servlet.annotation.WebServlet;
import javax.servlet.http.HttpServlet;
import javax.servlet.http.HttpServletRequest;
import javax.servlet.http.HttpServletResponse;
import javax.servlet.http.HttpSession;
import java.io.IOException;
import java.net.URLEncoder;

@WebServlet(name = "loginServlet",value = "/login")
public class loginServlet extends HttpServlet {
    protected void doPost(HttpServletRequest request, HttpServletResponse response)
            throws ServletException, IOException {
        //设置请求对象字符编码
        request.setCharacterEncoding("utf-8");
        //获取表单提交数据
        String username=request.getParameter("username");
        String password=request.getParameter("password");
        //创建用户数据访问对象
        UserDao userDao=new UserDaoImpl();

        //获取响应请求
        HttpSession session=request.getSession();
        //判断是否登录成功
        if (userDao.login(username,password)){
            //清除session里可能存在的errMsg
            if (session.getAttribute("errMsg")!=null){
                session.removeAttribute("errMsg");
            }
            //采用重定向,跳转到登录成功页面
            response.sendRedirect("success.jsp?username=" + URLEncoder.encode(username, "utf-8"));
        }else {
            //设置session属性值
            session.setAttribute("errMsg","用户名或密码错误,请重新登录!!");
            //采用重定向,跳转到登录成功界面
            response.sendRedirect("login.jsp");
        }

    }

    protected void doGet(HttpServletRequest request, HttpServletResponse response)
            throws ServletException, IOException {
        doPost(request,response);

    }
}
5.修改登录页面login.jsp

6.重启服务器,查看运行效果


 426
426


 被折叠的 条评论
为什么被折叠?
被折叠的 条评论
为什么被折叠?
 到【灌水乐园】发言


