      The queues at the this level (root is the root queue).
    </description>
  </property>
参考default的配置,添加配置xm rp子队列
注意这三个参数的配置(如果有的话)minshare,maxshare,maxrunningapp
要特别注意下面这个配置
<property>
    <name>yarn.scheduler.capacity.root.default.capacity</name>
    <value>40</value>
    <description>Default queue target capacity.</description>
  </property>
这个值一定要保证三个队列的值加起来等于100,否则会无法启动resourceManager,同时会报错Illegal capacity of 1.9000001 for children of queue root…
3、执行start-yarn.sh启动resourceManager,如果是修改了队列信息,可以执行刷新队列的命令:
yarn rmadmin -refreshQueues
4、为任务设置队列
第一种,通过conf设置:
configuration.set("mapreduce.job.queuename","xm");
第二种,通过-D命令:
-Dmapreduce.job.queuename=rp
添加了以后发现并没有效果,后来发现如果使用这种方式的话,那么hadoop的代码最好使用下面的格式,这种格式比较适用于shell脚本的运行方式,如果用hadoop jar命令行方式,那这个-D命令得加在jar包后面,如果使用ProgramDriver的话,还得加在类别名的后面才能正常拿到参数值。
public class Main extends Configured implements Tool {
    private final Logger logger = LoggerFactory.getLogger(Main.class);

    @Override
    public int run(String[] args) throws Exception {
        Configuration conf = getConf();

        String queue = conf.get("mapreduce.job.queuename");
        conf.set("mapreduce.job.queuename", queue);
        ......
}
}

public static void main(String[] args) throws Exception {

        if (args.length < 7) {
            System.exit(1);
        }
        int status = ToolRunner.run(new Configuration(), new Start(), args);
        System.exit(status);
    }
- 1
- 2
- 3
- 4
- 5
- 6
- 7
- 8
- 9
- 10
- 11
- 12
- 13
- 14
- 15
- 16
- 17
- 18
- 19
- 20
- 21
- 22
- 23
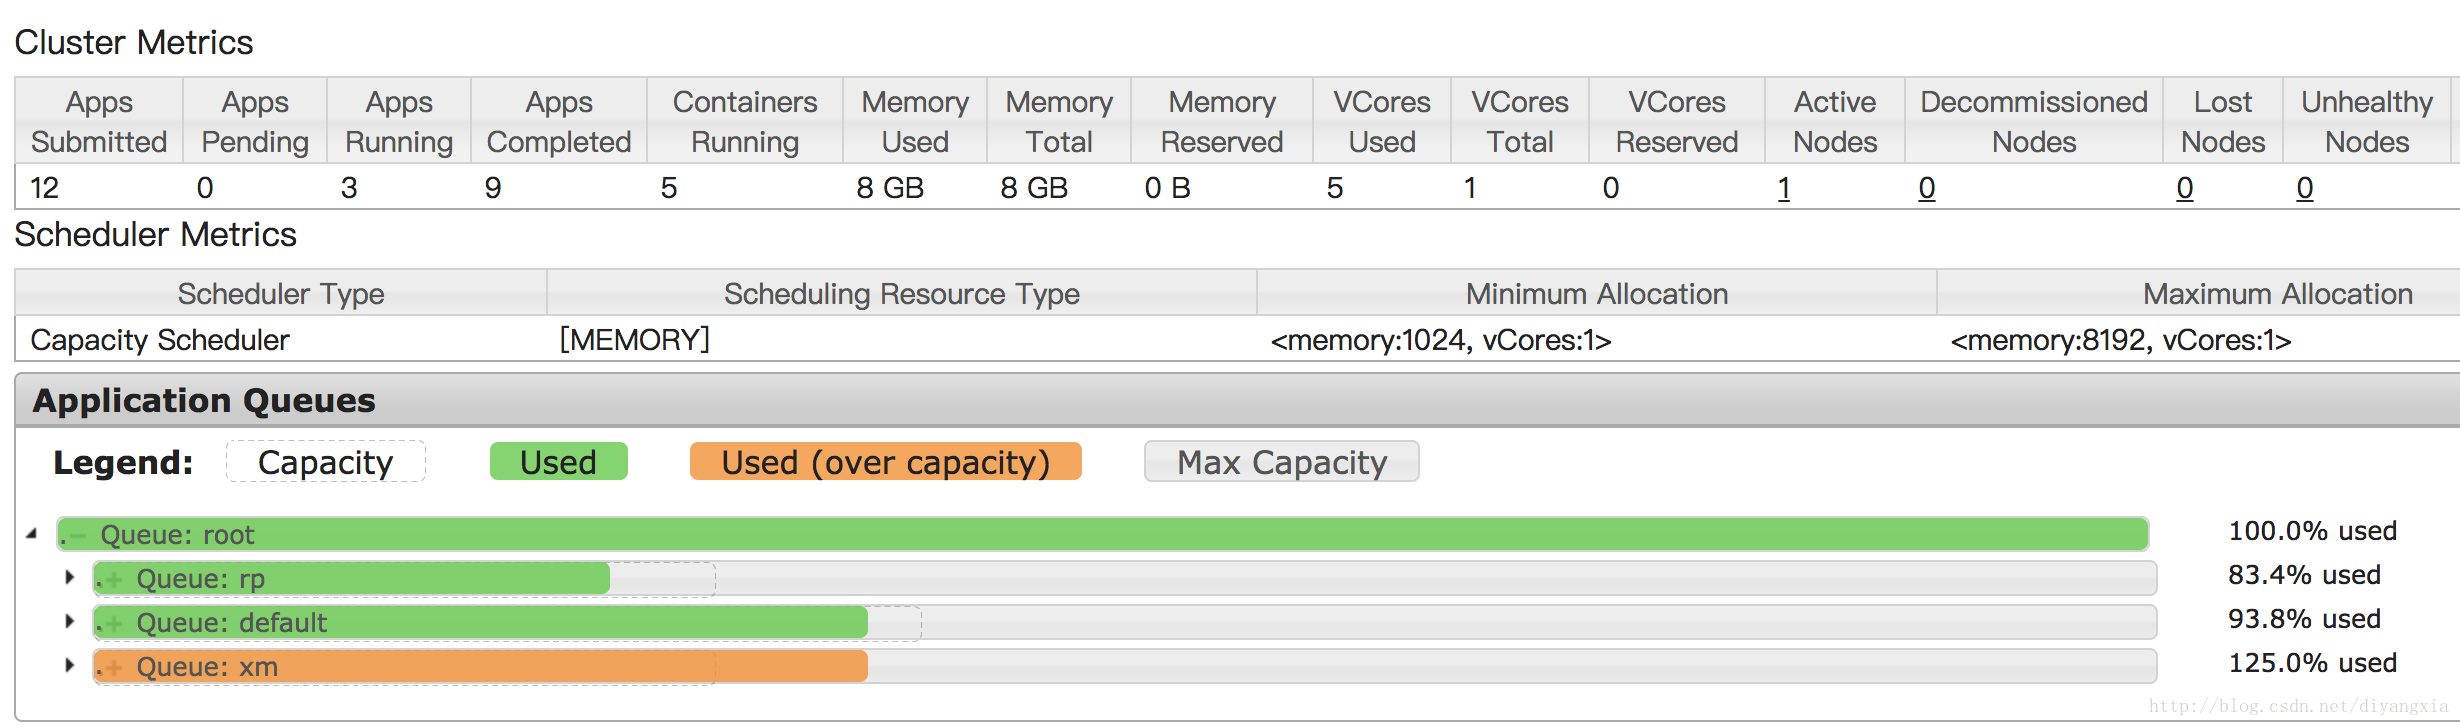
5、web截图效果
以下是同时执行了三个任务,三个任务的区别只是队列名不同,之前在没做以上这样的配置的时候,只执行一个任务的时候,就会占满所有的资源,其他任务只能排队等待,现在经过队列配置后,资源有了最大利用限制,就不会出现只执行某一个耗时的任务就占满所有资源的情况,提高了资源利用率。
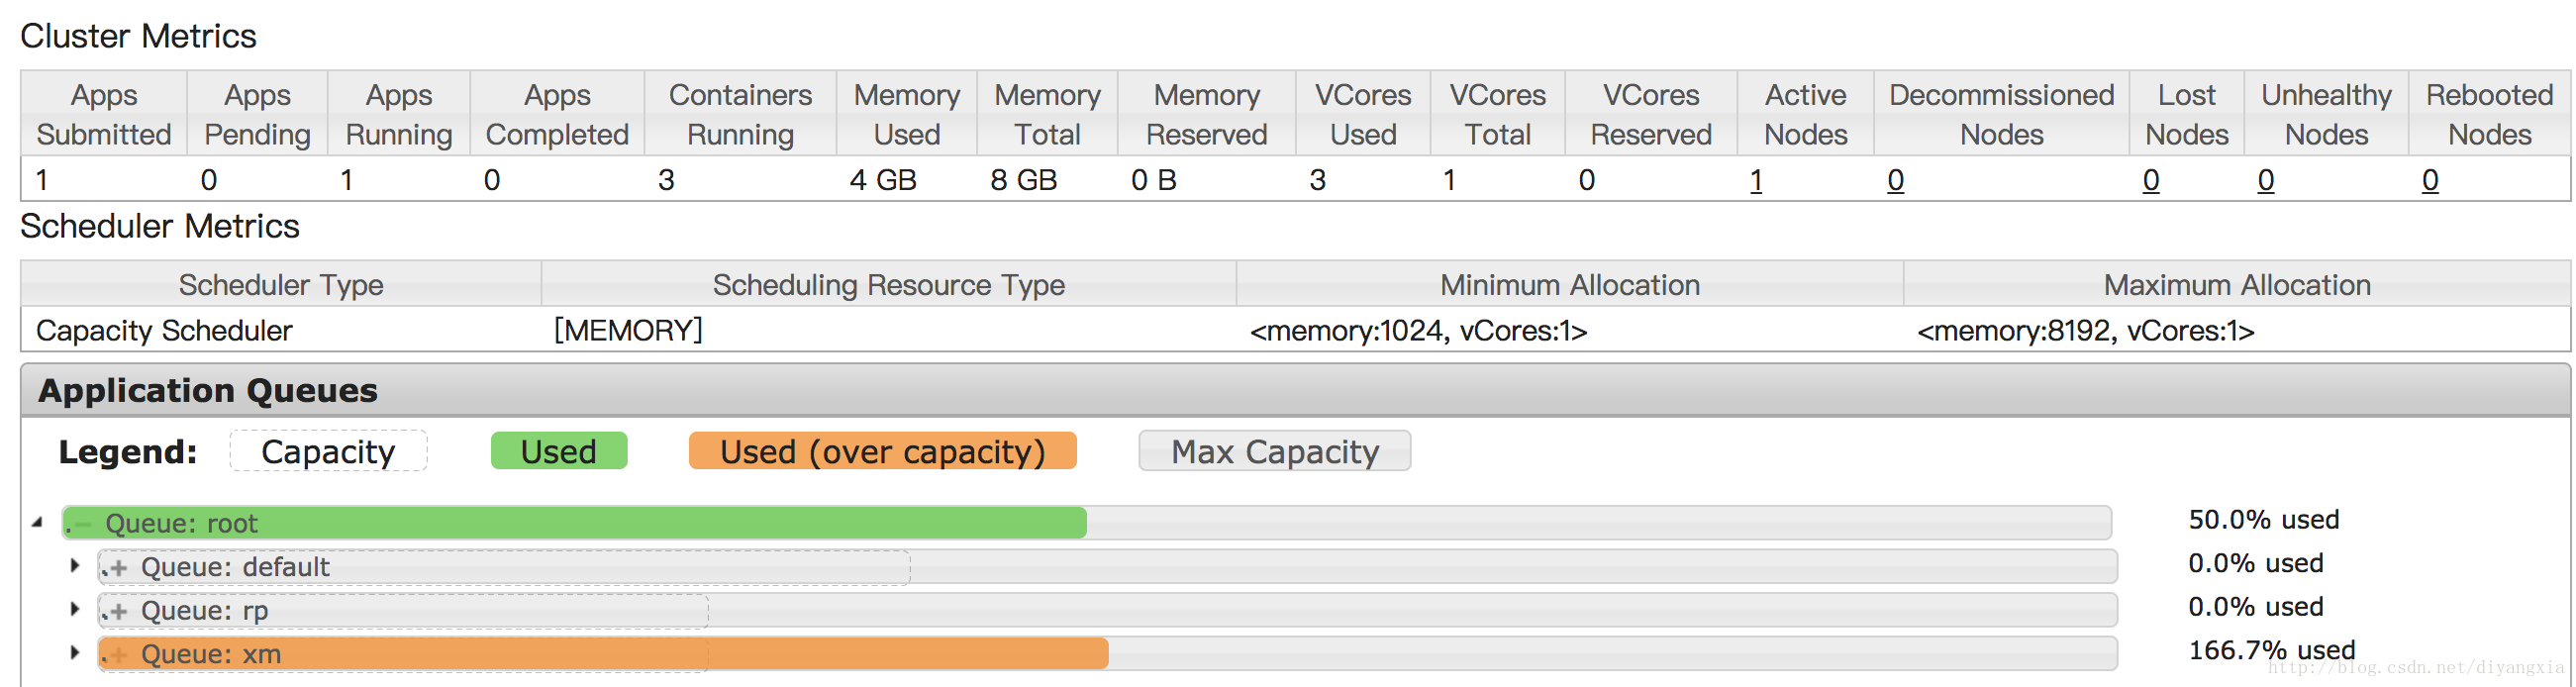
以下是只执行一个耗时任务的截图,可以看到子队列xm被使用了166.7%
      The queues at the this level (root is the root queue).
    </description>
  </property>
参考default的配置,添加配置xm rp子队列
注意这三个参数的配置(如果有的话)minshare,maxshare,maxrunningapp
要特别注意下面这个配置
<property>
    <name>yarn.scheduler.capacity.root.default.capacity</name>
    <value>40</value>
    <description>Default queue target capacity.</description>
  </property>
这个值一定要保证三个队列的值加起来等于100,否则会无法启动resourceManager,同时会报错Illegal capacity of 1.9000001 for children of queue root…
3、执行start-yarn.sh启动resourceManager,如果是修改了队列信息,可以执行刷新队列的命令:
yarn rmadmin -refreshQueues
4、为任务设置队列
第一种,通过conf设置:
configuration.set("mapreduce.job.queuename","xm");
第二种,通过-D命令:
-Dmapreduce.job.queuename=rp
添加了以后发现并没有效果,后来发现如果使用这种方式的话,那么hadoop的代码最好使用下面的格式,这种格式比较适用于shell脚本的运行方式,如果用hadoop jar命令行方式,那这个-D命令得加在jar包后面,如果使用ProgramDriver的话,还得加在类别名的后面才能正常拿到参数值。
public class Main extends Configured implements Tool {
    private final Logger logger = LoggerFactory.getLogger(Main.class);

    @Override
    public int run(String[] args) throws Exception {
        Configuration conf = getConf();

        String queue = conf.get("mapreduce.job.queuename");
        conf.set("mapreduce.job.queuename", queue);
        ......
}
}

public static void main(String[] args) throws Exception {

        if (args.length < 7) {
            System.exit(1);
        }
        int status = ToolRunner.run(new Configuration(), new Start(), args);
        System.exit(status);
    }
- 1
- 2
- 3
- 4
- 5
- 6
- 7
- 8
- 9
- 10
- 11
- 12
- 13
- 14
- 15
- 16
- 17
- 18
- 19
- 20
- 21
- 22
- 23
5、web截图效果
以下是同时执行了三个任务,三个任务的区别只是队列名不同,之前在没做以上这样的配置的时候,只执行一个任务的时候,就会占满所有的资源,其他任务只能排队等待,现在经过队列配置后,资源有了最大利用限制,就不会出现只执行某一个耗时的任务就占满所有资源的情况,提高了资源利用率。
以下是只执行一个耗时任务的截图,可以看到子队列xm被使用了166.7%


 977
977


 被折叠的 条评论
为什么被折叠?
被折叠的 条评论
为什么被折叠?
 到【灌水乐园】发言


