


四、类加载与字节码技术

1、类文件结构
通过 javac 类名.java 编译 java 文件后,会生成一个 .class 的文件!
以下是字节码文件:
0000000 ca fe ba be 00 00 00 34 00 23 0a 00 06 00 15 09
0000020 00 16 00 17 08 00 18 0a 00 19 00 1a 07 00 1b 07
0000040 00 1c 01 00 06 3c 69 6e 69 74 3e 01 00 03 28 29
0000060 56 01 00 04 43 6f 64 65 01 00 0f 4c 69 6e 65 4e
0000100 75 6d 62 65 72 54 61 62 6c 65 01 00 12 4c 6f 63
0000120 61 6c 56 61 72 69 61 62 6c 65 54 61 62 6c 65 01
0000140 00 04 74 68 69 73 01 00 1d 4c 63 6e 2f 69 74 63
0000160 61 73 74 2f 6a 76 6d 2f 74 35 2f 48 65 6c 6c 6f
0000200 57 6f 72 6c 64 3b 01 00 04 6d 61 69 6e 01 00 16
0000220 28 5b 4c 6a 61 76 61 2f 6c 61 6e 67 2f 53 74 72
0000240 69 6e 67 3b 29 56 01 00 04 61 72 67 73 01 00 13
0000260 5b 4c 6a 61 76 61 2f 6c 61 6e 67 2f 53 74 72 69
0000300 6e 67 3b 01 00 10 4d 65 74 68 6f 64 50 61 72 61
0000320 6d 65 74 65 72 73 01 00 0a 53 6f 75 72 63 65 46
0000340 69 6c 65 01 00 0f 48 65 6c 6c 6f 57 6f 72 6c 64
0000360 2e 6a 61 76 61 0c 00 07 00 08 07 00 1d 0c 00 1e
0000400 00 1f 01 00 0b 68 65 6c 6c 6f 20 77 6f 72 6c 64
0000420 07 00 20 0c 00 21 00 22 01 00 1b 63 6e 2f 69 74
0000440 63 61 73 74 2f 6a 76 6d 2f 74 35 2f 48 65 6c 6c
0000460 6f 57 6f 72 6c 64 01 00 10 6a 61 76 61 2f 6c 61
0000500 6e 67 2f 4f 62 6a 65 63 74 01 00 10 6a 61 76 61
0000520 2f 6c 61 6e 67 2f 53 79 73 74 65 6d 01 00 03 6f
0000540 75 74 01 00 15 4c 6a 61 76 61 2f 69 6f 2f 50 72
0000560 69 6e 74 53 74 72 65 61 6d 3b 01 00 13 6a 61 76
0000600 61 2f 69 6f 2f 50 72 69 6e 74 53 74 72 65 61 6d
0000620 01 00 07 70 72 69 6e 74 6c 6e 01 00 15 28 4c 6a
0000640 61 76 61 2f 6c 61 6e 67 2f 53 74 72 69 6e 67 3b
0000660 29 56 00 21 00 05 00 06 00 00 00 00 00 02 00 01
0000700 00 07 00 08 00 01 00 09 00 00 00 2f 00 01 00 01
0000720 00 00 00 05 2a b7 00 01 b1 00 00 00 02 00 0a 00
0000740 00 00 06 00 01 00 00 00 04 00 0b 00 00 00 0c 00
0000760 01 00 00 00 05 00 0c 00 0d 00 00 00 09 00 0e 00
0001000 0f 00 02 00 09 00 00 00 37 00 02 00 01 00 00 00
0001020 09 b2 00 02 12 03 b6 00 04 b1 00 00 00 02 00 0a
0001040 00 00 00 0a 00 02 00 00 00 06 00 08 00 07 00 0b
0001060 00 00 00 0c 00 01 00 00 00 09 00 10 00 11 00 00
0001100 00 12 00 00 00 05 01 00 10 00 00 00 01 00 13 00
0001120 00 00 02 00 14
类文件如下
u4 			   magic
u2             minor_version;
u2             major_version;
u2             constant_pool_count;
cp_info        constant_pool[constant_pool_count-1];
u2             access_flags;
u2             this_class;
u2             super_class;
u2             interfaces_count;
u2             interfaces[interfaces_count];
u2             fields_count;
field_info     fields[fields_count];
u2             methods_count;
method_info    methods[methods_count];
u2             attributes_count;
attribute_info attributes[attributes_count];
1)魔数
u4 magic
对应字节码文件的 0~3 个字节
0000000 ca fe ba be 00 00 00 34 00 23 0a 00 06 00 15 09
ca fe ba be :意思是 .class 文件,不同的东西有不同的魔数,比如 jpg、png 图片等!
2)版本
u2 minor_version;
u2 major_version;
0000000 ca fe ba be 00 00 00 34 00 23 0a 00 06 00 15 09
00 00 00 34:34H(16进制) = 52(10进制),代表JDK8
3)常量池
…
参考文档
传送门
2、字节码指令
可参考:
字节码指令
1)javap 工具
Java 中提供了 javap 工具来反编译 class 文件
javap -v D:Demo.class
2)图解方法执行流程
代码
public class Demo3_1 {
	public static void main(String[] args) {
		int a = 10;
		int b = Short.MAX_VALUE + 1;
		int c = a + b;
		System.out.println(c);
    }
}
常量池载入运行时常量池
常量池也属于方法区,只不过这里单独提出来了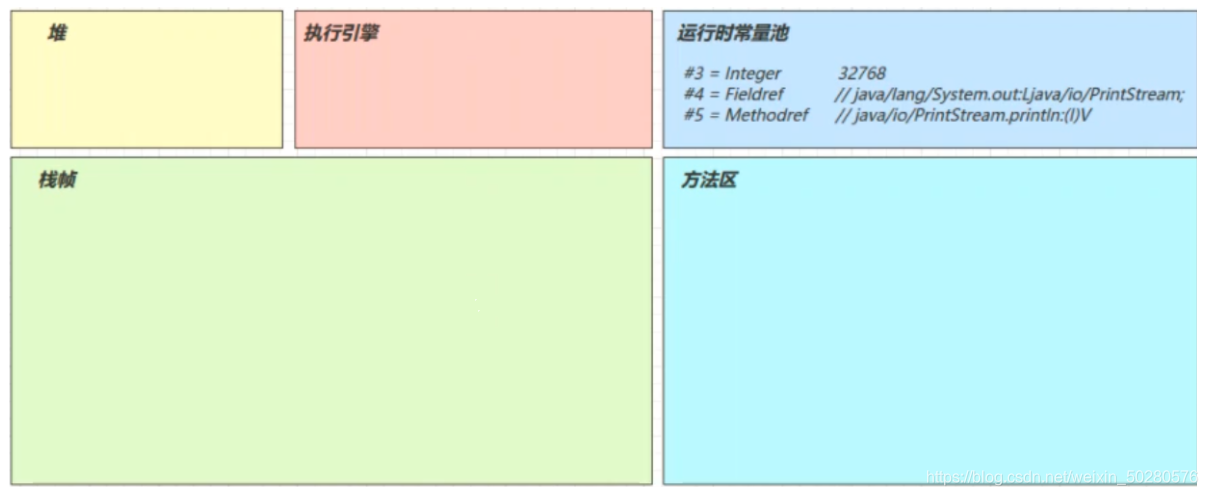
方法字节码载入方法区
(stack=2,locals=4) 对应操作数栈有 2 个空间(每个空间 4 个字节),局部变量表中有 4 个槽位。
执行引擎开始执行字节码
bipush 10
将一个 byte 压入操作数栈(其长度会补齐 4 个字节),类似的指令还有
- sipush 将一个 short 压入操作数栈(其长度会补齐 4 个字节)
- ldc 将一个 int 压入操作数栈
- ldc2_w 将一个 long 压入操作数栈(分两次压入,因为 long 是 8 个字节)
- 这里小的数字都是和字节码指令存在一起,超过 short 范围的数字存入了常量池

istore 1
将操作数栈栈顶元素弹出,放入局部变量表的 slot 1 中
对应代码中的 a = 10

ldc #3
读取运行时常量池中 #3 ,即 32768 (超过 short 最大值范围的数会被放到运行时常量池中),将其加载到操作数栈中
注意 Short.MAX_VALUE 是 32767,所以 32768 = Short.MAX_VALUE + 1 实际是在编译期间计算好的。
istore 2
将操作数栈中的元素弹出,放到局部变量表的 2 号位置

iload1 iload2
将局部变量表中 1 号位置和 2 号位置的元素放入操作数栈中。因为只能在操作数栈中执行运算操作
iadd
将操作数栈中的两个元素弹出栈并相加,结果在压入操作数栈中。
istore 3
将操作数栈中的元素弹出,放入局部变量表的3号位置。
getstatic #4
在运行时常量池中找到 #4 ,发现是一个对象,在堆内存中找到该对象,并将其引用放入操作数栈中
iload 3
将局部变量表中 3 号位置的元素压入操作数栈中。

invokevirtual #5
找到常量池 #5 项,定位到方法区 java/io/PrintStream.println:(I)V 方法
生成新的栈帧(分配 locals、stack等)
传递参数,执行新栈帧中的字节码
执行完毕,弹出栈帧
清除 main 操作数栈内容
return
完成 main 方法调用,弹出 main 栈帧,程序结束
3)通过字节码指令分析问题
代码
public class Code_11_ByteCodeTest {
    public static void main(String[] args) {

        int i = 0;
        int x = 0;
        while (i < 10) {
            x = x++;
            i++;
        }
        System.out.println(x); // 0
    }
}
为什么最终的 x 结果为 0 呢? 通过分析字节码指令即可知晓
Code:
     stack=2, locals=3, args_size=1	// 操作数栈分配2个空间,局部变量表分配 3 个空间
        0: iconst_0	// 准备一个常数 0
        1: istore_1	// 将常数 0 放入局部变量表的 1 号槽位 i = 0
        2: iconst_0	// 准备一个常数 0
        3: istore_2	// 将常数 0 放入局部变量的 2 号槽位 x = 0
        4: iload_1		// 将局部变量表 1 号槽位的数放入操作数栈中
        5: bipush        10	// 将数字 10 放入操作数栈中,此时操作数栈中有 2 个数
        7: if_icmpge     21	// 比较操作数栈中的两个数,如果下面的数大于上面的数,就跳转到 21 。这里的比较是将两个数做减法。因为涉及运算操作,所以会将两个数弹出操作数栈来进行运算。运算结束后操作数栈为空
       10: iload_2		// 将局部变量 2 号槽位的数放入操作数栈中,放入的值是 0
       11: iinc          2, 1	// 将局部变量 2 号槽位的数加 1 ,自增后,槽位中的值为 1
       14: istore_2	//将操作数栈中的数放入到局部变量表的 2 号槽位,2 号槽位的值又变为了0
       15: iinc          1, 1 // 1 号槽位的值自增 1
       18: goto          4 // 跳转到第4条指令
       21: getstatic     #2                  // Field java/lang/System.out:Ljava/io/PrintStream;
       24: iload_2
       25: invokevirtual #3                  // Method java/io/PrintStream.println:(I)V
       28: return
4)构造方法
cinit()V
public class Code_12_CinitTest {
	static int i = 10;

	static {
		i = 20;
	}

	static {
		i = 30;
	}

	public static void main(String[] args) {
		System.out.println(i); // 30
	}
}
编译器会按从上至下的顺序,收集所有 static 静态代码块和静态成员赋值的代码,合并为一个特殊的方法 cinit()V :
stack=1, locals=0, args_size=0
         0: bipush        10
         2: putstatic     #3                  // Field i:I
         5: bipush        20
         7: putstatic     #3                  // Field i:I
        10: bipush        30
        12: putstatic     #3                  // Field i:I
        15: return
init()V
编译器会按从上至下的顺序,收集所有 {} 代码块和成员变量赋值的代码,形成新的构造方法,但原始构造方法内的代码总是在后.
Code:
     stack=2, locals=3, args_size=3
        0: aload_0
        1: invokespecial #1                  // Method java/lang/Object."<init>":()V
        4: aload_0
        5: ldc           #2                  // String s1
        7: putfield      #3                  // Field a:Ljava/lang/String;
       10: aload_0
       11: bipush        20
       13: putfield      #4                  // Field b:I
       16: aload_0
       17: bipush        10
       19: putfield      #4                  // Field b:I
       22: aload_0
       23: ldc           #5                  // String s2
       25: putfield      #3                  // Field a:Ljava/lang/String;
       // 原始构造方法在最后执行
       28: aload_0
       29: aload_1
       30: putfield      #3                  // Field a:Ljava/lang/String;
       33: aload_0
       34: iload_2
       35: putfield      #4                  // Field b:I
       38: return
5)方法调用
public class Code_14_MethodTest {

    public Code_14_MethodTest() {

    }

    private void test1() {

    }

    private final void test2() {

    }

    public void test3() {

    }

    public static void test4() {

    }

    public static void main(String[] args) {
        Code_14_MethodTest obj = new Code_14_MethodTest();
        obj.test1();
        obj.test2();
        obj.test3();
        Code_14_MethodTest.test4();
    }
}
不同方法在调用时,对应的虚拟机指令有所区别
- 私有、构造、被 final 修饰的方法,在调用时都使用 invokespecial 指令
- 普通成员方法在调用时,使用 invokevirtual 指令。因为编译期间无法确定该方法的内容,只有在运行期间才能确定
静态方法在调用时使用 invokestatic 指令
Code:
      stack=2, locals=2, args_size=1
         0: new           #2                  //
         3: dup // 复制一份对象地址压入操作数栈中
         4: invokespecial #3                  // Method "<init>":()V
         7: astore_1
         8: aload_1
         9: invokespecial #4                  // Method test1:()V
        12: aload_1
        13: invokespecial #5                  // Method test2:()V
        16: aload_1
        17: invokevirtual #6                  // Method test3:()V
        20: invokestatic  #7                  // Method test4:()V
        23: return
- new 是创建【对象】,给对象分配堆内存,执行成功会将【对象引用】压入操作数栈
- dup 是赋值操作数栈栈顶的内容,本例即为【对象引用】,为什么需要两份引用呢,一个是要配合 invokespecial 调用该对象的构造方法 “init”: ()V (会消耗掉栈顶一个引用),另一个要 配合 astore_1 赋值给局部变量
- 终方法(final),私有方法(private),构造方法都是由 invokespecial 指令来调用,属于静态绑定
- 普通成员方法是由 invokevirtual 调用,属于动态绑定,即支持多态 成员方法与静态方法调用的另一个区别是,执行方法前是否需要【对象引用】
6)多态原理
因为普通成员方法需要在运行时才能确定具体的内容,所以虚拟机需要调用 invokevirtual 指令
在执行 invokevirtual 指令时,经历了以下几个步骤 - 先通过栈帧中对象的引用找到对象
- 分析对象头,找到对象实际的 Class
- Class 结构中有 vtable
- 查询 vtable 找到方法的具体地址
- 执行方法的字节码
7)异常处理
try-catch
public class Code_15_TryCatchTest {

    public static void main(String[] args) {
        int i = 0;
        try {
            i = 10;
        }catch (Exception e) {
            i = 20;
        }
    }

}
对应字节码指令
Code:
     stack=1, locals=3, args_size=1
        0: iconst_0
        1: istore_1
        2: bipush        10
        4: istore_1
        5: goto          12
        8: astore_2
        9: bipush        20
       11: istore_1
       12: return
     //多出来一个异常表
     Exception table:
        from    to  target type
            2     5     8   Class java/lang/Exception
- 可以看到多出来一个 Exception table 的结构,[from, to) 是前闭后开(也就是检测 2~4 行)的检测范围,一旦这个范围内的字节码执行出现异常,则通过 type 匹配异常类型,如果一致,进入 target 所指示行号
- 8 行的字节码指令 astore_2 是将异常对象引用存入局部变量表的 2 号位置(为 e )
多个 single-catch
public class Code_16_MultipleCatchTest {

    public static void main(String[] args) {
        int i = 0;
        try {
            i = 10;
        }catch (ArithmeticException e) {
            i = 20;
        }catch (Exception e) {
            i = 30;
        }
    }
}
对应的字节码
Code:
     stack=1, locals=3, args_size=1
        0: iconst_0
        1: istore_1
        2: bipush        10
        4: istore_1
        5: goto          19
        8: astore_2
        9: bipush        20
       11: istore_1
       12: goto          19
       15: astore_2
       16: bipush        30
       18: istore_1
       19: return
     Exception table:
        from    to  target type
            2     5     8   Class java/lang/ArithmeticException
            2     5    15   Class java/lang/Exception
- 因为异常出现时,只能进入 Exception table 中一个分支,所以局部变量表 slot 2 位置被共用finally
-
public class Code_17_FinallyTest {

    public static void main(String[] args) {
        int i = 0;
        try {
            i = 10;
        } catch (Exception e) {
            i = 20;
        } finally {
            i = 30;
        }
    }
}
对应字节码
-
Code:
     stack=1, locals=4, args_size=1
        0: iconst_0
        1: istore_1
        // try块
        2: bipush        10
        4: istore_1
        // try块执行完后,会执行finally
        5: bipush        30
        7: istore_1
        8: goto          27
       // catch块
       11: astore_2 // 异常信息放入局部变量表的2号槽位
       12: bipush        20
       14: istore_1
       // catch块执行完后,会执行finally
       15: bipush        30
       17: istore_1
       18: goto          27
       // 出现异常,但未被 Exception 捕获,会抛出其他异常,这时也需要执行 finally 块中的代码
       21: astore_3
       22: bipush        30
       24: istore_1
       25: aload_3
       26: athrow  // 抛出异常
       27: return
     Exception table:
        from    to  target type
            2     5    11   Class java/lang/Exception
            2     5    21   any
           11    15    21   any
可以看到 finally 中的代码被复制了 3 份,分别放入 try 流程,catch 流程以及 catch 剩余的异常类型流程
注意:虽然从字节码指令看来,每个块中都有 finally 块,但是 finally 块中的代码只会被执行一次finally 中的 return
-
public class Code_18_FinallyReturnTest {

    public static void main(String[] args) {
        int i = Code_18_FinallyReturnTest.test();
        // 结果为 20
        System.out.println(i);
    }

    public static int test() {
        int i;
        try {
            i = 10;
            return i;
        } finally {
            i = 20;
            return i;
        }
    }
}
对应字节码
Code:
     stack=1, locals=3, args_size=0
        0: bipush        10
        2: istore_0
        3: iload_0
        4: istore_1  // 暂存返回值
        5: bipush        20
        7: istore_0
        8: iload_0
        9: ireturn	// ireturn 会返回操作数栈顶的整型值 20
       // 如果出现异常,还是会执行finally 块中的内容,没有抛出异常
       10: astore_2
       11: bipush        20
       13: istore_0
       14: iload_0
       15: ireturn	// 这里没有 athrow 了,也就是如果在 finally 块中如果有返回操作的话,且 try 块中出现异常,会吞掉异常!
     Exception table:
        from    to  target type
            0     5    10   any
- 由于 finally 中的 ireturn 被插入了所有可能的流程,因此返回结果肯定以finally的为准
- 至于字节码中第 2 行,似乎没啥用,且留个伏笔,看下个例子
- 跟上例中的 finally 相比,发现没有 athrow 了,这告诉我们:如果在 finally 中出现了 return,会吞掉异常
- 所以不要在finally中进行返回操作
被吞掉的异常
public static int test() {
      int i;
      try {
         i = 10;
         //  这里应该会抛出异常
         i = i/0;
         return i;
      } finally {
         i = 20;
         return i;
      }
   }
会发现打印结果为 20 ,并未抛出异常
finally 不带 return
public static int test() {
		int i = 10;
		try {
			return i;
		} finally {
			i = 20;
		}
	}
对应字节码
Code:
     stack=1, locals=3, args_size=0
        0: bipush        10
        2: istore_0 // 赋值给i 10
        3: iload_0	// 加载到操作数栈顶
        4: istore_1 // 加载到局部变量表的1号位置
        5: bipush        20
        7: istore_0 // 赋值给i 20
        8: iload_1 // 加载局部变量表1号位置的数10到操作数栈
        9: ireturn // 返回操作数栈顶元素 10
       10: astore_2
       11: bipush        20
       13: istore_0
       14: aload_2 // 加载异常
       15: athrow // 抛出异常
     Exception table:
        from    to  target type
            3     5    10   any
8)Synchronized
public class Code_19_SyncTest {

    public static void main(String[] args) {
        Object lock = new Object();
        synchronized (lock) {
            System.out.println("ok");
        }
    }

}
对应字节码
Code:
      stack=2, locals=4, args_size=1
         0: new           #2                  // class java/lang/Object
         3: dup // 复制一份栈顶,然后压入栈中。用于函数消耗
         4: invokespecial #1                  // Method java/lang/Object."<init>":()V
         7: astore_1 // 将栈顶的对象地址方法 局部变量表中 1 中
         8: aload_1 // 加载到操作数栈
         9: dup // 复制一份,放到操作数栈,用于加锁时消耗
        10: astore_2 // 将操作数栈顶元素弹出,暂存到局部变量表的 2 号槽位。这时操作数栈中有一份对象的引用
        11: monitorenter // 加锁
        12: getstatic     #3                  // Field java/lang/System.out:Ljava/io/PrintStream;
        15: ldc           #4                  // String ok
        17: invokevirtual #5                  // Method java/io/PrintStream.println:(Ljava/lang/String;)V
        20: aload_2 // 加载对象到栈顶
        21: monitorexit // 释放锁
        22: goto          30
        // 异常情况的解决方案 释放锁!
        25: astore_3
        26: aload_2
        27: monitorexit
        28: aload_3
        29: athrow
        30: return
        // 异常表!
      Exception table:
         from    to  target type
            12    22    25   any
            25    28    25   any
3、编译期处理
所谓的 语法糖 ,其实就是指 java 编译器把 .java 源码编译为 .class 字节码的过程中,自动生成和转换的一些代码,主要是为了减轻程序员的负担,算是 java 编译器给我们的一个额外福利
注意,以下代码的分析,借助了 javap 工具,idea 的反编译功能,idea 插件 jclasslib 等工具。另外, 编译器转换的结果直接就是 class 字节码,只是为了便于阅读,给出了 几乎等价 的 java 源码方式,并不是编译器还会转换出中间的 java 源码,切记。
public class Candy1 {

}
经过编译期优化后
public class Candy1 {
   // 这个无参构造器是java编译器帮我们加上的
   public Candy1() {
      // 即调用父类 Object 的无参构造方法,即调用 java/lang/Object." <init>":()V
      super();
   }
}
2)自动拆装箱
基本类型和其包装类型的相互转换过程,称为拆装箱
在 JDK 5 以后,它们的转换可以在编译期自动完成
public class Candy2 {
   public static void main(String[] args) {
      Integer x = 1;
      int y = x;
   }
}
转换过程如下
public class Candy2 {
   public static void main(String[] args) {
      // 基本类型赋值给包装类型,称为装箱
      Integer x = Integer.valueOf(1);
      // 包装类型赋值给基本类型,称谓拆箱
      int y = x.intValue();
   }
}
3)泛型集合取值
泛型也是在 JDK 5 开始加入的特性,但 java 在编译泛型代码后会执行泛型擦除的动作,即泛型信息在编译为字节码之后就丢失了,实际的类型都当做了 Object 类型来处理:
public class Candy3 {
   public static void main(String[] args) {
      List<Integer> list = new ArrayList<>();
      list.add(10);
      Integer x = list.get(0);
   }
}
对应字节码
Code:
    stack=2, locals=3, args_size=1
       0: new           #2                  // class java/util/ArrayList
       3: dup
       4: invokespecial #3                  // Method java/util/ArrayList."<init>":()V
       7: astore_1
       8: aload_1
       9: bipush        10
      11: invokestatic  #4                  // Method java/lang/Integer.valueOf:(I)Ljava/lang/Integer;
      // 这里进行了泛型擦除,实际调用的是add(Objcet o)
      14: invokeinterface #5,  2            // InterfaceMethod java/util/List.add:(Ljava/lang/Object;)Z

      19: pop
      20: aload_1
      21: iconst_0
      // 这里也进行了泛型擦除,实际调用的是get(Object o)
      22: invokeinterface #6,  2            // InterfaceMethod java/util/List.get:(I)Ljava/lang/Object;
// 这里进行了类型转换,将 Object 转换成了 Integer
      27: checkcast     #7                  // class java/lang/Integer
      30: astore_2
      31: return
所以调用 get 函数取值时,有一个类型转换的操作。
Integer x = (Integer) list.get(0);
如果要将返回结果赋值给一个 int 类型的变量,则还有自动拆箱的操作
int x = (Integer) list.get(0).intValue();
使用反射可以得到,参数的类型以及泛型类型。泛型反射代码如下:
    public static void main(String[] args) throws NoSuchMethodException {
        // 1. 拿到方法
        Method method = Code_20_ReflectTest.class.getMethod("test", List.class, Map.class);
        // 2. 得到泛型参数的类型信息
        Type[] types = method.getGenericParameterTypes();
        for(Type type : types) {
            // 3. 判断参数类型是否,带泛型的类型。
            if(type instanceof ParameterizedType) {
                ParameterizedType parameterizedType = (ParameterizedType) type;

                // 4. 得到原始类型
                System.out.println("原始类型 - " + parameterizedType.getRawType());
                // 5. 拿到泛型类型
                Type[] arguments = parameterizedType.getActualTypeArguments();
                for(int i = 0; i < arguments.length; i++) {
                    System.out.printf("泛型参数[%d] - %s\n", i, arguments[i]);
                }
            }
        }
    }

    public Set<Integer> test(List<String> list, Map<Integer, Object> map) {
        return null;
    }
输出:
原始类型 - interface java.util.List
泛型参数[0] - class java.lang.String
原始类型 - interface java.util.Map
泛型参数[0] - class java.lang.Integer
泛型参数[1] - class java.lang.Object
4)可变参数
可变参数也是 JDK 5 开始加入的新特性: 例如:
public class Candy4 {
   public static void foo(String... args) {
      // 将 args 赋值给 arr ,可以看出 String... 实际就是 String[]
      String[] arr = args;
      System.out.println(arr.length);
   }

   public static void main(String[] args) {
      foo("hello", "world");
   }
}
可变参数 String… args 其实是一个 String[] args ,从代码中的赋值语句中就可以看出来。 同 样 java 编译器会在编译期间将上述代码变换为:
public class Candy4 {
   public Candy4 {}
   public static void foo(String[] args) {
      String[] arr = args;
      System.out.println(arr.length);
   }

   public static void main(String[] args) {
      foo(new String[]);
   }
}
注意,如果调用的是 foo() ,即未传递参数时,等价代码为 foo(new String[]{}) ,创建了一个空数组,而不是直接传递的 null .
5)foreach 循环
仍是 JDK 5 开始引入的语法糖,数组的循环:
public class Candy5 {
	public static void main(String[] args) {
        // 数组赋初值的简化写法也是一种语法糖。
		int[] arr = {1, 2, 3, 4, 5};
		for(int x : arr) {
			System.out.println(x);
		}
	}
}
编译器会帮我们转换为
public class Candy5 {
    public Candy5() {}

	public static void main(String[] args) {
		int[] arr = new int[]{1, 2, 3, 4, 5};
		for(int i = 0; i < arr.length; ++i) {
			int x = arr[i];
			System.out.println(x);
		}
	}
}


 647
647


 被折叠的 条评论
为什么被折叠?
被折叠的 条评论
为什么被折叠?
 到【灌水乐园】发言


