


以前一直使用的极光的手动输入推送内容然后推送到客户端,今天遇到了推送频率比较高且比较有规律的内容,比如事实天气。这样就需要用我们自己的服务器来自动生成推送内容了。
在官方的SDK文档中找了半天,终于找到了有点类似的接口了,进去先看看:http://docs.jpush.cn/pages/viewpage.action?pageId=2228302
可以看到,上面两句话很醒目,我们看看它封装的REST API是个什么东西,再点进去看看
上面两句话读了一下, 看来我们的运气还不错,这个应该就是了。
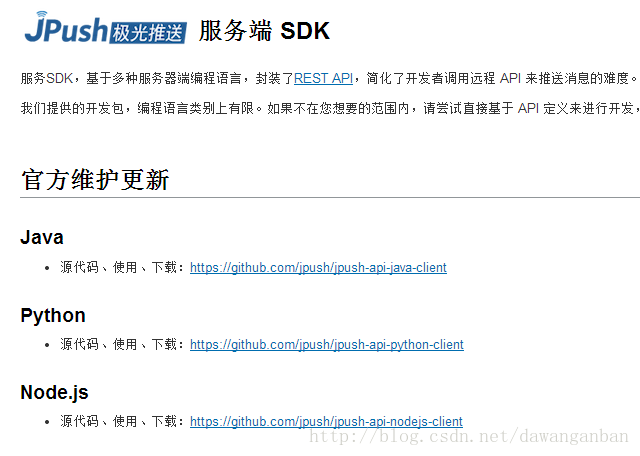
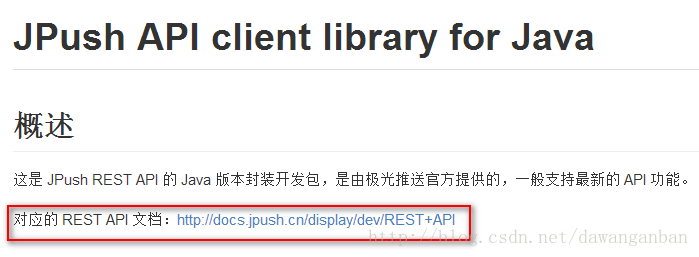
好了我们进入上面的Java开发部分:https://github.com/jpush/jpush-api-java-client
进去看了半天,大概明白意思了,已经帮助我们封装好了,现在我们只需要下载jar包和它提供的实例文档。
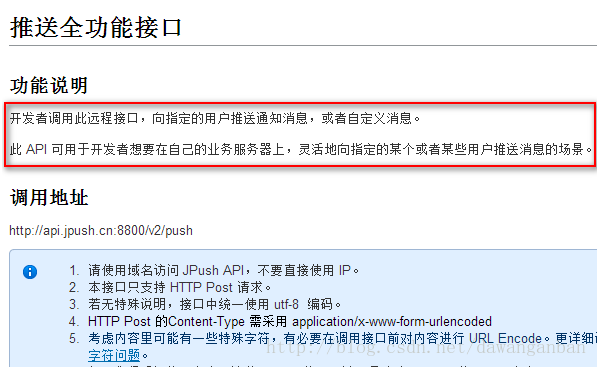
进去后发现又对RESI API进行了更详细的说明,比如参数、频率限制等。
好吧,我们看看推送消息和通知,如下图点击进入
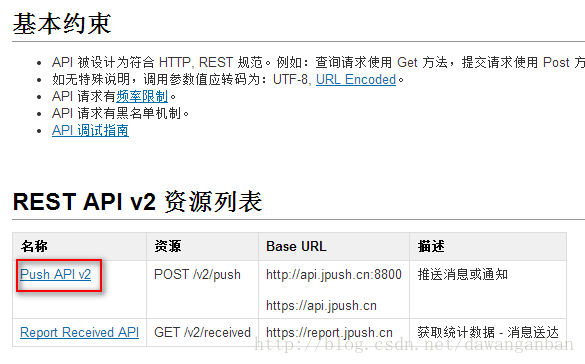
进去之后就看到了真真需要的api接口了,这里有各个方法和参数的说明。如果有的朋友还觉得看不懂,简单,直接下载示例代码(抄袭谁不会啊 )
)

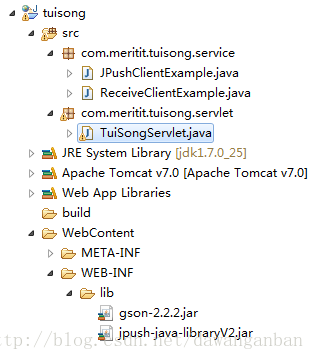
我下载官方示例代码,新建立了一个项目如下:
消息发送端代码:
- package com.meritit.tuisong.service;
- import java.util.HashMap;
- import java.util.Map;
- import cn.jpush.api.ErrorCodeEnum;
- import cn.jpush.api.IOSExtra;
- import cn.jpush.api.JPushClient;
- import cn.jpush.api.MessageResult;
- public class JPushClientExample {
- private static final String appKey ="5d30bebd28335593a13454861"; //必填,例如466f7032ac604e02fb7bda89
- private static final String masterSecret = "0e0cc80c6f6a4703bec9ed191";//"13ac09b17715bd117163d8a1";//必填,每个应用都对应一个masterSecret
- private static JPushClient jpush = null;
- /**
- * 保存离线的时长。秒为单位。最多支持10天(864000秒)。
- * 0 表示该消息不保存离线。即:用户在线马上发出,当前不在线用户将不会收到此消息。
- * 此参数不设置则表示默认,默认为保存1天的离线消息(86400秒)。
- */
- private static long timeToLive = 60 * 60 * 24;
- public static void main(String[] args) {
- /*
- * Example1: 初始化,默认发送给android和ios,同时设置离线消息存活时间
- * jpush = new JPushClient(masterSecret, appKey, timeToLive);
- */
- /*
- * Example2: 只发送给android
- * jpush = new JPushClient(masterSecret, appKey, DeviceEnum.Android);
- */
- /*
- * Example3: 只发送给IOS
- * jpush = new JPushClient(masterSecret, appKey, DeviceEnum.IOS);
- */
- /*
- * Example4: 只发送给android,同时设置离线消息存活时间
- * jpush = new JPushClient(masterSecret, appKey, timeToLive, DeviceEnum.Android);
- */
- jpush = new JPushClient(masterSecret, appKey, timeToLive);
- /*
- * 是否启用ssl安全连接, 可选
- * 参数:启用true, 禁用false,默认为非ssl连接
- */
- //jpush.setEnableSSL(true);
- //测试发送消息或者通知
- testSend();
- }
- private static void testSend() {
- // 在实际业务中,建议 sendNo 是一个你自己的业务可以处理的一个自增数字。
- // 除非需要覆盖,请确保不要重复使用。详情请参考 API 文档相关说明。
- int sendNo = getRandomSendNo();
- String msgTitle = "+;//jpush\"\"";
- String msgContent = "\\&;w\"\"a--【\npush】";
- /*
- * IOS设备扩展参数,
- * 设置badge,设置声音
- */
- Map<String, Object> extra = new HashMap<String, Object>();
- IOSExtra iosExtra = new IOSExtra(10, "WindowsLogonSound.wav");
- extra.put("ios", iosExtra);
- //对所有用户发送通知, 更多方法请参考文档
- MessageResult msgResult = jpush.sendCustomMessageWithAppKey(sendNo,msgTitle, msgContent);
- //MessageResult msgResult = jpush.sendNotificationWithAlias(sendNo, "a", msgTitle, msgContent);
- //覆盖指定msgId的消息,msgId可以从msgResult.getMsgid()获取。
- //MessageResult msgResult = jpush.sendNotificationWithAppKey(sendNo, msgTitle, msgContent, 0, extra,msgResult.getMsgid());
- if (null != msgResult) {
- System.out.println("服务器返回数据: " + msgResult.toString());
- if (msgResult.getErrcode() == ErrorCodeEnum.NOERROR.value()) {
- System.out.println(String.format("发送成功, sendNo= %s,messageId= %s",msgResult.getSendno(),msgResult.getMsg_id()));
- } else {
- System.out.println("发送失败, 错误代码=" + msgResult.getErrcode() + ", 错误消息=" + msgResult.getErrmsg());
- }
- } else {
- System.out.println("无法获取数据");
- }
- }
- public static final int MAX = Integer.MAX_VALUE;
- public static final int MIN = (int) MAX/2;
- /**
- * 保持 sendNo 的唯一性是有必要的
- * It is very important to keep sendNo unique.
- * @return sendNo
- */
- public static int getRandomSendNo() {
- return (int) (MIN + Math.random() * (MAX - MIN));
- }
- }
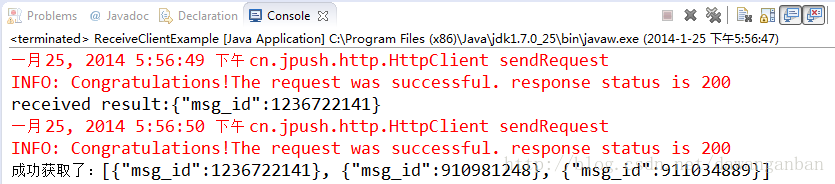
执行结果如下:

消息接收端代码:
- package com.meritit.tuisong.service;
- import java.util.List;
- import cn.jpush.api.JPushClient;
- import cn.jpush.api.receive.ReceiveResult;
- public class ReceiveClientExample {
- private static final String appKey ="5d30bebd28335593a13454861"; //必填,例如466f7032ac604e02fb7bda89
- private static final String masterSecret = "0e0cc80c6f6a4703bec9ed191";//"13ac09b17715bd117163d8a1";//必填
- public static void main(String[] args) {
- JPushClient JPushClient = new JPushClient(masterSecret, appKey);
- String msgId = "1236722141";
- String[] msgIds = {"1236722141","910981248","911034889"};
- //获取一条
- ReceiveResult receiveResult = JPushClient.getReceived(msgId);
- if(receiveResult == null){
- System.out.println("获取receive 数据失败!"+receiveResult);
- }else{
- //gson toJson 之后,NULL值的字段会被过滤掉
- System.out.println("received result:"+receiveResult.toString());
- }
- // 获取多条
- List<ReceiveResult> receiveResults = JPushClient.getReceiveds(msgIds);
- if(receiveResults == null ){
- System.out.println("获取receive 数据失败!");
- }else{
- System.out.println("成功获取了:"+receiveResults);
- }
- }
- }
执行结果:
测试已经成功,下面我们来看看源代码是怎么做的,其他的其实只是数据封装,我们来看看关键的一句代码
- MessageResult msgResult = jpush.sendCustomMessageWithAppKey(sendNo,msgTitle, msgContent);
查看源代码,如下:
- public MessageResult sendCustomMessageWithAppKey(int sendNo, String msgTitle, String msgContent) {
- CustomMessageParams p = new CustomMessageParams();
- p.setReceiverType(ReceiverTypeEnum.APPKEYS);
- return sendCustomMessage(p, sendNo, msgTitle, msgContent, null, null);
- }
发现实际是调用的sendCustomMessage方法
- protected MessageResult sendCustomMessage(CustomMessageParams p, int sendNo, String msgTitle, String msgContent, String msgContentType, Map<String, Object> extra) {
- if (null != msgContentType) {
- p.getMsgContent().setContentType(msgContentType);
- }
- if (null != extra) {
- p.getMsgContent().setExtra(extra);
- }
- return sendMessage(p, sendNo, msgTitle, msgContent);
- }
这里进行了空值判断,实际又调用了sendMessage方法
- protected MessageResult sendMessage(MessageParams p, int sendNo, String msgTitle, String msgContent) {
- p.setSendNo(sendNo);
- p.setAppKey(this.getAppKey());
- p.setMasterSecret(this.masterSecret);
- p.setTimeToLive(this.timeToLive);
- p.setSendDescription(this.getSendDescription());
- for (DeviceEnum device : this.getDevices()) {
- p.addPlatform(device);
- }
- if (null != msgTitle) {
- p.getMsgContent().setTitle(msgTitle);
- }
- p.getMsgContent().setMessage(msgContent);
- return sendMessage(p);
- }
在这里将参数封装到消息对象中调用sendMessage
- protected MessageResult sendMessage(MessageParams params) {
- return httpClient.sendPush(BaseURL.ALL_PATH, enableSSL, params);
- }
再进到sendPush方法中看看,哦,大概明白了,实际上是用的http请求发送消息的。
- public MessageResult sendPush(final String path, final boolean enableSSL, final MessageParams messageParams) {
- MessageResult messageResult = ValidateRequestParams.vidateParams(messageParams);
- if(messageResult != null) return messageResult;
- String pushResult = sendPost(path, enableSSL, parse(messageParams),RequestTypeEnum.PUSH.value(),null);
- return gson.fromJson(pushResult, MessageResult.class);
- }
关键看倒数第二行代码
- private String sendPost( String path, final boolean enableSSL, String params,Integer reqeustType,String authCode){
- return sendRequest(path, enableSSL, params, "POST", reqeustType,authCode);
- }
- private String sendRequest(String path, final boolean enableSSL, String params,String method,Integer reqeustType,String authCode){
- HttpURLConnection conn = null;
- DataOutputStream outStream = null;
- StringBuffer sb = new StringBuffer();
- try {
- if (enableSSL) {
- initSSL();
- }
- URL url = new URL(BaseURL.getUrlForPath(path,enableSSL,reqeustType));
- conn = (HttpURLConnection) url.openConnection();
- conn.setConnectTimeout(DEFAULT_CONNECTION_TIMEOUT);
- conn.setReadTimeout(DEFAULT_SOCKET_TIMEOUT);
- conn.setUseCaches(false);
- conn.setDoOutput(true);
- conn.setRequestMethod(method);
- conn.setRequestProperty("Connection", "Keep-Alive");
- conn.setRequestProperty("Charset", CHARSET);
- if(authCode != null && !authCode.isEmpty()){
- conn.setRequestProperty("Authorization", authCode);
- }
- if(method.equals("POST")){
- byte[] data = params.getBytes(CHARSET);
- conn.setRequestProperty("Content-Type", "application/x-www-form-urlencoded");
- conn.setRequestProperty("Content-Length", String.valueOf(data.length));
- outStream = new DataOutputStream(conn.getOutputStream());
- outStream.write(data);
- outStream.flush();
- }
- if (conn.getResponseCode() == 200) {
- logger.info("Congratulations!The request was successful. response status is 200");
- InputStream in = conn.getInputStream();
- InputStreamReader reader = new InputStreamReader(in, CHARSET);
- char[] buff = new char[1024];
- int len;
- while ((len = reader.read(buff)) > 0) {
- sb.append(buff, 0, len);
- }
- } else {
- logger.log(Level.WARNING,"Sorry!The request was fault. response " +
- "status = "+conn.getResponseCode()+",errormsg = "+conn.getHeaderField(0));
- String errmsg = "";
- if(reqeustType == RequestTypeEnum.RECEIVE.value()){
- errmsg = ErrorCodeEnum.errorMsg(conn.getResponseCode());
- errmsg = errmsg == null ? conn.getHeaderField(0) : errmsg;
- }else{
- errmsg = conn.getHeaderField(0);
- }
- BaseResult result = new BaseResult(errmsg,conn.getResponseCode());
- return result.toString();
- }
- }
- catch (SocketTimeoutException e) {
- logger.log(Level.SEVERE,"God! the server throw SocketTimeout Exception." +
- "please check it out the error message:"+e.getMessage());
- BaseResult baseResult = new BaseResult(e.getMessage().toString(),ErrorCodeEnum.CONNECTIONTIMEOUT.value());
- return baseResult.toString();
- }
- catch (ConnectException e) {
- logger.log(Level.SEVERE,"God! the server throw Connect Exception ." +
- "please check it out the error message:"+e.getMessage());
- BaseResult baseResult = new BaseResult(e.getMessage().toString(),ErrorCodeEnum.CONNECTIONREFUSED.value());
- return baseResult.toString();
- }
- catch (UnknownHostException e) {
- logger.log(Level.SEVERE,"God! the server throw UnknownHost Exception ." +
- "please check it out the error message:"+e.getMessage());
- BaseResult baseResult = new BaseResult(e.getMessage().toString(),ErrorCodeEnum.CONNECTIONREFUSED.value());
- return baseResult.toString();
- }
- catch (Exception e) {
- logger.log(Level.SEVERE,"God! the server throw exception." +
- "please check it out the error message:"+e.getMessage());
- BaseResult baseResult = new BaseResult(e.getMessage().toString(),ErrorCodeEnum.UnknownException.value());
- return baseResult.toString();
- }
- finally {
- if (null != outStream) {
- try {
- outStream.close();
- } catch (IOException e) {
- e.printStackTrace();
- }
- }
- if (null != conn) {
- conn.disconnect();
- }
- }
- return sb.toString();
- }
学过Android的朋友对这个应该很熟悉吧!比如里面的URL请求地址,看第9行代码
- URL url = new URL(BaseURL.getUrlForPath(path,enableSSL,reqeustType));
- public static String getUrlForPath(final String path,boolean enableSSL,Integer type) {
- return getHostname(enableSSL,type) + path;
- }
- private static String getHostname(boolean enableSSL,Integer type) {
- if(type == RequestTypeEnum.PUSH.value())
- return enableSSL? HOST_NAME_SSL :HOST_NAME;
- if(type == RequestTypeEnum.RECEIVE.value())
- return enableSSL? RECEIVE_HOST_NAME:RECEIVE_HOST_NAME;
- return null;
- }
在这里进行判断,如果enableSSL为false则发送消息请求地址为HOST_NAME,实际上这个enableSSL在BaseClient类中默认为false
- public boolean enableSSL = false;
HOST_NAME就是官方文档中所说的默认请求地址:
- public static String HOST_NAME = "http://api.jpush.cn:8800";
- public static String RECEIVE_HOST_NAME = "https://report.jpush.cn:443";


 6669
6669

 被折叠的 条评论
为什么被折叠?
被折叠的 条评论
为什么被折叠?
 到【灌水乐园】发言


