


第一步:在pom文件下加入
<plugin>
<groupId>org.mybatis.generator</groupId>
<artifactId>mybatis-generator-maven-plugin</artifactId>
<version>1.3.5</version>
<dependencies>
<dependency>
<groupId>mysql</groupId>
<artifactId>mysql-connector-java</artifactId>
<version>5.1.37</version>
</dependency>
</dependencies>
<configuration>
<overwrite>true</overwrite>
<verbose>true</verbose>
</configuration>
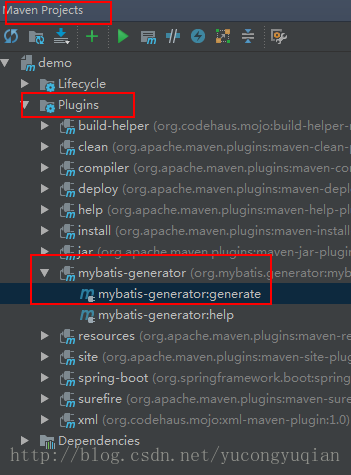
</plugin>第二步:Maven的项目配置文件存放路径如下图
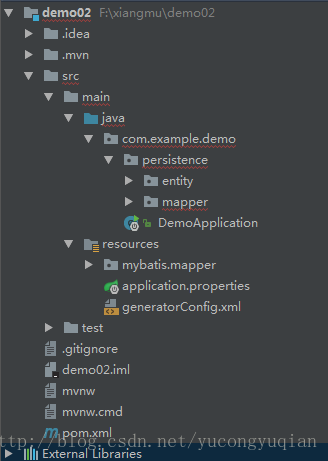
第三步:建立generatorConfig.xml文件
<?xml version="1.0" encoding="UTF-8"?>
<!DOCTYPE generatorConfiguration
PUBLIC "-//mybatis.org//DTD MyBatis Generator Configuration 1.0//EN"
"http://mybatis.org/dtd/mybatis-generator-config_1_0.dtd">
<generatorConfiguration>
<context id="MySql2Tables" targetRuntime="MyBatis3">
<property name="mergeable" value="false"/>
<!--
http://www.mybatis.org/generator/reference/plugins.html
-->
<plugin type="org.mybatis.generator.plugins.CachePlugin">
<property name="cache_flushInterval" value="20000"/>
</plugin>
<plugin type="org.mybatis.generator.plugins.SerializablePlugin"/>
<!--<plugin type="com.yingu.account.structure.common.utils.MySQLLimitPlugin"/>-->
<!--<plugin type="com.yingu.account.structure.common.utils.BatchInsertPlugin"/>-->
<!--<plugin type="com.yingu.account.structure.common.utils.BatchUpdatePlugin"/>-->
<!--去除注释 -->
<commentGenerator>
<property name="suppressAllComments" value="true"/>
</commentGenerator>
<!-- <!–导入属性配置–>
<properties resource="generator.properties"></properties>
<!–指定特定数据库的jdbc驱动jar包的位置–>
<classPathEntry location="${jdbc.driverLocation}"/>
<context id="default" targetRuntime="MyBatis3">
<!– optional,旨在创建class时,对注释进行控制 –>
<commentGenerator>
<property name="suppressDate" value="true"/>
<property name="suppressAllComments" value="true"/>
</commentGenerator>
<!–jdbc的数据库连接 –>
<jdbcConnection
driverClass="${jdbc.driverClass}"
connectionURL="${jdbc.connectionURL}"
userId="${jdbc.userId}"
password="${jdbc.password}">
</jdbcConnection>-->
<!--数据库连接 -->
<jdbcConnection driverClass="com.mysql.jdbc.Driver"
connectionURL="jdbc:mysql://localhost:3306/account_dev"
userId="root"
password="">
</jdbcConnection>
<!-- 非必需,类型处理器,在数据库类型和java类型之间的转换控制-->
<javaTypeResolver>
<property name="forceBigDecimals" value="false"/>
</javaTypeResolver>
<!-- Model模型生成器,用来生成含有主键key的类,记录类 以及查询Example类
targetPackage 指定生成的model生成所在的包名
targetProject 指定在该项目下所在的路径
-->
<javaModelGenerator targetPackage="com.example.demo.persistence.entity"
targetProject="./src/main/java">
<property name="enableSubPackages" value="true"/>
<property name="trimStrings" value="true"/>
</javaModelGenerator>
<!--Mapper映射文件生成所在的目录 为每一个数据库的表生成对应的SqlMap文件 -->
<sqlMapGenerator targetPackage="mybatis.mapper" targetProject="src/main/resources">
<property name="enableSubPackages" value="true"/>
</sqlMapGenerator>
<!-- 客户端代码,生成易于使用的针对Model对象和XML配置文件 的代码
type="ANNOTATEDMAPPER",生成Java Model 和基于注解的Mapper对象
type="MIXEDMAPPER",生成基于注解的Java Model 和相应的Mapper对象
type="XMLMAPPER",生成SQLMap XML文件和独立的Mapper接口
-->
<javaClientGenerator type="XMLMAPPER" targetPackage="com.example.demo.persistence.mapper"
targetProject="./src/main/java" >
<property name="enableSubPackages" value="true"/>
</javaClientGenerator>
<!--生成实体类
<columnOverride>
将数据库中的字段重命名为实体类的属性
column 数据库中字段名
property POJO属性名
javaType POJO类型
jdbcType 数据库字段类型
-->
<table tableName="user_account_entity" domainObjectName="UserAccountEntity">
<columnOverride column="disabled" javaType="boolean" jdbcType="TINYINT"/>
<columnOverride column="activated" javaType="boolean" jdbcType="TINYINT"/>
<columnOverride column="version" javaType="int"/>
</table>
<table tableName="business_entity" domainObjectName="BusinessEntity">
<columnOverride column="verified" javaType="int"/>
<columnOverride column="version" javaType="int"/>
</table>
<table tableName="business_operation_history_entity" domainObjectName="BusinessOperationHistoryEntity">
<columnOverride column="version" javaType="int"/>
</table>
<table tableName="customer_entity" domainObjectName="CustomerEntity">
<columnOverride column="version" javaType="int"/>
</table>
<table tableName="customer_business_entity" domainObjectName="CustomerBusinessEntity">
<columnOverride column="business_available" javaType="boolean" jdbcType="TINYINT"/>
<columnOverride column="version" javaType="int"/>
</table>
</context>
</generatorConfiguration>
第四步:导入数据


 2974
2974


 被折叠的 条评论
为什么被折叠?
被折叠的 条评论
为什么被折叠?
 到【灌水乐园】发言


